

Review: Book Sport Photography
Friday 28 December 2018, 20:10 by Michelle Peeters | 8,310 views | 5 commentsThis article was translated from Dutch with the help of AI. Read the original.
In this article, my review of this highly inspiring book about sports photography, written by Huub Keulers and Marcel van der Looij.
The reason why this book was written, 'learning to take professional-looking sports photos without having to spend thousands of euros on equipment', really appealed to me!
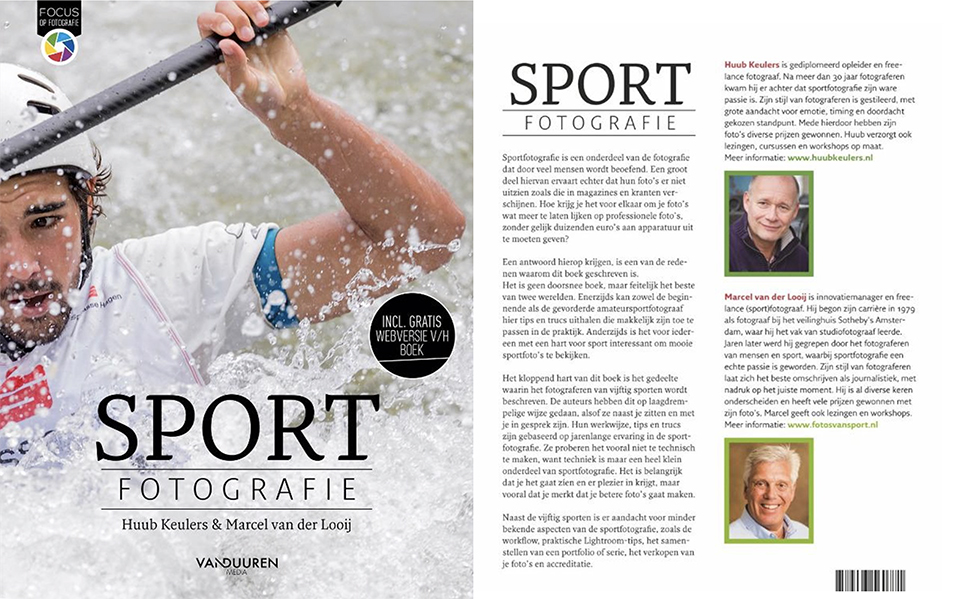
Contents
1. Equipment, settings, facts and fables
2. How do they do it?!
3. Workflow
4. For the advanced sports photographer
5. Inspiring sports photos
1. Equipment, settings, facts and fables
Chapter 1 covers the different types of cameras and lenses. It also mentions useful settings for once you are on the sports field.
Settings, shooting techniques and what a good sports photo should look like. In addition, ten statements are examined to see whether they are facts or fables.
A few eye-openers for me were that a full-frame camera performs better at higher ISO values and that it can also be beneficial to shoot in JPG if, for example, your camera does not have a large buffer capacity.
A RAW file from a full-frame camera can be quite large (30Mb is nothing..) and if you shoot in burst mode (which sports photographers generally do to avoid missing the moment), writing to your card otherwise takes too much time.
A second camera body is recommended, with a 24-70mm on one and a 70-200mm lens on the other. You simply do not have time to change lenses. A powerful telezoom, such as a 200-400mm, is also recommended.
It is best to use this from a (carbon) monopod tripod. Make sure that Image Stabilisation (IS) is switched off. Fast lenses are recommended too, despite naturally being more expensive, because you often have to work in poor lighting conditions (sports halls with sparse fluorescent lighting, and so on).
The solution for photographing somewhere where you cannot sit or are not allowed to go is explained in the form of a remote (a wireless remote control consisting of a transmitter and receiver). You place one camera where you are not allowed to go, with a receiver in the hot shoe.
You then put a transmitter on the camera you are photographing with. When the camera with the transmitter takes a photo, the camera with the receiver is triggered at the same time. Very useful!
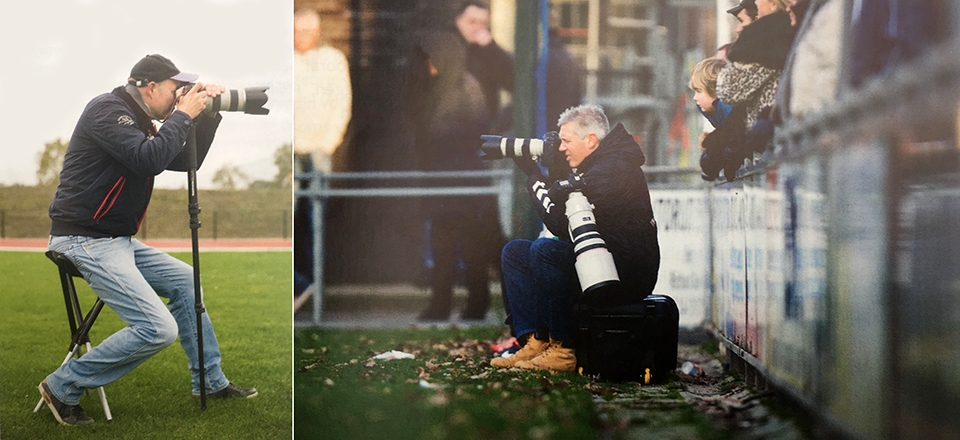
The fact that you should not format your cards in another camera or with your computer, but in the camera you are going to photograph with, is genuinely very useful advice in the book! An incorrect data structure can be created on your memory cards if you do not do this, which can lead to corrupted files.
I did not know that using a converter (2.0 or 1.4), something you should always carry as a sports photographer, slightly reduces the image quality. Nor did I know that focusing becomes just a little slower. Good to bear in mind!
The tip that a flashgun is useful to have with you for sports portraits, to lighten the shadows when the sun is high in the sky, is also a good one. Using flash is often forbidden during matches, but you can take better portraits with it during the awards ceremony or presentation.
A UV or polarising filter is recommended to protect your lens against dust and greasy fingers. A polarising filter is apparently regularly used by sports photographers. For example, you can make the skies look a little more dramatic with it.
In any case, make sure that it is multi-coated so that reflections are prevented as much as possible. Good brands include B&W, Tiffen and Hoya.
A laptop is also a useful and indispensable tool that you should have with you as a sports photographer, as is a smartphone. You often have to upload photos during the match (in JPG, since you often do not have time to edit them). And with your smartphone you can create an internet connection when there is no Wi-Fi.
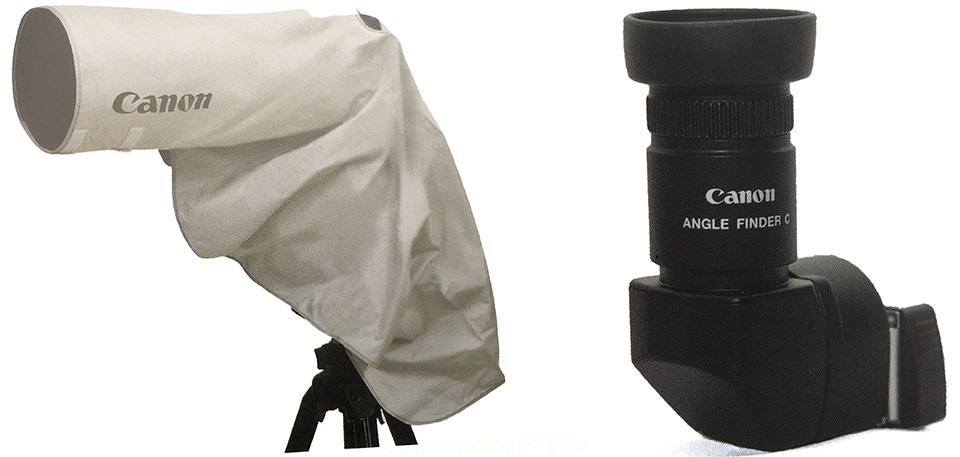
An angle finder is a useful tool when you have to photograph 'close to the ground'. You can still look through the viewfinder when the camera is lying on the ground. If you do not have an angle finder, you can also use a small mirror to frame your image.
Luck is not the most important thing in sports photography; 90% is preparation and only 10% luck!
A lot of attention is paid to how you can protect yourself against poor weather conditions such as rain and cold.
The advantages and disadvantages of an umbrella, which you can attach to your monopod, for example, and of rainwear, camera rain covers, thin but warm gloves that allow you to keep photographing (Lowepro, MacWet, Stealth Gear) and heat pads.
Camera settings
The Camera Settings chapter is not really intended for beginners, but rather for advanced photographers. It goes into considerable technical depth. And that is necessary too, because as a sports photographer you face quite a few challenges. It is not the easiest branch of photography, in fact it is one of the most difficult...
Sports photographers mainly use aperture or shutter speed priority (Av or Tv mode), because this is simply the fastest and most reliable option in most cases. You can also check and adjust the exposure compensation (+ or - on your light meter).
Av mode is often used in low-light situations, Tv mode when you want to control your shutter speed (when you want to freeze a moving subject), and M mode when the lighting conditions remain the same. M mode combined with auto ISO is a strong combination!
The white balance is explained, along with why AWB (Auto White Balance) often gets it wrong under fluorescent lights (often found in sports halls). To compensate for the green cast produced by these lights, the camera chooses an opposite colour from the colour spectrum, in this case light blue, to obtain neutral colours.
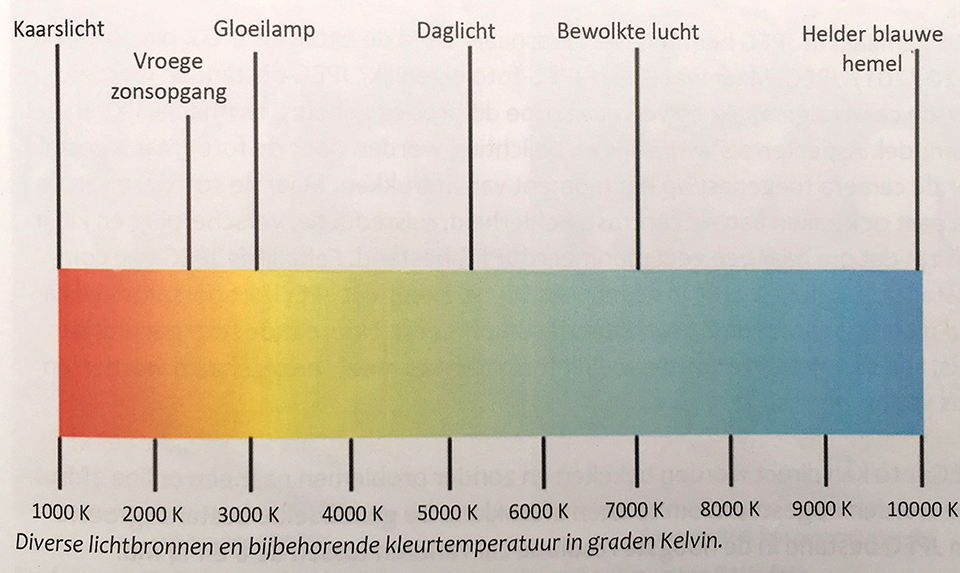
Photographing a grey card in the same lighting conditions provides a useful reference point. Colour temperature can range from very cool light (blue) in the sky to very warm light (red) from a candle or lamp, with all the variations in between.
The lower the colour temperature, the bluer the light. Candlelight is 1000K, early sunrise 2000K, an incandescent bulb 3000K, daylight 5000K, cloudy skies 7000K and a clear blue sky 10,000K.
Then there is a section on colour space: sRGB, AdobeRGB and ProPhotoRGB. The colours of a photo taken in an AdobeRGB colour space may look very different on the internet. Most browsers (with the exception of Safari) will display that photo in an sRGB colour space. AdobeRGB is therefore mainly used for professional printing.
The different metering methods for measuring reflected light are: Evaluative metering (matrix), Centre-weighted metering, Partial metering and Spot metering. A good tip is to start with Evaluative metering. If you notice that the photos are not correctly exposed, switch to Centre-weighted metering.
Measuring incident light is more accurate and must be done with an external light meter. This light metering option is used least in sports photography, which is of course logical.
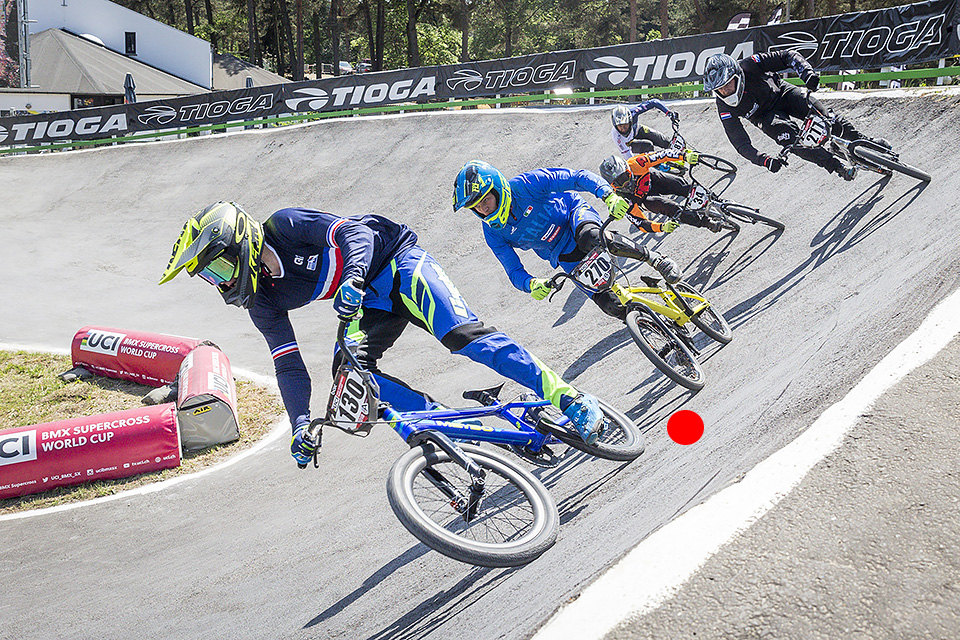
Disconnecting focusing from the shutter button and assigning it to the AF-ON button is also covered in detail. This offers huge advantages for sports photographers because the camera no longer tries to focus again every time you press the shutter button to take a photo.
Combined with AI-Servo, you then have continuous focus for as long as you press the AF-ON button. As soon as you release AF-ON, you have one-shot focus and the focus point remains in that position.
For Canon users, the Autofocus Cases are also covered. I have to admit that I had never looked at them. If you have a Canon 1DX Mark I or II, a 5D Mark II or IV, or a 7D Mark II camera, you can choose from six presets or cases, presented via a specific sports icon.
For example, there is a running icon for any predictable subject. There is also a tennis icon for subjects that need to be followed continuously while obstacles (a tennis net) must be ignored. And there is a road cycling icon for focusing quickly on subjects that appear very suddenly in your AF area.
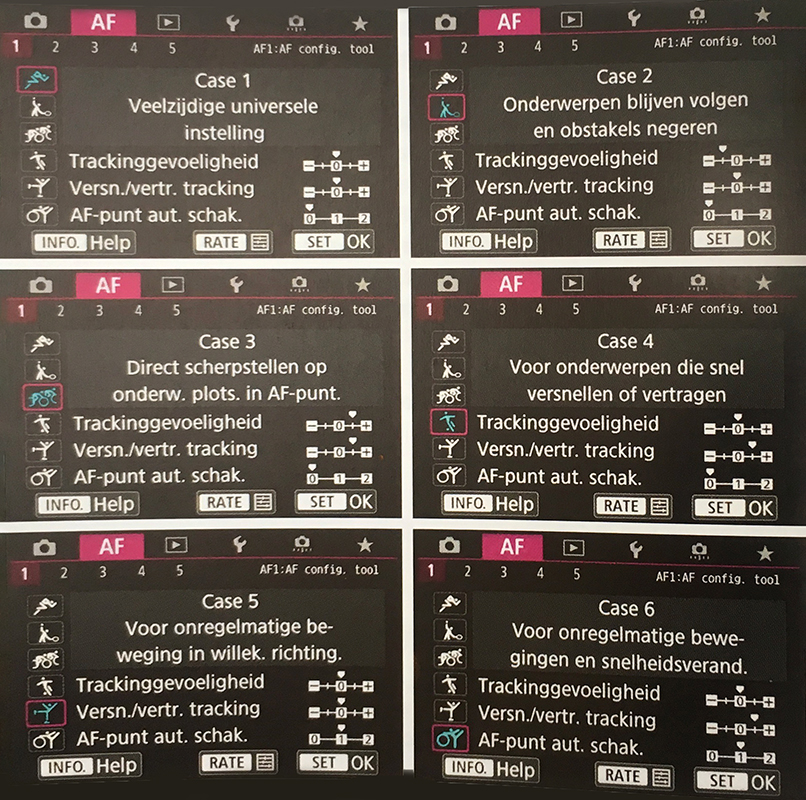
Finally, there is a football, figure skating and gymnastics icon. Very useful for different sports disciplines.
The advantages of ETTR (Expose To The Right) are explained. There is relatively little information in the dark area and a lot in the light area. So you should expose a photo in such a way that more tones are visible on the right. Overexposure, as long as it is not excessive, can be reduced again in post-processing if you shoot in RAW.
Camera techniques
Two camera techniques, Panning and Zoom-burst, are explained. Panning only works with predictable routes such as running, road cycling and car and motor racing. You need to make sure that the athlete moves quickly across your frame, which you do by standing at right angles to them. A monopod is very useful here.
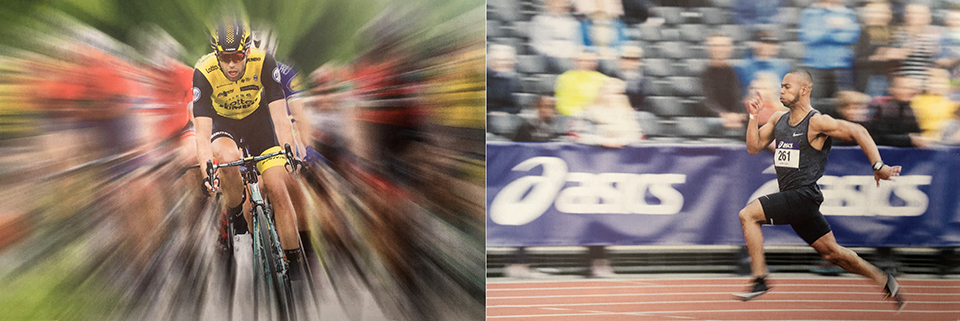
With Zoom-burst (an effect that you can also simulate with the radial filter in Photoshop), you turn the zoom ring while the shutter is open. A longer shutter speed is useful here. Finally, Prefocus is also examined. The trick is to focus in advance on a point where you expect some action. For example, a runner crossing a finish line.
An aperture value of f/5.6 gives you the greatest chance of success here, and disconnecting focusing from the shutter button is also essential.
What makes a good sports photo?
A good sports photo must appeal to the viewer. It should be immediately clear what the photo depicts. A sports photo is good if it contains emotion. Elements that are important in sports photography include the background (no empty stands, or blurred if they are messy), depth of field (to isolate your subject), viewpoint, perspective and timing.
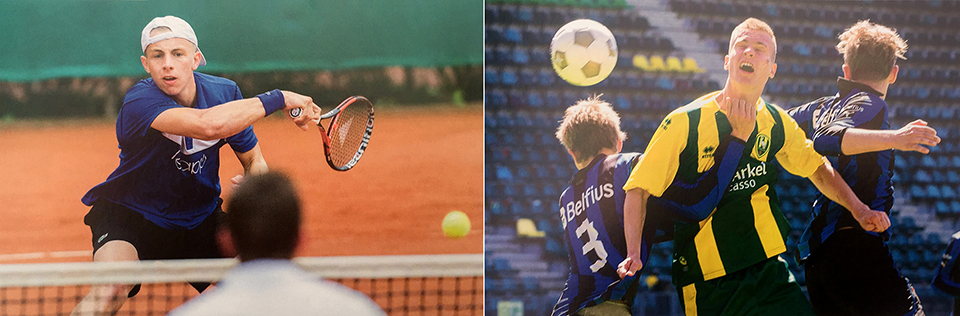
The ball should always be in the frame and you should be able to see the player's eyes. Ninety per cent of sports photos contain one of the following three elements: action, joy or sadness.
Fact or fable
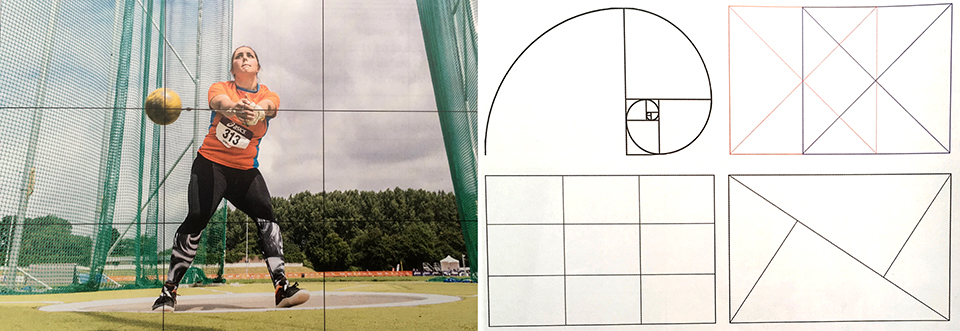
A number of composition techniques are explained, including the rule of thirds, the diagonal method, the triangle method, the golden ratio and the golden spiral. Finally, ten myths are debunked.
2. How do they do it?!
This chapter covers 50 different sports in alphabetical order, with tips and tricks for each specific sport. It also includes photos for inspiration or as examples.
A number of basic camera settings that apply to virtually all action sports are listed. For outdoor action sports, the combination of a shutter speed of 1/1000, an aperture of f/4-f/5.6 and an ISO value of 400 can be considered reasonably ideal.
For indoor sports, things are slightly different because of the poorer lighting conditions. In practice, this often means using a shutter speed of around 1/640, an aperture of f/2.8 and ISO 3200.
In addition, an AI-Servo (on Canon) or AF-C (on Nikon) autofocus mode is desirable, and it is best to use just one focus point to give you more control over your focus point. Also set the burst mode so that you can take several shots in succession and have a better chance of getting the perfect shot.
The specific practical tips about the 50 sports are based on personal experience. The authors make it clear that this is their way of photographing, which does not mean it is the only correct way. Everyone has their own approach and style.
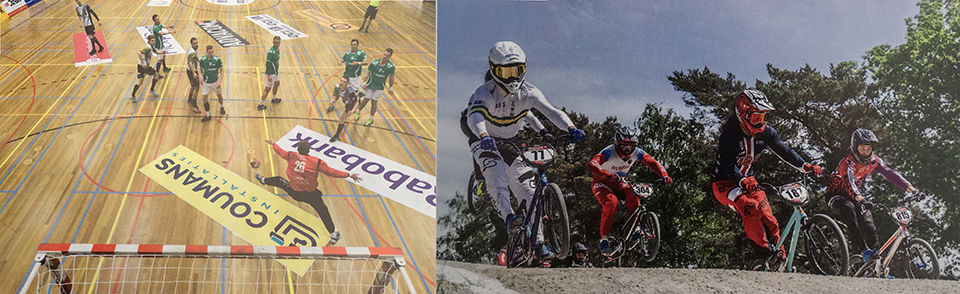
The 'Did you know' anecdotes in between are a welcome change, and the photos illustrate exactly what has just been explained. The best places to stand, or places where you should not stand because of the danger, are genuinely useful tips that you can put into practice immediately.
3. Workflow
In this chapter, you learn an efficient way to manage and edit your photos. Which software is available on the market, how to store your photos properly, and how to prepare your photos for printing and online use.
4. For the advanced sports photographer
In this chapter, you learn how to improve your photos through feedback. You also learn how to put together your portfolio and a series of photos. Finally, there are a number of ways to sell your photos.
5. Inspiring sports photos
Here you learn which images the authors themselves like, the most important settings for each photo, and how other award-winning sports photographers can inspire you.
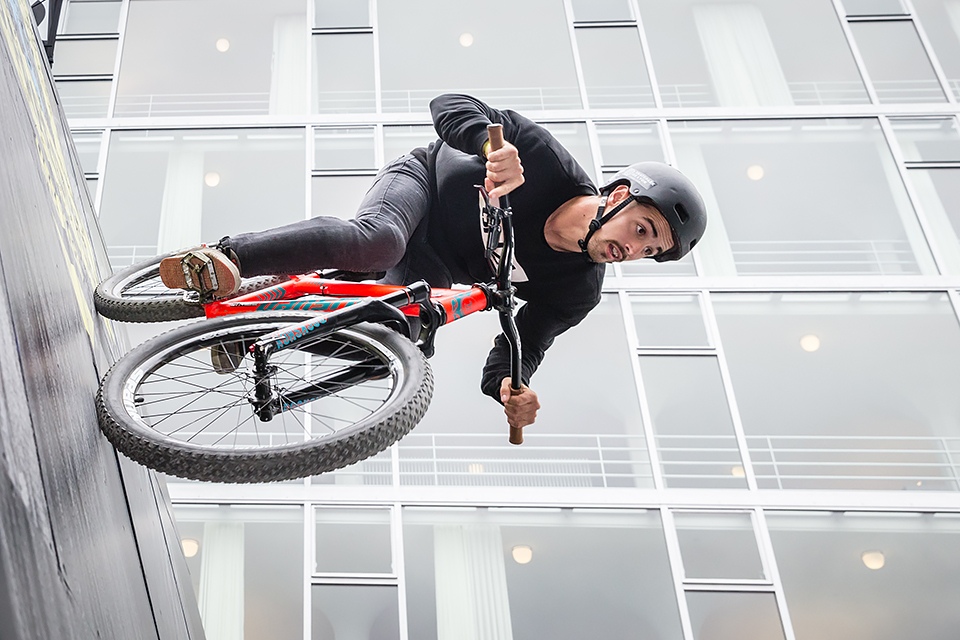
Conclusion
I am very enthusiastic about the book! You get the feeling that Huub and Marcel are giving away the chef's secrets. Every useful tip, based purely on personal experience, is shared.
You can read the book from cover to cover, as it is interesting enough to do so, especially because of all the illustrations with beautiful and relevant photos, and it is very accessible to read. But you can also use it as a reference book when you need to photograph a particular sport.
The book is laid out very clearly, making it easy to find something you were just looking for. I highly recommend it, both to professional sports photographers and to photographers who occasionally want to photograph a local match.
It would also be a good idea to have the book translated into English!
About the author
Michelle Peeters is fotografe en oprichter van DeuxBleus Fotografie. Michelle herkent het bijzondere in het gewone en het gewone in het bijzondere. Ze heeft zich nooit willen specialiseren en is daardoor van alle markten thuis.
You might also like
-
 20 photography books you should read!
by Michelle Peeters
-
 Review: Practical Nature Photography Book NXTLVL
by Michelle Peeters
-
 Review: Photo book 'Voor altijd Rotterdam'
by Erik van Rosmalen
-
 Book: Scott Kelby, how do you do that in Photoshop?
by Michelle Peeters
-
 Helena van der Kraan dies on her 80th birthday
by Michelle Peeters
-
 Review: Inspiration by Ap Dijksterhuis
by Erik van Rosmalen
5 comments
-

 Huub Keulers
wrote on Sunday 30 December 2018 at 09:53
| reply
Je hebt behoorlijk wat werk verzet met dit artikel Michelle. Dank je voor deze uitgebreide review.
This comment was written in another language and has not been translated yet.
-
 Michelle Peeters wrote on Sunday 30 December 2018 at 12:14
| reply
@Huub: jij bedankt dat ik het boek mocht reviewen. Ik heb er erg veel uit geleerd!
This comment was written in another language and has not been translated yet. -
 Huub Sanders wrote on Sunday 30 December 2018 at 12:32 | reply
heb het boek ook met veel interesse doorgekeken. Top hoor Huub!
This comment was written in another language and has not been translated yet. -
Huub Keulers
wrote on Sunday 30 December 2018 at 23:54
| reply
Dank je Huub en Michelle. Leuk om jullie reactie te lezen.
This comment was written in another language and has not been translated yet. -
 Johnny De Ceulaerde wrote on Tuesday 1 January 2019 at 15:35 | reply
Volgens het boek staat de lengte van de lens gelijk aan de ouderdom van de fotograaf. Echter jonge fotografen hebben meestal de financiële middelen niet om zulke lenzen te kopen.
This comment was written in another language and has not been translated yet.
Have your say
Please note: Articles older than a week can only be commented on by signed-in visitors.Would you still like to comment? sign in or create a free account.
Become a better photographer every week
A practical photography tip in your inbox every week.
38,937 photography enthusiasts already receive the tips! More about the weekly mail. Or keep up to date via  Facebook.

Elja Trum
Photofacts; everything to do with photography!
Would you like to take better photos and keep up with what is happening in photography? Photofacts publishes articles that teach you something about photography — from a product announcement to a practical shooting tip or a look at a website. Photofacts covers photography every day and is a hobby project of Elja Trum's that got out of hand. The articles are written by a team of volunteer authors. If you would enjoy writing one or more articles for Photofacts, do get in touch.More about PhotofactsPhotofacts is made possible in part by
