

7 tips for photographing lightning
Monday 24 April 2017, 20:40 by Michelle Peeters | 23,225 views | 8 commentsThis article was translated from Dutch with the help of AI. Read the original.
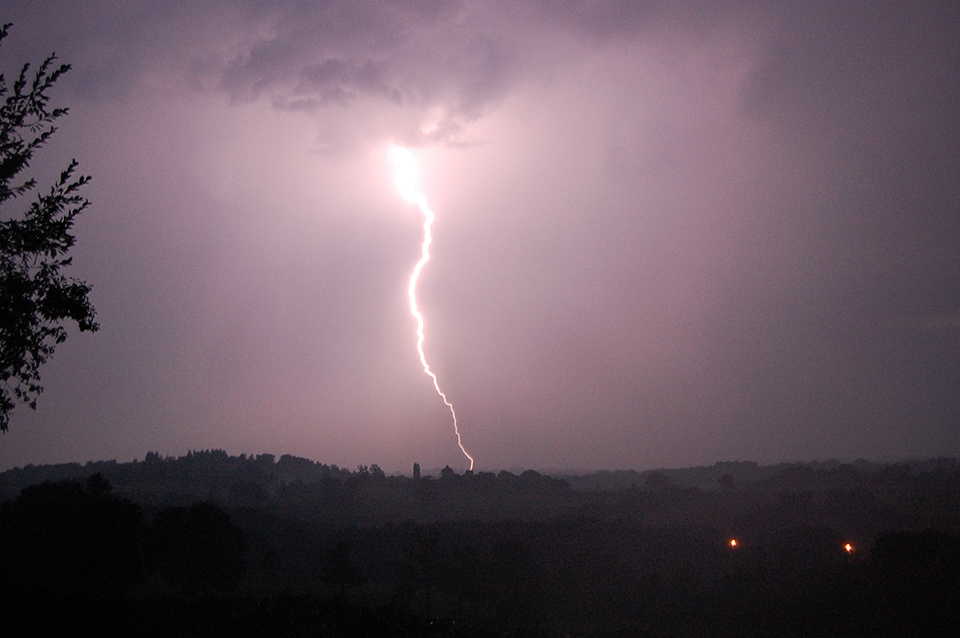
Explosive, that is how powerful well-captured photos of lightning can be. But how do you take such a perfect shot? This article gives you 7 tips to help you take one.
1. Luck
A fair dose of luck is no unnecessary luxury. If you happen to be out photographing somewhere and you suddenly get a thunderstorm and lightning, it can turn into a blessing in disguise instead of disappointment that you missed out on that beautiful sunset again.
Don't want to wait for luck? Learn to understand and predict the weather with, for example, Buienradar.
2. RAW
If you want to get the most out of your photos, RAW is definitely the best choice. Especially because you don't know whether you'll ever experience such a moment again with your camera at the ready.
3. Self-timer
To keep the camera still, set the self-timer to two seconds. This prevents camera shake. Special remote controls are available, such as a lightning trigger.
The Joopic Cambuddy Pro has this feature, for example. It reacts to light and takes a photo immediately when a bolt of lightning appears in the sky.
Don't have such a handy device with you? Your camera may also be able to take continuous shots (interval). Just let the camera keep shooting and delete all the photos without lightning in them afterwards.
4. Shutter speed
During a heavy thunderstorm with several lightning bolts in succession, good timing gives you a reasonable chance of capturing a few of them handheld with a fairly short shutter speed. If there is less thunder and lightning, you'll need to leave the shutter open for longer.
You can set the maximum shutter speed, half a minute, and try to capture all the lightning bolts that appear during that time. Do bear in mind that your photos may become overexposed, so choose a low ISO value and a small aperture opening.
5. Tripod
You can't use such a long shutter speed handheld. So you need to use a tripod. Make sure your tripod is standing firmly in the sand and that one of its legs is pointing towards your subject. This lets you point the lens over the leg and gives your tripod the greatest stability.
6. Location
A photo of lightning is quickly spectacular, but with a little extra effort the photo becomes truly special. It can help enormously to find a beautiful location. For example, from a high floor in a block of flats overlooking a city.
Or in the mountains, for example while on holiday. Let your surroundings play a part in your photo. In fact, the best approach is simply to take a beautiful (landscape) photo. If you can also get some lightning in it, that is a wonderful bonus!
7. Safety
Lightning is not just beautiful, it can also be dangerous. So pay close attention to yourself and your equipment while photographing. Work from inside a building or from your car.
In any case, don't stand under a tree and, obviously, don't stand as the highest point in an open field either. Thunderstorms usually come with a lot of rain. Make sure you can stay dry and that your equipment doesn't get wet either.
About the author
Michelle Peeters is fotografe en oprichter van DeuxBleus Fotografie. Michelle herkent het bijzondere in het gewone en het gewone in het bijzondere. Ze heeft zich nooit willen specialiseren en is daardoor van alle markten thuis.
You might also like
-
 Long exposures in the rain
by Nando Harmsen
-
 The real purpose of a rain cover for your camera backpack
by Nando Harmsen
-
 Nature photography tip: Put a rain jacket in your camera bag
by Rob Dijkstra
-
 Street photography tip: Go out when it rains
by Michiel Heijmans
-
 Photographing mushrooms in your own local rain shower
by Nando Harmsen
-
 Sport photography tip: Rain cover for camera and lens
by Nico Delmeire
8 comments
-

 bart.hulst@gmail.com
wrote on Monday 24 April 2017 at 23:00
| reply
Another handy tip is to use the bulb setting if you have it on your camera. This way you can determine the shutter speed yourself and you can capture more than just the lightning.
Translated from Dutch.
Using the self-timer (after 2 or 10 seconds) is also very handy if you don't have a remote control at hand.
I took this one myself while is was ready for the sunset that never came because of the thunderstorm, and afterwards I was quite happy about that Lightning photo
-
 Chris van Doorn wrote on Tuesday 25 April 2017 at 11:13 | reply
Michelle, I'm missing the most important one: manual focusing!
Translated from Dutch.
due to the lack of light and/or subjects, autofocus is almost never an option when photographing thunderstorms.
My experience is that setting it to infinity doesn't work, so focus beforehand on a subject that's far away (e.g. a streetlamp by a house). -
 Michelle Peeters wrote on Tuesday 25 April 2017 at 11:16
| reply
@Bart: that bulb setting is indeed very handy, especially in combination with a remote control. I think this works better than the self-timer because you can decide for yourself when to take the shot and how long to expose. Nice photo by the way!
Translated from Dutch. -
Michelle Peeters wrote on Tuesday 25 April 2017 at 11:19
| reply
@Chris: indeed, manual focusing should have been included too, very important! What you say about focusing at infinity often not working well is correct. The best thing is to focus on an object (which you can briefly illuminate with a flashlight if necessary so you can focus with AF) a few meters in front of your camera. Then set the lens to manual focus and leave it that way. With the Photographer's Tools app you can very easily determine your hyperfocal distance.
Translated from Dutch. -
 Ton wrote on Tuesday 25 April 2017 at 17:20 | reply
Interesting topic and good advice, also from the commenters.
Translated from Dutch.
@Bart nice photo. -
 Jan wessel Bakker wrote on Tuesday 25 April 2017 at 18:21 | reply
Another tip is. If you possibly have live view, use that for your manual focusing. Then take a point in the middle of the discharge area. And zoom in on that and focus. With the right f/value (f/11 <=> f/16) you almost always have a beautiful photo. With a bit of the right timing you will get a long way.
Translated from Dutch.
I myself have JL. won a photo competition with a thunderstorm photo from 2016. Click here and behold the photo at the bottom right. Settings are: ISO 100 - 18mm - f/11 - 26.0 sec. -
Michelle Peeters wrote on Tuesday 25 April 2017 at 18:31
| reply
@Jan: very good tip too! With live view you can indeed focus very accurately if you zoom in first, focus manually and zoom out again. And beautiful photo, nicely done!
Translated from Dutch. -
 guest wrote on Wednesday 26 April 2017 at 13:28 | reply
Patience patience and patience again
Translated from Dutch.
Have your say
Please note: Articles older than a week can only be commented on by signed-in visitors.Would you still like to comment? sign in or create a free account.
Become a better photographer every week
A practical photography tip in your inbox every week.
38,764 photography enthusiasts already receive the tips! More about the weekly mail. Or keep up to date via  Facebook.

Elja Trum
Photofacts; everything to do with photography!
Would you like to take better photos and keep up with what is happening in photography? Photofacts publishes articles that teach you something about photography — from a product announcement to a practical shooting tip or a look at a website. Photofacts covers photography every day and is a hobby project of Elja Trum's that got out of hand. The articles are written by a team of volunteer authors. If you would enjoy writing one or more articles for Photofacts, do get in touch.More about PhotofactsPhotofacts is made possible in part by
