

Create your own reusable photo frame in Photoshop
Monday 10 June 2024, 15:45 by Nando Harmsen | 4,512 views | 4 commentsThis article was translated from Dutch with the help of AI. Read the original.
Printing and framing a photo is always a lovely thing to do. Nothing beats a real frame with a photo on the wall. Would you still like a digital frame around your photo to display on a monitor or TV? You can easily make one yourself in Photoshop. One you can reuse.
As you may know, Photoshop includes a few standard automated actions that create a frame around your photo at the press of a button. Wouldn't it be more fun to make one yourself? One that is unique to you?
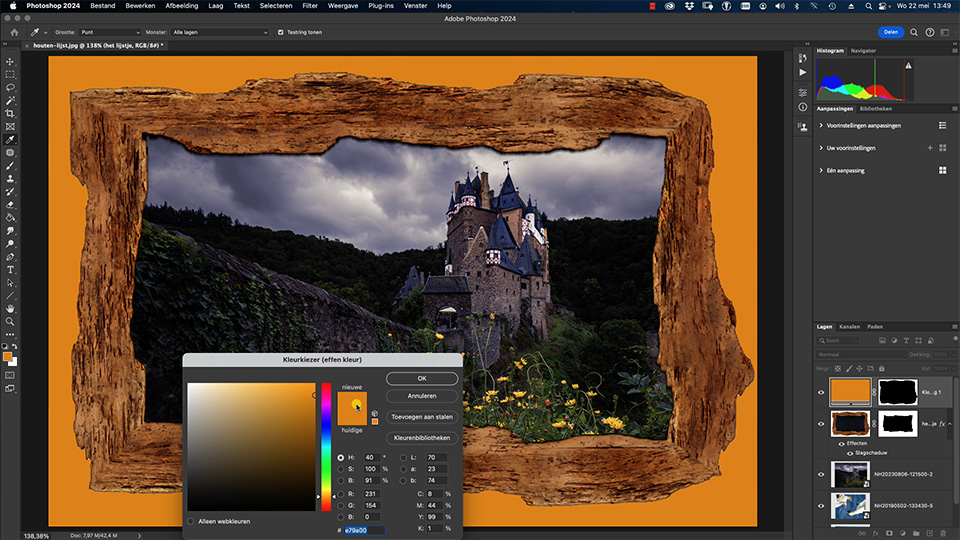
It isn't difficult to make your own unique frame. With layers and masks, you can create a Photoshop file that serves as a basis in no time. All you then have to do is drag your photo into it and you're done.
In the video below, I explain how you can do this in a simple way. You can fully automate this using an action. But by saving a file with layers and masks as a normal Photoshop file, you don't need any complicated 'programming' or procedures.
About the author
Nando Harmsen has been photographing for more than 40 years. He specialises in wedding photography and landscape photography. Nando also gives talks, workshops, masterclasses and photo trips, and regularly reviews new and interesting equipment.
You might also like
-
 Photoshop tip: use the export function
by Nando Harmsen
-
 Retouching and cloning in Photoshop
by Johan Elzenga
-
 This Is What Photoshop Was Like in 1988
by Michelle Peeters
-
 Everything about Generative Fill in Photoshop Beta
by Nando Harmsen
-
 Do you print photos for the wall, or have them printed?
by Nando Harmsen
-
 Photoshop tip: Using a clipping mask
by Nando Harmsen
4 comments
-
 Freddy wrote on Tuesday 11 June 2024 at 11:10 | reply
Can this only be made in pfotoshop? How does one do this with Elements or other photo programs
Translated from Dutch. -

 Nando
wrote on Tuesday 11 June 2024 at 11:14
| reply
Nando
wrote on Tuesday 11 June 2024 at 11:14
| reply
This is the explanation of how to make something like this in Photoshop.
Translated from Dutch.
It is of course also possible in other software, such as Affinity Photo and Elements. For Affinity Photo, it is virtually the same method. For Elements, it works differently. -
 Donald Willemsen wrote on Tuesday 11 June 2024 at 23:17 | reply
Honestly, I feel it's missing something. I would completely remove the border on the outside of the frame. Then you'd really have a frame with a photo in it.
Translated from Dutch. -
Nando
wrote on Wednesday 12 June 2024 at 09:40
| reply
Instead of a colored border around it, you can also leave it transparent.
Translated from Dutch.
Unfortunately, it remains digital and rectangular, and the photo will always have a border.
If you really want a frame with a photo in it, have it printed and frame the photo.
Have your say
Please note: Articles older than a week can only be commented on by signed-in visitors.Would you still like to comment? sign in or create a free account.
Become a better photographer every week
A practical photography tip in your inbox every week.
38,982 photography enthusiasts already receive the tips! More about the weekly mail. Or keep up to date via  Facebook.

Elja Trum
Photofacts; everything to do with photography!
Would you like to take better photos and keep up with what is happening in photography? Photofacts publishes articles that teach you something about photography — from a product announcement to a practical shooting tip or a look at a website. Photofacts covers photography every day and is a hobby project of Elja Trum's that got out of hand. The articles are written by a team of volunteer authors. If you would enjoy writing one or more articles for Photofacts, do get in touch.More about PhotofactsPhotofacts is made possible in part by
