

5 tips for better backgrounds in your portrait photos
Monday 31 August 2020, 20:02 by Elja Trum | 8,355 views | 14 commentsThis article was translated from Dutch with the help of AI. Read the original.
A portrait photo is naturally about the person you are photographing. The background you use is usually less important. However, the background has a big effect on the final photo, so it is worth paying attention to it.
1. Your background should not distract
A background can be quite distracting in your photo. You want the attention to go to your subject, not to the surroundings. So it is important to make sure that the background does not distract.
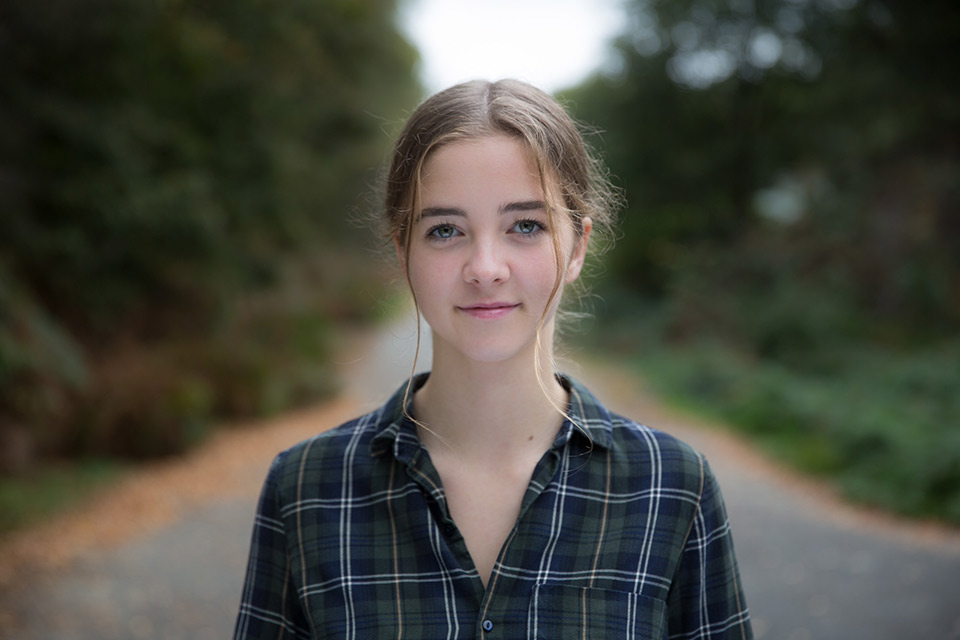
The easiest way to achieve this is to make sure that the background is out of focus. With a sharp background, your eyes quickly move towards all the details that are visible.
Blur a messy background and the photo immediately looks much better.
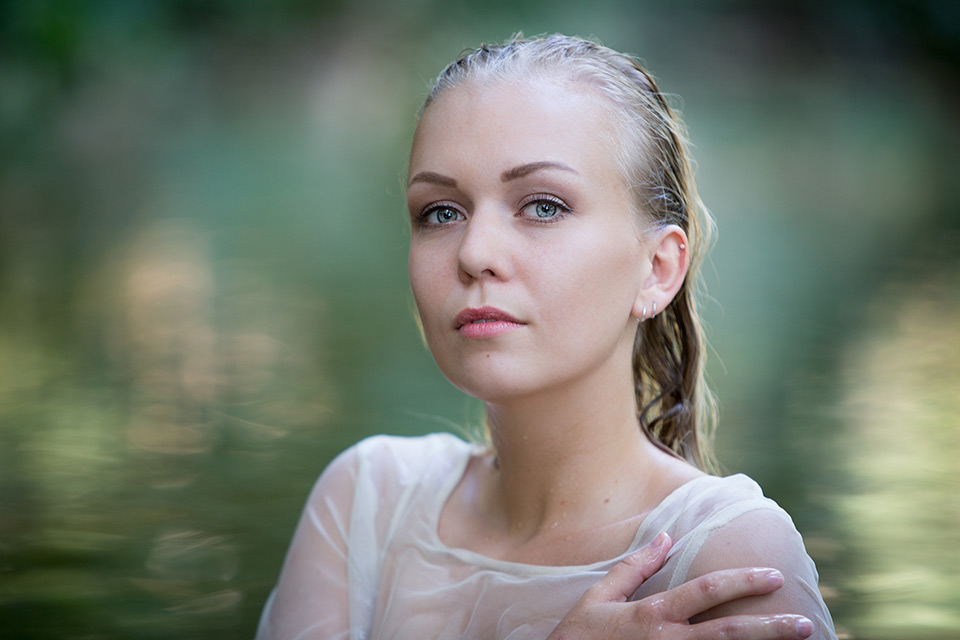
You get a blurred background by using a wide aperture, a small number and a large opening. You should also make sure that the distance between you and your model is small, while the distance to the background is large.
The wider your aperture and the closer you are to your model, the more blurred your background will be. By experimenting with these settings, you can create the amount of background blur you want.

In the photo of Anouk above, for example, the background was kept out of focus, but objects are still recognisable.
2. Look around your model before pressing the shutter
It is a good habit to look at the background before pressing the shutter for every portrait photo you take. If you teach yourself to always do this, it will soon become a good habit.
This makes it easy to avoid taking photos where branches or a post seem to grow out of someone's head, for example. If you only pay attention to your model, it is easy to make this kind of careless mistake.
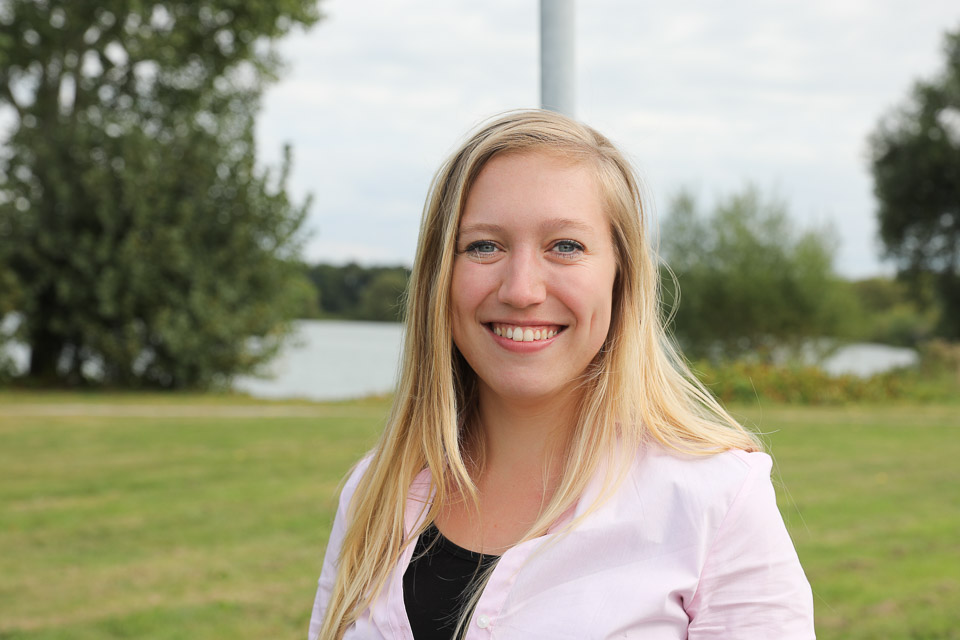
Look at the whole background, but especially at what is directly behind your model. So quickly scan around the outline of your model to prevent unwanted elements from 'sticking out'. You can do this in a fraction of a second.
3. Try different viewpoints
Do not stand still while taking photos. A small movement can make a world of difference. Sometimes you only need to move the camera a few centimetres for a completely different background.
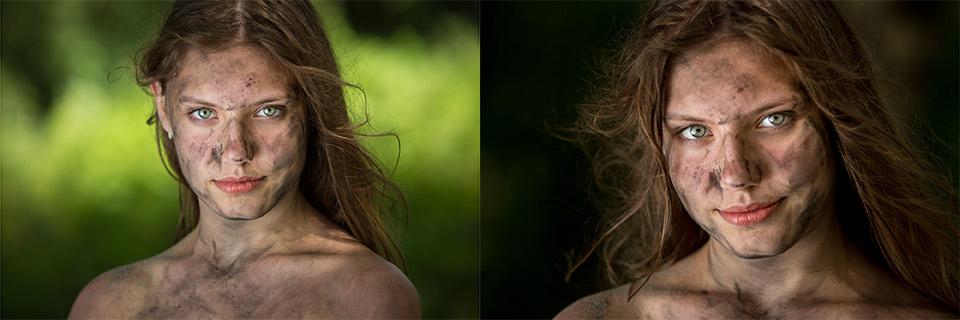
The photos above were taken one after the other with the same settings. The fact that the background looks completely different is because I moved a few centimetres.
As a result, instead of the bushes lit by the sun, the background now shows shade and tree trunks. A world of difference in the background.
4. Look for leading lines
We enjoy looking at repetition and patterns, and lines give us something to follow through an image. Lines can of course also form a pattern. You can use this in your background.
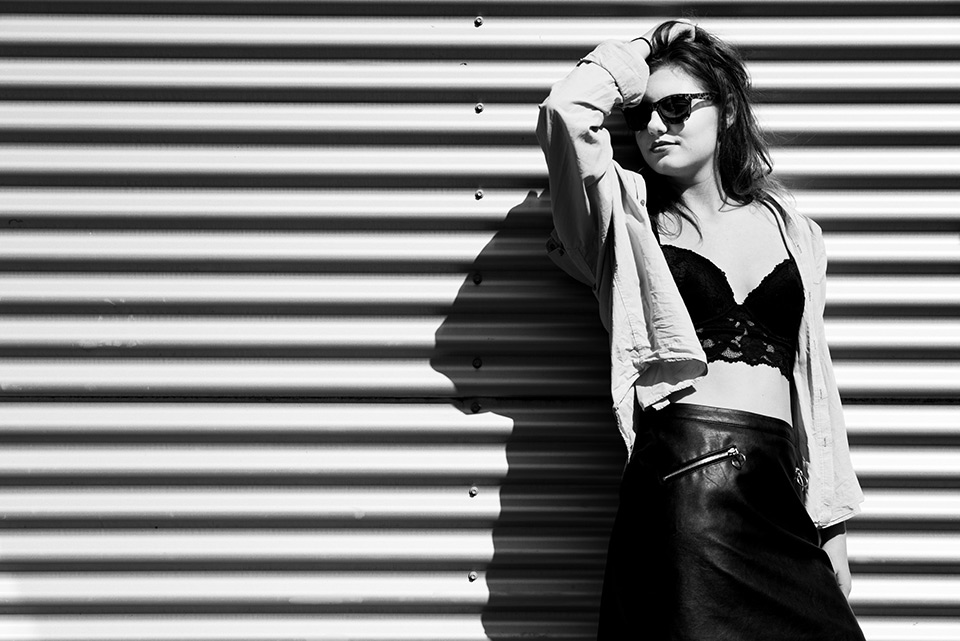
Diagonal lines work like arrows. They point something out in your photo. Vertical lines indicate height and hold your image in place. Horizontal lines often create a sense of speed or movement in your photo. Thickness is important too. Thin lines create a more fragile feeling, while thick lines convey strength.
So look for lines in backgrounds. For example, a road, a stair railing or the lines of a building. They do not have to be actual lines. They can also be patterns. Think of a repeating pattern of windows in a building, for example.
Then make sure that the lines in your composition lead towards your subject. This can be from the corners, but also from the sides of your image.
5. Use light and dark in your background
When a background is out of focus, it does not really matter that much what that background actually is. What becomes especially important then is the colour, and above all the light intensity, of the background. That is why it is nice to have lighter and darker areas in your background.
When looking for a suitable background for your photo, you can deliberately look for strikingly light areas. This can be evenly lit, but it becomes really interesting when light and dark areas alternate in the background.
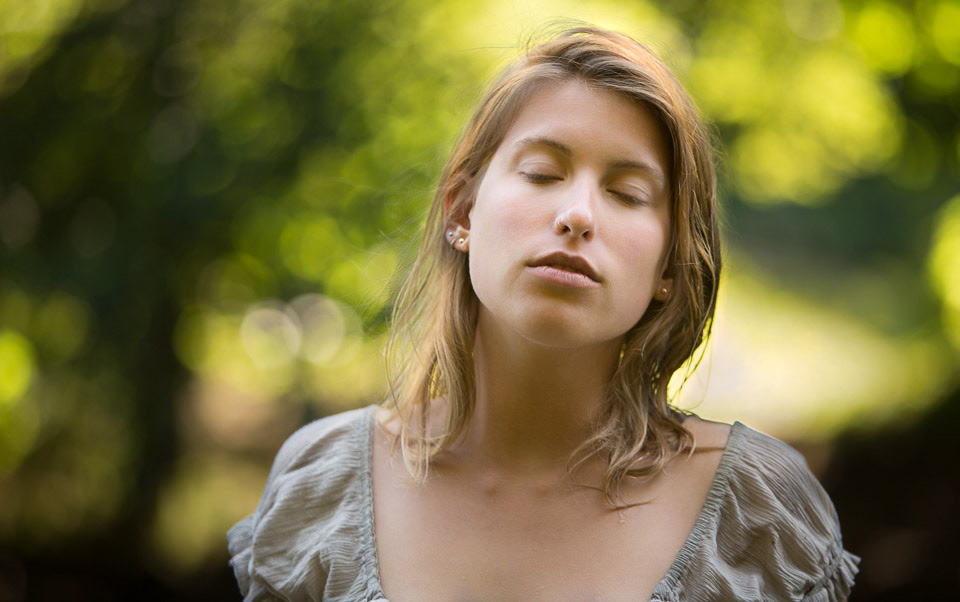
Remember that the viewer's attention will be drawn to the light areas. So place your model's head there.
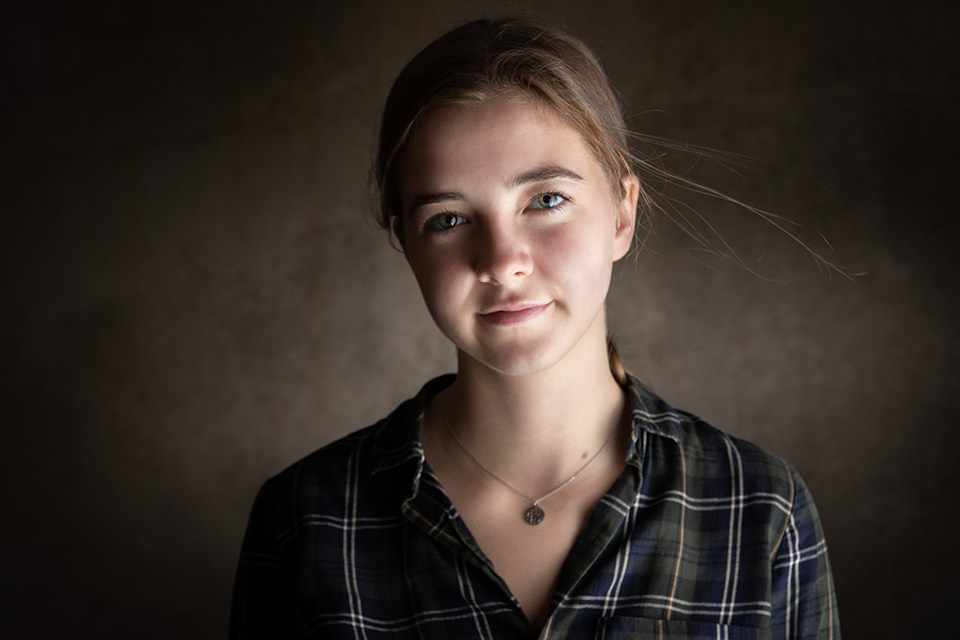
You can of course also deliberately create light areas in your backgrounds. In the photo of Anke below, I placed a flash behind her, aimed at the concrete wall. This creates a light spot that draws attention to the model.
About the author
Elja Trum is the founder of Photofacts and online photography course website Photofacts Academy. He has been writing about photography since 2006. Elja is also the author of (Dutch) books on composition, black-and-white photography, flash photography and portrait photography.
You might also like
-
 Workflow tips for Lightroom Classic in 7 steps
by Nando Harmsen
-
 The Perfect Picture; wildlife and personal heroes
by Elja Trum
-
 10 tips for getting the most out of a tripod
by Nando Harmsen
-
 12 tips for atmospheric autumn photography
by Laura van der Burgt
-
 7 tips for property photography
by Elja Trum
-
 The Perfect Picture: the Final (season 5)
by Elja Trum
14 comments
-

 jerry wrote on Tuesday 1 September 2020 at 12:56
| reply
jerry wrote on Tuesday 1 September 2020 at 12:56
| reply
weer maar eens prachtige tips heel duidelijk en eenvoudig uitgelegd, van harte dank
This comment was written in another language and has not been translated yet. -
 Lauran wrote on Tuesday 1 September 2020 at 13:05 | reply
You create beautiful portrait photos by working with a lot of volume. Strange that I never read that in any article. Beginner photographers would really benefit from this.
Translated from Dutch. -
 Petra Cremers wrote on Tuesday 1 September 2020 at 13:42 | reply
What do you mean by 'volume', Lauran?
Translated from Dutch. -
 guest wrote on Tuesday 1 September 2020 at 17:52 | reply
Too bad, a very distracting pole is sticking out of Anne's head
Translated from Dutch. -

-
guest wrote on Tuesday 1 September 2020 at 19:50 | reply
Yes.. Lauran , what you mean by "Volume".. I'm also pretty curious about that.
Translated from Dutch. -
Lauran wrote on Tuesday 1 September 2020 at 20:46 | reply
@gast @Elja @Petra Photographing with volume requires an entire article with example photos. I'm not a writer on Photofacts but since Elja jokes about it, he doesn't take it seriously while it is a serious subject in photography.
Translated from Dutch. -
 Edu wrote on Tuesday 1 September 2020 at 23:31 | reply
Then I saw it correctly with Anne
Translated from Dutch. lol
lol -
Elja Trum
wrote on Wednesday 2 September 2020 at 06:58
| reply
@Lauran; I was referring to ‘guest’s’ comment about the photo in which I deliberately showed that having a pole coming out of someone’s head was not a good idea. And that this apparently wasn’t clear as a photo showing ‘how not to do it’.
Translated from Dutch.
I’m also very curious about what you mean by volume. I’m not familiar with the term in that way. If you’d like, you’re also welcome to write an article about it for Photofacts. -
Lauran wrote on Wednesday 2 September 2020 at 07:42 | reply
@Elja: then I misunderstood you. I’m happy to comply, provided I can substantiate it with a few photos. It does need to be clear to the reader. Where can I send the whole thing?
Translated from Dutch. -
-
 Wim Bravenboer wrote on Wednesday 2 September 2020 at 11:02 | reply
Elja, could you explain to me why you used such a high ISO for the photos (preferably for each photo) of Sanne, Anouk, Bieke and Anke? I know you can photograph with a high ISO and I use it myself too without getting any unusual noise. I'm just curious about the reason for using it in these photos.
Translated from Dutch. -
Elja Trum
wrote on Wednesday 2 September 2020 at 11:27
| reply
@Wim; I generally use the ISO sensitivity I need to take the photo in question. I don't have a problem with going as high as ISO 3200 (depending on the camera, of course).
Translated from Dutch.
Up to ISO 800 I don't even think about it at all. It's simply an extra variable to use when determining the desired exposure.
For Sanne's photo I'm at ISO 640 because I wanted to work with a large aperture opening to get the blurry background. Here I use an aperture of f/2.8 with a shutter speed of 1/80s. At 195mm, that's actually already too slow. Fortunately, the lens has image stabilization. So ISO 640 was simply really necessary here, actually I should have gone higher.
Anouk's photo was taken in a pitch-dark hallway in an old factory. The light comes entirely from my battery-powered flash units. In such a situation I turn up the ISO to save batteries. Working at ISO 100 would also have been possible here, but then I would have had to make the flash fire more than twice as powerfully for the same result. That drains batteries.
Bieke's photo was taken at f/2.8. Again, deliberately with a wide aperture. At 150mm, a shutter speed of 1/200th is not strange. At ISO 100 I would have had a shutter speed of 1/100th here. That would have increased the chance of motion blur. Actually, I could have gone to ISO 400 here as a precaution too.
For Anke I used an aperture of f/7.1 in combination with a shutter speed of 1/100th to largely suppress the available light. That allowed me to use my flashes to light Anke. With a longer shutter speed I would get more ambient light in the image.
ISO 250 wasn't chosen very deliberately here either, it just happened to work out that way in combination with how brightly the flashes were set. Here too, a higher ISO saves the flash batteries.
By the way, I took this photo of Anke while recording a video about using flash light. As a member of Photofacts Academy you can watch it. However, in this video I don't discuss the settings used. -
 Jos wrote on Thursday 3 September 2020 at 15:48 | reply
Too bad, with Anne there is a pole coming out of her head.
Translated from Dutch.
Yes, that was to show a very clear photo of how not to do it. That was also clearly stated by the photographer.
I take a lot of photos of football myself and the fields are full of floodlight poles, which are sometimes quite far away. But when you take the photo, you have to be very careful that the floodlight pole is not directly above someone's head after all.
When taking a photo indoors with a low ceiling, you always have to look carefully that nobody is standing with their head just above a lampshade.
Have your say
Please note: Articles older than a week can only be commented on by signed-in visitors.Would you still like to comment? sign in or create a free account.
Become a better photographer every week
A practical photography tip in your inbox every week.
39,079 photography enthusiasts already receive the tips! More about the weekly mail. Or keep up to date via  Facebook.

Elja Trum
Photofacts; everything to do with photography!
Would you like to take better photos and keep up with what is happening in photography? Photofacts publishes articles that teach you something about photography — from a product announcement to a practical shooting tip or a look at a website. Photofacts covers photography every day and is a hobby project of Elja Trum's that got out of hand. The articles are written by a team of volunteer authors. If you would enjoy writing one or more articles for Photofacts, do get in touch.More about PhotofactsPhotofacts is made possible in part by
