

10 Lightroom tips you should know!
Thursday 13 December 2018, 11:47 by Michelle Peeters | 13,279 views | 5 commentsThis article was translated from Dutch with the help of AI. Read the original.
Lightroom is full of often almost hidden buttons and keyboard shortcuts that can be incredibly useful. You just need to know where to find them. Peter McKinnon reveals 10 of these Lightroom secrets.
1. Auto Tone
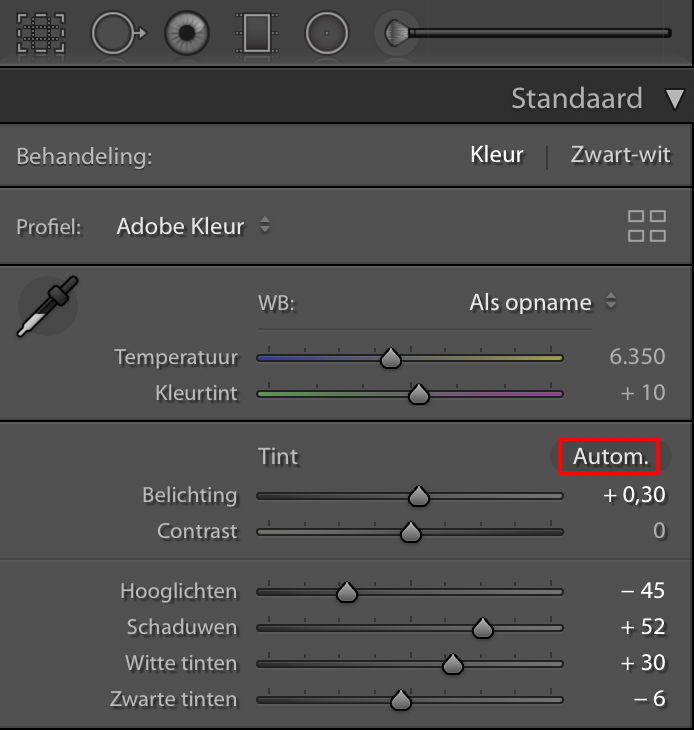
If you click the Auto Tone button, just above Exposure, it is almost impossible to spot, Lightroom does most of the work for you and automatically adjusts your settings.
In fact, the Auto Tone function evaluates your image based on what it sees in the histogram, reducing highlights and lifting shadows if needed.
It then tries to find the right balance. It often does a very good job and at least gives you a good starting point to fine-tune things yourself. And if the result is disappointing, you can easily undo the changes with Command-Z (PC: Ctrl-Z).
2. Resetting adjustments
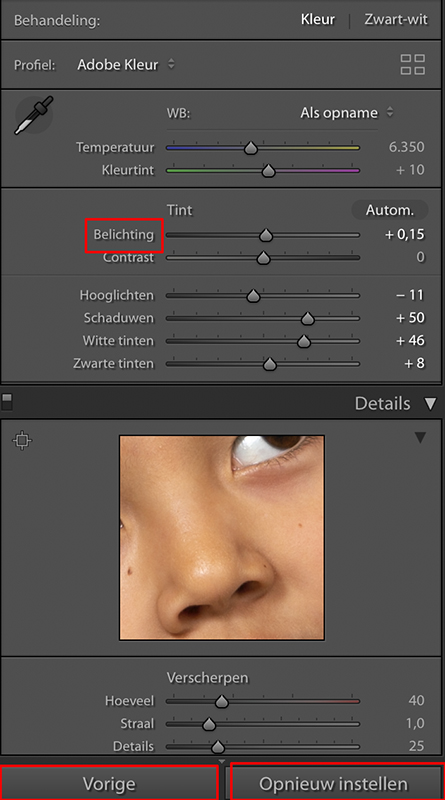
In Lightroom, you can reset all the changes you have made in one go using the 'Previous' or 'Reset' buttons at the very bottom of the screen.
If you only want to undo your last change, such as adjusting 'Exposure', double-click on 'Exposure' and only this adjustment will be reset to zero.
3. Grid overlays
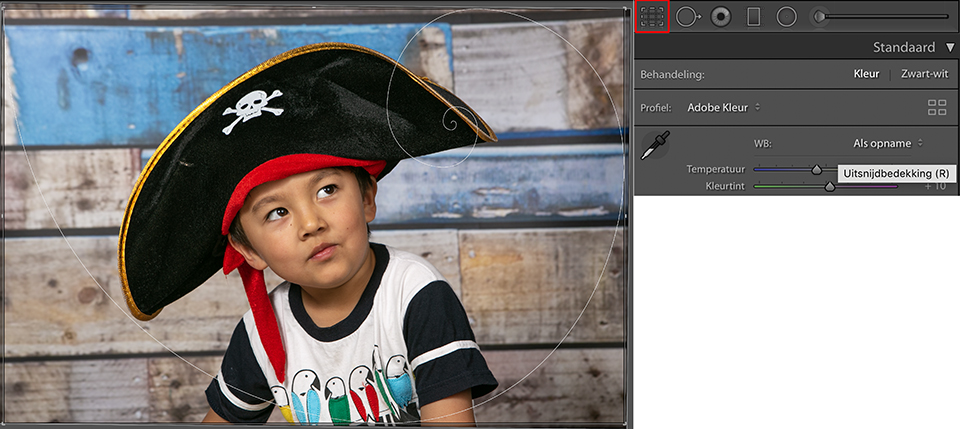
Normally, clicking the letter R brings up the Crop tool. If you then also click the letter O, an overlay appears. This changes each time you keep clicking the letter O.
The range of overlays also includes a 'golden spiral', an advanced 'rule of thirds' that guides your attention towards a particular point in the image.
4. Lights out
If you click the letter L on your keyboard, your photo is isolated by dimming the background. This directs all attention to your photo, and how you edited it, instead of all kinds of other things that only serve as distractions.
Click the letter L once more and the background, everything around your photo, turns completely black. Click L again and all the tools and navigation panels reappear as before.
5. Level out
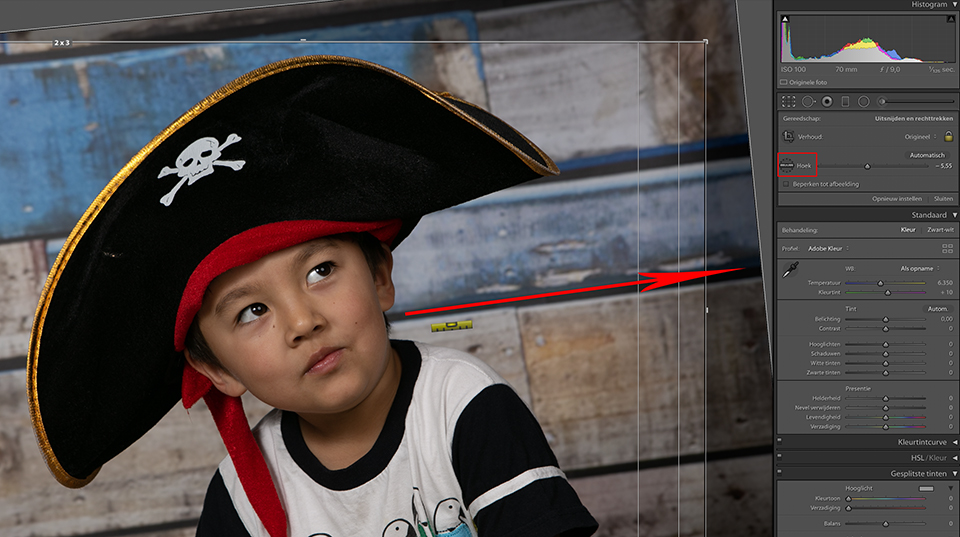
You can of course click the letter R again, the Crop tool, see point 3, and straighten the horizon by eye. But you can also do it more precisely. To do this, first click R and then the 'Angle' button.
Draw a line across your photo, preferably along a wonky line or the wonky horizon, and the photo will be straightened very accurately and automatically.
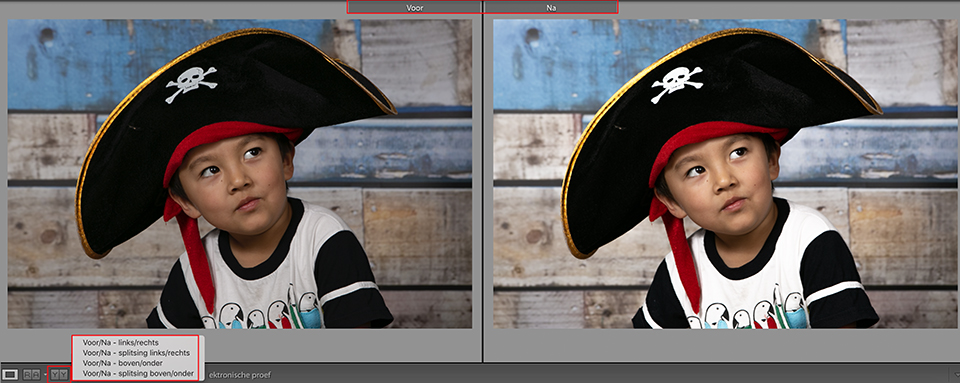
6. Before and after
In Lightroom, you can switch on a useful comparison view so you can clearly see exactly what your changes have done. There are several options for placing the before and after photos next to, above or below each other, with or without a split.
If you now press the 'backslash' key, note: not the forward slash, you can view the before and after photos one after the other. This can sometimes give you a better comparison than having both photos visible at the same time.
7. Clipping indicator
If you click the letter J on your keyboard, you will not see anything at first.
Then move the Exposure slider quite a long way to the right. At some point, the red clipping indicators will light up in the areas of your photo that are becoming seriously overexposed and where detail is starting to disappear.

8. Radial filter adjustments
Click the oval, the radial filter, and adjust the exposure, for example. In this case, I made the exposure darker. Then draw an oval around the face, or wherever you want to draw attention.
You will now see that the background, everything outside the oval, is darker, making your model appear to be in the spotlight. With 'Invert', you can swap dark and light around, in other words, invert the selection.

9. Size up
Drag your panel on the right a little further to the left so you can see better what you are doing with your adjustment sliders. This gives you more space and visibility, allowing you to work more precisely.
10. Organise yourself
There are more ways to select your photos than simply adding a flag. You can also create a ranking by numbering photos from 1...5. The number 5 then represents the images you really like, a top score, so to speak.

Photos numbered from 6...9 are given a colour, making them immediately recognisable, for example as poor and unusable.

More tips?
I found the tips above a revelation. I had not discovered them myself before. If you know of any more golden tips like these, please let us know in the comments!
Want to know more about Lightroom?
Then follow one of Piet van den Eynde's Lightroom courses on Photofacts Academy. The Lightroom Workflow tips & tricks course is a very useful one to start with.
You can follow this and other courses for two weeks with a free trial membership.
Dit artikel is voor het laatst bijgewerkt op 13 december 2018.
De eerste publicatiedatum is maandag 16 juli 2018, 10:20.
About the author
Michelle Peeters is fotografe en oprichter van DeuxBleus Fotografie. Michelle herkent het bijzondere in het gewone en het gewone in het bijzondere. Ze heeft zich nooit willen specialiseren en is daardoor van alle markten thuis.
You might also like
-
 Photoshop tip: Use keyboard shortcuts to work faster
by Elja Trum
-
 Having trouble with Photoshop's new 'Save As'? Change your shortcut
by Nando Harmsen
-
 Fujifilm X-Pro3 with 'hidden' screen and hybrid viewfinder
by Michelle Peeters
-
 Photoshop tip: Use a copy of a merged layer
by Nando Harmsen
-
 7 useful tips for Capture One Pro
by Heike Jasper
-
 The Hidden Costs of Using AI
by Nando Harmsen
5 comments
-
 jos wrote on Monday 16 July 2018 at 12:29 | reply
One more little tip for tip3: if you press [shift]O, the overlays (for example, the spiral) are mirrored.
Translated from Dutch. -

 Michelle Peeters wrote on Monday 16 July 2018 at 12:30
| reply
@Jos: that's a good one, thanks!
Translated from Dutch. -
 Harry wrote on Monday 16 July 2018 at 12:35 | reply
Thanks for your article, Aspre looks nice in it!
Translated from Dutch. -
Michelle Peeters wrote on Monday 16 July 2018 at 12:37
| reply
@Harry: a bloodthirsty pirate huh...
Translated from Dutch. Thanks for letting me 'borrow' him for a moment!
-
 Lieke van Grinsven van Aarle wrote on Friday 20 July 2018 at 10:04 | reply
Another selection that I often use.
Translated from Dutch.
P stands for flagging.
U to remove the flag
X to easily delete the photo. Is sometimes confusing with the X in PS
Have your say
Please note: Articles older than a week can only be commented on by signed-in visitors.Would you still like to comment? sign in or create a free account.
Become a better photographer every week
A practical photography tip in your inbox every week.
38,886 photography enthusiasts already receive the tips! More about the weekly mail. Or keep up to date via  Facebook.

Elja Trum
Photofacts; everything to do with photography!
Would you like to take better photos and keep up with what is happening in photography? Photofacts publishes articles that teach you something about photography — from a product announcement to a practical shooting tip or a look at a website. Photofacts covers photography every day and is a hobby project of Elja Trum's that got out of hand. The articles are written by a team of volunteer authors. If you would enjoy writing one or more articles for Photofacts, do get in touch.More about PhotofactsPhotofacts is made possible in part by
