

Getting started with a trail camera, what you need to know
Thursday 6 May 2021, 15:30 by Stijn Madou | 13,162 views | 5 commentsThis article was translated from Dutch with the help of AI. Read the original.
Trail cameras can make your life easier and increase your chances of taking successful wildlife photos. They also allow you to keep an eye on and monitor animal activity without being there yourself.
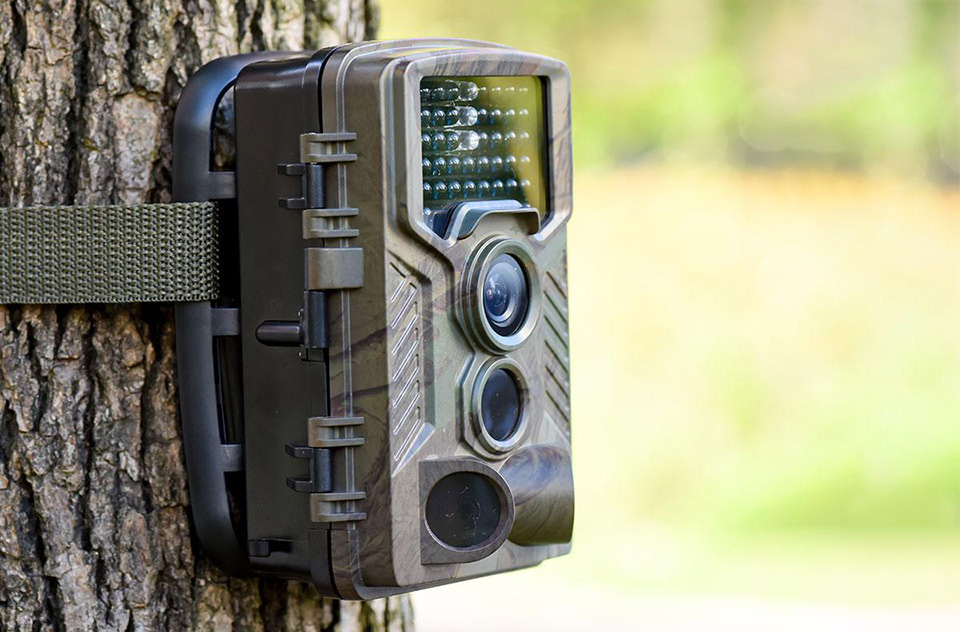
A trail camera is, in short, a portable, automatic camera that only switches on when it detects movement. It measures heat as well as movement, making both day and night images possible.
Some trail cameras can also be controlled remotely. The cameras are specially designed to record animal behaviour from a distance, completely automatically.
Animals travel, socialise and feed throughout the day, and we cannot always be there to keep an eye on them. To understand the animals you want to photograph as well as possible, it is useful to use trail cameras to monitor these activities.
But just like all the other gadgets we use in our lives, trail cameras can be susceptible to both user and technological errors. The great advantage is that animal behaviour is not disturbed by human presence, the cameras can take images both day and night, and they also have many practical options.
A trail camera, also called a trailcamera, can also be used to:
- Monitor nests and breeding grounds
- Carry out animal observations without disturbing nature
- Carry out biological research
- Monitor the growth of plants, animals or structures, using the timelapse function
- Give your passion for nature an extra dimension in a special way
How does a trail camera work?
The essential parts that make a trail camera work are the motion sensor, lens, infrared emitters, batteries and memory card. The motion sensor of a trail camera is what activates the camera to record movement.
A camera that took photos or video clips every time the wind blew the leaves around would be useless, so motion sensors are also equipped with heat detection.
This heat detection ensures that the camera and its sensors only start recording when a living creature enters its field of view. The better the sensor, the faster it detects movement and heat, and the faster it can collect images within its field of view.
Higher-quality cameras also have a short recovery time between taking a photo and being ready for the next one.
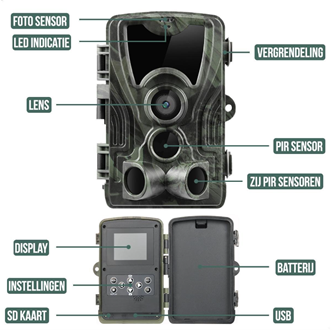
Main parts of a trail camera
When you are looking for a trail camera, you will often come across many different terms and names. Below, we briefly explain in simple terms what each function actually does.
No-glow or low-glow
Cameras with a “no-glow” flash are equipped with black LEDs that are completely invisible, not only to wildlife but also to people.
You should note that all images captured at night with this option will be in black and white.
Are you using the camera as a security camera and do you want it to remain unseen? Then no-glow cameras are for you! In general, wild animals are not bothered by flashes.
Low-glow trail cameras, on the other hand, have a faint glow from the infrared sensors. This red glow is slightly visible to the naked eye. Low-glow models are often a little cheaper to buy.
Megapixels and video resolution
Most trail cameras range from 8 to a maximum of 20 megapixels. Megapixels, together with the quality of the camera lens, determine the sharpness and resolution of the photos taken by the camera.
Within the wildcameraXL range, the lowest number of megapixels is 12, rising to as much as 42MP. In terms of video resolution, it is important to aim for at least Full HD video sharpness. It is of course very important to shoot sharp videos. There are also several 4K video models, which shoot particularly good videos.
Trigger speed
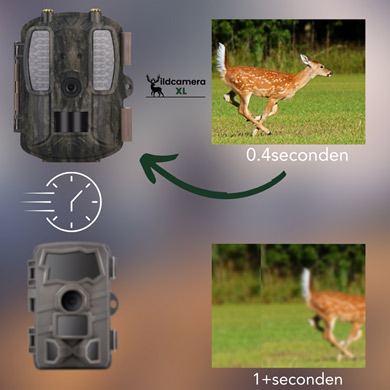
Trigger speed, or trigger time, is essentially the time a camera needs to take a photo once movement, such as a deer, is detected.
Trigger speed is a very important feature and can undoubtedly make the difference between seeing or missing a particular movement. Trigger speed is one of the most important features of a trail camera. Trigger times range from 0.2 seconds to 1.5 seconds.
In principle, a shorter trigger speed is always better. With a longer trigger time, there is a chance that the passing animal will already have disappeared from view.
Detection zone
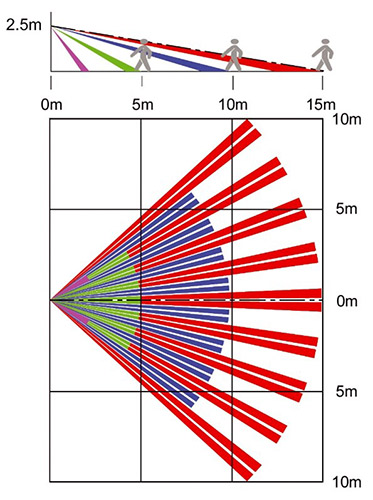
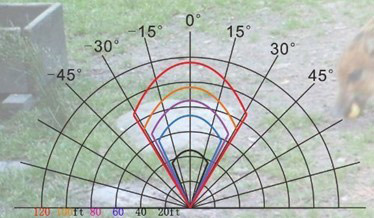
The ‘detection zone’ of a trail camera is an invisible area that starts at the front of the camera and extends outwards in a V shape. It becomes larger as the distance increases.
This is the zone in which the camera detects movement. As soon as movement is noticed, the camera is activated and takes a photo or starts recording video.
When it comes to detection zones, you need to be aware of how wide and how long your particular model is, because depending on where you want to use the camera, you may not need such a large zone.
Naturally, higher figures in both zones mean that the camera will detect more movement and take more photos, and vice versa.
PIR angle
PIR stands for Passive Infrared, and the PIR angle refers to the extent to which the camera can detect movement.
Cameras with a wide PIR angle can detect movement more quickly and have a better chance of capturing the animal or object in the centre of the frame.
Lower-quality cameras have a narrow PIR angle. Higher-quality cameras usually have a PIR angle of 48 degrees.
Multi-shot/burst mode
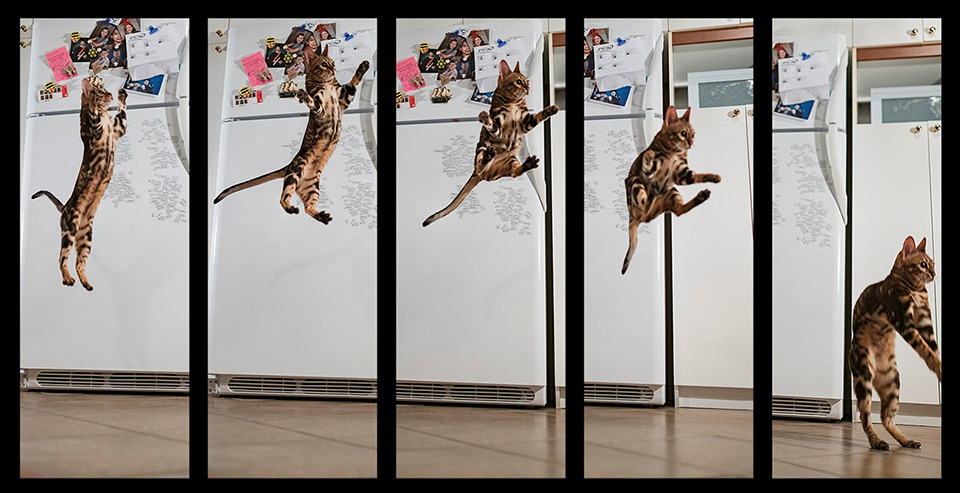
Instead of taking one image when the camera is triggered, Burst Mode allows the camera to take a predetermined number of images before stopping.
For example, a deer walks past and the camera, when multi-shot is switched on and set to 3 photos per detection, immediately takes 3 extremely fast photos one after the other!
Your memory card will naturally fill up faster, but it is ideal for getting that shot.
The 3 main advantages of a trail camera
1. You get better and more information about the areas you are interested in
Trail cameras can take you to another location with just one click of a button. With properly installed trail cameras with internet access, you can observe live feeds from your chosen location and scout for a suitable photography location or a location to study over a longer period.
They give you the insight you need to prepare yourself. You can imagine that it is an extremely valuable tool to have several ‘eyes’ watching different locations using trail cameras with live notifications!
This allows you to study, for example, the behaviour, feeding habits and breeding areas of your specific subject.
These days, trail cameras have very advanced digital functions. For example, you can remotely adjust the position of some cameras for better shots.
This is made possible by advanced Bluetooth and Wi-Fi connectivity, which can be operated from up to 150 metres away. Trail cameras with Wi-Fi are ideal for watching live within a limited distance!
2. Time-saving
You can save a lot of time by using a trail camera. Instead of spending countless hours personally scouting different locations, you can place a trail camera at the location that interests you, sit back and let the camera do the work for you.
If the camera captures a lot of activity, you know that you have found a good location. Not to mention that you can monitor it throughout the season and constantly receive new information about movement.
They can be much more than a seasonal scouting tool if you use them properly.
3. Security
Trail cameras are ideal for monitoring your land, storage area or house. The last thing you need is an unwanted person who should not be on your property walking around your private areas.
Trail cameras give you a sense of security for situations you hope will never happen. For example, you can hang a camera with an alarm at your personal storage area, shed or in the garden. It can send you a real-time signal from up to 150 metres away with a connected beeper or alarm.
Alternatively, you can receive a notification through the live app, with the Wi-Fi, 4G or 3G models, when movement takes place around a particular area!
Trail camera tips
Location and placement
Location is the most crucial aspect when scouting with a trail camera. Give priority to food and water sources, well-used paths and sleeping places when looking for a place to put your camera.
Bear in mind that wildlife behaviour changes throughout the year depending on the season, so familiarise yourself with these changes.
The positioning of the trail camera is also a factor in getting the most out of it.
Depending on the animals you want to observe, it is useful to follow certain ‘general rules’.
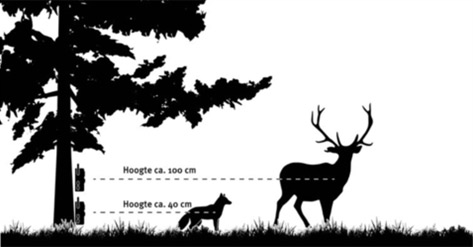
For example, it is better to hang the camera at a height of about 1 metre when you want to observe deer, roe deer or other larger animals.
Do you want to observe foxes, wild boar or other smaller animals? Then it is useful to position the camera at a height of about 40-60 centimetres.
Powering the camera
When it comes to buying batteries for your trail cameras, you may think you can save money by choosing cheaper options.
Although this may be true, low-quality batteries have voltage irregularities and perform poorly in different weather conditions. This can lead to malfunctions.
Make sure your trail cameras are powered by high-quality, durable rechargeable lithium batteries or replaceable alkaline batteries, depending on the manufacturer’s instructions.
Although they may be slightly more expensive to buy, they last much longer, so you get value for money. Using solar panels or adapters is also no unnecessary luxury when the situation calls for it. There are also solar panels and adapters for trail cameras.
Check the trail camera settings
To get the most out of your trail camera, it is important to set it up properly according to your own needs.
Set the sensor sensitivity of the trail cameras to suit your scouting needs. Although you want to capture every movement of the animal, you certainly do not want to capture false triggers such as falling leaves and moving branches.
Make sure you set the correct passive infrared (PIR) angle on the trail camera, so that it can detect wildlife movement according to the speed at which the animals usually move. This prevents the slow movements of things such as leaves and branches from being recorded.
You should also set a higher image resolution to capture high-quality images. Do not forget to use a high-quality SD card with plenty of storage.
Tips for settings
Camera mode
Camera mode is essentially the choice of how the user wants the camera to take photos. Common options include burst photos, video, a single photo or timelapse.
Which mode a user chooses depends on their goals. Some people choose bait, which means placing food near the camera to attract animals.
In that case, a single photo may work best. Burst photos take several photos one after another, making this mode better for photography without bait.
Video functions are useful when you want to monitor behaviour properly. However, this takes up a lot of space on the SD card, but it is a very interesting function for observing animal behaviour.
Interval mode
The interval is the time between each individual photo or burst. Choosing a suitable interval is important because it can help preserve battery life and prevent the camera from ending up with hundreds of shots of exactly the same animal.
If the user wants many images of one particular animal, a short interval can be set.
Suppose you want to take a photo or video every 15 minutes of the animal you are monitoring, such as an owl’s nest. You can then set the camera interval to 15 minutes.
When this function is set on a 4G trail camera, it is recommended that you choose a generous internet plan. A Wi-Fi camera is also ideal for this!
Do note that most trail cameras have an internal hotspot, meaning that you cannot be more than about 20 metres from the camera if you want to watch on your mobile or download the files.
Sensitivity
Sensitivity is the camera’s response to movement and heat detection when the camera uses infrared. Higher sensitivity settings will respond even to small movements, causing the camera to take a photo.
The easiest approach is to make some test shots with the trail camera to determine which sensitivity works best in the chosen environment.
If you hang the trail camera in a forest where many branches and leaves move in front of the camera in the wind, and your aim is to capture larger animals, it is wise not to set the sensitivity to its highest level.
Common mistakes
1. Choosing the wrong trail camera
It is very important to buy the right trail camera straight away. This prevents a lot of hassle and can also save you unnecessary costs.
Do you want to hang a trail camera in your garden? Then a Wi-Fi camera or standard camera may be the best option.
Do you want to hang the camera far from home and is it necessary to be able to watch live? Then it is very useful to buy a trail camera with internet access.
Not sure which type of camera suits you? Then take the trail camera quiz or ask a salesperson for advice.
2. Buying a memory card that is too small
Memory cards need to be large enough to store multiple photos over many hours. A memory card that is too small will cause the camera’s storage to fill up too quickly because of the many photos or videos.
It is recommended that you buy the largest memory card the trail camera can handle. This is a slightly larger investment, but in the long term it certainly has more advantages than disadvantages.
3. Not taking your own scent into account
Trail camera users should bear in mind that animals have a keen sense of smell and that the camera will retain the person’s scent if it is not cleaned after being set up.
The camera should be set up using odour-resistant gloves or wiped clean after being set up, so that the animals are not alerted or alarmed.
4. Camouflaging or hiding the camera too well
Although it is important to hide your camera, to prevent theft and take the best photos, it is possible to hide it too well.
This affects the photos. If you use too much foliage or cover, it can actually prevent you from getting a good shot.
You can also make it difficult for yourself to find the camera again.
Difficulty finding the camera: And if you do not record a GPS point, it is also possible to hide it from yourself and have trouble finding it again.
5. Forgetting to switch the camera on
You may not believe it, but people sometimes set up and hide the camera perfectly, only to forget to switch it on before leaving the area!
About the author
Stijn heeft passie voor dieren, natuur en fotografie. Hij is oprichter van de webwinkel WildcameraXL waar hij wildcamera's verkoopt.
You might also like
-
 6 Tips for Creating Star Trails
by Nando Harmsen
-
 Combine star trails in Photoshop with an action
by Nando Harmsen
-
 Increase Your Chances of Taking Successful Street Photos
by Huub Keulers
-
 Photograph a Still Life for a Change
by Laura van der Burgt
-
 Street photography tip: Add light trails to your photos
by Michiel Heijmans
-
 7 tips: Wildlife photography for beginners
by Rob Dijkstra
5 comments
-
 Stijn Madou wrote on Thursday 6 May 2021 at 16:37 | reply
Questions or comments? I'd love to hear them!
Translated from Dutch.
Regards Stijn Madou
also reachable at:
0618484438
info@wildcameraxl.nl -
 Jasper wrote on Friday 7 May 2021 at 20:16 | reply
I sometimes see wildlife cameras at, for example, Lidl, go by. What is the difference?
Translated from Dutch. -
Stijn Madou wrote on Monday 10 May 2021 at 10:53 | reply
@jasper, the quality of Lidl cameras is not that high, and their specifications and options are limited. That doesn't mean that the Lidl wildlife cameras can't also be useful though! but the prices alone indicate that these aren't high-quality cameras.
Translated from Dutch. -
 Paul wrote on Wednesday 12 May 2021 at 08:23 | reply
I would like to buy a trail camera, but when I read the reviews of a particular model I have in mind, the quality often turns out to be subpar. Especially at night, the quality still doesn’t seem to be very good, and that is mainly what I would want to use it for. I understand that you shouldn’t expect razor-sharp photos at night, but a mere silhouette of an animal is no use to me either.
Translated from Dutch. -
Stijn Madou wrote on Wednesday 12 May 2021 at 09:27 | reply
Hi Paul,
Translated from Dutch.
If you send me an email at info@wildcameraxl.nl, I may be able to help you further or at least provide you with the right advice!
Have your say
Please note: Articles older than a week can only be commented on by signed-in visitors.Would you still like to comment? sign in or create a free account.
Become a better photographer every week
A practical photography tip in your inbox every week.
38,982 photography enthusiasts already receive the tips! More about the weekly mail. Or keep up to date via  Facebook.

Elja Trum
Photofacts; everything to do with photography!
Would you like to take better photos and keep up with what is happening in photography? Photofacts publishes articles that teach you something about photography — from a product announcement to a practical shooting tip or a look at a website. Photofacts covers photography every day and is a hobby project of Elja Trum's that got out of hand. The articles are written by a team of volunteer authors. If you would enjoy writing one or more articles for Photofacts, do get in touch.More about PhotofactsPhotofacts is made possible in part by
