

General camera settings for beginners
Wednesday 12 December 2018, 20:47 by Michelle Peeters | 85,232 views | 37 commentsThis article was translated from Dutch with the help of AI. Read the original.
Many beginner photographers often wonder which camera settings they should use to get the best results with their current camera equipment.
Although there are no fixed camera settings that work well in every situation, there are a number of settings that I use on every camera, making them universal for the most common brands.
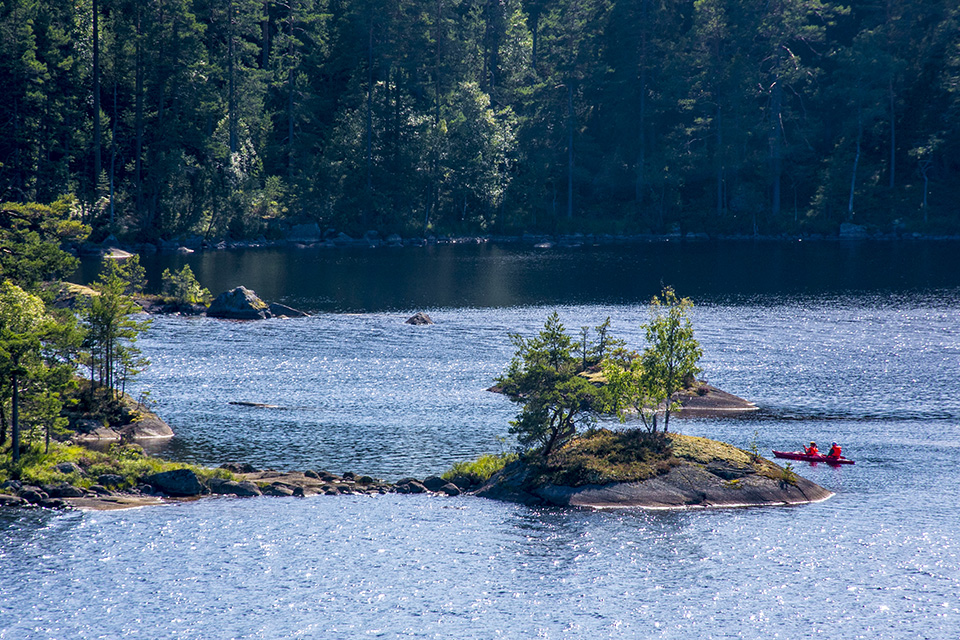
These are the basic settings I set initially. Once this is done, I rarely return to them.
There are also certain camera modes that make photography easier or faster, especially for beginner photographers. Below, I will explain these general camera settings in more detail.
Camera setup
Here are a number of camera settings found on most modern digital cameras:
- Image quality: RAW
- RAW recordings: Lossless compression, if available
- White balance: Auto
- Picture Control / Picture Style / Creative Style / Film Simulation: Standard
- Colour space: sRGB
- Long exposure noise reduction: On
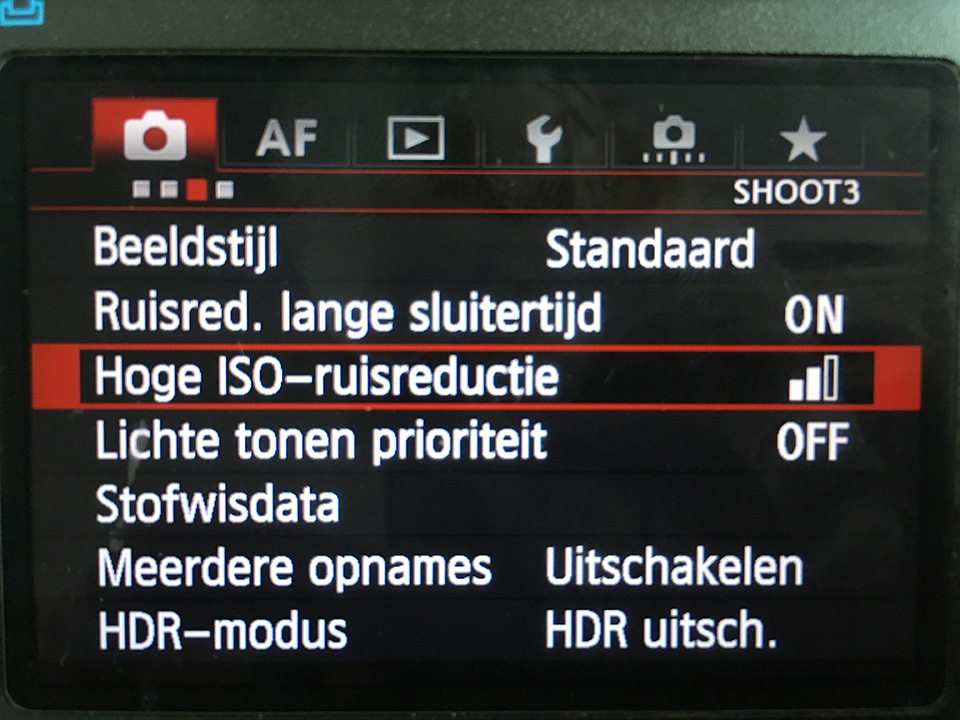
- High ISO noise reduction: Off
- Active D-Lighting / DRO, HDR, Lens Correction, Vignette Control, Chromatic Aberration Control, Distortion Control, et cetera: Off
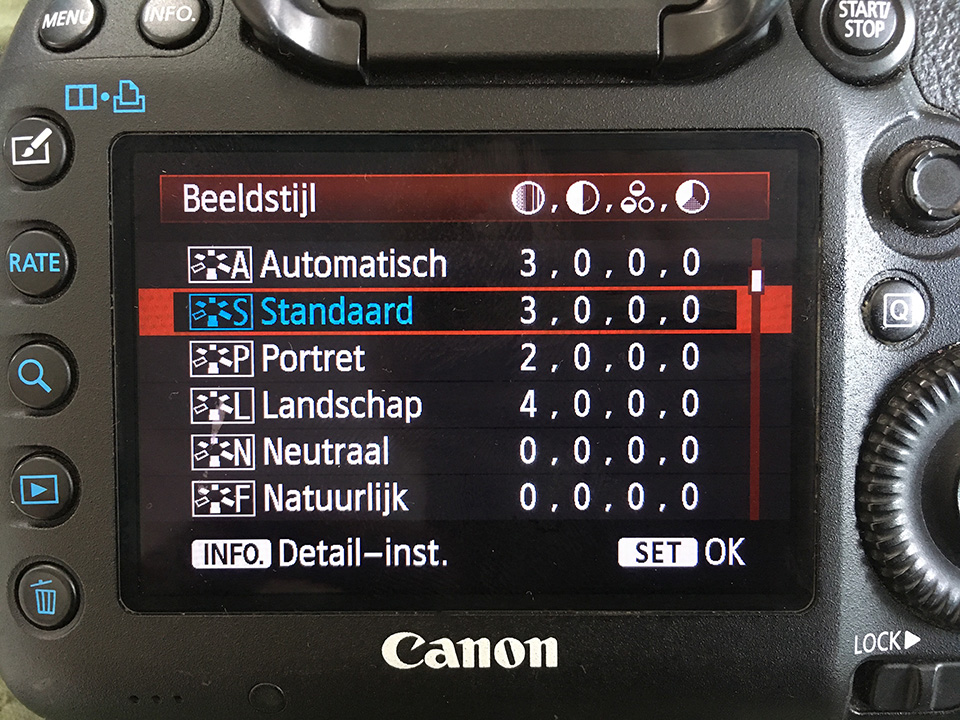
These are the most important camera settings. They are explained in more detail below.
- You always start by choosing the file format, which is RAW. The disadvantage is that you have to edit your photos afterwards. However, the advantages far outweigh this disadvantage.
You can get much more out of your photo without losing data, and even correct exposure errors afterwards. You can also bridge much larger differences in contrast - If there is a setting for selecting RAW compression, always select lossless compression. This reduces the amount of space your RAW files take up
- If you shoot in RAW, you can still adjust the white balance afterwards. The automatic setting usually already gives a fairly natural result
- Things such as Picture Controls have no effect on RAW files. They only affect how your images appear on your camera's LCD screen.
It is therefore best to use a standard profile without other settings such as Sharpening, Contrast, Saturation, et cetera. Such settings only matter if you shoot in JPEG format. - The same applies to colour space and white balance: you do not need to worry about these when shooting in RAW, because you can change them later
- Unless you know what you are doing, it is useful to enable long exposure noise reduction, as it affects your RAW files. It reduces noise during long exposures, but also doubles the amount of time normally needed to save an image
- It is better not to leave high ISO noise reduction to the camera. It is more controlled to reduce any noise during post-processing
- All other built-in options, such as lens corrections, dynamic range optimisation and noise reduction, should also be disabled, because they do nothing to improve your RAW images.
Once you have set the above settings on your camera, it is time to move on to the things that matter when taking photos.
Best shooting mode
Although some photographers argue that it is always best to shoot in manual mode to gain complete control over your camera, I do not entirely agree.
When you consider how good modern cameras have become at metering a scene accurately, there is actually very little reason to shoot in manual mode.
So why not use one of the semi-automatic camera modes instead?
The conclusion of the article Shooting in semi-automatic mode was that shooting in manual mode is only useful when you have complete control over the light, for example in a photo studio, or when the light does not change.

I rely on Aperture Priority mode 90% of the time, because it does an excellent job. I have complete control, both over my aperture and over how light or dark I want my image to be.
If I want a brighter image, I can simply use the Exposure Compensation button to adjust my exposure.

Scene modes
I would advise against using the 'Scene' modes, such as Macro, Sport and Fireworks, on your camera. The main reason is that these modes vary greatly between different camera manufacturers and between different models.
So if you have learned to rely on a particular scene mode on one camera and switch to another model in the future, that same scene mode may not be available on it.
Moreover, these scene modes are no longer found on most high-end and professional camera models.
Best autofocus mode
You should always make sure that you use the best autofocus mode, regardless of the subject you are photographing. For example, if you want to photograph a stationary subject, it is best to use Single Area Focus mode, also known as "Single Area AF", "One Shot AF" or "AF-S".
If your subject is constantly moving, however, it is better to switch to Continuous / AI Servo Focus mode, so that your camera keeps tracking your moving subject and focusing on it.
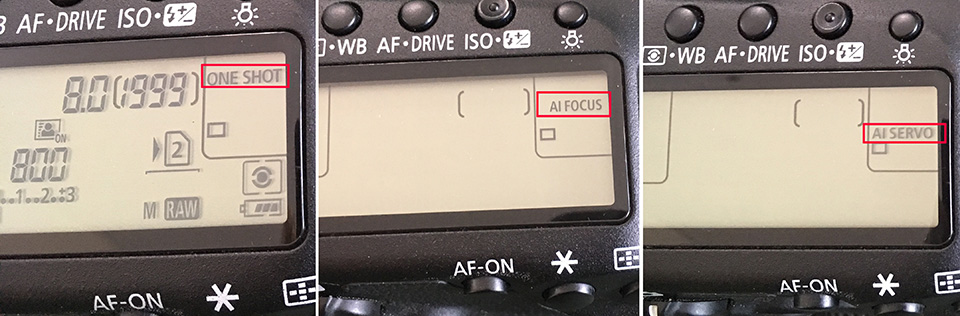
To make things easier for beginners, many cameras contain a hybrid mode that automatically switches between Single Area Focus Mode and Continuous / AI Servo Focus Mode, depending on whether or not your subject keeps moving.
This hybrid mode, known as "AF-A" on Nikon cameras and "AI Focus AF" on Canon cameras, can be a great autofocus mode to use as your default if you find it difficult to keep switching between AF-S and AF-C camera modes.
Some cameras are also equipped with an "Auto AF" mode, which looks at the entire scene and tries to focus on the nearest subject or a subject the camera considers important.
As a beginner, I would not use such a mode, because it is better to keep control yourself over what you want to focus on and keep in focus.
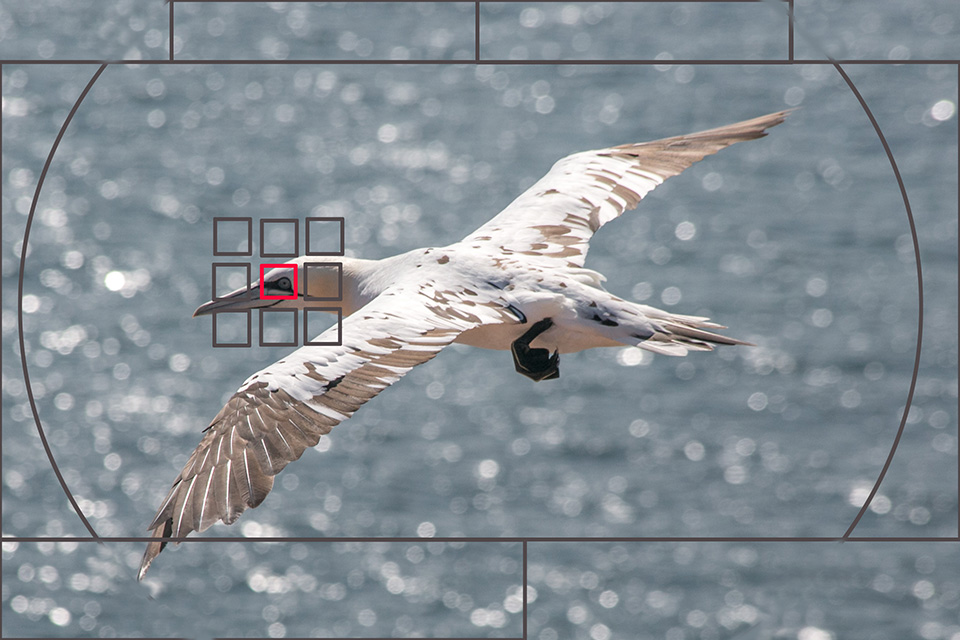
You can do this by switching to single-point AF area mode. Once you have enabled a single focus point, I often have mine positioned right in the centre, you can move that focus point within your frame yourself, or you can focus and recompose the entire camera for a slightly different composition.
Best metering method
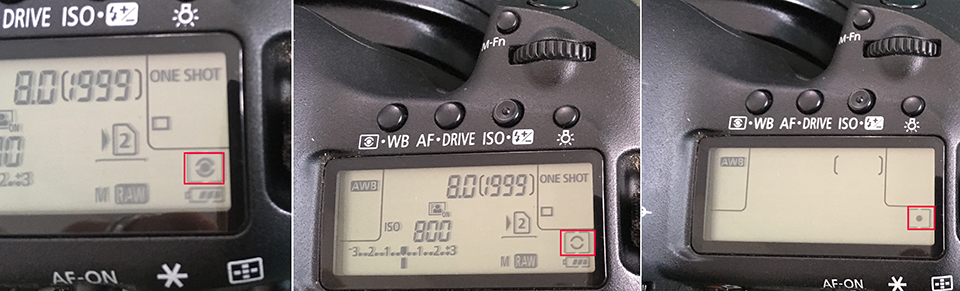
You can set a number of different metering methods on your camera, such as spot metering, centre-weighted metering and matrix / evaluative metering. For most situations, it is best to set Matrix / Evaluative Metering as the default.
This is because this mode takes the exposure of the entire scene into account. In general, it gives the best result for exposing your subjects.
Best aperture
The aperture affects how much your subject is isolated from the background, but it also affects the amount of light that enters through the lens. So you need to pay close attention to which aperture you choose in a particular situation. The aperture can also affect things such as depth of field, or DOF.
This is therefore about choosing the best aperture for the scene you want to photograph. If you are taking photos in low light and want to prevent motion blur, you should use the widest possible aperture.
For example, if you are photographing in poor light with a 35mm f/1.8 lens, you will definitely want to use the widest possible aperture of f/1.8. However, if you see a beautiful view and want to take a sharp photo of the entire landscape, the optimal aperture for your lens will be around f/8 or f/11.
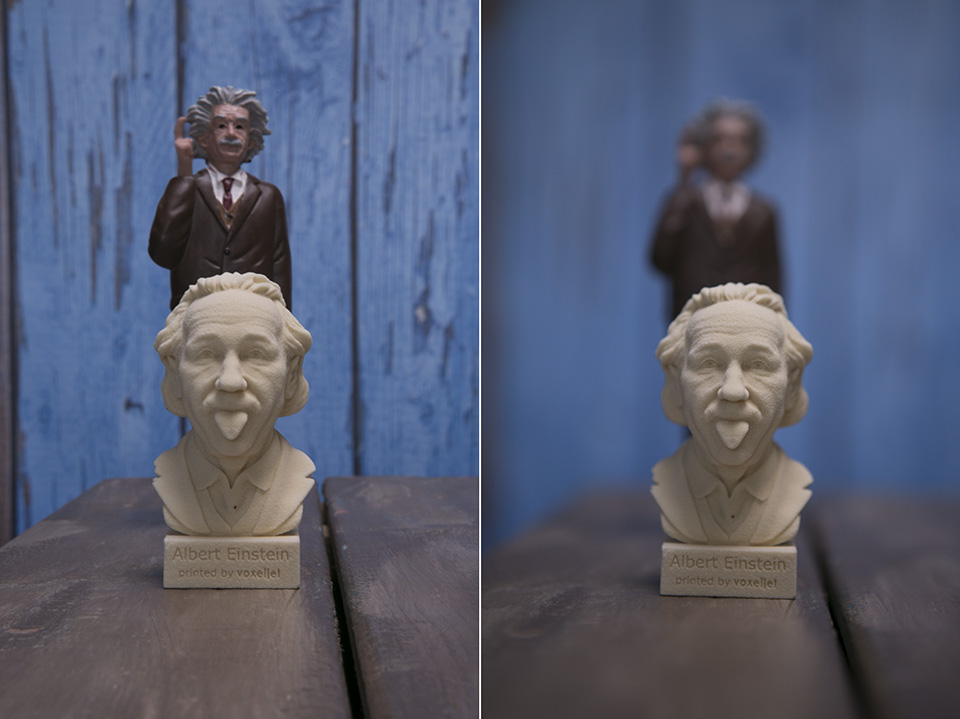
The example below shows how different an image can look when you shoot with an open aperture, in this case a small aperture of f/22, and a wide aperture of f/2.8.
Best shutter speed
Just like the aperture, choosing the best shutter speed depends greatly on what you are trying to photograph. For example, if you want to create a dreamy photo of a waterfall, you need to use a slow shutter speed that can last several seconds to make the flowing water blurry:
If you want to freeze your subject in the scene, you will need to use very fast shutter speeds lasting only a small fraction of a second.
For most situations, however, it is best to use shutter speeds that are fast enough to take photos without motion blur caused by camera shake. For this reason, I would recommend enabling Auto ISO.
Best ISO setting
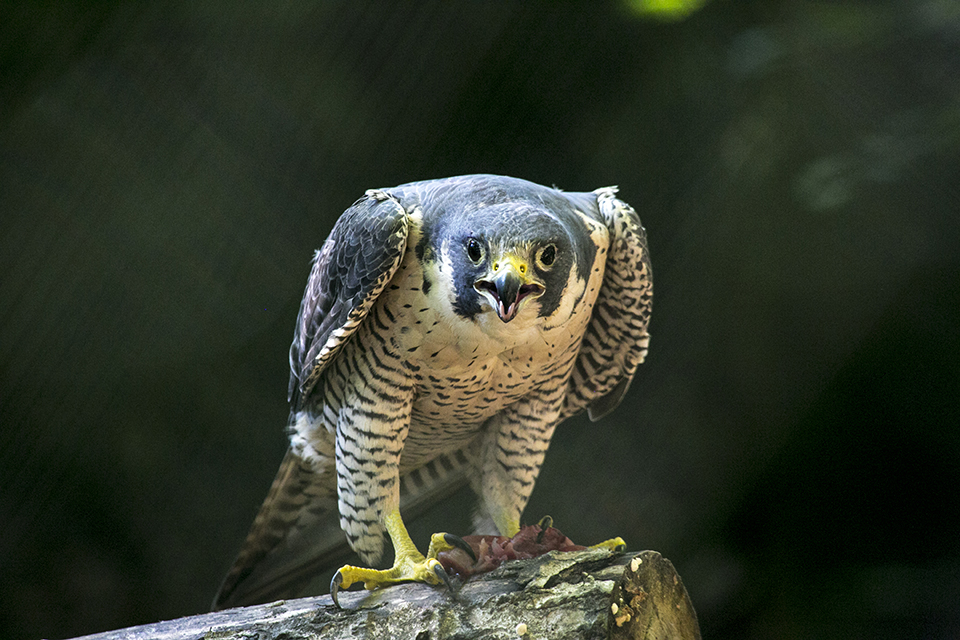
You are generally best off shooting at the lowest ISO value, because this produces the least amount of noise. Using noise reduction techniques can of course help, but it is better to avoid noise in the first place.
Shooting at the lowest ISO value is not always practical, however, especially when you have to photograph in poor light. In such situations, you need to increase the ISO value on your camera to keep the shutter speed fast enough to prevent motion blur.
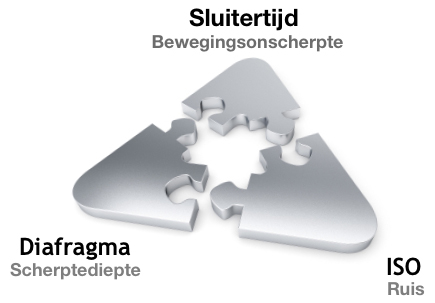
A good exposure is always a balance between Aperture, Shutter Speed and ISO, also known as the Exposure Triangle. This is explained clearly in this article with photography cheat sheets.
Auto ISO
Many modern cameras have an Auto ISO function, which can be very useful for a beginner photographer. Once you have enabled Auto ISO, your camera automatically adjusts the camera's ISO value, depending on how bright the light is on your subject and in the surroundings.
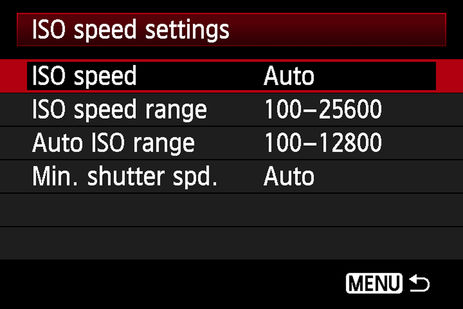
The ISO is set so that the shutter speed reaches the same level as, or a higher level than, the minimum shutter speed you entered in the Auto ISO menu.
Automatic ISO configuration
Some Nikon and Canon cameras have advanced Auto ISO menus. They provide an "Auto" configuration for the minimum shutter speed, taking the focal length of the lens being used into account.
Such options can be very useful for beginners, because they prevent you from having to adjust your settings constantly. This is something that beginners in particular find difficult.
Image stabilisation
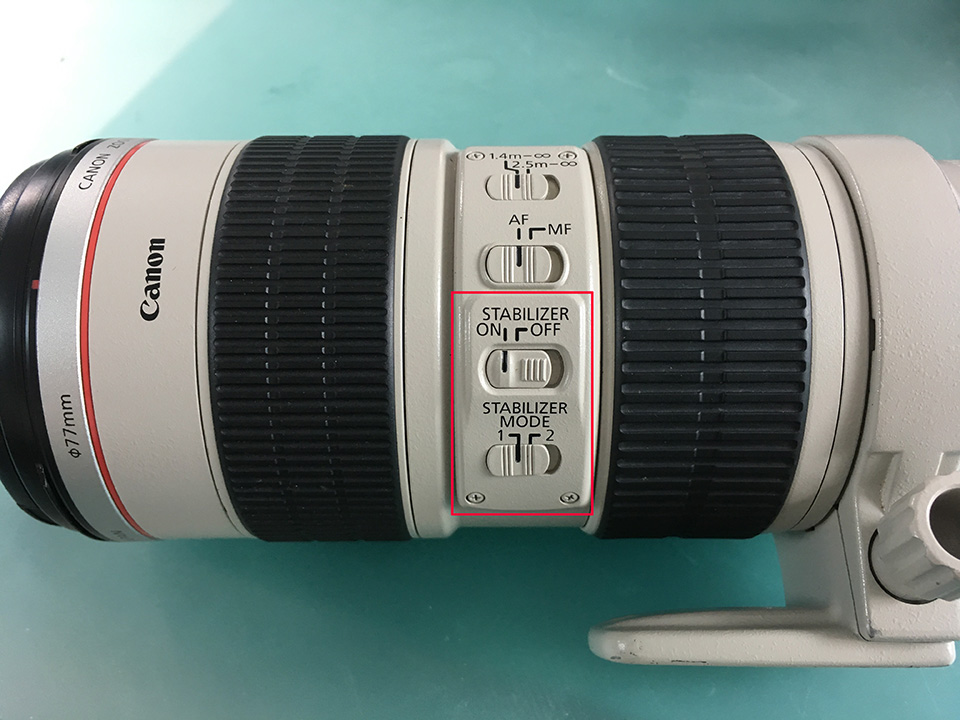
Finally, do not forget to make use of image stabilisation, also known as SteadyShot, Vibration Reduction or Vibration Compensation, which is built into your camera, in-body image stabilisation, or your lens.
Do not forget to turn it on when shooting handheld. Turn it off when working with a stable tripod.
It is also always a good idea to half-press the shutter button for half a second to let your camera stabilise before fully pressing the button. This reduces the chance of blurry images even further.
More tips?
If you have any more tips for useful settings for beginner photographers, or if you disagree with the settings described above, let us know in the comments!
Want to learn more about the basics of photography?
At Photofacts Academy, our online learning environment for photographers, we have a complete basic photography course. You can follow this course for two weeks with a free trial membership.
About the author
Michelle Peeters is fotografe en oprichter van DeuxBleus Fotografie. Michelle herkent het bijzondere in het gewone en het gewone in het bijzondere. Ze heeft zich nooit willen specialiseren en is daardoor van alle markten thuis.
You might also like
-
 10 Tips for Beginner Photographers
by Elja Trum
-
 5 Beginner Tips for Better Photos
by Nando Harmsen
-
 Everything about Generative Fill in Photoshop Beta
by Nando Harmsen
-
 Video: 5 Mistakes Beginner Photographers Make
by Elja Trum
-
 Advice for beginner photographers
by Elja Trum
-
 7 tips: Wildlife photography for beginners
by Rob Dijkstra
37 comments
-
 Marguerite Krajenbrink wrote on Tuesday 12 September 2017 at 11:25 | reply
Very useful tips Michelle but people almost always talk about Nikon and Canon cameras. I have a mirrorless camera from Panasonic and for many
Translated from Dutch.
people the light weight is a reason to choose this camera. However, Photofacts rarely covers mirrorless cameras. Too bad. -

 Michelle Peeters wrote on Tuesday 12 September 2017 at 11:29
| reply
@Marguerite: many settings in this article are universal and therefore usable with the most common camera brands. I myself have a Canon, though, so I can only demonstrate the settings on my own camera..
Translated from Dutch.
That light weight is becoming more and more of an issue, so perhaps I might switch to a mirrorless camera myself someday! -
 jeroendehaan
wrote on Tuesday 12 September 2017 at 11:49
| reply
For Camera setup, point 5: I wouldn't use sRGB. sRGB has a much smaller color space than AdobeRGB, and that way you "lose" colors (if you shoot in JPEG). Incidentally, the color space has no effect if you shoot RAW.
Translated from Dutch. -
Michelle Peeters wrote on Tuesday 12 September 2017 at 11:51
| reply
@Jeroen: but Adobe RGB or even better still isn't supported by many print labs and browsers, right? That last part is indeed correct, by the way!
Translated from Dutch. -
 Henk wrote on Tuesday 12 September 2017 at 13:15 | reply
I too would like some more information and guidance about mirrorless cameras.
Translated from Dutch.
More and more photographers are switching to mirrorless or bridge cameras. -
 kok.f@ziggo.nl wrote on Tuesday 12 September 2017 at 13:31
| reply
Good article, but I have my doubts about tip 6 (noise reduction on for long exposures). If you do a lot of evening and night photography, or work with ND filters, then the waiting time is very annoying. Imagine having made a 4-minute exposure, then your camera is unusable for the same amount of time afterwards. Lightroom does that noise reduction just as well for you.
Translated from Dutch. -
 Rawshooter wrote on Tuesday 12 September 2017 at 14:47 | reply
Michelle: so sRGB is supported by print labs after all? And what does the browser have to do with the color space you shoot in? The largest possible color space gives you more room to edit. You then save as jpg in sRGB.
Translated from Dutch.
An article full of contradictions, especially when it comes to jpg settings while advising people to work only in RAW. I wonder if a beginner understands that. I certainly don't. -
 Evert wrote on Tuesday 12 September 2017 at 14:54 | reply
The disadvantage of RAW is mentioned less often, but if I have a RAW photo and want to save it as a JPG, the photo often loses its value anyway. That is a disadvantage if you want to make a photo album. To what extent does this happen with a Polaroid or Lumix camera
Translated from Dutch. -
 Marc wrote on Tuesday 12 September 2017 at 15:40 | reply
To avoid having to constantly change the "Autofocus Mode" I have been using the "Back Button focus" button for a very long time. Can be set on most cameras. My "Back Button focus" button is set to AI SERVO.
Translated from Dutch.
More info about "Back Button focus". -
 THea wrote on Tuesday 12 September 2017 at 16:34 | reply
I found it very educational,
Translated from Dutch. -
 Dick J wrote on Tuesday 12 September 2017 at 16:34 | reply
It's a shame that in the item "Best aperture opening" the photos are actually in the wrong order compared to the text :(
Translated from Dutch. -
Rawshooter wrote on Tuesday 12 September 2017 at 17:22 | reply
Evert: every raw shot that is saved as jpg loses information. With a jpg shot, that is already done in the camera. It is a myth that a jpg from your camera would be better than a self-edited jpg from a raw shot. The opposite is true, as long as you know how to edit.
Translated from Dutch. -
 Jos wrote on Tuesday 12 September 2017 at 17:27 | reply
Just a comment on those photos of Albert Einstein.
Translated from Dutch.
To clarify, it would have been better to mention which photo was taken with Aperture 2.8 and which with F22.
In the photo on the left, everything is sharp, including the background, so it was shot at F22. In the photo on the right, only the foreground is sharp (also called bokeh), so it was shot with an aperture of F2.8. This is just for clarification -
 Lauran van Schilt wrote on Tuesday 12 September 2017 at 17:38 | reply
I still don't understand people who make such an issue of the weight. It's wonderful to hold a camera with a lens of outstanding quality. It actually gives me stability. My advice: spend money on a good backpack too. (Lowepro)
Translated from Dutch. -
Evert wrote on Tuesday 12 September 2017 at 17:46 | reply
I know perfectly well how to edit a photo, I have been able to learn all that reasonably well here. But even if I do nothing to a photo, I still see that when I only convert it, the JPG is different in terms of color or brightness, so to speak, than the NEF. If I get both the NEF and the JPG from my camera (I have two cards), I see on the PC that the NEF and JPG are identical in terms of brightness. Is this then caused by Lightroom itself?
Translated from Dutch. -
RAWshooter wrote on Tuesday 12 September 2017 at 20:10 | reply
Evert: So you DON'T know how to edit. It's not Lr's fault, but the person pressing the buttons.
Translated from Dutch. -
Michelle Peeters wrote on Tuesday 12 September 2017 at 20:25
| reply
@Rawshooter: yes, sRGB is supported by print labs and by virtually all browsers. So at least you know that your colors are correct, which is not unimportant either! When exporting, it is therefore important to realize what you are going to use your JPGs for. In any case, always keep your RAW files because all the info is still in them, should you run into problems.
Translated from Dutch.
@Evert: could it be that certain settings are automatically 'on' in Lightroom when you export? I don't know whether 'convert only' is actually an option. -
 Carolina wrote on Tuesday 12 September 2017 at 20:56 | reply
Can you also use exposure compensation when photographing at dusk? I recently photographed at the finish of a running race and it ended almost in the dark. I now had a lot of noise due to the high iso.
Translated from Dutch. -
Michelle Peeters wrote on Tuesday 12 September 2017 at 21:01
| reply
@Carolina: It will undoubtedly be possible, but I think it is quite unusual. I often use exposure compensation ('plus' and 'minus') for backlit shots, where your main subject is then properly exposed and the background overexposed (the latter is less of a problem because it is about your subject, so you make a choice). Honestly, I think a higher ISO value is the only option, since you want to photograph moving subjects in almost darkness. So slow shutter speeds are out.. Another option might be using flash, preferably off-camera!
Translated from Dutch. -
Michelle Peeters wrote on Tuesday 12 September 2017 at 21:05
| reply
@kok.f: those long wait times with 'long exposure noise reduction' are indeed annoying and are caused by 2 photos being taken (a 'black' one and a normally exposed photo), so that the noise can easily be filtered out. You won't achieve such a good result in post-processing..
Translated from Dutch. -
RAWshooter wrote on Wednesday 13 September 2017 at 08:18 | reply
Print labs work in CMYK. That color space only partially overlaps the sRGB gamut.
Translated from Dutch.
Exposure compensation during twilight is not unusual at all. Your camera will automatically overexpose during twilight to keep the entire scene "middle gray". That is why it is actually very good to use compensation to expose less. The ISO value has nothing to do with that, it only plays a role if the shutter speed would become too long. -
guest wrote on Wednesday 13 September 2017 at 08:31 | reply
Read the whole story and there are many useful tips for beginners in it. Still, I would like to comment on a few tips.
Translated from Dutch.
Michelle, you advise shooting in RAW. In itself, that is also the best way to photograph, but is it actually good advice? RAW ALWAYS needs post-processing and I doubt whether a beginner can do that. He/she then needs to have editing software and also be able to work with it, otherwise he/she will do more harm than good. My advice to a beginner would be: start photographing in jpg to get to know the camera well and then switch to RAW.
Then the picture style. You advise setting it to standard, after all, if you shoot in RAW it has no effect on the photo anyway. True, but given the previous tip I would advise setting the picture style to neutral as long as you are still shooting in jpg. You can still make corrections to contrast etc. afterwards.
The best aperture, in my opinion, depends on the type of lens (wide-angle, standard, telephoto) and how much depth of field you want to have. It also always affects the shutter speed. You do not want motion blur and depending on the type of lens you need to shorten the shutter speed to prevent motion blur. Image stabilization gives you a bit more leeway in this regard. The quality of the lens (glass) also plays a major role when setting the best aperture, but generally speaking, most lenses give their best performance in terms of sharpness, vignetting, depth of field at apertures from f8 to f11. -
Michelle Peeters wrote on Wednesday 13 September 2017 at 09:37
| reply
@Guest: good tips, thanks! I did understand that all digital photos need to be edited. Sharpening must always be applied because digital files are by definition somewhat unsharp. If you shoot in JPG and use a neutral picture style, then that's an extra incentive to start editing right away (in any case, adjust the levels a bit to make the photos less 'muddy'), so I think that's a really good one!
Translated from Dutch. -
Michelle Peeters wrote on Wednesday 13 September 2017 at 16:54
| reply
The article: Improving your photos in post-processing in 8 steps may be useful to read!
Translated from Dutch. -
jeroendehaan
wrote on Wednesday 13 September 2017 at 17:19
| reply
@Michelle: if all is well, your print lab reads the profile embedded in your file. If it can't find a profile, they assume it's sRGB. Best thing is of course to check the FAQ of your fave print lab. For websites, sRGB is indeed better/ideal, but you're not going to put unedited hi-res images on there (if all goes well)...
Translated from Dutch. -
Michelle Peeters wrote on Wednesday 13 September 2017 at 17:24
| reply
@Jeroen: you mean the print profile? You can indeed embed that in your photo file. But there are (I think) only a few print labs that do that. I know for sure that Profotonet does!
Translated from Dutch. -
 Gerard wrote on Wednesday 13 September 2017 at 21:21 | reply
I read the entire article with great interest. My compliments. However, I have a Nikon 7200 and these settings do not correspond with Canon. So it does take some searching with all those abbreviations.
Translated from Dutch.
I hope more articles like this will follow. There is still a lot to learn for amateurs like us. My thanks -
 Raymond wrote on Wednesday 13 September 2017 at 21:31 | reply
@Michele: I think you have written a good article for the target audience and that there is quite a lot of "taking the piss" in the reactions. Seems like people either didn't read the title of your post or didn't understand it. As a beginner you simply give the key tips clearly and for the people who want to experiment or are already a bit further along, they can move forward with the advanced tips in your post. It's just how many people interpret the info in your post. Your post is clear: info for real beginners who can / want to also look at the advanced techniques.
Translated from Dutch. -
Michelle Peeters wrote on Wednesday 13 September 2017 at 22:56
| reply
@Gerard: Canon and Nikon don't differ that much, you know:
Translated from Dutch.
With Canon it's called 'One Shot', with Nikon AF-S (from Single)
With Canon: AI Focus, with Nikon: AF-A
AI Servo with Canon is called AF-C with Nikon (from Continuous)
The light metering methods are roughly the same: Evaluative, center-weighted and spot metering. -
Michelle Peeters wrote on Thursday 14 September 2017 at 10:36
| reply
@Raymond, thanks! But you don't have to agree with everything, you know, the responses from people who do things differently or have more tips are especially educational!
Translated from Dutch. -
 wim hendriks wrote on Thursday 14 September 2017 at 11:56 | reply
when I shoot in raw I have the problem that I have to edit the photos with Adobe or another program I’m already happy if I take jpeg photos that look good enough to me
Translated from Dutch. -
Michelle Peeters wrote on Thursday 14 September 2017 at 12:17
| reply
@Wim: that's your own choice too, of course! And if you're happy with your photos, that's perfectly fine! But there's so much more to get out of them in post-processing (especially if you shoot in RAW) that once you've started, you won't want anything else! It's a lot of work, that's true, but your photos improve enormously because of it!
Translated from Dutch. -
 Donald Willemsen
wrote on Thursday 14 September 2017 at 17:25
| reply
@Wim, what Michelle says is right. You are clearly not ready yet to edit photos yourself. If photography really is a hobby of yours, there will naturally come a moment when you want more. I would say, enjoy your photos and let others enjoy them too. Also look into online courses on post-processing. There are plenty, and they're free too. Good luck and above all keep photographing.
Translated from Dutch. -
 Chris wrote on Friday 15 September 2017 at 11:55 | reply
All the points mentioned above are also in my mirrorless camera Fujifilm X-T1, you know. Even in its little brother, the X-T10
Translated from Dutch. -

-
Michelle Peeters wrote on Friday 29 September 2017 at 10:30
| reply
@Kmpoel:
Translated from Dutch.
Stabilizer mode 1 works in both vertical and horizontal directions of movement. If you are working handheld (so not from a tripod), this is the best option.
Stabilizer mode 2 is used when panning from a tripod; the stabilizer only compensates for horizontal movements, not vertical ones (since the camera does not move vertically when working from a tripod). -
 kees wrote on Friday 5 January 2018 at 21:01
| reply
@Michele
Translated from Dutch.
I see that this topic was created quite some time ago. I think it is well written. I switched from a Canon 1000D to a Nikon D5200 with an 18-105 mm lens. Don't ask me why the switch from Canon to Nikon. I still have a click with the D5200. I can also count myself lucky to have a 70-200 mm f2.8 VRII. The lens is really worth its money. And the weight, sigh ... a little training works wonders .
Recently during New Year's Eve, the camera on a tripod with the 18-105 mm.
18 mm.
ISO: 100
Shutter speed: Bulb due to remote control.
Photo format: RAW.
Noise reduction: Off
And then just hope that one can take a number of beautiful photos. A few worked out and were edited in Lightroom. I ended up with a number of beautiful photos.
For a quick photo I still sometimes shoot in Jpeg, but otherwise only in RAW and the camera on manual. This way I have control over the camera and not the other way around.
My thanks for your tips.
Kind regards kees
Have your say
Please note: Articles older than a week can only be commented on by signed-in visitors.Would you still like to comment? sign in or create a free account.
Become a better photographer every week
A practical photography tip in your inbox every week.
38,764 photography enthusiasts already receive the tips! More about the weekly mail. Or keep up to date via  Facebook.

Elja Trum
Photofacts; everything to do with photography!
Would you like to take better photos and keep up with what is happening in photography? Photofacts publishes articles that teach you something about photography — from a product announcement to a practical shooting tip or a look at a website. Photofacts covers photography every day and is a hobby project of Elja Trum's that got out of hand. The articles are written by a team of volunteer authors. If you would enjoy writing one or more articles for Photofacts, do get in touch.More about PhotofactsPhotofacts is made possible in part by
