

10 Tips for Beginner Photographers
Monday 26 August 2024, 15:51 by Elja Trum | 231,248 views | 29 commentsThis article was translated from Dutch with the help of AI. Read the original.
When you first start taking photographs, there is a lot to learn: equipment, composition, editing and much more. This article gives beginner photographers ten tips to help you become a better photographer.
1. Equipment is not important
Many photographers, whether they are just starting out or not, often think that a new lens or camera body will allow them to take better photos.
The equipment you use to take photographs is only a small part of photography, so it will only have a small influence on the end result.
Of course, there are subjects or techniques that are easier to handle with certain equipment. A good photographer can take beautiful photos with any camera. A bad photographer will not be able to take a good photo even with thousands of pounds' worth of equipment.
So focus on your photography first and only then look at which equipment can best help you improve.
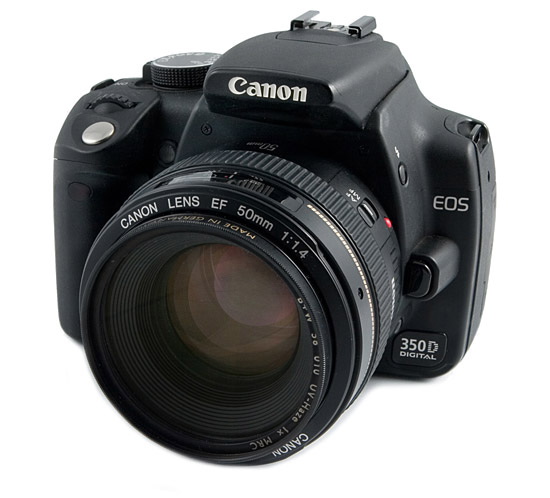
If you really cannot resist looking at equipment, remember that your camera body is less important than your lenses. The right lenses will do more for your photo than a more expensive camera can.
2. Do not let the technology overwhelm you
What applies to equipment is also true of the technology behind photography. You do not need to know all the ins and outs of shutter speed, aperture, ISO and white balance straight away to take beautiful photos.
You learn this best by experiencing it step by step. Do not focus on the technology involved, but remember which setting you need for which effect.
Would you like to build up a basic understanding of setting your camera straight away? Then take a look at the Starting with Photography course on Photofacts Academy. Try the course for free with a 2-week trial membership.
Also try different settings in the same situation. Once you know what happens in practice, it will not be difficult to learn the theory behind it later.
Instead of studying aperture numbers, you can also remember that a lower number, such as f/2.8, means you need less light to take a sharp photo and that your background will easily become blurred.
With a higher number, you need lots of light and almost everything in the photo will be sharp. For light sensitivity, you can remember that a higher ISO value, such as ISO 1600, results in less camera shake in low light, but does cause noise in your photo.
Although there are plenty of exceptions to this basic knowledge, you can get a long way with these basics. As you go along, you will discover what the exceptions are and what can enhance certain things. Do not worry about the technology!
3. Good composition does not have to be difficult
Composition is much more important for most photos than the technology behind them. Whatever setting you use, you can leave your camera on automatic if necessary, your photo will become much more interesting with the right composition.
Composition is the way you choose the image. That sounds more complicated than it is. Just look through your camera's viewfinder, or at the screen, and make sure what you see looks pleasing. You do this by paying attention to a few simple things.
For example, do not place your subject in the middle of the frame, especially not centred horizontally and vertically at the same time. Pay attention to the background. Make sure there are no trees, people or other distracting elements 'sticking out of your subject'.
Another useful tip is to stay at the same height as your subject. This is an important rule, especially when photographing children or pets. Lie or sit on the ground and your photo will immediately be much better. It really is not as complicated as it seems.
The rule of thirds is also a useful starting point for a successful composition. Divide the image into three sections both horizontally and vertically, using two lines. When composing your image, make sure your subject ends up at an intersection of these lines.
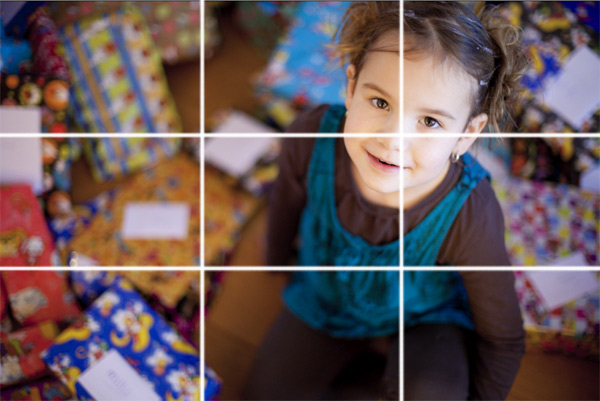
Rule of thirds in practice, and an exception to working at the same height
It is important to know that you can often improve a photo's composition enormously by moving your camera just a few centimetres. So try this too. Move around a little and see how your movement affects the background.
Oh, and rules are meant to be broken. You can always deviate from the rules, which can often produce unusual photos too! Experiment!
4. Take lots of photos
Photography is really no different from anything else. If you want to get good at it, you mainly need to do it a lot. You will not become a good photographer by photographing a holiday twice a year. If you spend two hours on it every day, you will become much better at taking photographs.
Finding a subject to photograph does not have to be difficult. There are more than enough subjects to find in and around your home. You can photograph family members as often as they allow. You can never have enough photos of your family anyway. Excellent practice material.
Cats, dogs and other pets are willing subjects and, unlike family members, will not object as quickly. If they have had enough of your photographic enthusiasm too, move on to objects, from the living room to a single flower from a bouquet. It does not matter, as long as you keep taking photographs.
In his book Outliers, Malcolm Gladwell discusses the 10,000-hour rule. If you spend ten thousand hours on one activity, you will excel at it and become successful. It does not matter what it is. The 10,000-hour rule seems to apply in all fields.
If you have spent ten thousand hours on photography, you will simply be very good at it. It can hardly be otherwise. His book, which is not related to photography at all, is highly recommended, by the way. I really enjoyed reading it.
5. Keep it simple
The best photos are often quiet photos without distracting elements. Do not make it too difficult for yourself and try to keep distracting elements out of your frame. A quiet, simple photo is often very pleasant to look at. Use lines, shapes, repeating patterns, blurred backgrounds and composition to give your photo a sense of calm.
This actually applies to all subjects: portraits, architecture, macro and so on. The calmness in a photo also helps direct the viewer's attention straight to your subject.

6. Keep your camera still
The reason a photo is blurry will usually be movement. Especially when you are not taking photos outside in bright sunshine, movement in your photo is a risk.
Learn how to hold a camera steadily. Use both arms. Support the lens with your left hand, not the camera. Use your right hand to press the shutter button. Keep your arms against your body to prevent as much shaking as possible.
You can use a tripod if you want. For some types of photography, such as macro photography, it is almost impossible without a tripod. For many types of photography, however, you can manage perfectly well without one.
When buying a tripod, do not choose the cheapest one. These are generally unstable and unpleasant to use. As a result, you will not use the tripod very often.
7. Check your settings
It is a good idea to choose a basic setting for your camera. This is the starting point for taking photos. Make sure you know how to get your camera back to this basic setting.
If necessary, start by having another photographer or a shop assistant choose this basic setting for you. The point is that you can always return to this starting point.
Before you start taking photos, set the camera to these basic settings. Think of a low sensitivity, ISO 100, the camera set to P, Av or Tv mode, autofocus enabled on your lens, the file format set to the highest settings, an empty memory card and so on.
By learning this standard setting, you can start experimenting with the settings from there without later losing track of whether you are still using the right settings. It is essentially the basic knowledge of your camera without needing to know exactly what everything is and does.
8. Learn to work with Lightroom
Taking a photo is now only one part of the job. Every photo can be improved with the right editing.
Of course, a good photo is still the preferred starting point, but with that foundation you can make a good photo even better in a short time. You can do this with programmes such as Photoshop or even the free programme Gimp.
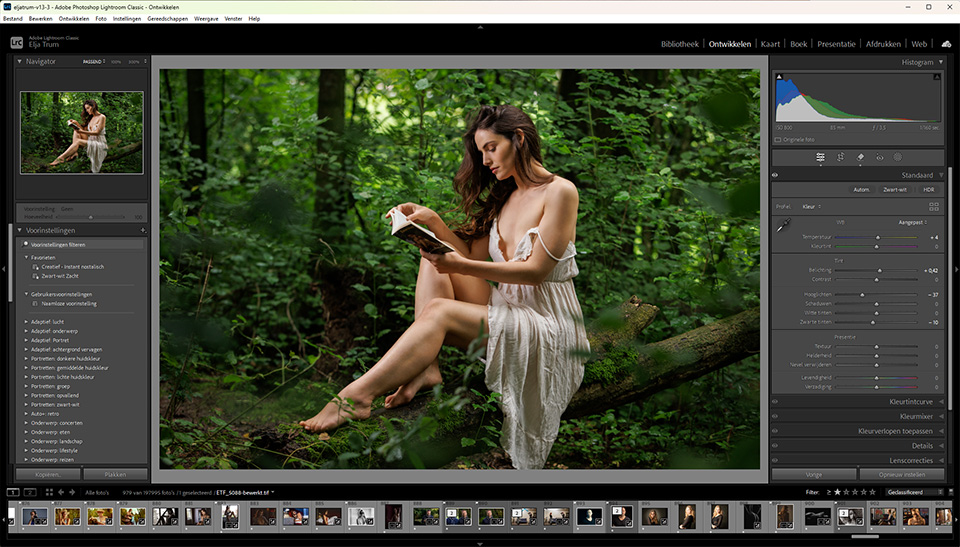
My advice, however, is to take out a membership for Adobe Photoshop Lightroom. Learn how to use it with the help of a book, practical video tutorials or by attending a workshop.
You can then improve photos in just a few seconds, and a programme such as Lightroom also speeds up your entire photography workflow.
9. Take photos in RAW formatMost professional cameras can take photos in what is known as RAW format. This is a raw data file containing information directly from the sensor.
If you take photos in Jpeg, this raw data is converted in the camera into a Jpeg file. Unfortunately, Jpeg can contain much less information than your camera sensor can capture. You therefore lose information.
RAW files are larger than Jpegs, but with the low prices of memory cards and hard drives, this should not be a problem these days.
What is difficult is that every RAW photo has to be converted to Jpeg afterwards if you want to show the photo to someone else. However, you have complete control over this conversion and can get exactly what you want from it.
Right, more about the advantages and disadvantages of RAW has already been published on Photofacts. My advice is to learn to work in RAW in any case!
10. Look, learn and take photos
The internet is full of websites where you can learn more about photography. Instagram, of course, but sites such as 500px and Youpic can also inspire you with the most beautiful photos.
You can of course find useful tips on blogs such as Photofacts. Sign up for the newsletter to stay up to date every week.
Spend some time on these kinds of sites and with other photographers to stay enthusiastic about photography. The most important thing, however, is that you then pick up your camera and start taking photos!
Een eerdere versie van dit artikel is verschenen op maandag 27 december 2010, 23:46.
About the author
Elja Trum is the founder of Photofacts and online photography course website Photofacts Academy. He has been writing about photography since 2006. Elja is also the author of (Dutch) books on composition, black-and-white photography, flash photography and portrait photography.
You might also like
-
 Getting started with photography
by Jerry van Es
-
 5 Beginner Tips for Better Photos
by Nando Harmsen
-
 The basics of photography in 10 minutes
by Elja Trum
-
 Get to know your camera properly
by Nando Harmsen
-
 Advice for beginner photographers
by Elja Trum

29 comments
-
 Jaap B. wrote on Tuesday 28 December 2010 at 09:42 | reply
Very helpful piece. Funny that you say 'don't worry too much about technique right away'. On the one hand, I partly agree with your opinion that people should just get started. But on the other hand, I know so many people who buy an SLR and, after two years, still look at me blankly when I ask them which aperture they used. These people keep shooting in auto mode and therefore also give up when they notice that their photos aren't actually much better than with a point&shoot. And the latter is a lot easier to carry.
Translated from Dutch.
A tip that has helped me a lot: make use of the information available on the internet. There is so much available! And definitely also look on Flickr; search for photos you like and then look at the information to see which settings were used to achieve that result.
And another tip that ties in with your tip 4: take your camera with you everywhere. I have a friend who didn't take his brand-new canon 500d with him when we went to Berlin for a few days because he thought it was 'too much to carry' and I would take my camera with me anyway. Well... -

 Marco Nedermeijer
wrote on Tuesday 28 December 2010 at 10:21
| reply
Marco Nedermeijer
wrote on Tuesday 28 December 2010 at 10:21
| reply
Indeed very useful tips for the (beginning) photographer. And especially tip 1. you can nowadays take fantastic photos with a mobile phone. Following on from Jaap B.: Take your mobile phone everywhere with you
Translated from Dutch. also saves a lot of lugging.
 -
LX wrote on Tuesday 28 December 2010 at 12:57 | reply
Great article Elja, I've noticed that not everything is in my system yet...
Translated from Dutch.
Maybe a bit off-topic, but in the context of tip 8: does anyone know a good Dutch Lightroom book? -

-
 Elja Trum
wrote on Tuesday 28 December 2010 at 15:40
| reply
Elja Trum
wrote on Tuesday 28 December 2010 at 15:40
| reply
@LX; Personally, I think Scott Kelby's Lightroom 3 book is pretty good.
Translated from Dutch.
@Michael; If you're going to work with Lightroom anyway, you might as well do that with RAW, of course.
-
Daniël wrote on Tuesday 28 December 2010 at 15:59 | reply
Nice piece, it's just a shame that item 8 comes with such a high price tag. The "upgrade" price is still attractive enough but if you have to buy a complete version of Lightroom then that's a different story.
Translated from Dutch.
Now this may lie in my powers of persuasion with my financier, commonly known as 'my wife', but he remains high on the wish list.
Maybe I should is look for an old version of Lightroom after all, Suggestions?
First read Black/white(216) is response follows. -
Elja Trum
wrote on Tuesday 28 December 2010 at 17:10
| reply
@Daniël; if you're attending school, or have school-age children, you can also purchase Lightroom more cheaply. Perhaps a solution?
Translated from Dutch.
Anyway, enjoy reading! -
 Eduard A. van Mil wrote on Tuesday 28 December 2010 at 17:40 | reply
I read the 10 tips with interest and because I am a (real) beginning photographer I will certainly be able to benefit from them. During my fairly long stay in the US, I bought an EOS 50D and two lenses (EF 28-135mm 3.5-5.6 IS USM and EF 70-300mm 4-5.6 IS USM) in a package deal. I read and practise every day but for now I am nowhere near those 10,000 hours yet, so I will probably always be known as a beginner.
Translated from Dutch.
It is true that making the first sublime photo is more due to the photographer than to the equipment, but I do notice that I am starting to come up a bit short with these two lenses (because of the crop factor), particularly when it comes to a wide angle. I am also thinking of moving on to fixed focal length lenses, but perhaps I want too much too quickly. For now I am not starting with RAW yet, although the story about it does sound logical.
First I have to get rid of those snapshots and start taking photos. I continue to read the discussions about all sorts of matters with interest, but my MAC book in combination with iLife and therefore iPhoto, (see my (beginner's) site eduardvanmil.com) and photography, can no longer be imagined away. I will continue to follow the stories and learn a great deal from them. Regards. -
 Martin Philippo wrote on Tuesday 28 December 2010 at 21:13 | reply
A standing ovation for the fact that you begin the series with: Equipment is not important. More people should take a look at that. Nice too that you illustrate this with a 350D with a 50 mm, a combination I have done an enormous number of photo sessions with and that I could go back to without sacrificing quality.
Translated from Dutch. -
Daniël wrote on Tuesday 28 December 2010 at 23:53 | reply
@Elja, I'm no longer in school :'( but..... I do have a child who is in school (13 y/o)
Translated from Dutch.
I even knew about this way of buying, but had unfortunately completely forgotten about it again.
Thanks to remind me -
Willem wrote on Wednesday 29 December 2010 at 06:05 | reply
@Elja,
Translated from Dutch.
I don't entirely agree with you on tip 3. if you take a good look at the work of photographer Patricia Steur, 90% of the photos she takes are people in the middle, How can that be!!!!. this is a photographer with a good reputation throughout the world. -
 Peter van Veen
wrote on Wednesday 29 December 2010 at 06:31
| reply
Peter van Veen
wrote on Wednesday 29 December 2010 at 06:31
| reply
Nice series of tips, Elja. I can certainly agree with that. One thing you don't mention, but which I do consider an important point: the camera brand, which you choose for a longer period of time or even forever. That means you're tied to the range of lenses the manufacturer offers. Not that it makes any difference otherwise, but there are always differences.
Translated from Dutch. -
Elja Trum
wrote on Wednesday 29 December 2010 at 14:50
| reply
@Martin; With an inexpensive 50mm lens and an entry-level camera you can indeed take beautiful photos. I therefore always recommend the 50mm when someone is going to buy their first camera.
Translated from Dutch.
@Willem; The exception confirms the rule.
@Peter; After I say in my first point that equipment isn't important, I can hardly start promoting equipment in another point, right. Of course, you can work well with all brands. Aside from that, I would recommend every beginner to get an entry-level Canon or Nikon DSLR. With that 50mm f/1.8 and the kit lens. -
 Reinoud
wrote on Wednesday 29 December 2010 at 19:27
| reply
Reinoud
wrote on Wednesday 29 December 2010 at 19:27
| reply
I do have one addition to point 1: consider buying second-hand. A one-year-old model on Marktplaats or eBay works perfectly well and saves a lot of money.
Translated from Dutch.
And a tip I often give to people who frequently photograph their children and pets: try to be at or below eye level with your subject with your camera -
 Ernst Hartwich
wrote on Friday 21 January 2011 at 15:09
| reply
Ernst Hartwich
wrote on Friday 21 January 2011 at 15:09
| reply
Great list Elja! Especially point 1 is still sometimes forgotten. But whatever equipment you use, it helps if you understand what its possibilities are and also what its limitations are. And you can make use of that. So that lens flare from a cheap lens can also turn out really beautiful, just to name something. Experimenting with those possibilities (or impossibilities) can sometimes produce surprising results.
Translated from Dutch.
Maybe I'm still missing 1 point. Learn what light does in your photo and experiment with it. After all, photography is writing with light.
Less serious but fun is the list of 10 tips from Zack Arias. -
 puttiron wrote on Wednesday 8 January 2014 at 12:01
| reply
puttiron wrote on Wednesday 8 January 2014 at 12:01
| reply
May I add a suggestion for working with Lightroom? Or better: all post-processing on a PC? Make sure you have good lighting and a good monitor. Because if you have been fiddling around for a while under a dim lamp and on an average monitor with mediocre (or no) calibration and/or an incorrect color profile and you finally think you have achieved the ultimate result and have it printed (or do it yourself), then the painstakingly created colors, contrast and so on might well look different from what you had devised earlier on that monitor. A waste of energy.
Translated from Dutch. -
 A.Gooier wrote on Saturday 31 May 2014 at 11:21
| reply
A.Gooier wrote on Saturday 31 May 2014 at 11:21
| reply
Everyone can take photos with a camera with preset settings, but that way you learn nothing about technique. That's why you learn photography best on a camera with basic settings and capabilities, then you're forced to think about aperture, shutter speed, depth of field, et cetera.
Translated from Dutch.
But with knowledge of technique, you're not there yet: composing an image is a craft in its own right. You learn that by doing, or you'll never learn it. -
 Guido Bellens wrote on Tuesday 21 March 2017 at 09:25
| reply
Guido Bellens wrote on Tuesday 21 March 2017 at 09:25
| reply
Very nicely written, Elja.
Translated from Dutch.
I am a beginner photographer and got to know this site through a friend. All the articles are clearly explained, without many difficult terms, and if something specific is mentioned, you always have a corresponding link with an explanation.
In short, I am sure that thanks to you I get extra information and can improve myself as a photographer.
Regards. -
 DRoeten wrote on Saturday 19 May 2018 at 03:51
| reply
DRoeten wrote on Saturday 19 May 2018 at 03:51
| reply
Dear Elja,
Translated from Dutch.
First of all, I want to thank you incredibly much for the 10 useful tips you have shared with us!
Actually, I have been involved in photography since I was 16.
Besides the fact that it is very creative work, I love sharing my photos with others, allowing me to show them my perspective. Seeing things just a little differently than most people, you understand? Seeing things differently makes you unique.
Even though I only take photos with my iPhone, I often receive compliments. Besides the compliments, people also recommend that I really do something with it. Because of my education and other interests, I have left photography aside.
Now I am 21 and I have finally finished my education. After reading your blog, you have certainly inspired me to start delving into photography again. I am also definitely planning to buy a 'real' camera soon to pick up my passion for photography again.
Once again, I want to thank you incredibly much for your tips.
Danny
Question: What kind of camera would you recommend to me? -
Elja Trum
wrote on Thursday 24 May 2018 at 10:28
| reply
@DRoeten; Which camera is interesting for you depends a lot on your needs and budget. What do you want to photograph with it?
Translated from Dutch.
In general, I can say that I think a mirrorless camera is a smart choice at the moment. For example, a Sony or a Fujifilm. I think Fujifilm is the more affordable choice here. -
 Eves wrote on Thursday 24 February 2022 at 13:29
| reply
Eves wrote on Thursday 24 February 2022 at 13:29
| reply
Written in an interesting way and nice to read! I am gathering a lot of information on the internet because I would also really like to start with photography. Actually, mainly the equine photography aspect, so lots of action photos. I think mainly purely as a hobby, but which lens and body are ideal for this? Since it is not professional either, preferably equipment that remains fairly affordable too.
Translated from Dutch. -
Elja Trum
wrote on Thursday 24 February 2022 at 13:44
| reply
@Eves; Most cameras should be able to handle this subject just fine, so you can let your budget determine it. I can imagine that a telephoto lens would be useful as well. Those can be expensive, but if you mainly expect to photograph on sunny summer days, an affordable 70-300mm telephoto lens can work just fine.
Translated from Dutch.
A lot depends on your budget. -
 Donald Willemsen wrote on Tuesday 27 August 2024 at 11:16 | reply
Quote: 'You don't have to be fully familiar with the ins and outs of shutter speed, aperture, ISO and white balance right away to take beautiful photos.'
Translated from Dutch.
I think you do indeed need to know something about the relationship between the 'holy trinity ' (aperture, shutter speed and ISO). Nando also confirms that in his courses, including the one about photographing with long shutter speeds.
I completely agree with that. You cannot get around the fact that when you change the aperture, for example, it affects the shutter speed and/or ISO value. Besides a desired DoF, you also want to have a correct exposure. By setting the camera to fully automatic, you learn nothing about that relationship. A good photo also stands or falls with that relationship, no matter how beautiful the composition is.
I realize wit that the above article is already an old article that has been taken out of the cupboard again. It seems sensible to me to take certain tips under scrutiny and possibly rewrite them. The article is certainly worth looking at again and adapting to the latest new developments. -
Elja Trum
wrote on Tuesday 27 August 2024 at 16:06
| reply
I went through the article completely and updated it before republishing it.
Translated from Dutch.
Of course you want to know what shutter speed, aperture and ISO do, but that can also be perfectly fine after you've already been happily taking photos for a few weeks/months.
Look at how many beautiful photos are taken with smartphones. Generally, you are not concerned with the technique at all. Only with seeing light and composition.
I think that as a beginner photographer, it is perfectly fine not to be concerned with the technique at first. If you enjoy your photography, then the interest in the technique behind it - in order to be able to take better photos - will come naturally. -
 Jan-Karel Kok wrote on Tuesday 27 August 2024 at 12:53 | reply
Learn to work with Affinity Photo (or Darktable=free). Lightroom is expensive!
Translated from Dutch. -
-
Donald Willemsen wrote on Tuesday 27 August 2024 at 15:55 | reply
Elja, totally agree with you.Moreover, for those 12€ you get not only Photoshop and Lightroom, but also other apps for, for example, tablet and smartphone + 20GB external storage.
Translated from Dutch. -
 Liesbeth Verkade wrote on Tuesday 27 August 2024 at 19:03
| reply
Liesbeth Verkade wrote on Tuesday 27 August 2024 at 19:03
| reply
Hi Elja, good to read everything once again, even though I've already been doing photography for many years by now.
Translated from Dutch.
I have a question about something you mention under point 7:
autofocus enabled on your lens. It seems important to me to mention that you should also switch off the image stabilization. By not doing that, photos regularly 'failed' for me in the beginning. -
Liesbeth Verkade wrote on Tuesday 27 August 2024 at 22:26
| reply
Oops, read it wrong.
Translated from Dutch.
I read 'tripod' and then you have to switch off image stabilization. Switching on autofocus on the lens is of course very useful.
Have your say
Please note: Articles older than a week can only be commented on by signed-in visitors.Would you still like to comment? sign in or create a free account.
Become a better photographer every week
A practical photography tip in your inbox every week.
39,027 photography enthusiasts already receive the tips! More about the weekly mail. Or keep up to date via  Facebook.

Elja Trum
Photofacts; everything to do with photography!
Would you like to take better photos and keep up with what is happening in photography? Photofacts publishes articles that teach you something about photography — from a product announcement to a practical shooting tip or a look at a website. Photofacts covers photography every day and is a hobby project of Elja Trum's that got out of hand. The articles are written by a team of volunteer authors. If you would enjoy writing one or more articles for Photofacts, do get in touch.More about PhotofactsPhotofacts is made possible in part by
