

Extra depth of field with focus stacking
Thursday 13 December 2018, 12:29 by Michelle Peeters | 16,113 views | 7 commentsThis article was translated from Dutch with the help of AI. Read the original.
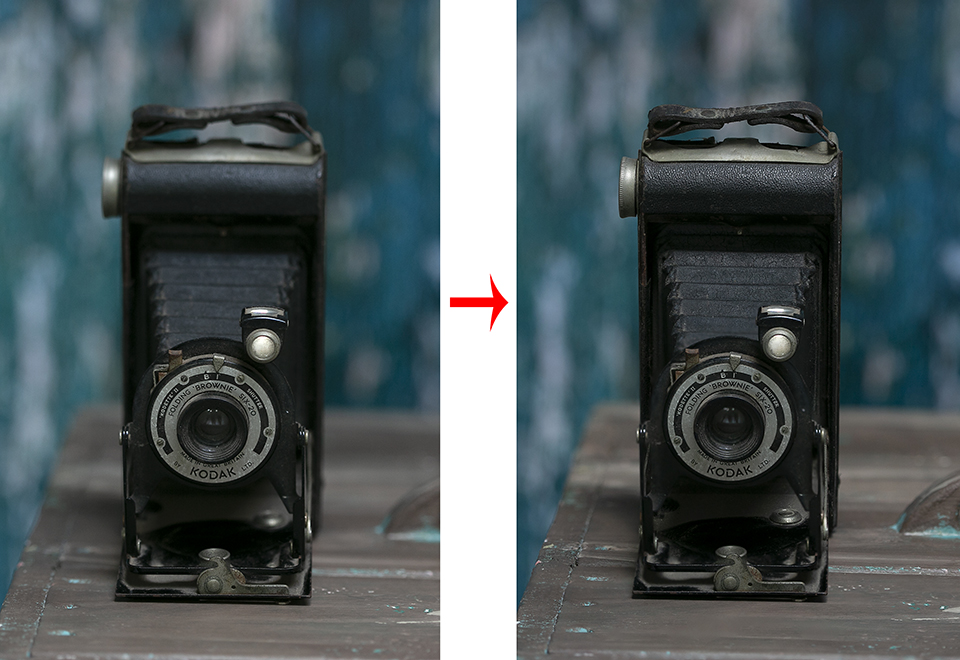
Even with more expensive cameras, you sometimes run up against the limits of what is possible in terms of sharpness. Focus stacking is a technique that lets you create the image you had in mind after all. In this article, an explanation of how it works in Photoshop.
Sooner or later, you will run into impossible situations as a photographer. Camera technology simply has its limits. Combining several different photos can be the solution.
Focus stacking is a way to increase the sharpness in your photos. It does require you to work carefully, though.
Especially for macro photography
Sharpness is an important issue in photography anyway, and sometimes you want even more sharpness in your images than the laws of physics allow.
Macro photographers in particular run into this limitation (insufficient depth of field), because they enlarge their subjects considerably and are often very close to them.
The area of sharpness is therefore often very small, or even too small. No matter how small the insects you photograph are, you still want them to be completely sharp. Flowers also look better when they are completely sharp in the image, rather than having just a few stamens in focus.
A smaller aperture (higher f-number) is often not the solution, because you are frequently so close to your subject. And of course you don't want to lose your beautiful, calm and blurred background.
The problem doesn't only occur with macro photography. Even in landscape photos, sharpness at the back of the image decreases with a small aperture. Many photographers stick to the sweet spot (an aperture of around f/11), because sharpness starts to decrease at an even smaller aperture (higher number) due to diffraction.
Stacking
With focus stacking, you take a number of photos in which the focus shifts each time. You combine the photos into one image in which your subject is sharp from top to bottom.
It would be impossible to take such an image in one go while still making it look believable. If you apply focus stacking properly, you won't be able to see it, which is of course exactly what you want as a photographer.
Working accurately
If you want a natural-looking end result, you will have to work very precisely. All the photos you take must be properly sharp. A tripod is therefore essential to prevent movement, and also because the different images must have exactly the same composition.
Otherwise, Photoshop will run into problems when the images are placed on top of each other. You will also need to use the self-timer or a remote control.
Focus manually and very precisely. This also prevents any movement caused by the autofocus motor. Finally, make sure the exposure is the same in all the photos. So use the same shutter speed, aperture and ISO setting for every shot.
Editing in Photoshop
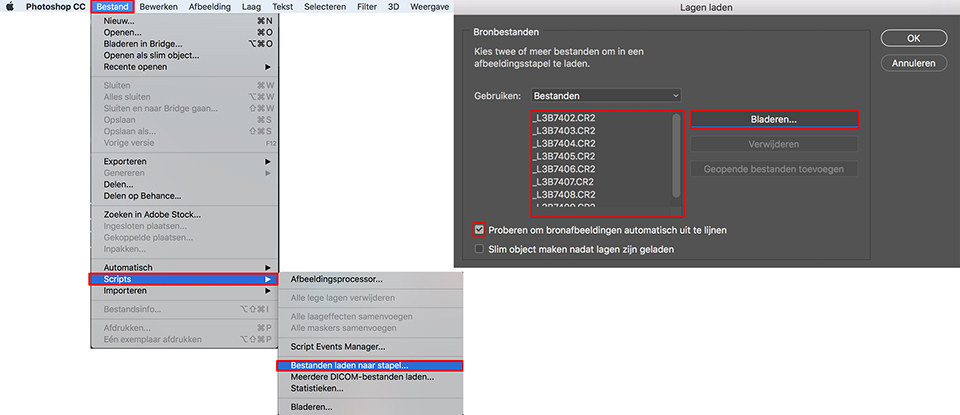
- Open the photos you took, moving the focus point a little further back each time. Photoshop loads the different files separately next to each other. You can also select the photo files later (see the screenshot above);
- The separate files now need to become one image (they need to be stacked). Choose File, Scripts, Load Files into Stack. A dialogue box appears in which you choose Add Open Files (in my case, I chose Browse because I hadn't opened the photos beforehand).
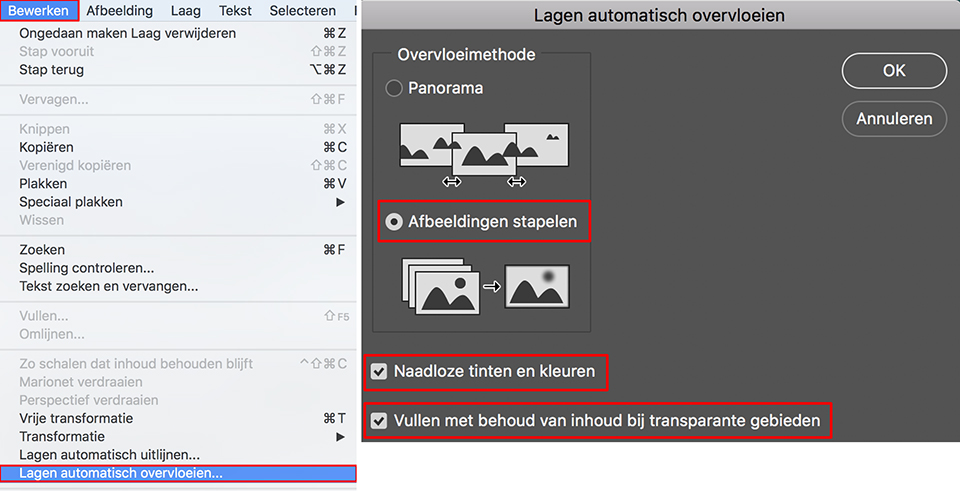
Leave the tick next to Attempt to Automatically Align Source Images enabled. The photos are now stacked into one document; - The photos are now stacked and these layers need to be merged. Choose Edit, Auto-Blend Layers. In the dialogue box, choose Stack Images. Leave the ticks next to Seamless Tones and Colors and Content Aware Fill Transparent Areas enabled;
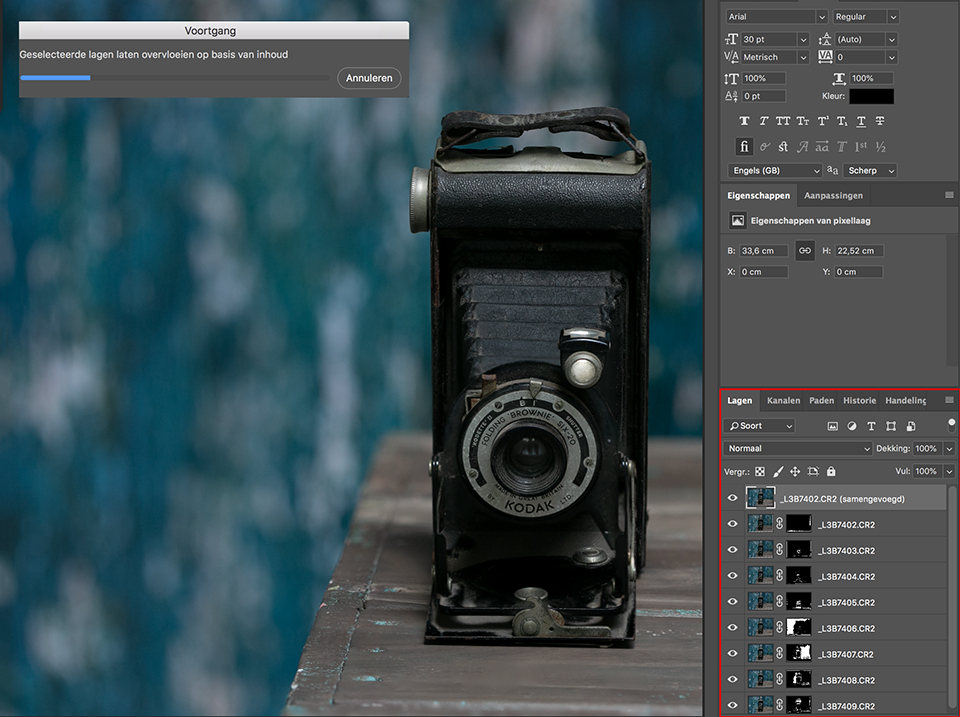
- The process will probably take a while (depending on your computer's processing power and the number of photos), but if everything goes well, you will see a great result. Photoshop has combined the sharp parts of all the photos into one photo in which the antique camera is shown completely sharp.
Conclusion
I am very enthusiastic about this technique. I hadn't tried it before, and really I should have tested it on photos of a macro subject (a heavily enlarged insect or something similar), rather than on an antique camera that I photographed with a macro lens.
That will definitely happen in the short term, though!
Want to know more about focus stacking?
Would you like to know more about focus stacking? In the Macro Photography course, nature photographer Johannes Klapwijk also shows you how to apply it to your photos.
With a free trial membership, you can watch the complete course, or just the video about focus stacking, straight away.
Want to know more about Photoshop editing?
At Photofacts Academy, our online learning environment for photographers, we have several courses about Adobe Photoshop.
- Photoshop for Beginners (Johan Elzenga)
- Photoshop for Photographers (Piet van den Eynde)
- Photoshop for Advanced Users (Marit Hilarius)
- Photoshop Effects (Elja Trum)
And many more...
You can take these courses for two weeks with a free trial membership.
About the author
Michelle Peeters is fotografe en oprichter van DeuxBleus Fotografie. Michelle herkent het bijzondere in het gewone en het gewone in het bijzondere. Ze heeft zich nooit willen specialiseren en is daardoor van alle markten thuis.
You might also like
-
 Review: StackLab for focus stacking
by Nando Harmsen
-
 To stack or not to stack
by Erik Nevels
-
 The term system camera is being used incorrectly
by Nando Harmsen
-
 How does focus stacking work?
by Michelle Peeters
-
 Which is better? Stacking or noise reduction?
by Nando Harmsen
-
 Not enough depth of field in your landscape? Use focus stacking.
by Nando Harmsen
7 comments
-
 Tiem Meijering wrote on Tuesday 28 August 2018 at 10:22 | reply
There are cameras with which you can apply focus bracketing, so you only have to focus once and the camera takes as many photos as you want, with the focus point shifted each time. And there are also several programs for stacking the photos. And there are cameras where the stacking of 8 exposures is done in the camera itself. It surprises me why you don't also mention these possibilities. That would make your story much more complete after all!
Translated from Dutch. -
 guest wrote on Tuesday 28 August 2018 at 10:57 | reply
Just like I work, especially fun with product photography and architecture...
Translated from Dutch. -
 Rob wrote on Tuesday 28 August 2018 at 15:10 | reply
I use Helicon Remote. It controls my camera so I don't have to focus and press the shutter manually
Translated from Dutch. -
 Rieks wrote on Tuesday 28 August 2018 at 17:11 | reply
I think this is a fun and interesting article in any case. Logically and clearly written. I don't have Photoshop installed on my PC, I have been a Paint Shop Pro user since version 2.42, by now having reached version 2018. PSP will certainly also offer a possibility for this type of bracketing. I am going to look this up in any case, otherwise I guess I'll just have to install Photoshop. Can this also be done in Lightroom? Fun, experimenting with the camera and the computer again
Translated from Dutch. -
 Footootje wrote on Tuesday 28 August 2018 at 22:01 | reply
RIEKS' question was already on the tip of my tongue, because I also work -and am very satisfied- with PSP instead of that expensive and difficult Photoshop. But how do I stack in PSP ? Another question would then be why PSP is not used more often in photography magazines etc. I have now left my favorite magazine ZOOM because they only work with Photoshop.
Translated from Dutch. -
 Hans den Boer wrote on Wednesday 29 August 2018 at 05:47 | reply
The need for focus stacking only increases when using newer cameras (read: more pixels). Not only because of the higher resolution, but also because of the higher pixel density, which causes diffraction to occur even sooner.
Translated from Dutch.
A number of newer cameras offer the option to automatically create a focus stack (Nikon D850, the new Nikon Z7, Fuji GFX etc.). Here you can enter both the range and the number of shots you want to take. With “older” cameras, manual focusing is a perfectly good option.
Incidentally, the stacking option in Photoshop is nice, but in practice it often falls short with complex photos. That is also why I stopped using Photoshop for this years ago. For optimal results, you really do need to use a program like Heliconfocus or Zerene stacker, which not only provide a better result, but also allow you to choose from different algorithms. -


Have your say
Please note: Articles older than a week can only be commented on by signed-in visitors.Would you still like to comment? sign in or create a free account.
Become a better photographer every week
A practical photography tip in your inbox every week.
38,886 photography enthusiasts already receive the tips! More about the weekly mail. Or keep up to date via  Facebook.

Elja Trum
Photofacts; everything to do with photography!
Would you like to take better photos and keep up with what is happening in photography? Photofacts publishes articles that teach you something about photography — from a product announcement to a practical shooting tip or a look at a website. Photofacts covers photography every day and is a hobby project of Elja Trum's that got out of hand. The articles are written by a team of volunteer authors. If you would enjoy writing one or more articles for Photofacts, do get in touch.More about PhotofactsPhotofacts is made possible in part by
