

How to cut out product photos
Wednesday 12 December 2018, 21:22 by Michelle Peeters | 23,981 views | 16 commentsThis article was translated from Dutch with the help of AI. Read the original.
Once you have managed to take good product photos with a background that is as white as possible, as much depth of field as possible, as few hard shadows as possible and perfect exposure, it is time for post-processing.
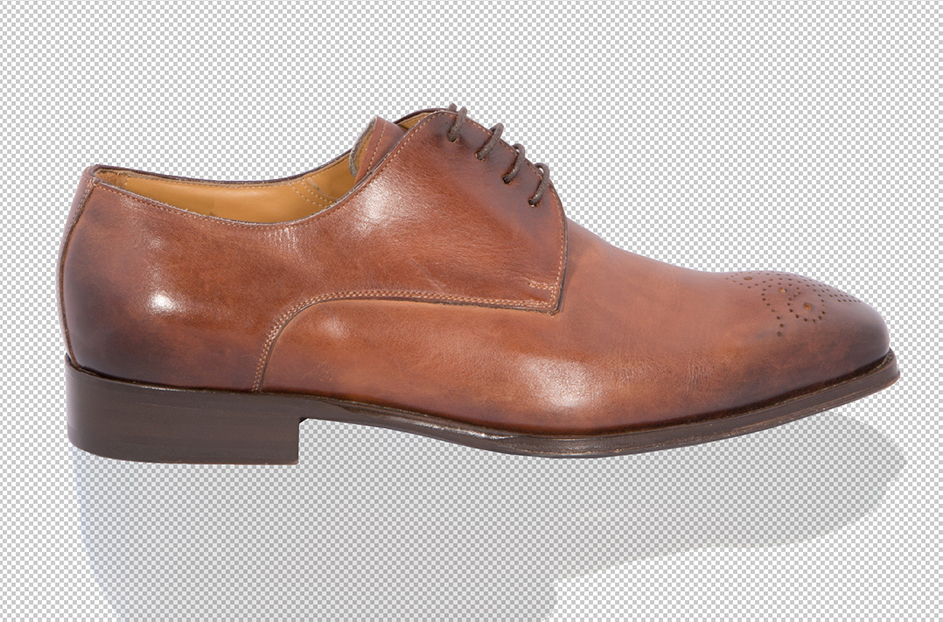
Your client wants a 100% white background, perfect cut-outs and product photos positioned in exactly the same way. Sometimes with a transparent background!
In this article, I will show you one way to make your background 100% white in Photoshop (1). Then a method for cutting out your product photo with a transparent background (2).
When you remove your background completely, you also lose all shadows and/or reflections, making it look as if your product is floating. So finally, I will also show you a method for adding both shadows and reflections back in (3 and 4).
1. Making the background 100% white
I found a very useful article by Elja: Putting a product photo on a truly white background. This works better than my own method, selecting the background and clicking with the white eyedropper in Levels, which makes the background pure white while the subject itself is 'spared'.
Below, I will show the steps from Elja's article one by one and illustrate them with screenshots. First, copy the entire image to a new layer (CRTL-J). Then open the 'Curves' window (CRTL-M or Image -> Adjustments -> Curves).
Drag the diagonal line, click on the point and hold down the mouse button, towards the top-left corner of the box. Keep going until the original greyish background is pure white.
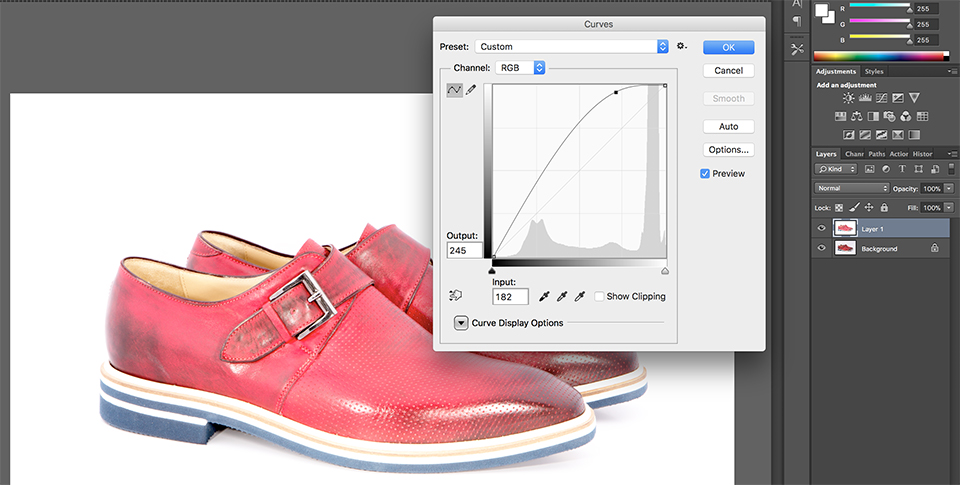
Drag the diagonal line, click on the point and hold down the mouse button, towards the top-left corner of the box. Keep going until the original greyish background is pure white. When the background is bright white, click OK.
The object itself will now also be far too light. We will fix that in the next step. If you are not sure, check whether the background really is white by moving the eyedropper (Eyedropper tool; key: I) over the white area and checking whether the result in the colour picker is '#ffffff'.
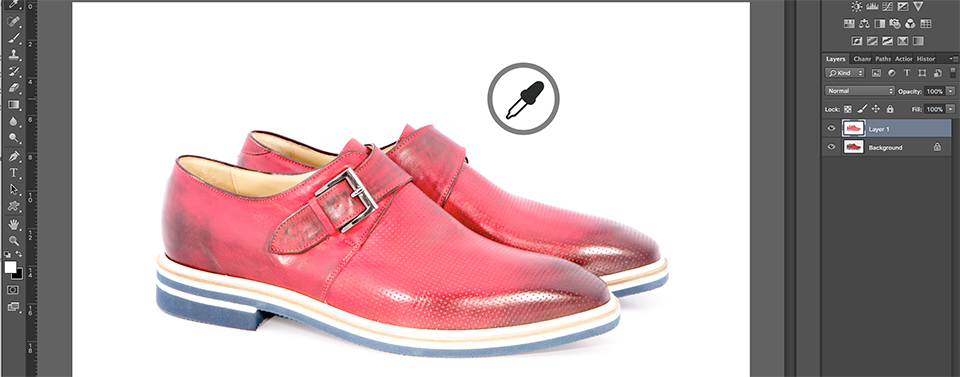
Add a layer mask to the top layer, the one you have just made lighter. Layer -> Layer Mask -> Reveal All. Select a soft black brush and roughly paint over your object. You can start with a relatively large brush for the larger areas of the object.
As soon as you draw in your mask with the black brush, the original image underneath appears. If you go outside the edges and include too much of the background, you can use a white brush to make the mask opaque again.
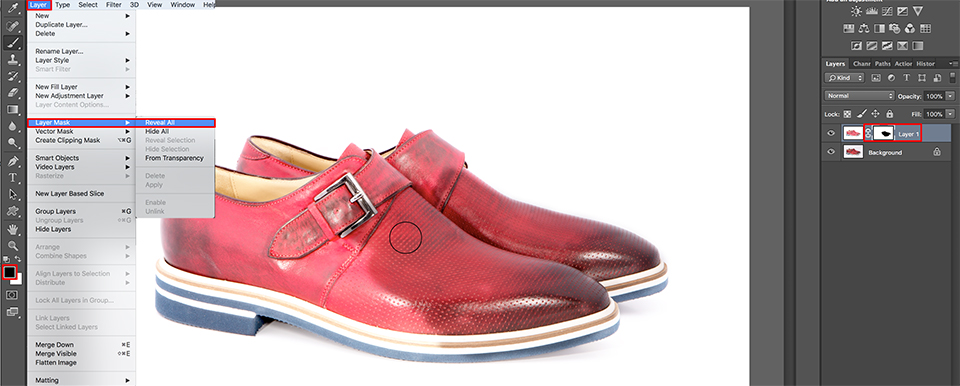
Work towards the edges with an increasingly smaller brush. You can bring back most of it with a few broad strokes. In the end, use a small brush to finish the outer edge.
When you are completely happy with the image, you can merge the layers again (CRTL-E).
2. Cutting out the product
I use the 'Quick Selection' tool (W) to select the white background. Photoshop does most of the work here. First, double-click the background to turn it into a 'real' layer.
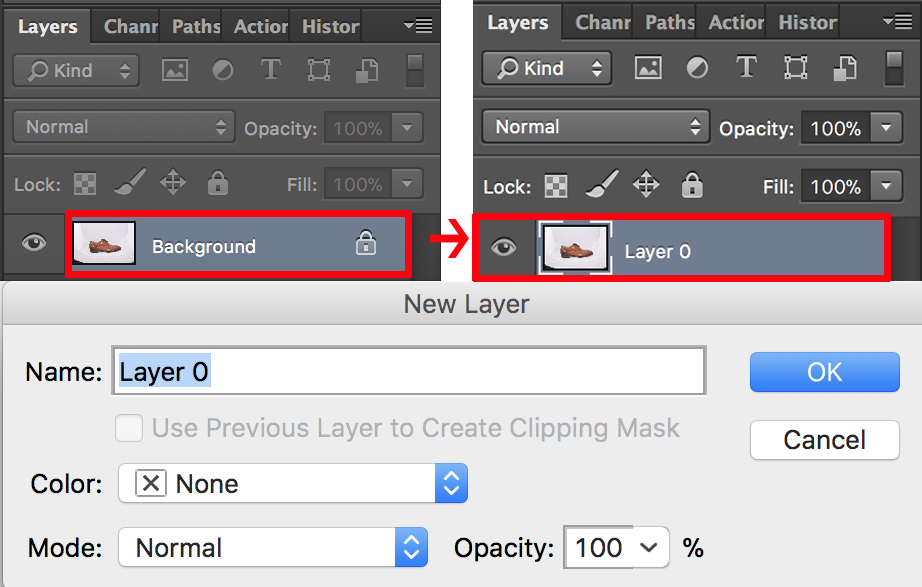
After pressing W, choose Quick Selection, which is combined with the Magic Wand, and simply paint over the background to select it. The selection appears as soon as you start painting.
At first, it looks as if it is doing a poor job, but after a few moments it analyses the edges of the object again and then recovers quite well.
If something goes wrong and it selects too much, hold down the Alt key and paint over the part that you do not want to select. The clearer the edges are, the better it works. Zoom in to check that the edges of the shoe have not been selected as well.
When you are happy, press the Backspace or Delete key to remove the background. The background layer is now grey and white checkered. Fine-tune the result with other selection tools, such as the Pen or Eraser tool (E), to remove any remaining pieces of background.

After removing the background layer, save the file in PNG format so that the background remains transparent. This does not work in JPG format. You have now lost all shadows and/or reflections! You can add these again during post-processing.
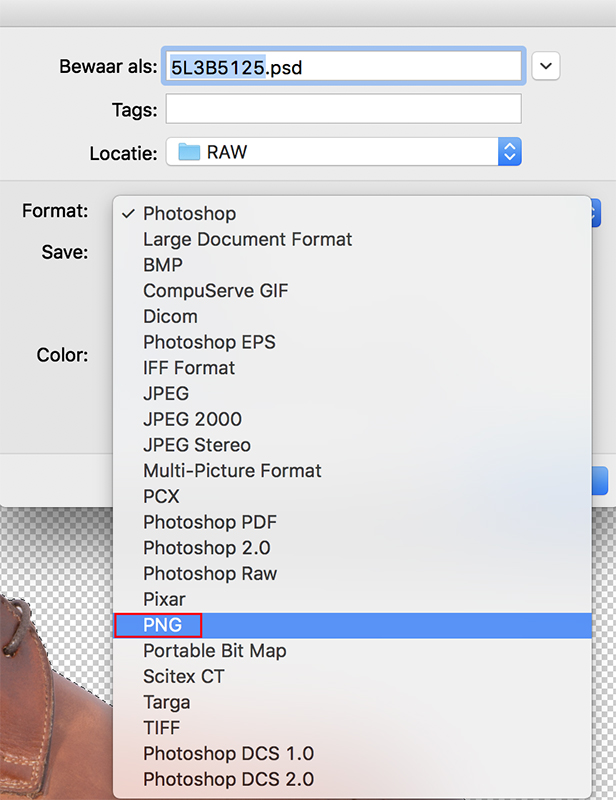
3. Creating reflections
Select the shoe with the 'Quick Selection tool' (W). Right-click and select 'Layer via Copy' to place this selected area on its own layer. Then press Command-T (PC: Ctrl-T) to activate 'Free Transform'.
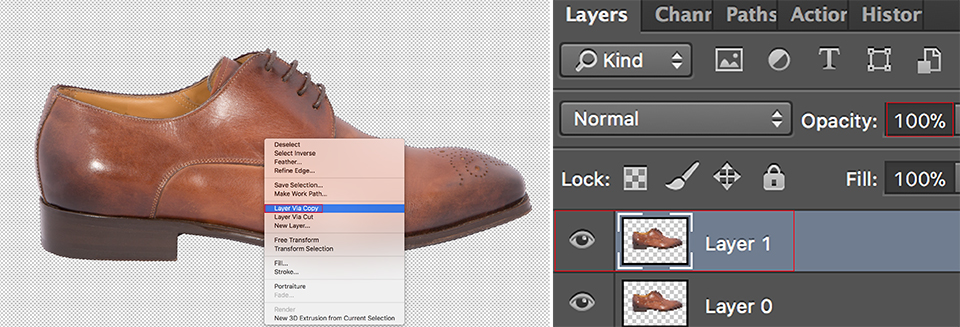
Right-click somewhere inside the selection box and choose Flip Vertical from the shortcut menu that appears, to turn the image on this layer upside down. Press the Return or Enter key to apply the transformation.
Now switch to the 'Move' tool (V) and move the layer until it is nicely aligned underneath the shoe. Then add a layer mask to the copied and flipped layer (Add layer mask).
Now select the 'Gradient tool' (G), make sure that black and white are selected in the colour palette at the bottom left and use the transparent mode in the gradient panel at the top left.
Use the Gradient tool to draw a vertical line, hold down Shift, from just above the bottom edge of the canvas to the top edge of your copied layer.

Your reflection is almost ready. Now adjust the opacity of the copied layer to around 40%. This makes the reflection look much more natural.
Leave a small white edge between the two layers. This emphasises the reflection. Make sure your reflection is subtle and does not overpower the image. The reflection should give the whole image a fresh look, not make it heavier.
Some products are better suited to a reflection than others. Shoes with raised soles are tricky. You will also need to create some shadow underneath to make it completely convincing. A bottle standing flat on the ground is easier!
4. Creating a drop shadow
Select the shoe with the Quick Selection tool, which is very easy now with the transparent background, and place the selection on a separate layer by right-clicking it and selecting 'Layer via Copy'.
Then choose the Add Layer Style icon, the fx icon, at the bottom of the Layers panel and choose 'Drop Shadow' from the menu that appears.
This opens the Layer Style dialogue box and adds a drop shadow to everything on the current layer. If you want a softer shadow, drag the Size slider to the right.
You can change the angle and distance using the settings in this dialogue box. But it is easier to place your cursor outside the dialogue box, on the image itself, then click and drag the shadow exactly where you want it.
Once the shadow has been applied, you will immediately see the word 'Effects' in the Layers panel, directly below your layer thumbnail, with Drop Shadow directly underneath it.

These methods for creating a white background, cutting out a product and adding a reflection or drop shadow are of course not unique.
There are undoubtedly better and/or other ways to achieve the same or a better result. If you know of such a method, do let us know in the comments!
Want to learn more about Photoshop image editing?
At Photofacts Academy, our online learning platform for photographers, we have several courses about Adobe Photoshop.
- Photoshop for Beginners (Johan Elzenga)
- Photoshop for Photographers (Piet van den Eynde)
- Photoshop for Advanced Users (Marit Hilarius)
- Photoshop Effects (Elja Trum)
And much more...
You can take these courses for two weeks with a free trial membership.
About the author
Michelle Peeters is fotografe en oprichter van DeuxBleus Fotografie. Michelle herkent het bijzondere in het gewone en het gewone in het bijzondere. Ze heeft zich nooit willen specialiseren en is daardoor van alle markten thuis.
You might also like
-
 Taking Product Photos in the Living Room
by Rob Zwart
-
 Managing your photos smartly
by Huub Keulers
-
 Review: Colour Management, Reliable Colours from Input to Output
by Michelle Peeters
-
 Red Dot Award: Product Design for Nikon
by Michelle Peeters
-
 How do you attract the attention of potential clients?
by Huub Keulers

16 comments
-
 Tom De Win wrote on Tuesday 27 March 2018 at 14:04 | reply
If you really want to work in a customer-oriented way, you will still fall short with these methods. In real commercial photography, post-processing is always done with all parts separated from each other. You also don't do this with Photoshop's provided selection tools, but with the pen tool because with that you immediately have full control, whereas with the others Photoshop controls things largely for you. You also treat a background as a separate "object". If the client changes their mind afterwards, it should only take half a minute to change this e.g. from white to green or transparent, with the method above you lack the necessary flexibility. The method above is good if you have your own web shop and want to put some photos online quickly, but if you want to work for commercial clients, you need more control and flexibility. It happens more than once that a client changes their mind or makes additional demands and then you need to have control over everything, also afterwards.
Translated from Dutch. -

 Michelle Peeters wrote on Tuesday 27 March 2018 at 14:15
| reply
@Tom: I agree with you that the 'quick selection tool' sometimes falls a bit short. In that case (so you should also always zoom in to 100% to properly assess the result) you should also be able to fall back on other tools, such as the pen tool, for example. And a transparent background indeed gives you more control if the client changes their mind about the background. It also looks better than a white background, but is a bit more laborious!
Translated from Dutch. -
Michelle Peeters wrote on Tuesday 27 March 2018 at 15:25
| reply
@Tom: I understood that the latest version of Photoshop has a somewhat smarter pen tool that automatically follows curves for you. Do you have any experience with it?
Translated from Dutch. -

-
Michelle Peeters wrote on Tuesday 27 March 2018 at 18:14
| reply
@Ad: I went to the Adobe Creative Meetup last November. The new features of Creative Cloud (Photoshop CC) were presented there. They said that the Pen tool has been improved enormously (something I always had major problems with myself. Especially when creating curves where you had to use all kinds of key combinations). Apparently this is no longer necessary, you can simply keep clicking; the rounding or (intelligent) curve is automatically followed and shaped for you. I am curious about that, I still use the CS6 version myself..
Translated from Dutch. -
Tom De Win wrote on Tuesday 27 March 2018 at 20:15 | reply
I have played around a bit with the new "pen function" (Curvature pentool) of cc2018, and I think it is a good "introductory feature" for the pen tool. If you are initially a bit intimidated by it, this can help you a bit. But it gives you too little control from the start, you can still adjust everything a bit but with the real pen tool you have complete control immediately. I think most people also use the pentool incorrectly. You have to give the subject the shape you want with the pentool, not use the shape that is there. Even if the difference is only a few pixels, you immediately make your subject better with it and you have control over it immediately. It saves having to retouch difficult edges afterwards.
Translated from Dutch. -
Ad wrote on Tuesday 27 March 2018 at 20:43 | reply
@Michelle: I use the full CC. The tool you mean: the "Curvature Pen". If there is enough contrast between the object to be cut out and its surroundings, it is a nice function, though occasionally also unpredictable.
Translated from Dutch.
I spent quite some time back then mastering the Bezier technique. With the 'alt key' always within reach to modify anchor points while drawing a path, this remains the best way to create cutout images. An additional advantage when you really do it by hand is that you can exclude unwanted image or edge elements from your path on-the-fly. Don't forget to check the "Anti-aliased" box under the "Make Selection" submenu when converting a path into a selection.
Another tip: once you have a selection, give the "Copy" command and immediately afterwards "Paste". This keeps the object in exactly the same place, only on a layer above it. Then you can still do very nice things with the bottom layer, while the object remains untouched.
Good luck! -
-
Michelle Peeters wrote on Tuesday 27 March 2018 at 23:35
| reply
That sounds good Ad and Tom, reason enough to go ahead and get Photoshop CC after all... But don't you find the edges of something that has been 'cut out' with the pen tool look too sharp? I often find the result looks somewhat unnatural because of this..
Translated from Dutch. -
Tom De Win wrote on Wednesday 28 March 2018 at 09:08 | reply
The pen tool gives you a sharp cutout. But if you turn it into a selection, you can immediately give it a feather by doing this via right-clicking. If you don't do this, you can still give your layer mask a feather in the properties panel, or apply a Gaussian blur to it directly (this can no longer be undone), so you can make it look more natural. A feather of 0.5 pixels can already work wonders. Also create a path in the Paths panel and give it a name as well, so all your paths are saved, you can fall back on them and adjust them if necessary. Sorry for the English terminology, I am not familiar with the Dutch terminology for Photoshop. I recommend this to everyone, by the way. There are many more resources to be found online in English if you want to look something up about Photoshop.
Translated from Dutch. -
Ad wrote on Wednesday 28 March 2018 at 09:42 | reply
You can prevent that by following the tip in my previous answer: When converting a path into a selection, don't forget to tick the "Anti-aliased" box under the "Make Selection" submenu.
Translated from Dutch.
Moreover, you can also optionally "feather" the selection on a per-pixel basis. Plenty of possibilities within Photoshop CC. -
Michelle Peeters wrote on Wednesday 28 March 2018 at 11:05
| reply
Thanks Ad and Tom, good explanation!
Translated from Dutch. -
-
Michelle Peeters wrote on Wednesday 28 March 2018 at 11:21
| reply
@Ad: thank you very much! I had a quick look at your and Tom's website and I'm impressed! As soon as I have the CC version, I'll write an article about the new pen-tool functionality. Your tips will come in handy for that!
Translated from Dutch. -
 Lightroomstatistics
wrote on Wednesday 28 March 2018 at 19:15
| reply
For a client I created a Lightroom export plugin that can replace a background with transparency completely automatically, see Transparency Exporter plugin
Translated from Dutch.
Can automatically determine the background color and you can play with the "fuzz" factor to set how much the color may deviate.
Advantage: completely automatic during export for all selected photos
Disadvantage: not always as accurate as doing it manually. However, decide situationally whether this is a problem. -
Michelle Peeters wrote on Wednesday 28 March 2018 at 20:27
| reply
@Lightroomstatistics: nice, thank you! I'll give it a try.
Translated from Dutch.
Have your say
Please note: Articles older than a week can only be commented on by signed-in visitors.Would you still like to comment? sign in or create a free account.
Become a better photographer every week
A practical photography tip in your inbox every week.
38,885 photography enthusiasts already receive the tips! More about the weekly mail. Or keep up to date via  Facebook.

Elja Trum
Photofacts; everything to do with photography!
Would you like to take better photos and keep up with what is happening in photography? Photofacts publishes articles that teach you something about photography — from a product announcement to a practical shooting tip or a look at a website. Photofacts covers photography every day and is a hobby project of Elja Trum's that got out of hand. The articles are written by a team of volunteer authors. If you would enjoy writing one or more articles for Photofacts, do get in touch.More about PhotofactsPhotofacts is made possible in part by
