

Increase resolution with Photoshop CC
Thursday 13 December 2018, 12:37 by Michelle Peeters | 51,986 views | 5 commentsThis article was translated from Dutch with the help of AI. Read the original.
As a photographer, you are always concerned with image quality. Whether that is sharpness, the level of detail in highlights and shadows, or resolution. In this article, you will learn step by step how to quickly and easily increase the resolution of existing images with Photoshop CC.
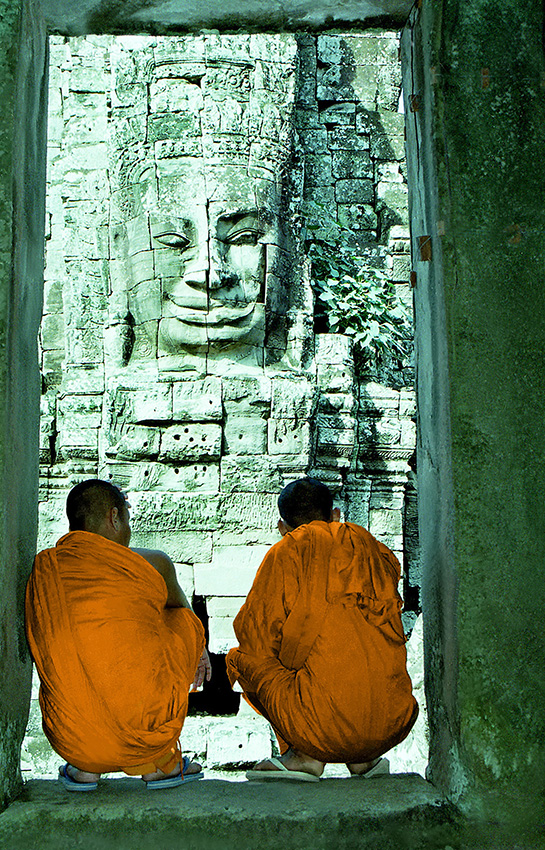
What is resolution?
The word 'resolution' gives many people a headache. You usually come across the term when someone asks you to provide a photo in .jpg format at a particular resolution.
You send the photo and are told that its resolution is too low. A photo with too low a resolution shows 'blockiness'.
In photography terms, resolution is the amount of detail in a photo. This is determined by factors such as focusing precision, lens quality and camera sensor pixel count. If you would like to know more about this, also read the article: How much DPI do you need in your photo? The DPI value is not that important, but the number of pixels is!
Unfortunately, it is not easy to create a good photo from an original with a (too) low resolution, but it is not impossible. You can still achieve impressive results if you do things properly, as shown below.
Increasing resolution with Photoshop CC
Most photo editing packages can increase the number of pixels in an image. That is not the most difficult part, though. The difficulty lies in obtaining and retaining the important details while increasing the number of pixels.
Improving a low-resolution thumbnail to CSI levels is only possible on television. No matter how good your post-processing software is, you cannot go further than simply improving a low-resolution photo. That is as far as it goes. Sometimes the result is even a blurry image!
But that does not mean the situation is hopeless. It can still help to increase the resolution of an image, in this case the number of pixels, using a process called upscaling.
This is often used when you need to make very large prints. It also helps as a last resort to improve an image that would otherwise be unusable.
Preserve Details 2.0
Photoshop CC now offers AI-powered upscaling to preserve important details and structures without distortion when enlarging or reducing an image. As well as skin tones and hair textures, it also preserves details with hard edges, such as text and logos.
Try it on soups, salads, pizzas and other subjects whose structure needs to be preserved better.
Upscaling with Photoshop CC
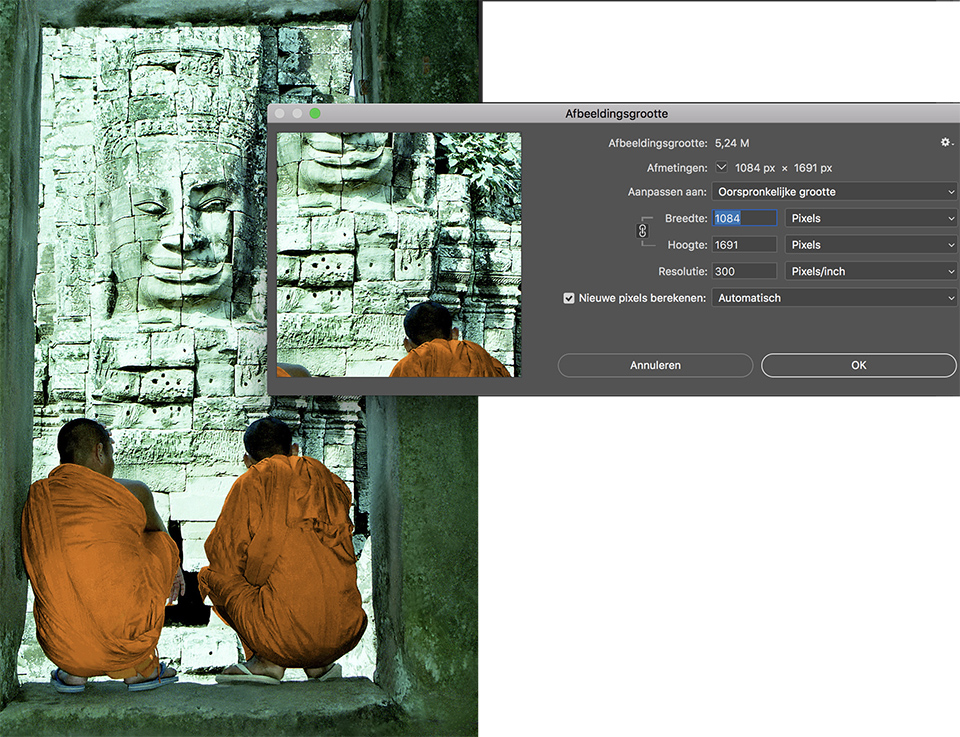
With Photoshop CC, you can quickly and easily upsample your image, adding more pixels. Go to Image> Image Size, enter the desired pixel dimensions and select the desired upsampling method. In Photoshop CC, you should choose 'Preserve Details 2.0'.
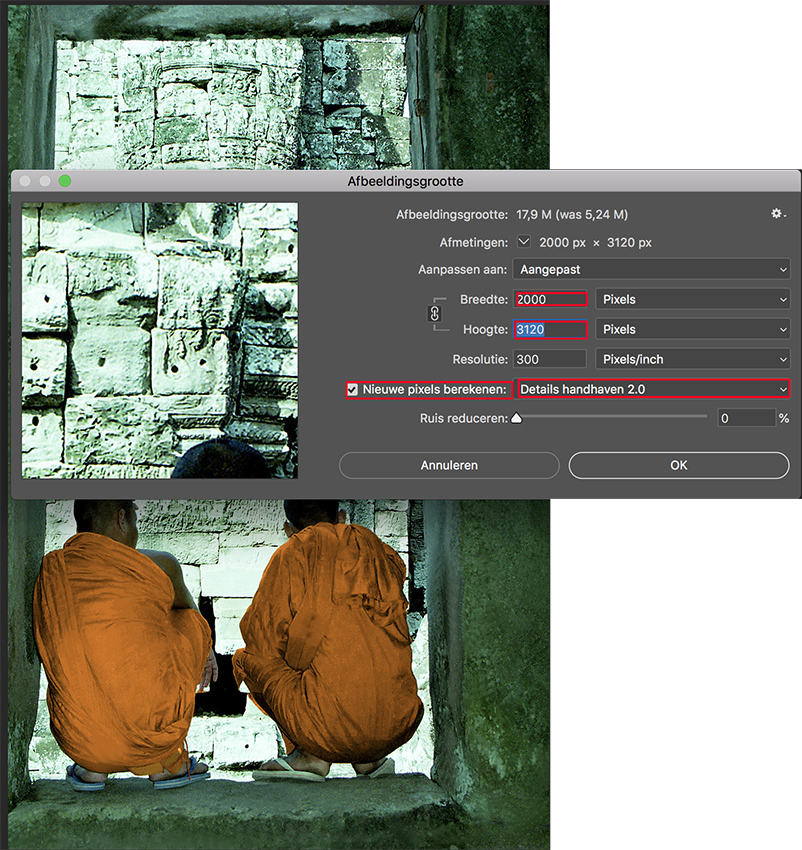
I tried the method on a scanned medium-format negative that was also badly damaged. I have to say that the result surprised me.
Conclusion
The photo was actually increased from 1.2 megabytes to 3.8 megabytes, which is not all that important because you can do a lot with compression, and from 1,084 by 1,691 to 2,000 by 3,000 pixels, with all the details wonderfully preserved.
Want to know more about Photoshop image editing?
At Photofacts Academy, our online learning environment for photographers, we have several courses on Adobe Photoshop.
- Photoshop for Beginners (Johan Elzenga)
- Photoshop for Photographers (Piet van den Eynde)
- Photoshop for Advanced Users (Marit Hilarius)
- Photoshop Effects (Elja Trum)
And much more...
You can follow these courses for two weeks with a free trial membership.
About the author
Michelle Peeters is fotografe en oprichter van DeuxBleus Fotografie. Michelle herkent het bijzondere in het gewone en het gewone in het bijzondere. Ze heeft zich nooit willen specialiseren en is daardoor van alle markten thuis.
You might also like
-
 The new Lightroom update now offers super-resolution
by Nando Harmsen
-
 How Google's Handheld Multi-frame Super-resolution Technology Works
by Michelle Peeters
-
 Is the Canon EOS R5's high-resolution option any use?
by Nando Harmsen
-
 5 Good Photography Resolutions for 2020
by Michelle Peeters
-
 What is your photography resolution for 2024?
by Nando Harmsen
5 comments
-
 Leo? wrote on Tuesday 18 September 2018 at 00:42 | reply
I should hope that the details have been “wonderfully preserved”. Adding pixels of course shouldn't cost any details, but should produce them.
Translated from Dutch.
And that is simply not the case. No upscaling method produces more details. -
 Fred Gramberg wrote on Tuesday 18 September 2018 at 14:34 | reply
A trick. What isn't there can't come there either.
Translated from Dutch. -

 Michelle Peeters wrote on Tuesday 18 September 2018 at 14:45
| reply
It must of course be guesswork (the application has to come up with something and fills in pixels, depending on the algorithm). In my case it went well, maybe just luck?
Translated from Dutch. -
 A H M Kerkhoff wrote on Wednesday 19 September 2018 at 08:29 | reply
the message is very clear, but what does the author mean in her conclusion by the sentence "with compression you can do a lot'/
Translated from Dutch. -
Michelle Peeters wrote on Wednesday 19 September 2018 at 09:10
| reply
@A H M Kerkhoff: that a very small file (heavily compressed) of around 100Kb can still have a lot of pixels and thus still be printable, even in large format.
Translated from Dutch.
Have your say
Please note: Articles older than a week can only be commented on by signed-in visitors.Would you still like to comment? sign in or create a free account.
Become a better photographer every week
A practical photography tip in your inbox every week.
38,886 photography enthusiasts already receive the tips! More about the weekly mail. Or keep up to date via  Facebook.

Elja Trum
Photofacts; everything to do with photography!
Would you like to take better photos and keep up with what is happening in photography? Photofacts publishes articles that teach you something about photography — from a product announcement to a practical shooting tip or a look at a website. Photofacts covers photography every day and is a hobby project of Elja Trum's that got out of hand. The articles are written by a team of volunteer authors. If you would enjoy writing one or more articles for Photofacts, do get in touch.More about PhotofactsPhotofacts is made possible in part by
