

Adobe Super Resolution: Turn your 25-megapixel sensor into a 100-megapixel camera
Saturday 3 April 2021, 14:41 by Nando Harmsen | 8,001 views | 8 commentsThis article was translated from Dutch with the help of AI. Read the original.
The latest update to Adobe Camera Raw, or ACR, adds Super Resolution to the programme. It makes your photo four times larger while retaining detail. In this video, I show you how it works and what to look out for.
With all the clever software available these days, some remarkable things are possible. One of them is increasing the resolution without the quality of the photo deteriorating much, if at all.
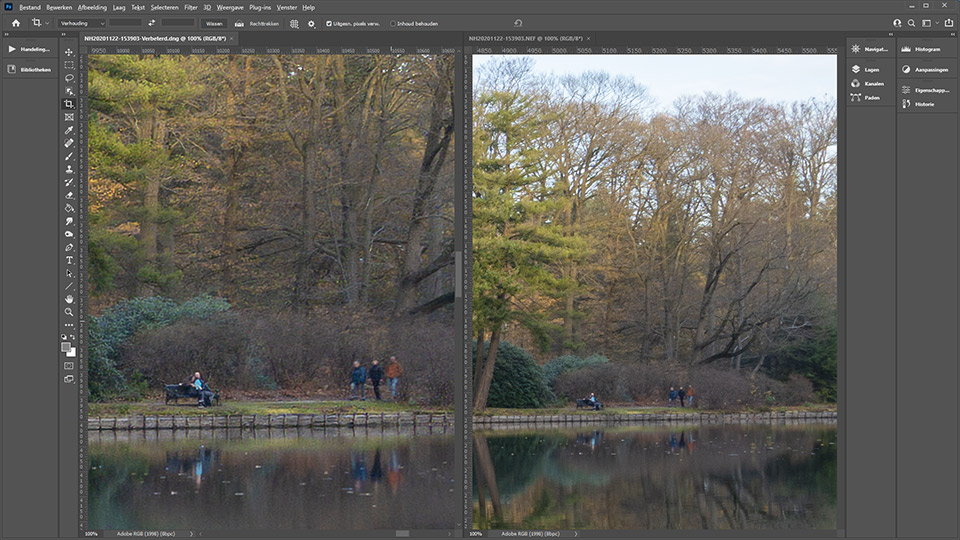
The latest update to Adobe Camera Raw adds Super Resolution to the raw converter. It makes the photo four times larger. In other words, the number of pixels along both the long and short sides is doubled.
This turns a 24-megapixel photo into an impressive 96-megapixel photo. If you have a camera with a 50-megapixel sensor, Super Resolution turns the photo into a staggering 200-megapixel image.
But it has the biggest impact on low-resolution JPEG images. A 1-megapixel photo becomes a 4-megapixel image with Super Resolution, which is enough to make a 20x30 print while retaining the quality. Provided the JPEG photo did not have too much compression.
How does it work?
The option works in the Adobe Camera Raw plug-in, which you can open through Bridge or Photoshop. It contains the Enhance option, which you can find by right-clicking. Super Resolution is enabled automatically.
You do need to make sure that you do not use the Camera Raw filter in Photoshop. Super Resolution is not available there. You can set Photoshop to open the plug-in instead of the filter.
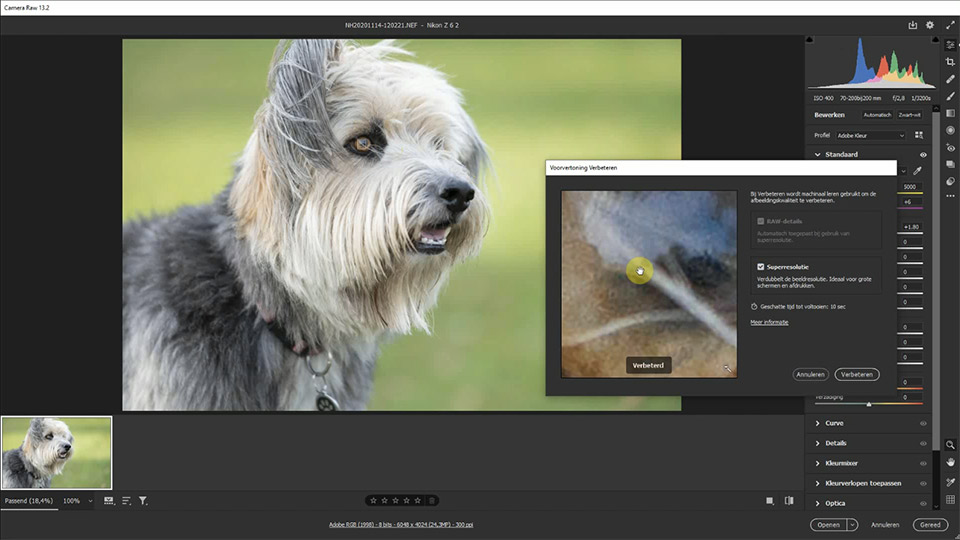
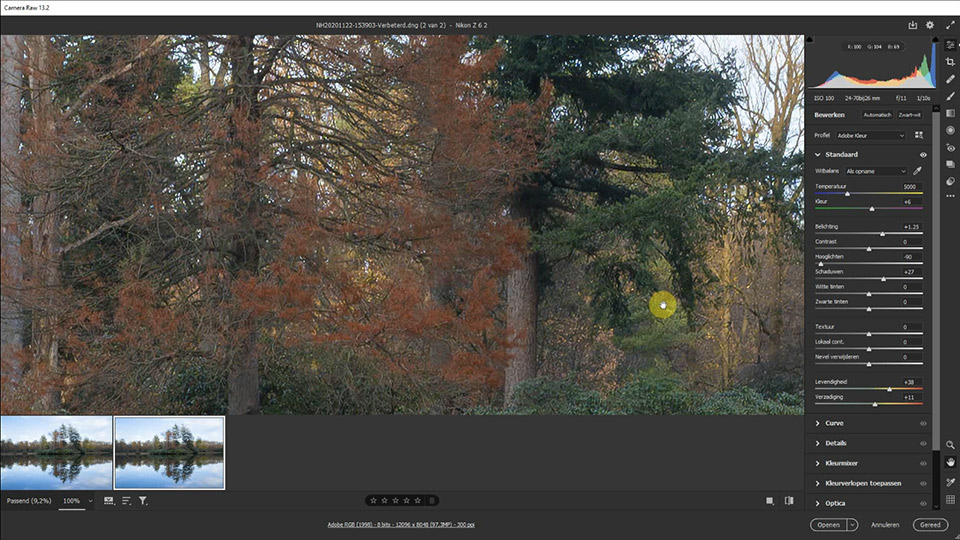
Adobe Camera Raw saves the Super Resolution file as a DNG file, allowing you to make further edits without any problems. If you have already made edits, it is wise to check them again. A higher resolution affects certain edits.
It does not matter whether you edit your photo before applying Super Resolution or afterwards. Both are possible, and the result does not depend on this.
Limitations
There are two limitations. You can only apply Super Resolution to a photo once. This makes the photo four times larger. The programme will not accept a second attempt.
You can of course save the Super Resolution file as a TIFF or JPEG and enlarge it again. But doing so a second time will certainly not improve the quality.
The second limitation is the size of the Super Resolution file. This file cannot be larger than 65,000 pixels on its longest side, or 500 MB. The chances of reaching these dimensions are small, but that is the limit.
Only available in ACR for now
For now, Super Resolution can only be used in Adobe Camera Raw. But it will soon also become available in Adobe Lightroom Classic. It is just a matter of waiting until then.
Although I have included a few examples that are covered in the video, trying it yourself is best. Only then will you see how well Super Resolution can work.
The alternative
The obvious alternative to Adobe Super Resolution is Topaz Labs Gigapixel AI, which has already been on the market for some time. I have not been able to compare this software side by side, but from what I have seen, both pieces of software produce very good results.
Which one is best depends more on the photo being enlarged than on one of them being objectively better.
About the author
Nando Harmsen has been photographing for more than 40 years. He specialises in wedding photography and landscape photography. Nando also gives talks, workshops, masterclasses and photo trips, and regularly reviews new and interesting equipment.
You might also like
-
 The new Lightroom update now offers super-resolution
by Nando Harmsen
-
 Masks in Adobe Camera Raw get feathering
by Nando Harmsen
-
 The difference between file size and resolution
by Nando Harmsen
-
 Updates for LrC, LR and ACR
by Nando Harmsen
-
 Update your Canon EOS R5 and get 400-megapixel photos
by Nando Harmsen
-
 Adobe updates Lightroom (Classic) with new AI masks
by Elja Trum
8 comments
-

 Stefan ALEN wrote on Tuesday 6 April 2021 at 12:18
| reply
Stefan ALEN wrote on Tuesday 6 April 2021 at 12:18
| reply
Very interesting feature, but what exactly is the difference compared to the "image size" function that I have used until now.
Translated from Dutch.
I mainly mean in terms of the result.
Thanks in advance. Stefan. -
 Nando
wrote on Tuesday 6 April 2021 at 14:07
| reply
Nando
wrote on Tuesday 6 April 2021 at 14:07
| reply
@Stefan:
Translated from Dutch.
It is the way the new pixels are created. With image size you do enlarge the photo, but the quality deteriorates drastically if you enlarge the photo 4x. With super-resolution, that deterioration is much less or virtually nonexistent. Just try it out yourself and compare them with each other. -
 Çois wrote on Tuesday 6 April 2021 at 17:42 | reply
Interesting
Translated from Dutch.
PhotoZoom is also a formidable competitor in my experience. -
 Henk wrote on Tuesday 6 April 2021 at 19:42 | reply
Clear explanation, Nando.
Translated from Dutch.
Don't you do something similar with the 'Smart Object' feature in Photoshop? -
Nando
wrote on Wednesday 7 April 2021 at 11:27
| reply
@Çois: I haven't heard of PhotoZoom before. But there are indeed several software packages for enlarging photos, even online. You would have to test how good they are if you're looking for something like that.
Translated from Dutch.
The advantage of this super-resolution is that it's included with your Adobe account. So it won't cost you anything extra. -
Nando
wrote on Wednesday 7 April 2021 at 11:28
| reply
@Henk:
Translated from Dutch.
A smart object is something completely different. It's more or less just a collection of layers in a layer. That has nothing to do with enlarging a photo.
But with the help of a smart object and a series of photos, it is possible to create a super-resolution image. You only need about twenty photos of the same object for that. -
 Will Gillemot wrote on Thursday 8 April 2021 at 12:19 | reply
on Mac the right mouse button doesn't work ?
Translated from Dutch. -
Have your say
Please note: Articles older than a week can only be commented on by signed-in visitors.Would you still like to comment? sign in or create a free account.
Become a better photographer every week
A practical photography tip in your inbox every week.
39,079 photography enthusiasts already receive the tips! More about the weekly mail. Or keep up to date via  Facebook.

Elja Trum
Photofacts; everything to do with photography!
Would you like to take better photos and keep up with what is happening in photography? Photofacts publishes articles that teach you something about photography — from a product announcement to a practical shooting tip or a look at a website. Photofacts covers photography every day and is a hobby project of Elja Trum's that got out of hand. The articles are written by a team of volunteer authors. If you would enjoy writing one or more articles for Photofacts, do get in touch.More about PhotofactsPhotofacts is made possible in part by
