

New Curvature Pen Tool in Photoshop
Wednesday 12 December 2018, 21:25 by Michelle Peeters | 11,754 views | 2 commentsThis article was translated from Dutch with the help of AI. Read the original.
The new Photoshop CC 2018 has a new addition to the pen family: the Curvature Pen tool. It is essentially the regular Bézier Pen, but without the direction lines. The old way of drawing with handles was confusing and difficult for many people.
Photoshop now has a version for drawing curves, but you do not see any direction lines.
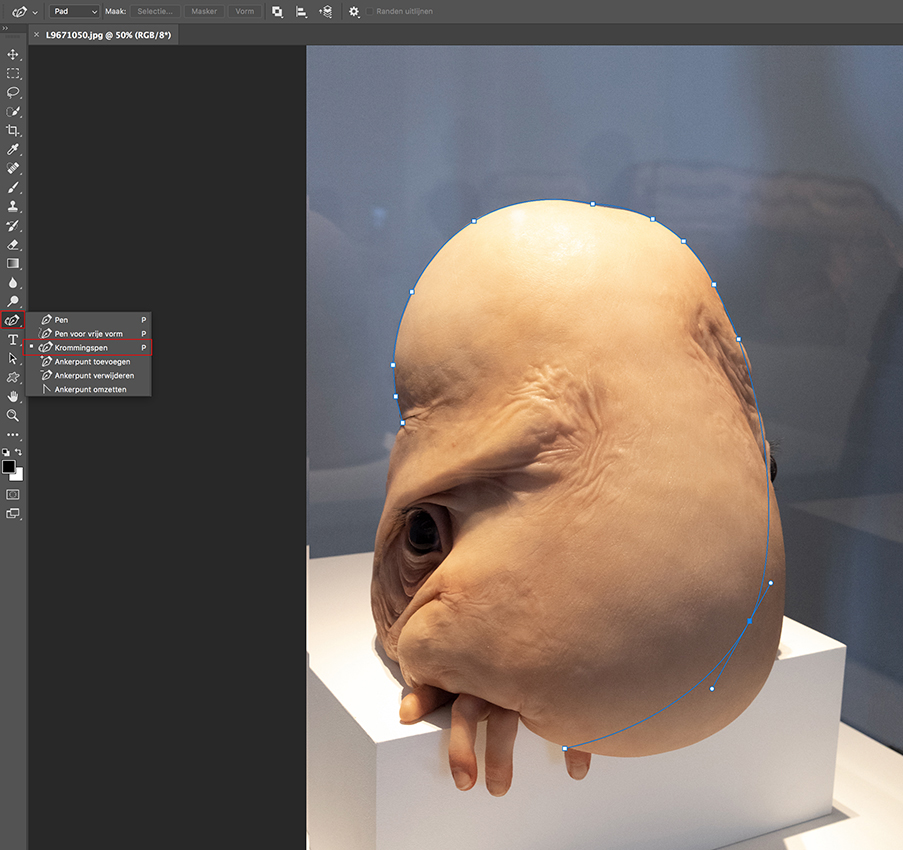
The (old) Pen tool
The king of all selection tools is the Pen tool (P), because it lets you make very precise selections that can easily be adjusted later. Best of all, it can create perfect curves around objects.
At Photofacts Academy, you can take an interesting course on this by Piet van den Eynde as part of the course Selections, masks and channels in Photoshop.
It works like a kind of connect-the-dots tool. You click once to choose your starting point, then move your cursor and click again. It draws a straight line between these two points, which is perfect for selecting a wall, a box or anything with straight lines.
But as soon as you reach a part of the object that has a curve, you have to click and drag. As you drag, a perfect curve appears, along with two small handles that you can use to adjust the curve later. You adjust the curve after you have gone all the way around the object.
So the Pen tool works as follows: click-click-click creates straight lines; click and drag creates a curve.
When you have gone all the way around the object, return to the point where you started. A small circle then appears in the bottom-right corner of the Pen tool cursor. This tells you that you have gone all the way around.
Click the starting point to connect the last point, and therefore everything else, together.
What you have now is not a selection, but a path: straight lines and curves that do not blink. To turn the path into a selection, press Command-Return (PC: Ctrl-Enter). This was a very confusing way of working, which is why I never used it myself.
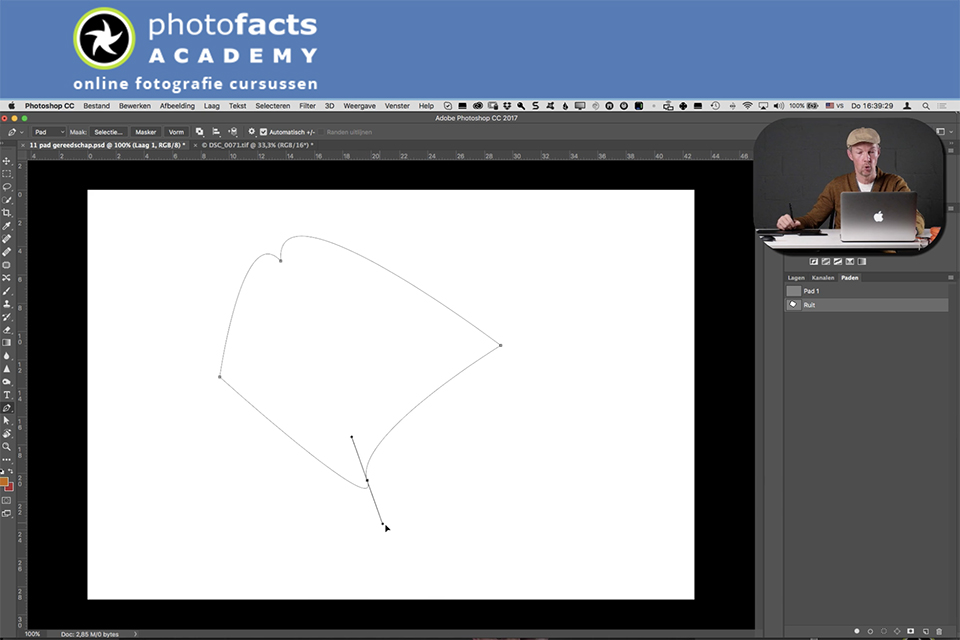
New Curvature Pen tool
Thanks to this new Curvature Pen tool, you can now draw smooth curves just as easily as straight line segments. You can create smooth points and corner points, switch between them, edit them, and add or remove them without changing tools.
How does the new Curvature Pen tool work?
The video below shows how to select a shape made up of both curves and straight sections. It is not easy at first, but if you follow the rules below, it works well.
- Set the first anchor point by clicking with the mouse on the point where you want to start. Then click your second anchor point and you will see a straight line appear.
Do not be alarmed if you actually want to follow a curve. As soon as you place a third anchor point, the lines change into smooth lines and the existing curve is followed; - If you then want to follow a straight section, double-click the last anchor point you placed;
- Another way to select something with the new Curvature Pen tool is to follow the entire shape by placing several anchor points. Once you are back at your first anchor point, click it to close the path. You will see that the straight sections are automatically treated as curves.
You can fix this by double-clicking both anchor points that define the straight section. You can then create a Shape or a Selection (Command-Return (PC: Ctrl-Enter).
Second video
In the second video below, Julieanne Kost explains the new Curvature tool in more detail. She explains that you can now simply place control points instead of using the click and drag mode that you previously had to use with the Pen tool.
You can create paths or shapes that are resolution-independent, so you can scale them without any loss of quality.
You can think of a path as a giant piece of string, for example in the shape of a circle. Once the shape is closed, when you have clicked the initial anchor point and closed the circle, you can add extra anchor points and drag them around. This allows you to bend the 'string' into whatever shape you want.
If you want to remove an anchor point, simply click it to select it. It will turn blue. Then press the delete key and it will disappear. Your shape will change immediately as well.
You can change a curve point, or rounded corner, into a sharp corner point by double-clicking it. This is useful when you are about to follow a number of straight lines, or when you want to create a pointed corner, as in the bird's tail in this example.
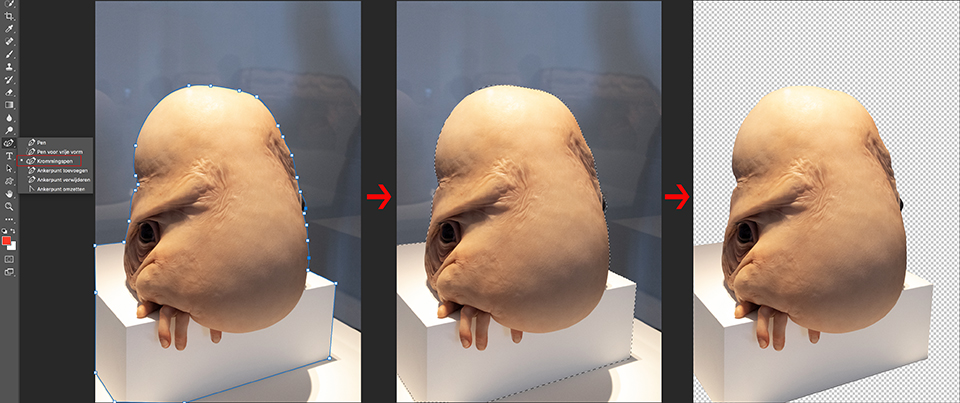
In the image below, I made a selection of the subject myself using the Curvature Pen tool.
After following the curves of the head, I was able to select the square table it is lying on properly by double-clicking the last anchor point before the straight lines began.
To turn the path into a selection, press Command-Return (PC: Ctrl-Enter). The anchor points disappear and your subject is surrounded by a dotted line.
I double-clicked the background to create a separate layer, inverted the selection and clicked Delete, which made the background disappear. It is now shown as a white and grey checkerboard.
Want to learn more about Photoshop image editing?
At Photofacts Academy, our online learning environment for photographers, we have several courses on Adobe Photoshop.
- Photoshop for Beginners (Johan Elzenga)
- Photoshop for Photographers (Piet van den Eynde)
- Advanced Photoshop (Marit Hilarius)
- Photoshop Effects (Elja Trum)
And much more...
You can take these courses for two weeks with a free trial membership.
About the author
Michelle Peeters is fotografe en oprichter van DeuxBleus Fotografie. Michelle herkent het bijzondere in het gewone en het gewone in het bijzondere. Ze heeft zich nooit willen specialiseren en is daardoor van alle markten thuis.
You might also like
-
 Review: Tether Tools Air Direct for wireless tethered photography
by Nando Harmsen
-
 Wacom One 14 Pen Display announced
by Elja Trum
-
 Review: Luminar 2018 version 1.2 Jupiter
by Michelle Peeters
-
 The Most Useful Tool for a Photographer
by Nando Harmsen
-
 Adobe previews new Sensei-powered Object Selection Tool
by Michelle Peeters
-
 Review: Photoshop tools for photographers by Glyn Dewis
by Michelle Peeters
2 comments
-
 Elly wrote on Tuesday 17 April 2018 at 20:27 | reply
Het zou een mooi gereedschap kunnen zijn, maar ondanks het updaten van PS CC 2018, kwam de pen niet tevoorschijn.
This comment was written in another language and has not been translated yet. -


Have your say
Please note: Articles older than a week can only be commented on by signed-in visitors.Would you still like to comment? sign in or create a free account.
Become a better photographer every week
A practical photography tip in your inbox every week.
38,886 photography enthusiasts already receive the tips! More about the weekly mail. Or keep up to date via  Facebook.

Elja Trum
Photofacts; everything to do with photography!
Would you like to take better photos and keep up with what is happening in photography? Photofacts publishes articles that teach you something about photography — from a product announcement to a practical shooting tip or a look at a website. Photofacts covers photography every day and is a hobby project of Elja Trum's that got out of hand. The articles are written by a team of volunteer authors. If you would enjoy writing one or more articles for Photofacts, do get in touch.More about PhotofactsPhotofacts is made possible in part by
