

Remove unwanted shine in Photoshop
Wednesday 12 December 2018, 20:50 by Michelle Peeters | 35,362 views | 7 commentsThis article was translated from Dutch with the help of AI. Read the original.
If you have ever had to deal with unwanted shine (on the face of the person photographed, caused by uneven lighting or reflected flash light, making it look as though the person is sweating), you know that shine can be quite difficult to remove.
Unless you know this trick from Scott Kelby.

Step one
Open the photo with the unwanted shine or shiny spots.
Step two
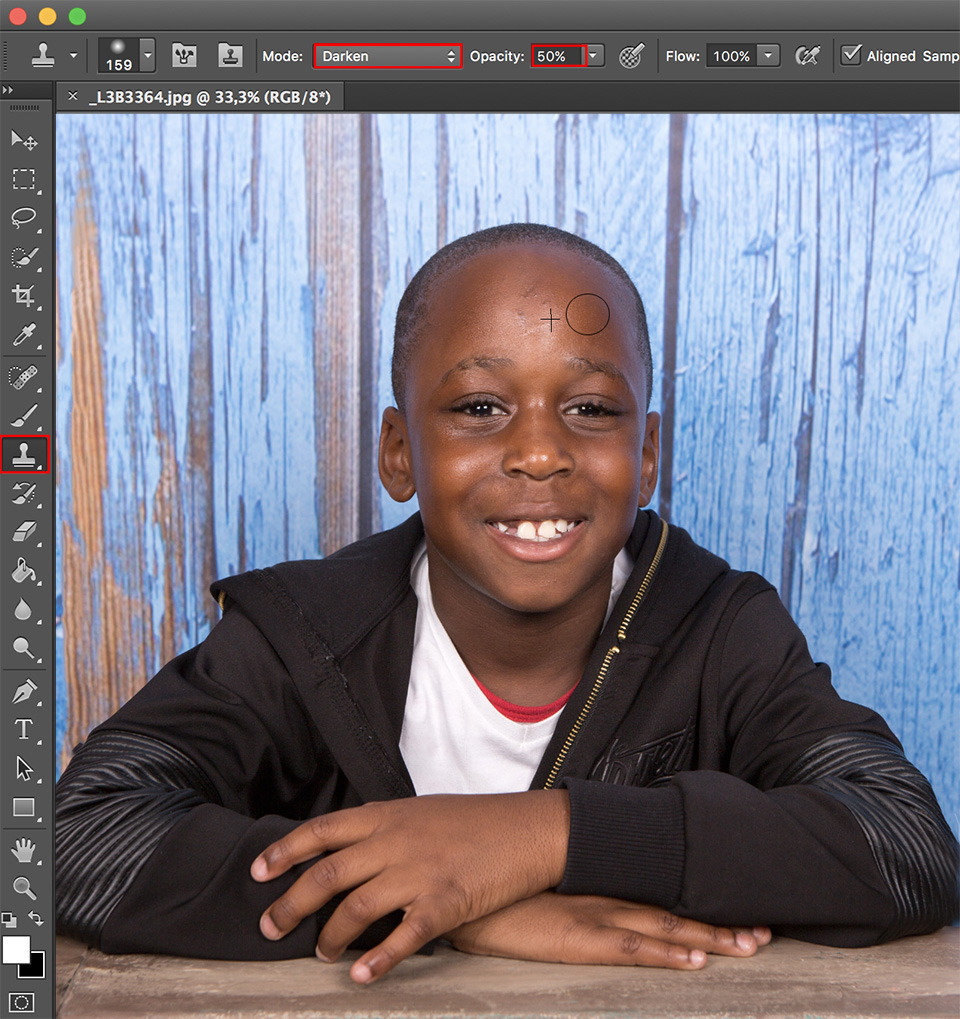
Press the S key to select the Clone Stamp tool. In the Mode drop-down menu in the options bar, change Normal to Darken and reduce the opacity to 50%.
By setting the blending mode to Darken, the adjustment you are about to make only affects pixels that are lighter than the source area we choose to clone (those lighter pixels form the unwanted shine).
Step three
Click the thumbnail next to the word 'brush' in the options bar and choose a large brush with a soft edge in the Brush Picker. Then, while holding down the Option key (the Alt key on a Windows computer), click in a clean area of the face (without shine).
This is your source area (or reference point), so Photoshop knows that it only needs to edit pixels that are lighter than these pixels.
Step four
Now carefully paint over the shiny area with the Clone Stamp tool and you will see the shine disappear.
When editing different shiny spots, you will regularly need to choose a new source area (with an Option/Alt-click) that is close to the shiny area, so that the skin tone does not start to differ.
For example, when working on the shiny spot under the eye, choose a non-shiny source area on the cheek (or possibly the forehead). It is amazing what a difference 60 seconds of shine retouching can make.
Want to learn more about Photoshop image editing?
At Photofacts Academy, our online learning environment for photographers, we have several courses on Adobe Photoshop.
- Photoshop for Beginners (Johan Elzenga)
- Photoshop for Photographers (Piet van den Eynde)
- Advanced Photoshop (Marit Hilarius)
- Photoshop Effects (Elja Trum)
And much more...
You can take these courses for two weeks with a free trial membership.
About the author
Michelle Peeters is fotografe en oprichter van DeuxBleus Fotografie. Michelle herkent het bijzondere in het gewone en het gewone in het bijzondere. Ze heeft zich nooit willen specialiseren en is daardoor van alle markten thuis.
You might also like
-
 Retouching and cloning in Photoshop
by Johan Elzenga
-
 Control your light with an optical spot
by Elja Trum
-
 Street photography tip: Create beautiful silhouettes with spot metering
by Michiel Heijmans
-
 Be careful when removing power lines and dust spots in Luminar NEO
by Nando Harmsen
-
 Portrait photography tip: Add water for extra shine
by Elja Trum
7 comments
-

 Louis Meulstee
wrote on Tuesday 26 September 2017 at 11:42
| reply
Hi Michelle, it's not a trick but a way of working!
Translated from Dutch.
Regards, Louis Meulstee -
 Broucker wrote on Tuesday 26 September 2017 at 13:19 | reply
Absolutely not a trick. It's just normal editing.
Translated from Dutch. -
 anneke janissen wrote on Tuesday 26 September 2017 at 14:16 | reply
oh what a great tip, now just figure out how and whether it works haha. But I always try to edit it out because I never think those reflections look nice. I often think I'm the only one because you see it so often, even with professional photographers. You can't always prevent it (and editing it out doesn't always work) but apparently there is a way to remove it! Thanks
Translated from Dutch. -
 Wilma wrote on Tuesday 26 September 2017 at 14:40 | reply
I basically always do it this way already, but the tip of setting the blending mode to darken is a useful one! I usually set the opacity to just 20% myself, click more often, but with a more natural effect. I find it has become somewhat unnatural in the example and the skin imperfections have disappeared too....
Translated from Dutch. -
 Marijke wrote on Tuesday 26 September 2017 at 15:49 | reply
What a great tip! I duplicated the original layer and worked on that. If it ends up looking too unnatural, you can always reduce the opacity of that layer. If you're satisfied, you can merge the layers. It worked fine with my photo.
Translated from Dutch. -
anneke wrote on Tuesday 26 September 2017 at 15:59 | reply
That would be a good addition to play around with. It’s nice if it indeed stays somewhat natural.
Translated from Dutch.
I’m not that familiar with PS yet, and with retouching, cloning and repairing etc. it was already quite a task, so I’m very happy with it. -
 Donald Willemsen
wrote on Wednesday 27 September 2017 at 22:47
| reply
For this kind of editing I use PotraitPro Studio. That works much faster and more precisely than using the clone stamp.
Translated from Dutch.
Have your say
Please note: Articles older than a week can only be commented on by signed-in visitors.Would you still like to comment? sign in or create a free account.
Become a better photographer every week
A practical photography tip in your inbox every week.
38,836 photography enthusiasts already receive the tips! More about the weekly mail. Or keep up to date via  Facebook.

Elja Trum
Photofacts; everything to do with photography!
Would you like to take better photos and keep up with what is happening in photography? Photofacts publishes articles that teach you something about photography — from a product announcement to a practical shooting tip or a look at a website. Photofacts covers photography every day and is a hobby project of Elja Trum's that got out of hand. The articles are written by a team of volunteer authors. If you would enjoy writing one or more articles for Photofacts, do get in touch.More about PhotofactsPhotofacts is made possible in part by
