

Save blurry photos in Photoshop
Wednesday 12 December 2018, 20:52 by Michelle Peeters | 35,189 views | 6 commentsThis article was translated from Dutch with the help of AI. Read the original.
This is a simple technique by Scott Kelby for rescuing a blurry photo from the bin. There are some limitations, though. This gives you a photo that is really only suitable for digital use or for printing at 10 by 15 centimetres.
If you can live with that, you can work wonders with this technique. It is based on the idea that almost anything looks sharp as long as it is small.
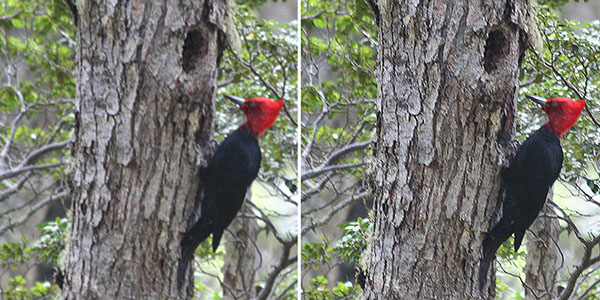
Just look at the LCD screen on the back of your camera, where every photo looks sharp. You only discover the truth when you view the photo at full size in Photoshop.
Step one
Open your blurry photo. In this example, I chose a blurry high-resolution photo that I opened in Photoshop.
It was difficult to find another blurry photo, because I usually delete them straight away. In this case, the focus was wrong, on the surrounding twigs instead of the woodpecker. But because of the precious memory, I kept it anyway.
Step two
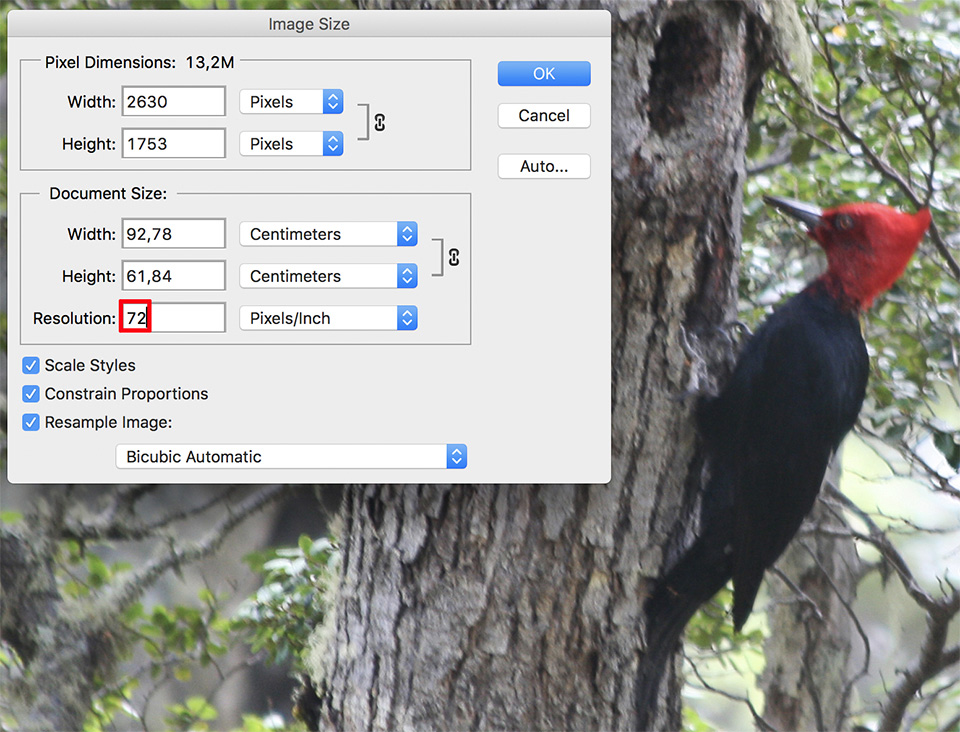
In the Image menu, choose Image Size (Command-Option-I, or Control-Alt-I). In the dialogue box, leave the dimensions unchanged, so it remains 92.78 centimetres, but reduce the resolution from 300 ppi to 72 ppi. Click OK.
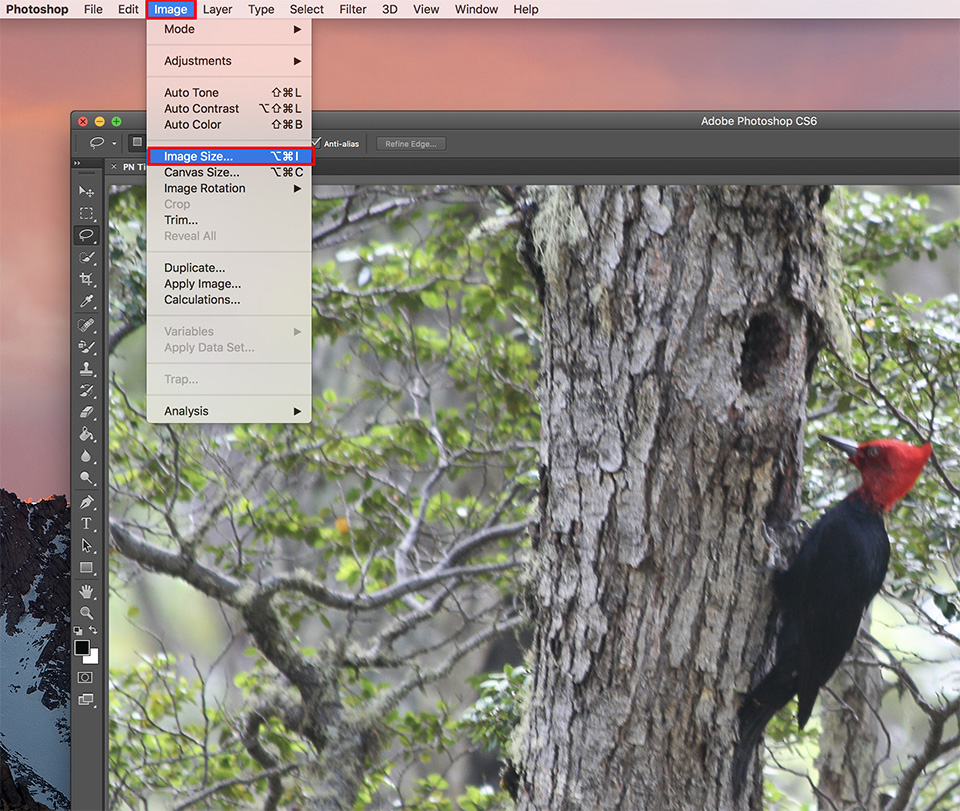
If you are already working with a low-resolution photo, leave the resolution unchanged in the dialogue box.
Step three
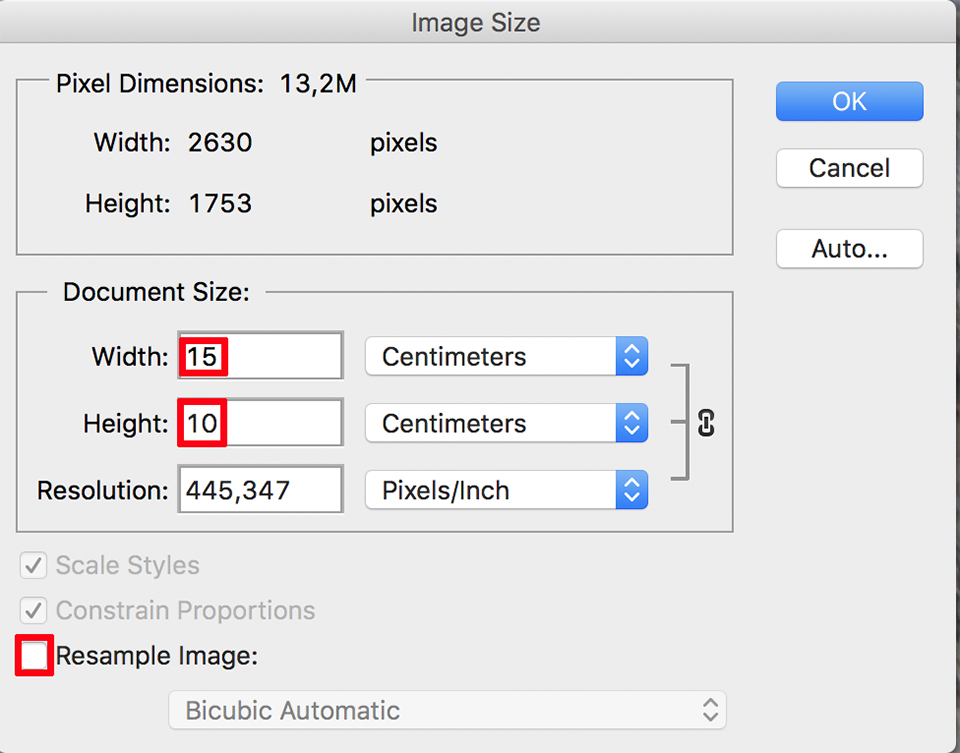
The aim is to have a resolution that is high enough to print the photo on an inkjet printer. Now go back to the Image Size dialogue box.
Clear the Resample Image checkbox and reduce the width to 15 centimetres. The result is a 10 by 15 centimetre photo at 445 ppi.
Step four
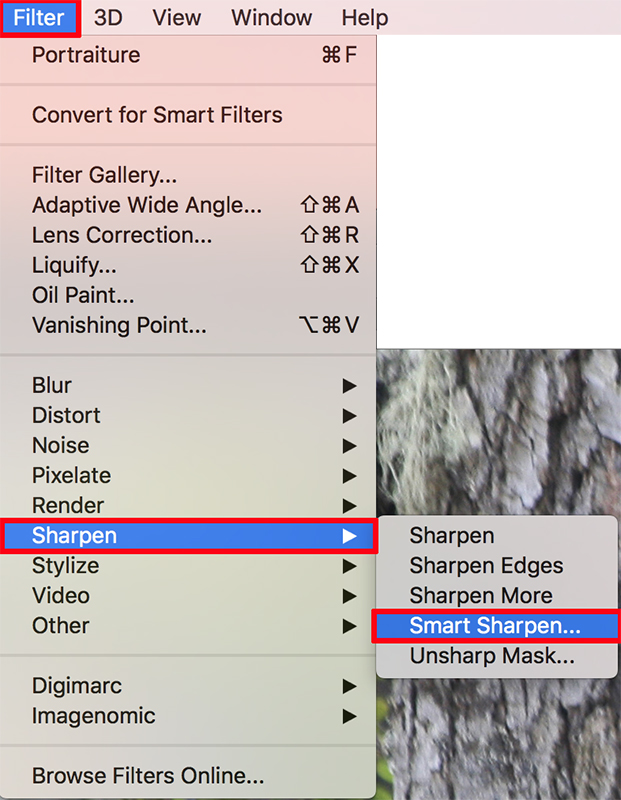
Now we have reached the Smart Sharpen filter that will work its magic. In the Filter menu, under Sharpen, choose Smart Sharpen.
In the dialogue box, enter 58% as the amount and leave the radius at 1 pixel.
Make sure that Gaussian Blur is selected in the Remove drop-down list and tick the More Accurate checkbox. Click OK to apply this first sharpening pass.
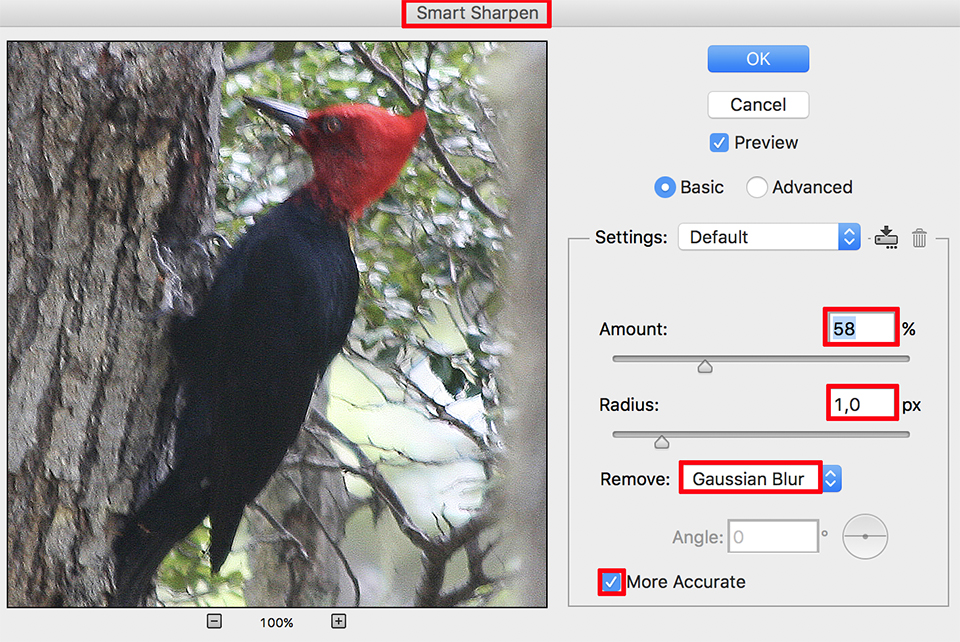
Then use Command-F (PC: Control-F) to apply the Smart Sharpen filter again with the same settings. The trick is in this second time sharpening.
Want to learn more about Photoshop editing?
At Photofacts Academy, our online learning environment for photographers, we have several courses on Adobe Photoshop.
- Photoshop for Beginners (Johan Elzenga)
- Photoshop for Photographers (Piet van den Eynde)
- Photoshop for Advanced Users (Marit Hilarius)
- Photoshop Effects (Elja Trum)
And much more...
You can take these courses for two weeks with a free trial membership.
About the author
Michelle Peeters is fotografe en oprichter van DeuxBleus Fotografie. Michelle herkent het bijzondere in het gewone en het gewone in het bijzondere. Ze heeft zich nooit willen specialiseren en is daardoor van alle markten thuis.
You might also like
-
 Review: Portrait Photography with Natural Light by Scott Kelby
by Michelle Peeters
-
 Book: Scott Kelby, how do you do that in Photoshop?
by Michelle Peeters
-
 Review: Photographing with the iPhone by Scott Kelby
by Elja Trum
-
 Avoid Blurry Photos With These 10 Tips
by Nando Harmsen
-
 Review: The Great Landscape Photography Book by Scott Kelby
by Michelle Peeters
-
 Camera Rescue aims to save 100,000 analogue cameras for the future
by Michelle Peeters
6 comments
-
 P. Kamps wrote on Monday 2 October 2017 at 14:55 | reply
When I saw the name Kelby I already knew. Another one of those fantastic tricks that doesn't work at all. Just like his enlarging in steps whereby you would supposedly gain quality. Not so.
Translated from Dutch.
On top of that, the screenshots are from CS6 and since CC the dialogs for Image Size and Smart Sharpen have changed. The content of the screenshots isn't correct either, in the first one Resample should actually be turned off. Otherwise your image immediately becomes much smaller.
It's complete nonsense: an image doesn't change at all by changing the resolution and/or the physical dimensions. The number of pixels remains the same and sharpening only targets pixels. Smart Sharpen also does absolutely nothing with the physical dimensions of a photo.
The only thing this "trick" does is fake sharpening: It has the same effect as the detail slider in Lr or ACR. A form of mini-posterization. -

 Michelle Peeters wrote on Monday 2 October 2017 at 15:10
| reply
@P. Kamps: you're right that you can never get a blurry photo sharp in post-processing. Perhaps you can with the current new camera technologies that allow you to change the focus point afterwards. But nowhere in the article is it claimed that this is a perfect tool to 'save' your blurry photo. It only looks sharper (just like you often can't tell on your camera screen whether your photo is actually in focus). Everything that is small looks sharper than when you blow it up. For photos that you don't want to throw away because of their emotional value, this can be an option. Not perfect, but better than nothing! The 'unsharp mask' tool in fact also does nothing more than create the illusion that the photo is sharper than it actually is.
Translated from Dutch. -
 van casteren annie wrote on Tuesday 3 October 2017 at 22:21 | reply
I thought it was great , a big difference
Translated from Dutch.
thanks for the explanation -
guest wrote on Wednesday 4 October 2017 at 10:05 | reply
thanks for the tip!
Translated from Dutch. -
 cmvangogh wrote on Wednesday 4 October 2017 at 13:48 | reply
I always sharpen using a high-pass filter and I like it just fine
Translated from Dutch. -
Michelle Peeters wrote on Wednesday 4 October 2017 at 13:56
| reply
@cmvangogh: sharpening via the high-pass filter is useful for noise-free sharpening of basically non-blurry photos. This 'trick' is more of a last resort (although it doesn't work 100%) for blurry (and actually failed) photos!
Translated from Dutch.
Have your say
Please note: Articles older than a week can only be commented on by signed-in visitors.Would you still like to comment? sign in or create a free account.
Become a better photographer every week
A practical photography tip in your inbox every week.
38,764 photography enthusiasts already receive the tips! More about the weekly mail. Or keep up to date via  Facebook.

Elja Trum
Photofacts; everything to do with photography!
Would you like to take better photos and keep up with what is happening in photography? Photofacts publishes articles that teach you something about photography — from a product announcement to a practical shooting tip or a look at a website. Photofacts covers photography every day and is a hobby project of Elja Trum's that got out of hand. The articles are written by a team of volunteer authors. If you would enjoy writing one or more articles for Photofacts, do get in touch.More about PhotofactsPhotofacts is made possible in part by
