

Working with layers in Photoshop
Wednesday 12 December 2018, 20:37 by Michelle Peeters | 26,112 views | 15 commentsThis article was translated from Dutch with the help of AI. Read the original.
Working with layers is Photoshop's greatest strength. It gives you much more control over your work and the results are often brilliant. In this article, I show you what you can do with the Layers panel.
Difficult?
Layers are an essential part of Photoshop, yet they are often given too little attention, even on courses. I always found learning to work with layers an almost insurmountable barrier, and I put off actually getting started with them for far too long.
But without layers, Photoshop is practically worthless, and it is the only way to get the most out of your photos. Layers are not just for technical improvements to your photos. You can also create effects that would otherwise be difficult to make in no time at all with layers.
You can blend photos together, make something jump out of a photo, build a poster from layers yourself and much more.
In the points below, I will try to show step by step how you can use different types of layers and how you can get the most out of Photoshop by using them intelligently.
You will find that once you have overcome the first barrier and have been working with them for a while, you will not want to work any other way. It really is a brilliant system!
What are layers?
In fact, they are exactly what their name suggests: layers within an image, and each layer can be corrected and changed independently of the others. And that is precisely what makes this option so brilliant.
Your edits are non-destructive. You can always go back by deleting layers. This is useful if your History panel is full, meaning you can only remove the steps you took most recently.
A Photoshop file can consist of many different layers. The best way to compare layers is to think of a stack of coloured sheets of paper lying on top of each other. You can only see the colour of the top sheet. But if you cut a hole in the top layer, the colour of the sheet underneath appears.
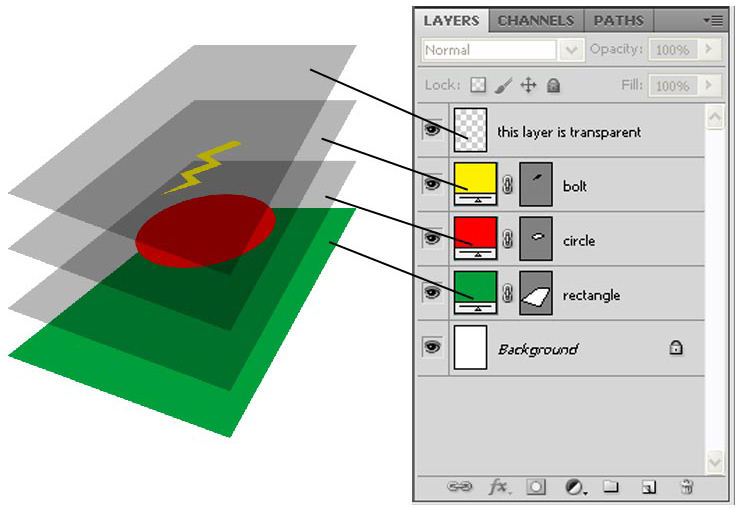
This is how layers work in Photoshop too. You can place multiple photos on top of each other in this way, and you can make layers more transparent so that more of the layer underneath becomes visible.
You can hide layers while working on other layers. You can also completely erase parts of a layer so that the layer underneath becomes fully visible again in that area. You can also blend layers together and link them, allowing you to add certain effects to your photo.
1. The Layers panel
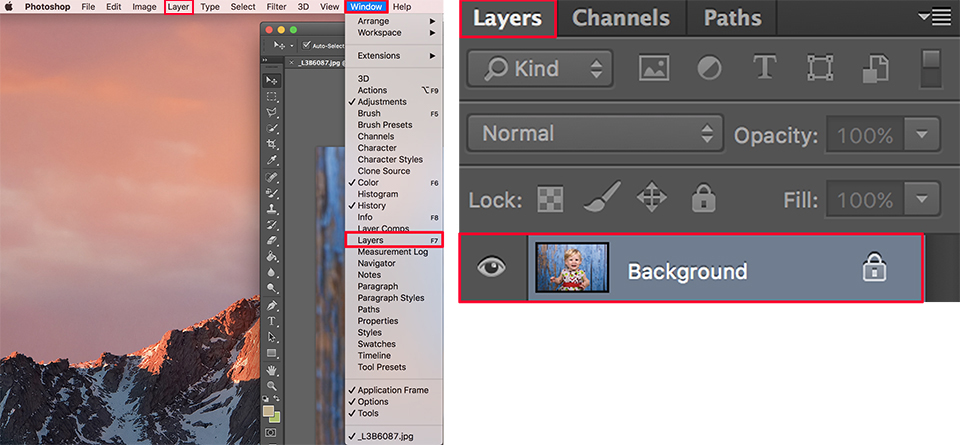
First of all, make sure that Layers is ticked when you go to Window. The Layers panel will appear in the right-hand column. In this panel, you can see everything related to layers. You can also use the Layer menu in the bar at the top of the screen. It is simply a matter of what you find most convenient.
In the image below, the only layer you can see is the 'background layer', which is not really a proper layer yet. More on this later in the article.
2. The background layer
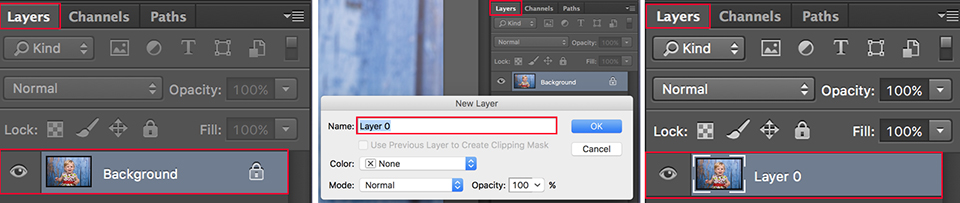
In the previous image, you saw the background layer, which is not really a layer yet and cannot be worked on. You must unlock it first. You can do this by double-clicking it in the Layers panel.
Photoshop suggests giving the layer the name 'Layer 0' in the dialogue box. You can continue by clicking OK. You can change the name later. The padlock next to 'Layer 0' has now disappeared.
3. Creating a new layer
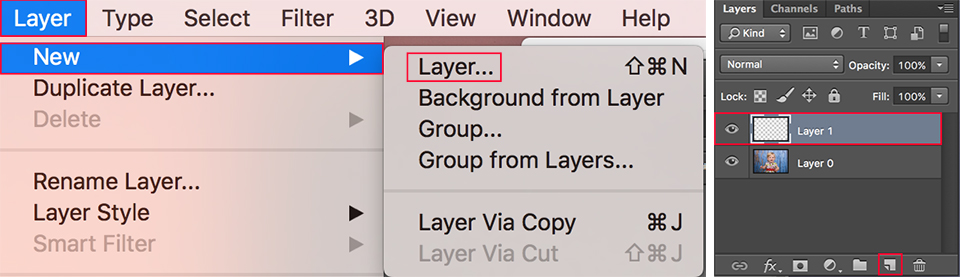
There are several ways to create a new layer. At the very bottom of the Layers panel, click the button with the sheet of paper, choose Layer, New, Layer in the bar at the top, or use the keyboard shortcut Shift+Ctrl (Cmd on Mac-OS) +N. The new layer appears above the existing layer or layers. To change the order, drag the layer in the panel.
4. Hiding or deleting a layer
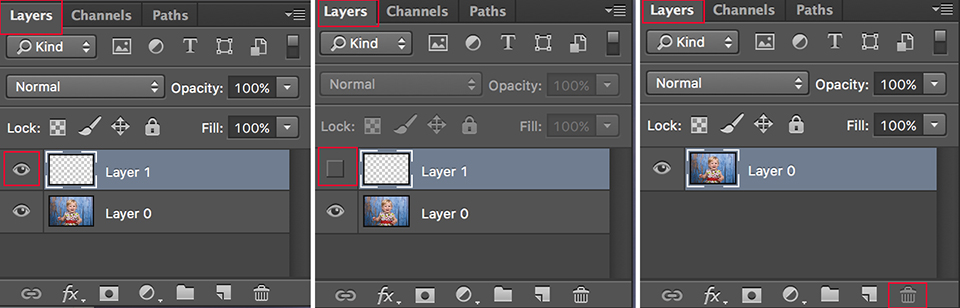
You may want to temporarily hide a layer when working with several layers. You can do this by clicking the eye to the left of the layer. This makes it easy to view the changes made to a particular layer.
If you want to delete a layer permanently, drag it to the bin at the bottom right of the screen.
5. Linking and merging
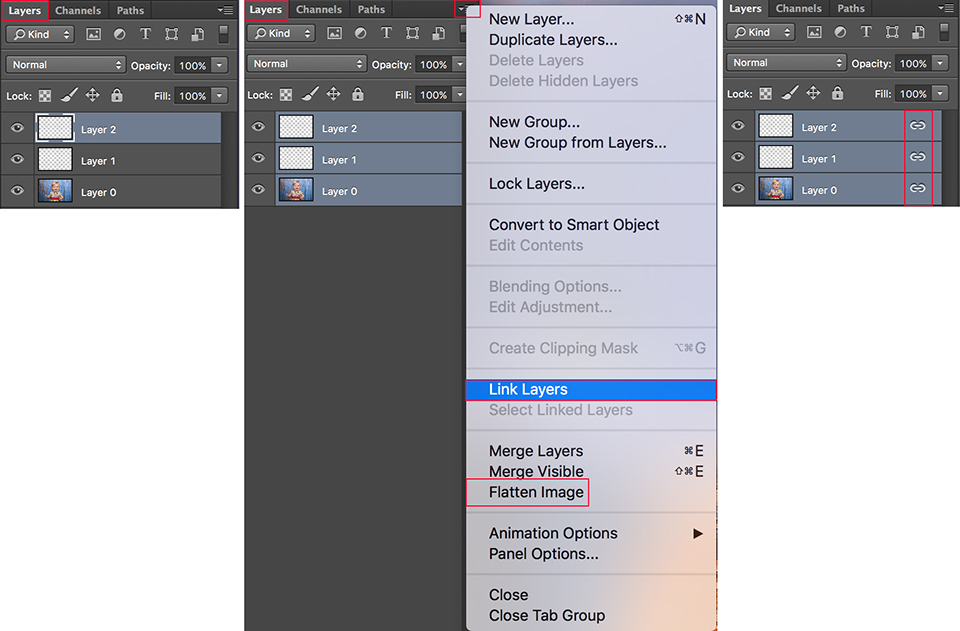
When you are working on complicated edits across different layers, it can sometimes be useful to group several layers together (link layers). You do this by selecting two or more layers in the panel. Then choose Link Layers from the right-click menu.
The layers now get a chain icon in the panel. This shows that they are grouped. You can also merge multiple layers into one layer (flatten image).
6. Grouping with layer groups
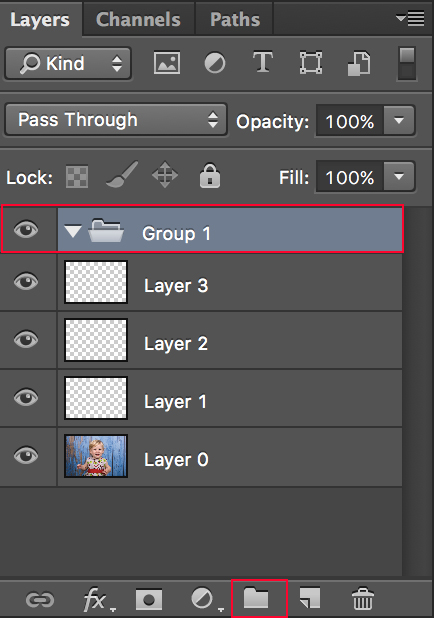
You can also work with layer groups. Click the button with the folder at the bottom of the Layers panel to create a group. You can now drag all the layers you want into the group.
You can, for example, make all the layers within this group visible or invisible at once. The advantage of layer groups is that they help you keep everything more organised.
7. Layers and filters
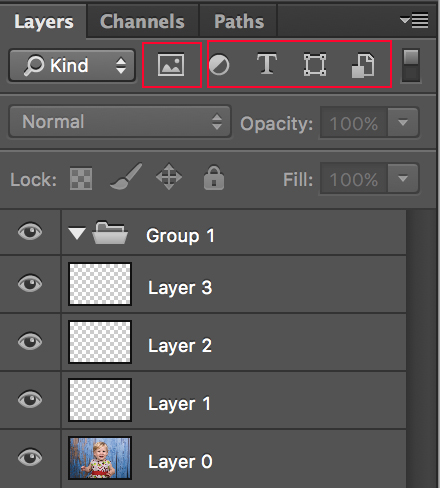
It is possible to work with different types of layers, including pixel layers, text layers, shape layers, section masks, smart objects, fills and adjustment layers. Each type of layer has a different appearance in the Layers panel, so it can be recognised immediately.
If you are working with many layers, you can apply a filter using the buttons next to Kind. As soon as a filter is enabled, the box on the far right of the screen turns red.
8. Adjustment layer
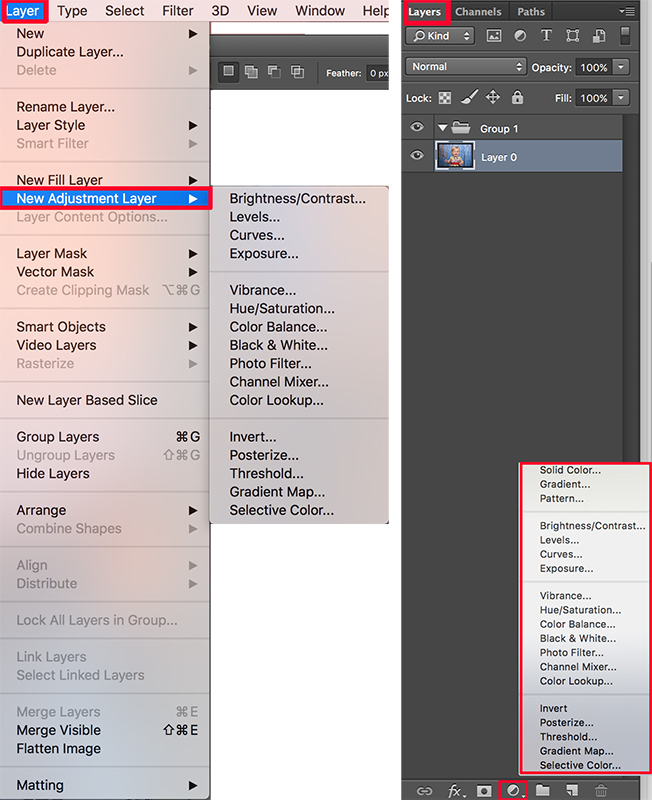
With adjustment layers, you can make all kinds of non-destructive adjustments to your photo. So you can easily go back. Thanks to an adjustment layer, you can readjust the brightness, vibrance or colour balance at any time.
If you are not happy with it, delete the layer or hide it. To create a new adjustment layer, click the black-and-white circle in the Layers panel, or choose Layer, New Adjustment Layer from the menu.
9. Editing an adjustment layer
Once you have created the adjustment layer, you can choose which edit you want to add to this layer. For example, Levels. You then make the adjustments in the Properties panel.
You can return at any time via the Layers panel to make small adjustments. Simply click the black-and-white circle in the Layers panel to open the Properties panel again.
10. Fill layers
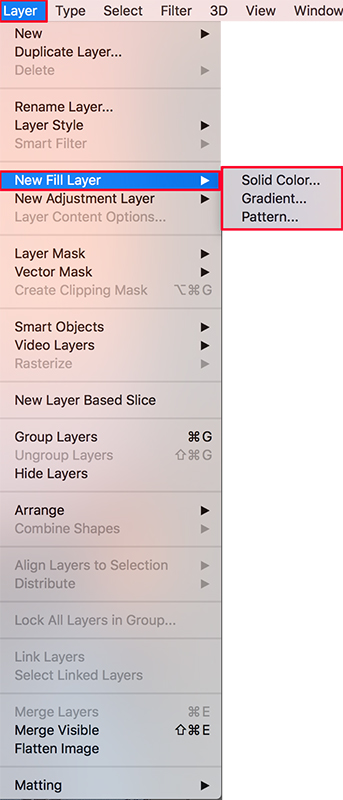
With fill layers, you can fill a layer with a solid colour, a gradient or a pattern. They have no effect on the layers underneath, whereas adjustment layers do. Choose Layer, New Fill Layer and select Solid Colour, Gradient or Pattern.
You can choose further details in the dialogue box. With Gradient Fill, for example, you can choose the type of Gradient, the Style and Angle. Just like with an adjustment layer, you can change the details at any time.
11. Adjusting opacity
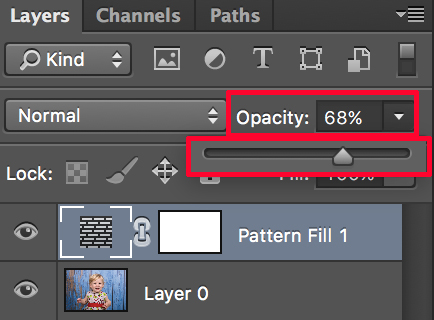
You can adjust the opacity of every layer. It is set to 100% by default, and you can reduce this percentage using the slider. This makes the layer less intense. This option can be useful if you want to tone down the effect of a layer.
12. Layer style
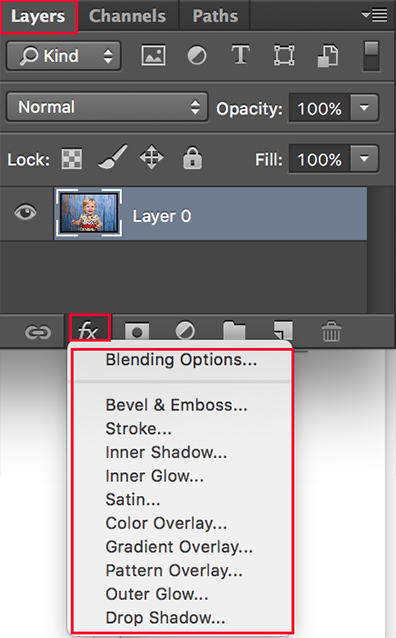
It is also possible to link a number of effects, such as shadows and borders, to your layer. Layer styles ensure that the effects remain applied to the content, even if you move it at a later time. You apply a layer style by clicking the fx button at the bottom of the Layers panel. With Stroke, for example, you can create a border around your photo.
13. Layer masks
With layer masks, you can use only part of a layer for something. For example, a mountain range without the grey clouds above it. You can then insert a beautiful blue sky using another photo.
To do this, select a layer and click the button with the rectangle and circle at the bottom of the Layers panel. A black brush makes parts transparent, while a white brush undoes this.
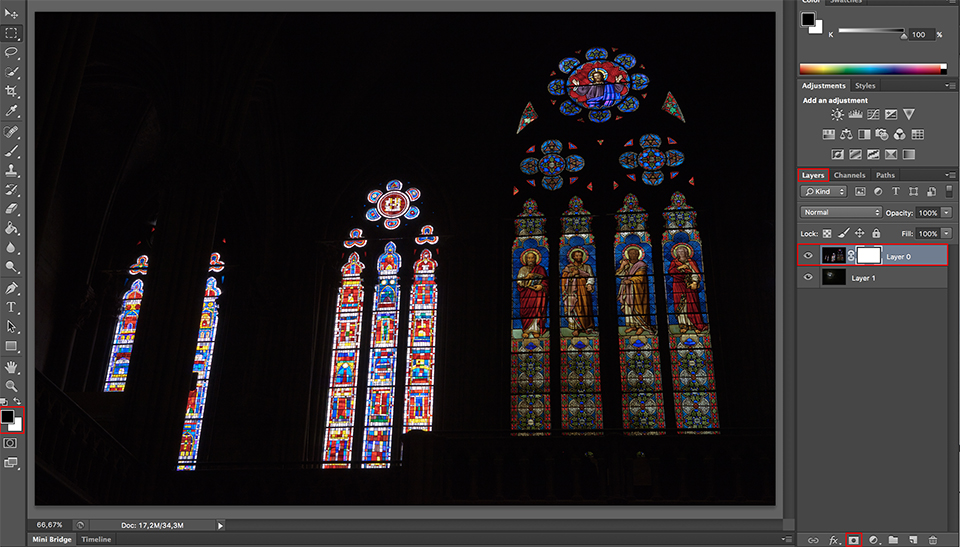
In this case, I open a photo of the interior of a church and another photo of the moon shining through the clouds. You now need to copy the photo of the moon as a layer onto the photo of the church interior.
First create a copy layer using the Ctrl-J keyboard shortcut from the photo of the moon, and select the top layer, the copy, by clicking it with the mouse.
Then choose Layer, Copy Layer from the menu, and for Destination choose the document or filename of the photo of the church in this case. You will now see two layers in the photo of the church interior, including the layer containing the photo of the moon.
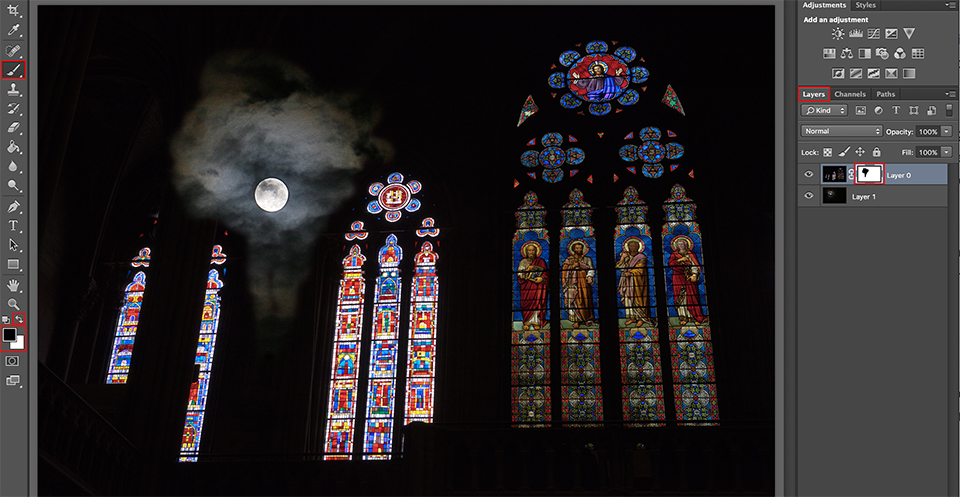
Now create a layer mask on the top layer, the one with the church interior. Using a black brush, first set the foreground and background colours to black and white with the Ctrl-D keyboard shortcut. You can swap the foreground and background colours using the arrow. This reveals the moon and the small wreath of clouds.
Then switch to a white brush as the foreground colour, using the arrow between the foreground and background colours, and erase the unwanted parts.
14. Smart object
If you reduce the contents of a layer, for example via Edit, Transform, Scale, the excess pixels are discarded. If you change your mind and want to make an object larger in the image after all, you will get a lower resolution. By converting a layer into a smart object, you retain the original resolution in the background, so you can always go back to the beginning.
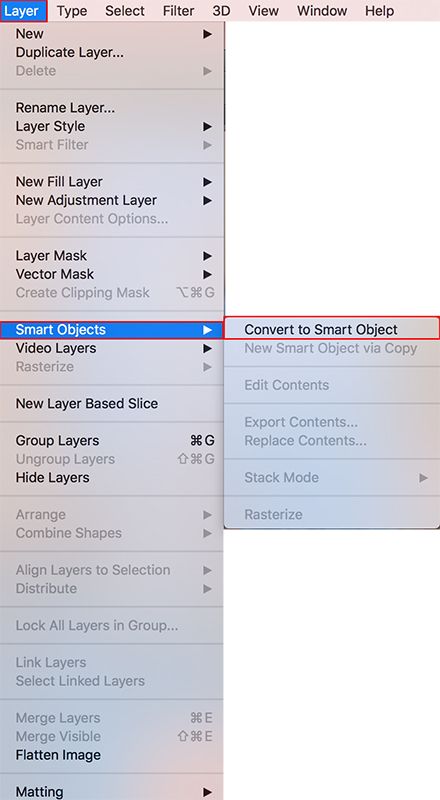
To convert a layer, choose Layer, Smart Objects, Convert to Smart Object.
15. Multiply layer mode
If you want a different background for the model you photographed, you can cut out your model, but it is quicker and easier to change the layer mode.
Open the photo with, for example, a white background and paste this background into a new layer. Make sure the new background is below the other photo in the Layers panel.
Select the layer with the object on the white background and change the Layer Mode from Normal to Multiply.
Here is a nice video about using blending modes to blend layers together:
16. Colour-coding layers
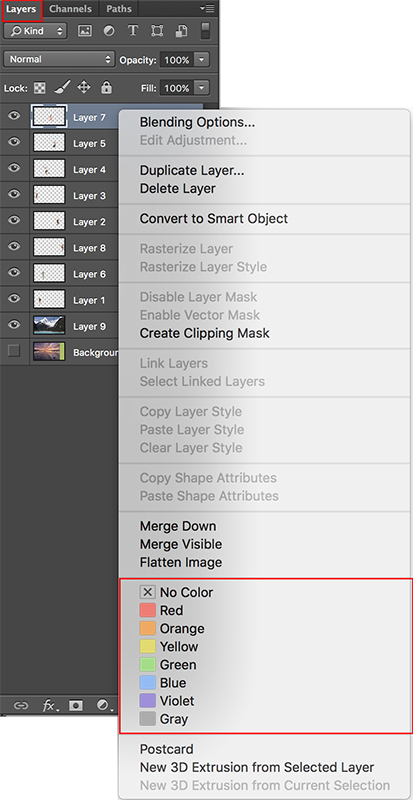
If you are working on a great many layers at the same time, you can easily lose track. It is then useful to use colour codes. You can assign a colour to each layer.
Select a layer in the Layers panel and then choose the colour you want from the right-click menu. This allows you, for example, to indicate which layers still need some work.
Tips or ideas?
Do you already have experience working with layers, and do you have any tips or fun ideas about what you can do with them? Let us know in the comments!
Want to learn more about Photoshop image editing?
At Photofacts Academy, our online learning environment for photographers, we have various courses about Adobe Photoshop.
- Photoshop for Beginners (Johan Elzenga)
- Photoshop for Photographers (Piet van den Eynde)
- Photoshop for Advanced Users (Marit Hilarius)
- Photoshop Effects (Elja Trum)
And much more...
You can follow these courses for two weeks with a free trial membership.
About the author
Michelle Peeters is fotografe en oprichter van DeuxBleus Fotografie. Michelle herkent het bijzondere in het gewone en het gewone in het bijzondere. Ze heeft zich nooit willen specialiseren en is daardoor van alle markten thuis.
You might also like
-
 Review: The Photoshop Layers Book - Johan Elzenga
by Michelle Peeters
-
 Save a Photoshop file with layers
by Michelle Peeters
-
 Street photography tip: Add layers to your street photo
by Michiel Heijmans
-
 Copying and pasting in Photoshop
by Michelle Peeters
-
 Photoshop tip: Keep your layer stack organised
by Nando Harmsen
-
Photoshop tip: Use a copy of a merged layer
by Nando Harmsen
15 comments
-
 Rob wrote on Saturday 29 July 2017 at 18:54 | reply
Good report and a nice reason to delve further into the subject
Translated from Dutch. -
 Hans wrote on Sunday 30 July 2017 at 11:54 | reply
Clear story. Thanks.
Translated from Dutch. -
 Huub wrote on Sunday 30 July 2017 at 12:06 | reply
A very good and clear article that I can definitely use.
Translated from Dutch. -

 Piet van Kroonenburg
wrote on Sunday 30 July 2017 at 12:28
| reply
Nice and clear explanation for anyone who isn't very familiar with layers yet, hats off! I'm going to recommend it in my Google+ community 'Foto Plaza'.
Translated from Dutch.
Regarding 2. Background layer; personally, I would choose not to unlock the background layer but always make a copy of the layer. In my opinion, that also fits better with the non-destructive nature of working with layers. -
 Michelle Peeters wrote on Sunday 30 July 2017 at 12:47
| reply
@Piet: thanks! And I agree with you, making a duplicate layer (Ctlr-J) is always good, it should actually be a standard operation.
Translated from Dutch. -
 Klaas Jager wrote on Monday 31 July 2017 at 22:04 | reply
Excellent explanation and instruction!! I've often been messing around with layers, but never really understood what I was actually doing. Thanks to this clear description, I get it now for the first time!
Translated from Dutch. -
 Helly Coppens wrote on Tuesday 1 August 2017 at 11:31 | reply
I agree with the previous comments. Learned a lot from the clear explanation. Now to put it into practice!
Translated from Dutch. -
 Hans van Sterkenburg wrote on Tuesday 1 August 2017 at 16:01 | reply
Hi Michelle
Translated from Dutch.
Once again learned a thing or two.
Thanks!
Question:
The layers palette appears all the way on the right. The tool palette is all the way on the left. Shortly after I started using Photoshop, I also moved the tool palette to the right and 'stuck' it to the layers palette. So I no longer have to 'windshield-wiper' across my screen with the mouse.
I never see this applied elsewhere. Why not?
greetings
Hans -
 Jan van de Meerakker wrote on Tuesday 1 August 2017 at 16:03 | reply
Perfect article, very clearly and comprehensibly written. Compliment
Translated from Dutch. -
 Rein wrote on Tuesday 1 August 2017 at 18:00 | reply
The explanation started with a child in the photo.
Translated from Dutch.
In the end result I no longer see a child but other things such as church windows and a lady . I would have liked to see the reslutaat with the child.
Rein -
Michelle Peeters wrote on Tuesday 1 August 2017 at 18:15
| reply
@Hans: this is a matter of personal preference. I personally prefer to have them separate from each other.
Translated from Dutch. -
Michelle Peeters wrote on Tuesday 1 August 2017 at 18:17
| reply
@Rein: that photo with a child was not suitable for demonstrating that specific layer application.
Translated from Dutch. -
 Lauran van Schilt wrote on Tuesday 1 August 2017 at 18:41 | reply
Good article but I'm not a real fan of Photoshop. I do have it along with Lightroom. However, I think Photoshop is the death blow for photography. Call me old-fashioned, but entire generations nowadays are no longer learning how to really take photographs.
Translated from Dutch. -
 Dick de Roos wrote on Tuesday 1 August 2017 at 18:44 | reply
I was already doing quite a lot with layers, but I still learned something from this. Clear and educational. Thanks!
Translated from Dutch. -
 Jan wrote on Wednesday 2 August 2017 at 09:39 | reply
Good article: especially that layers are seriously discussed for once.
Translated from Dutch.
I have been working with this program since Photoshop 2 (1995).
There are many programs on the market but few with the possibilities that Adobe Photoshop offers. Especially the ability to create paths with the pen tool is missing in most programs, which is nevertheless important for working well with layers.
For those for whom it is new but also those with some experience: get to work after Michelle's excellent explanation.
Have your say
Please note: Articles older than a week can only be commented on by signed-in visitors.Would you still like to comment? sign in or create a free account.
Become a better photographer every week
A practical photography tip in your inbox every week.
38,835 photography enthusiasts already receive the tips! More about the weekly mail. Or keep up to date via  Facebook.

Elja Trum
Photofacts; everything to do with photography!
Would you like to take better photos and keep up with what is happening in photography? Photofacts publishes articles that teach you something about photography — from a product announcement to a practical shooting tip or a look at a website. Photofacts covers photography every day and is a hobby project of Elja Trum's that got out of hand. The articles are written by a team of volunteer authors. If you would enjoy writing one or more articles for Photofacts, do get in touch.More about PhotofactsPhotofacts is made possible in part by
