

Where do you place the light for portrait photography?
Monday 7 January 2019, 20:02 by Liesbeth van Asselt | 18,743 views | 21 commentsThis article was translated from Dutch with the help of AI. Read the original.
As a student on the Photography course, I, Tygo, am currently doing an internship with Liesbeth van Asselt from Stapfoto. We found that what we were taught at school about portrait photography does not really match the practical side of things.
So Liesbeth asked me to study lighting setups. I have described my experiences in this blog. It is my second and, at the same time, last blog on Photofacts. From this month onwards, I am back in the classroom!
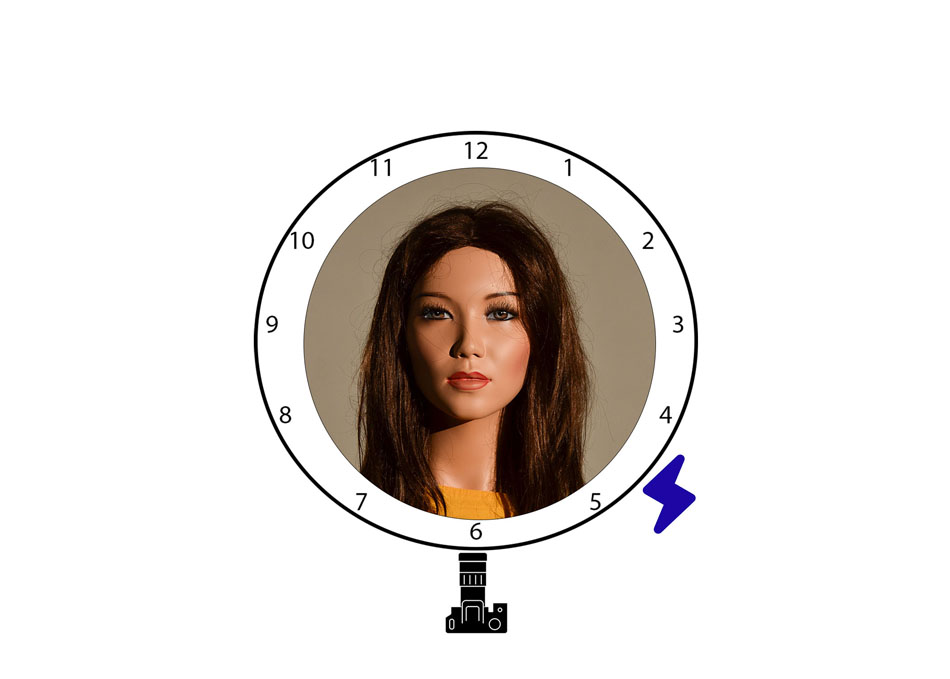
Mono setup for soft light, 1 flash at half five, close by
The flash is positioned at an angle next to the camera, and is triggered via a trigger set. Using this flash setup prevents the 'flat images' you get when you flash straight from the front with the flash on the camera.
With this setup, I found it difficult to stop the shadows on the wall from becoming too distracting in the image. Moving the model further away from the wall eventually solved this. Of course, you can also point a flash at the background to flash away the shadow, or move the flash to four o'clock. But then you get a completely different photo....
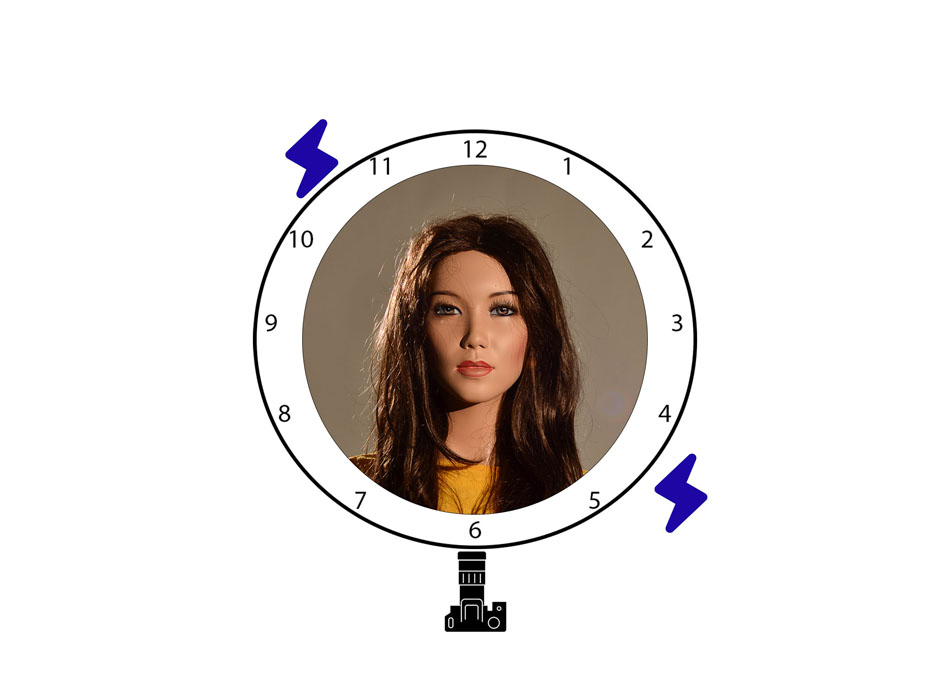
Adding hair light, 2 flashes, at half five and half eleven
The front flash remains at half five. An extra flash is added at half eleven to create a rim of light around the person, the so-called rim light or hair light. This separates the person nicely from the background. The two flashes are positioned in a diagonal line. The person stands between the two flashes.
What I found difficult was positioning the flash at half eleven properly. Otherwise, the light falls into your lens, or for example the shoulder is lit instead of the hair.
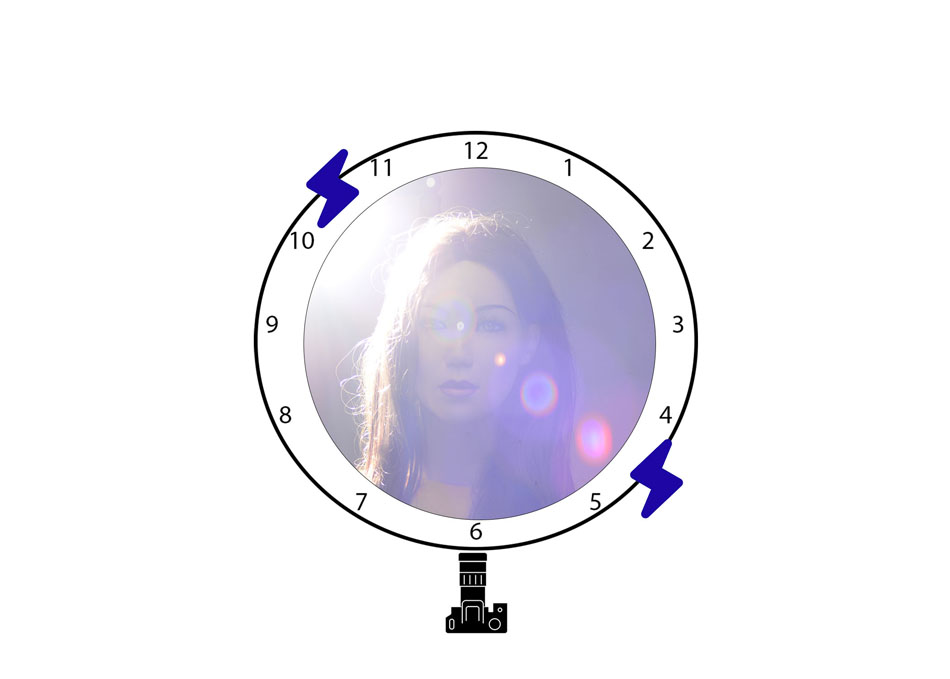
Lens flare, 2 flashes, at half five and half eleven
The setup remains the same as with the previous portrait. This time, however, we remove the lens hood from the camera. If you make sure the flash light falls into your lens, you get a haze in your photo, the so-called "lens flare". Personally, I don't like this, but tastes differ
 .
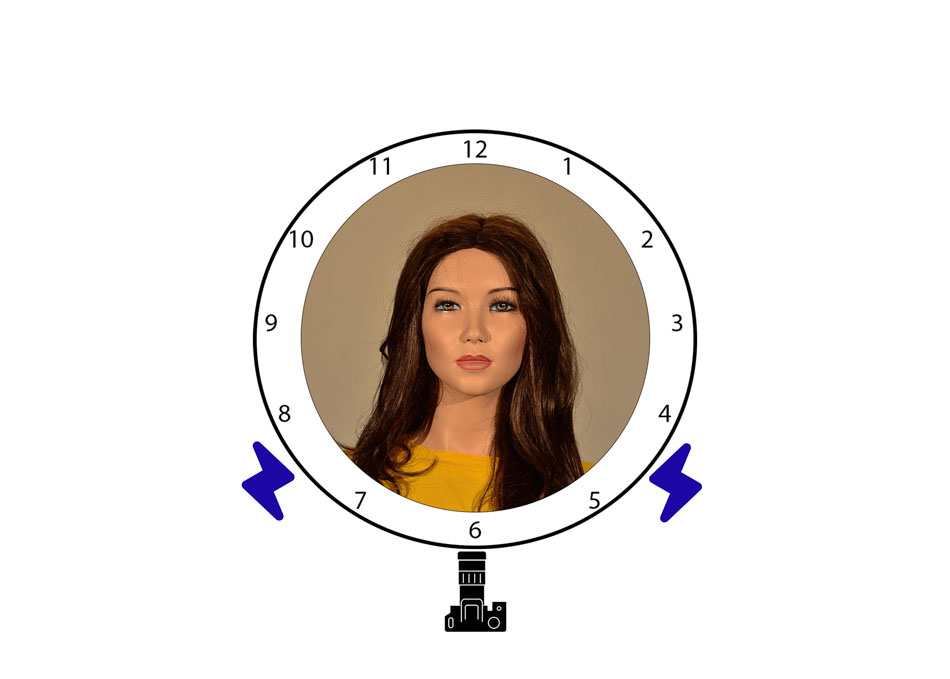
Lightening shadows, 2 flashes, at half five and half eight
Here I left the first flash at half five. I now move the other flash further forward, to half eight. Both flashes are at the same distance from the camera in this setup. One flash is set to 1/64, the other to 1/128. The latter is intended to lighten the shadows.
If you compare this photo with the one from the first setup, you can see that this flash setup, with an extra flash at half eight, makes the shadows disappear.
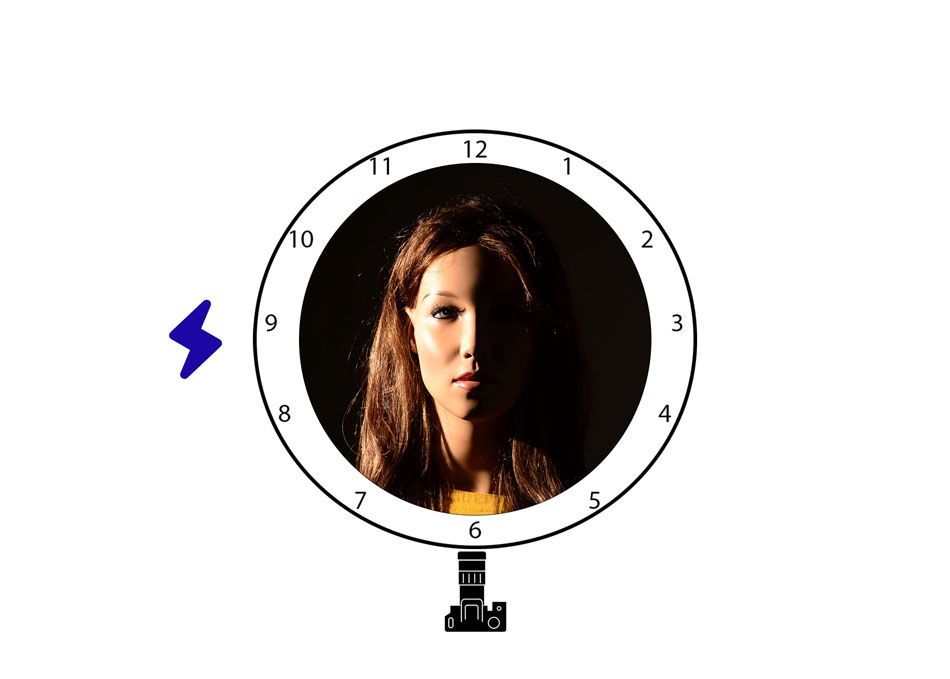
Split light, 1 flash at 9 o'clock, or 3 o'clock
I found this a difficult setup because the flash has to be positioned exactly at the side. Moving it just one centimetre too far forwards or backwards already makes a difference. The shadow line then no longer falls neatly down the middle of the face.
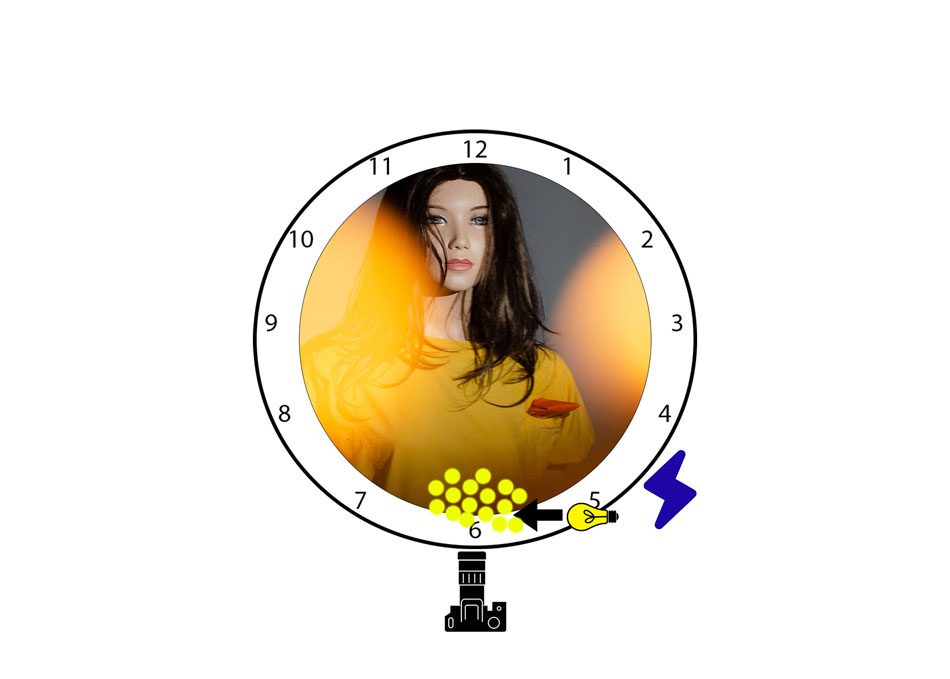
Bokeh, 1 flash at half five
Bokeh? Yes, bokeh. When I read this word, I thought Liesbeth had made a spelling mistake, but it turned out that the word really existed. And that it means blur in a photo....
Photographing this setup was quite difficult. The beads have to be held in front of the lens and lit. The flash has to be set up and positioned, and then you still have to take the photo. Fortunately, I didn't have to direct the model
.I start by focusing on the model using autofocus and then set the camera to manual focus. This means that the AF will not try to focus on the beads later. I then hold the beads in front of the lens. One flash is aimed at the subject from half five. A LED light is positioned next to the beads at five o'clock to light them.
Naturally, you use a wide aperture here to make the beads blurry.
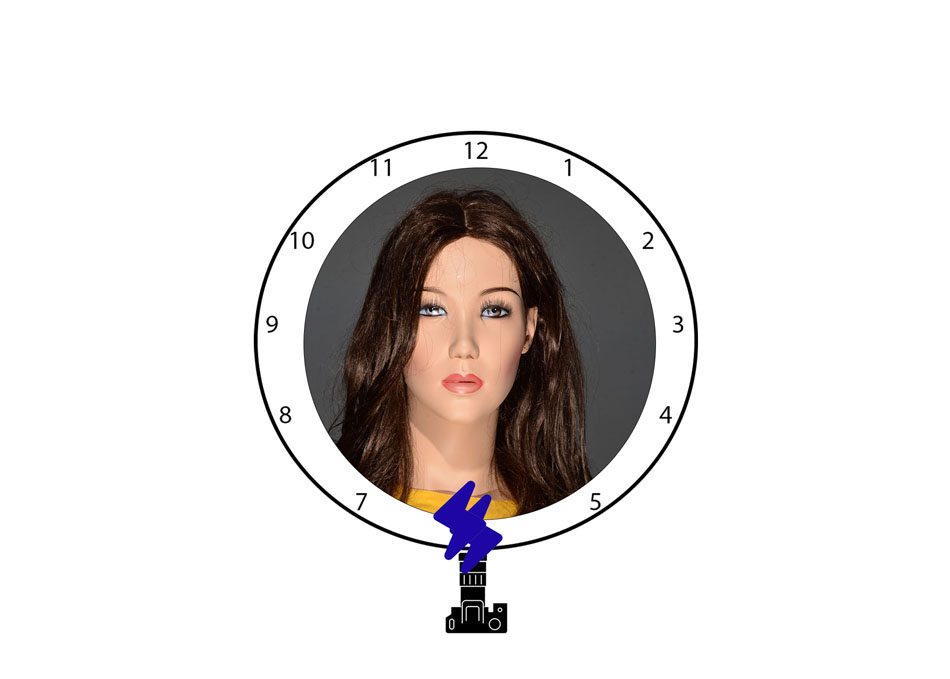
Clamshell, 2 flashes at 6 o'clock
Both flashes are positioned near the camera. One flash is aimed at the subject from above at an angle. The other flash lights the subject from below at an angle. The upper flash is more powerful than the lower flash.
The lower flash is intended to flash away some of the shadows. If you only have one flash available, this second flash can optionally be replaced by a reflector.
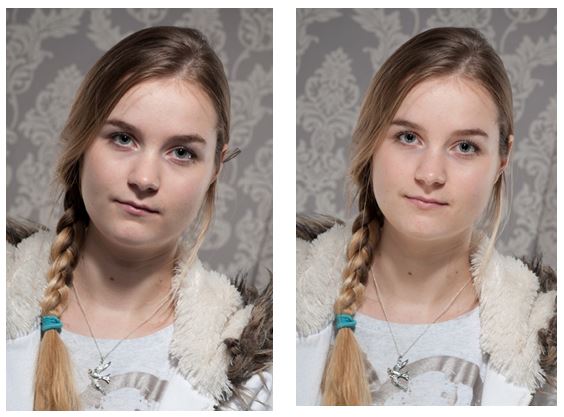
So what is the difference between butterfly light and clamshell light? With butterfly light, there is only a light above the subject, which creates shadows under the nose and chin. The shadow under the nose is shaped like a butterfly, hence the name of this lighting setup. Models often really like this light.
If you add a flash, lamp or reflector to lighten these shadows, you are using a clamshell setup. Finally, here is another photo to show the difference.
About the author
Liesbeth fotografeert met haar bedrijf stapfoto.nl voor websites van bedrijven. Daarnaast verzorgt ze al sinds 2004 (vooral creatieve) workshops zoals lightpainting, flitsen in de natuur, fine art, frozen flowers, paintsplash, infrarood, icm en multi exposure. Daarnaast is er een Stapfoto vakgroep voor de meer gevorderde fotografen.
You might also like
-
 Gobos, what are they and what can you do with them?
by Liesbeth van Asselt
-
 Photographing dogs in the studio
by An Smedts
-
 A tripod in the studio?
by Leen Koper
-
 Inspiration: Portraits in the Studio
by Elja Trum
-
 5 Tips for Variety in the (Home) Studio
by Elja Trum
-
 Recreating a Room in Your Studio
by Elja Trum
21 comments
-
 Edwin wrote on Tuesday 8 January 2019 at 11:37 | reply
Nice to read and well put! I can still learn a lot from this
Translated from Dutch.
-

 Vbruggeman wrote on Tuesday 8 January 2019 at 12:40
| reply
Explained super well! I can work with this as a beginner photographer
Translated from Dutch. -
 guest wrote on Tuesday 8 January 2019 at 13:07 | reply
Well explained , clear, great !
Translated from Dutch. -
Marianne wrote on Tuesday 8 January 2019 at 14:34 | reply
Clear explanation!!!
Translated from Dutch. -
 Chantal wrote on Tuesday 8 January 2019 at 15:15 | reply
Clear and straightforward language, I can really learn from this, thank you
Translated from Dutch. -
 eeuwout baart wrote on Tuesday 8 January 2019 at 16:02 | reply
Clear explanation via clockwork. Hope to receive more articles like this in the future.
Translated from Dutch. -
 Vanderhoven wrote on Tuesday 8 January 2019 at 16:42 | reply
Thanks, I have 2 flash softboxes myself. I'm going to give this a try.
Translated from Dutch. -
Daniel wrote on Tuesday 8 January 2019 at 17:04 | reply
Good article and clearly shown with the clock, I only miss a bit of information about the height of the flashes, are they at the same height as the model or at an angle of 45 degrees above the model (or below the model when it concerns rim or hair light)?
Translated from Dutch. -
 Francis wrote on Tuesday 8 January 2019 at 17:38 | reply
Very clear and straightforward explanation !
Translated from Dutch. -
 Liesbeth van Asselt
wrote on Tuesday 8 January 2019 at 18:23
| reply
@Daniel The flash is generally positioned slightly above the model. You can tell this by where the shadows fall. In the first two photos, for example, this is very clearly visible. The shadow falls diagonally down to the left, so the light must be coming from above on the right. Only with the split light is the flash positioned exactly at the same height as the model.
Translated from Dutch. -
Ingebeeld wrote on Tuesday 8 January 2019 at 19:23 | reply
Clear and helpful explanation!
Translated from Dutch. -

-
 joop wrote on Wednesday 9 January 2019 at 09:11 | reply
great explanation I also have an external flash with a gold-colored umbrella and a silver-colored one, I'm going to get started with this
Translated from Dutch. -

-
 André wrote on Wednesday 9 January 2019 at 20:28 | reply
What I would like to know is how you create a somewhat dark atmosphere with lighting. I want to make a remake of Van Gogh's The Potato Eaters with a group of extras. I'm still looking for the best way to create that dark atmosphere with flash units. So if anyone has any suggestions, please.
Translated from Dutch. -
Liesbeth van Asselt
wrote on Thursday 10 January 2019 at 09:12
| reply
@Andre, then you're talking about low-key photography. That means you'll have to work a lot with snoots on your flashes (that can also be a Pringles can
Translated from Dutch. ). -
André wrote on Thursday 10 January 2019 at 11:53 | reply
@ Liesbeth, lowkey; thanks for your response. I have done this before with portrait studies of 1 model, but for a group of 7 people, the space and the table make it very complicated. I don't think recreating the light from the pendant lamp as a light source and rendering the rest of the space - an old farm barn - in dim light can be done with a few snoots or barndoors.
Translated from Dutch. -
Liesbeth van Asselt
wrote on Thursday 10 January 2019 at 15:02
| reply
@Andre, yes, if you use multiple flashes or lamps. The point is that you have to direct the light with a snoot and barn doors at the point where you want it. The rest of the photo should get some light, but not too much. That light also shouldn't be too harsh, so you need to soften it with, for example, sheer curtains. This falls a bit outside the scope of this blog about where you place the light, as it is more about the tools you put on flashes and/or LED lamps. And about camera settings, of course. I think that's another separate blog
Translated from Dutch.. -
 ErikJan Braakman wrote on Friday 11 January 2019 at 13:44 | reply
Nicely and clearly explained. The pictures make it even clearer. Thank you and good luck with everything!
Translated from Dutch. -
 martinphili wrote on Friday 11 January 2019 at 14:16
| reply
I'm looking forward to that next blog
Translated from Dutch. I think with one little bulb, high ISO and a long shutter speed you'll get the same result as Van Gogh. -
André wrote on Friday 11 January 2019 at 16:56 | reply
@ martin: I’ll post the result of “my” van Gogh; next Tuesday I’m doing a test session with 1 model, the 22nd with the group. I’m indeed going to work with snoots/barndoors and net curtains. Could make a nice blog post. I’ll also ask some acquaintances who work with low light or dark to show their approach.
Translated from Dutch.
Have your say
Please note: Articles older than a week can only be commented on by signed-in visitors.Would you still like to comment? sign in or create a free account.
Become a better photographer every week
A practical photography tip in your inbox every week.
38,938 photography enthusiasts already receive the tips! More about the weekly mail. Or keep up to date via  Facebook.

Elja Trum
Photofacts; everything to do with photography!
Would you like to take better photos and keep up with what is happening in photography? Photofacts publishes articles that teach you something about photography — from a product announcement to a practical shooting tip or a look at a website. Photofacts covers photography every day and is a hobby project of Elja Trum's that got out of hand. The articles are written by a team of volunteer authors. If you would enjoy writing one or more articles for Photofacts, do get in touch.More about PhotofactsPhotofacts is made possible in part by
