

The tilt of a tilt-shift lens explained
Monday 15 March 2021, 20:20 by Nando Harmsen | 8,100 views | 4 commentsThis article was translated from Dutch with the help of AI. Read the original.
I recently wrote about the shift function of a tilt-shift lens. But these lenses have a second special feature, which is tilting the lens. In this article, I explain how the tilt function of a tilt-shift works and what it is useful for.
I have already shown how impressive a tilt-shift lens can look when you set both the shift and the tilt. You may wonder whether a good photo can come out of it at all.

I have already explained the use of the shift function in this article, including how you can use it to prevent converging lines. Although you might expect tilting a lens to do this, it creates a completely different effect.
The focusing plane of a lens
To understand what happens, it is important to realise that a lens has a focusing plane. This is a plane in two directions, from top to bottom and from left to right, that is in focus. Focusing determines how far this plane is from the sensor, the focusing distance.
Everything in front of and behind this plane is out of focus. The greater the distance from the focusing plane, the more blurred objects there are.
You can influence this blur with your aperture. With a large depth of field, the area in front of and behind that focusing plane is also in focus. A shallow depth of field leaves only a very small area in front of and behind this focusing plane in focus.
It is a little more complicated than this, but for now this is an acceptable representation of the situation for explaining how tilt works. What matters is that you understand that this focusing plane always runs parallel to the sensor.
Tilting a focusing plane
The special thing about the tilt function of a tilt-shift lens is that it allows you to tilt the focusing plane. This means that the focusing plane is no longer parallel to the sensor, but is at an angle to it.
How the angle changes when you tilt your lens is determined by the Scheimpflug principle. Going into detail would take us too far, but the drawings I made make it somewhat clear how it works.
An experiment
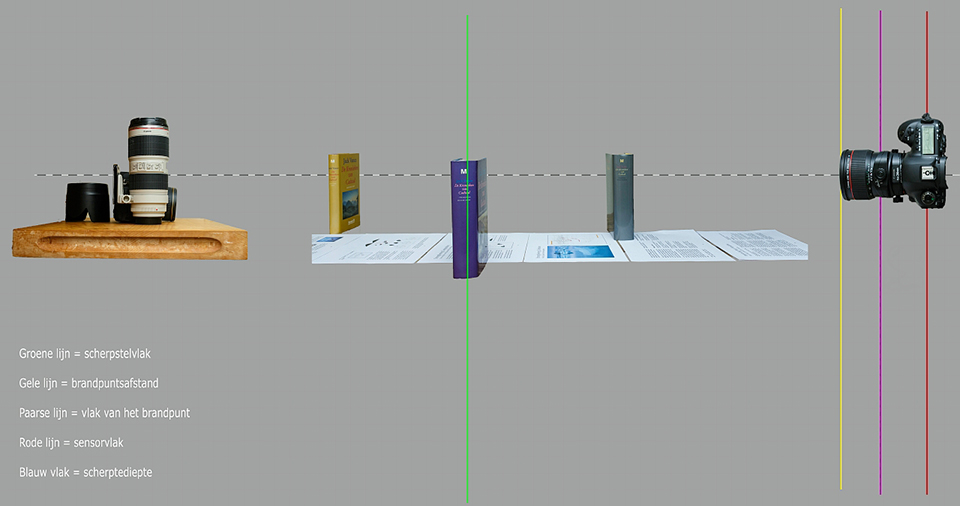
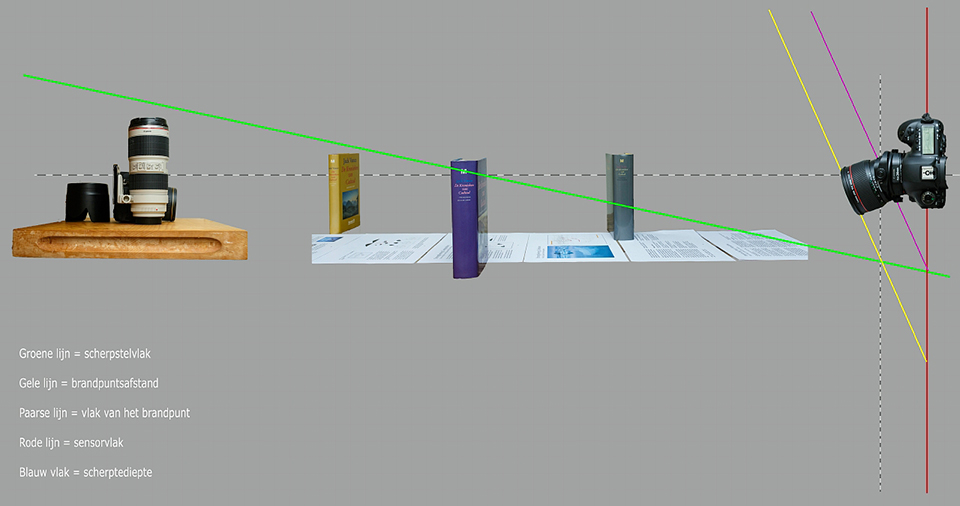
I built a setup to show the effect of tilt, together with a schematic representation of how the focusing plane changes. This schematic representation is only a general illustration and is absolutely not to scale or drawn with exact angles. It is about understanding the principle.

I focused on the middle book. The focusing plane lies at that distance, with everything at that distance appearing sharp. Anything in front of or behind it is out of focus because I used the shallowest possible depth of field.

Tilting the lens down also tilts the focusing plane down. This means that everything is no longer in focus at the same distance, but the focusing plane runs from the bottom up towards an angle at the top.
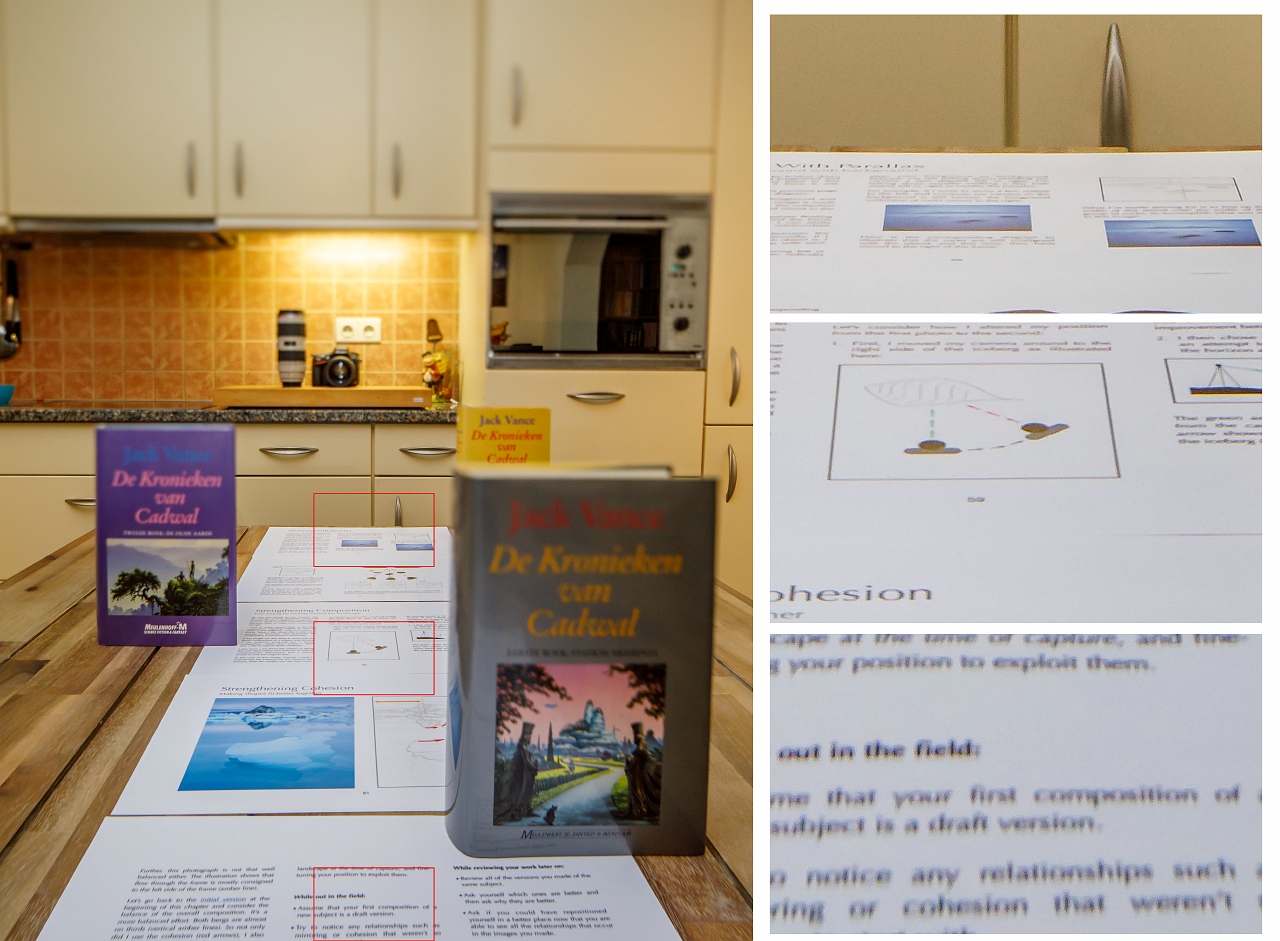
If you can tilt the lens far enough, the focusing plane can even become parallel to the table. This is not possible with an ordinary tilt-shift lens, though. For that, you need a completely different kind of camera.
Creative use of tilt
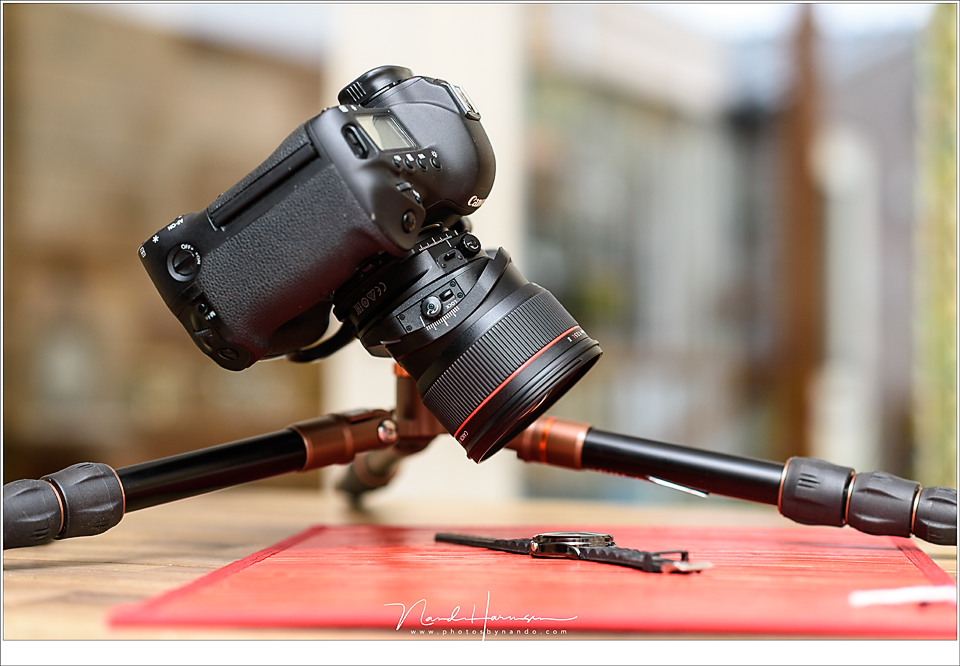
You can position the focusing plane almost entirely as you wish by choosing the direction of the tilt and the camera angle. This allows you to get subjects completely sharp with a minimal depth of field, while the surroundings are out of focus.
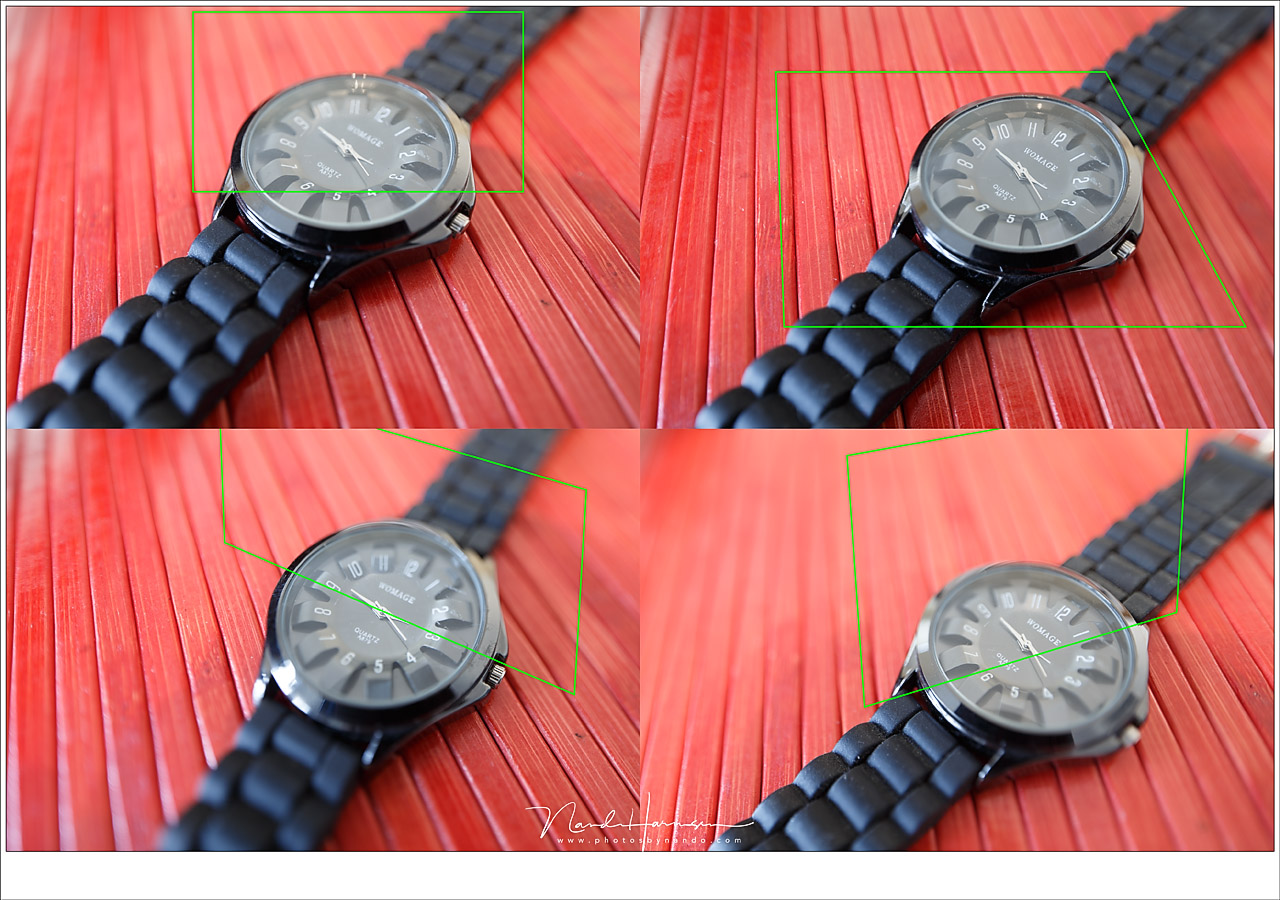
What happens with a large depth of field?
If you introduce depth of field by stopping down your lens, the effect of an ordinary lens is easy to imagine. An area in front of and behind the focusing plane will also appear sharp. We make a lot of use of this in our photography.
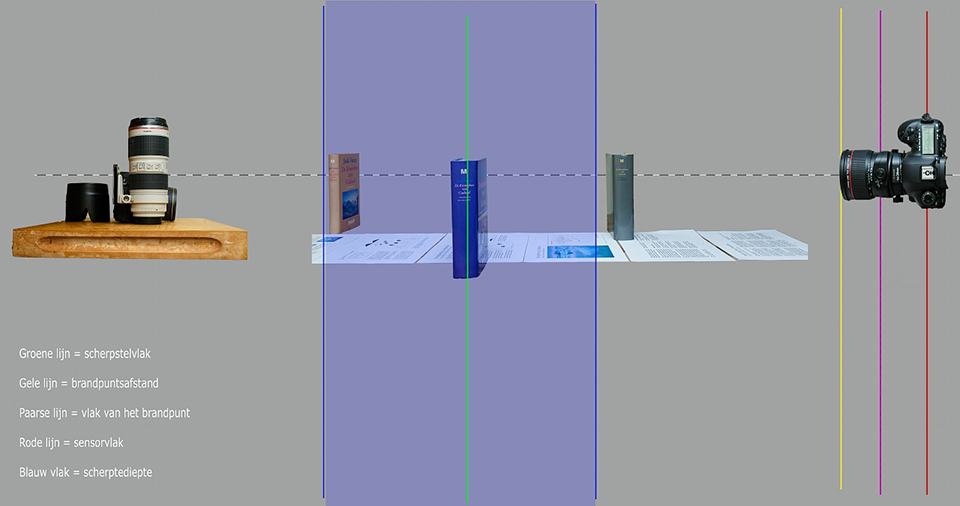
The depth of field is parallel to the sensor, just like the focusing plane. But when you tilt the lens, the area of depth of field tilts along with the focusing plane.
Something unusual happens, though. Your depth of field no longer runs from front to back, but from diagonally below to diagonally above. It has become a triangle that runs backwards from a point close to the lens.
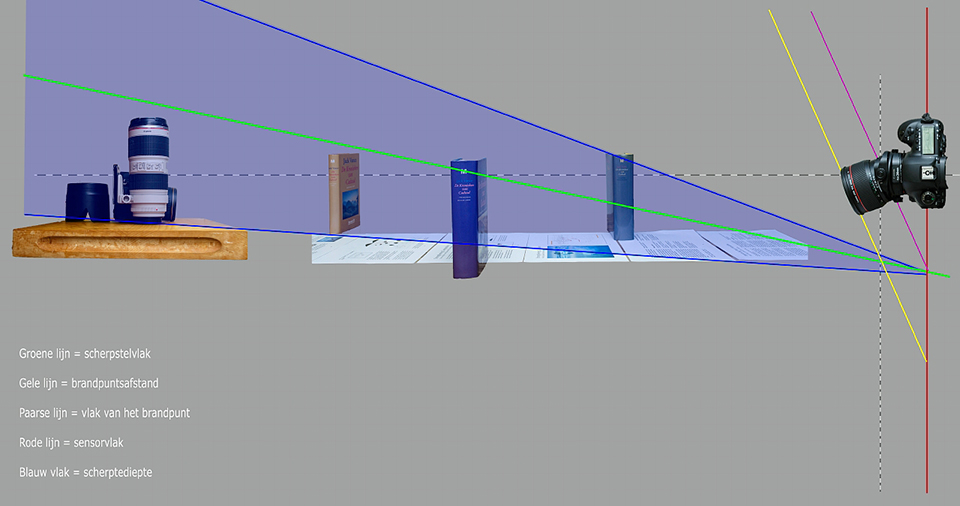
This means that tall objects can extend above the area of depth of field, especially when they are close by. This creates a very unusual effect that you can once again use to give a photo a distinctive look.

Tilting the focusing plane in the other direction
In this example, I tilted the focusing plane so that it is almost parallel to the subjects I want to include in the image. This allows you to get an extremely large depth of field, even with a wide aperture.
You can also tilt the focusing plane in the other direction, giving you an extremely shallow depth of field instead. This makes the subject you are photographing look like a miniature.
In effect, you are simulating the shallow depth of field of a macro photo and applying it to the real world. This is naturally a playful effect that can sometimes produce very fun results. It usually works best with slightly longer focal lengths.

Very specialised use
Using the tilt function of a tilt-shift lens is highly specialised work. It can produce special results, especially when used for photographing landscapes with an extreme depth of field or for product photography, results that cannot be achieved in any other way.

It takes a lot of time to work with the tilt function, and it does not always produce the results you would expect. Especially because the amount a tilt-shift lens can tilt is limited.
If you want to use this to its full potential, you soon end up with large-format cameras, where not only the lens can be tilted, but the photographic plate as well.
These specialist cameras are expensive and are not suitable or necessary for everyone. A tilt-shift lens at least gives you the ability to control the position of your focusing plane to a certain extent.
Would you have a use for the tilt function of a tilt-shift lens? Or is this kind of photography too much for you? Share your opinion in a comment below this post.
About the author
Nando Harmsen has been photographing for more than 40 years. He specialises in wedding photography and landscape photography. Nando also gives talks, workshops, masterclasses and photo trips, and regularly reviews new and interesting equipment.
You might also like
-
 The shift of a tilt-shift lens explained
by Nando Harmsen
-
Tilt-shift effect in landscape photography
by Nando Harmsen
-
 Tilt-shift lens for extreme depth of field
by Nando Harmsen
-
 7 tips for architectural photography
by Michelle Peeters
-
 A tilt-shift adapter for the Canon RF mount
by Nando Harmsen

4 comments
-

 Donald Willemsen
wrote on Tuesday 16 March 2021 at 10:59
| reply
Donald Willemsen
wrote on Tuesday 16 March 2021 at 10:59
| reply
A particularly good article and an equally good explanation. For myself, I can see applications in product/studio photography. Especially if you use a reflective surface for that as well, to get the reflected image completely sharp.
Translated from Dutch.
Unfortunately, TS lenses are financially out of reach for me. I don't have a 'sugar aunt'. 😃 -
 Fon van de Riet wrote on Tuesday 16 March 2021 at 15:10 | reply
also think architectural photography. Eliminate perspective distortion. Nice and clear explanation again Nando. Technical cameras are expensive but tilt-shift lenses are too. Especially with sporadic use!
Translated from Dutch. -
 Marjo van Oosten wrote on Tuesday 16 March 2021 at 19:35 | reply
What a good explanation, I’m not good at math so I always find it difficult to understand concepts like this, but I’m sure I’ll understand it after rereading this, which is useful because I have a Lensbaby Sol45 that I want to get more out of, many thanks!
Translated from Dutch. -
 ifiamminghi wrote on Tuesday 16 March 2021 at 21:34
| reply
ifiamminghi wrote on Tuesday 16 March 2021 at 21:34
| reply
Not easy to explain this! But you’ve managed to do it anyway !
Translated from Dutch.
And in hindsight a good idea to separate the tilt from the shift... Clear! Thanks!
Have your say
Please note: Articles older than a week can only be commented on by signed-in visitors.Would you still like to comment? sign in or create a free account.
Become a better photographer every week
A practical photography tip in your inbox every week.
38,982 photography enthusiasts already receive the tips! More about the weekly mail. Or keep up to date via  Facebook.

Elja Trum
Photofacts; everything to do with photography!
Would you like to take better photos and keep up with what is happening in photography? Photofacts publishes articles that teach you something about photography — from a product announcement to a practical shooting tip or a look at a website. Photofacts covers photography every day and is a hobby project of Elja Trum's that got out of hand. The articles are written by a team of volunteer authors. If you would enjoy writing one or more articles for Photofacts, do get in touch.More about PhotofactsPhotofacts is made possible in part by
