

The shift of a tilt-shift lens explained
Monday 8 March 2021, 20:02 by Nando Harmsen | 6,795 views | 16 commentsThis article was translated from Dutch with the help of AI. Read the original.
We have all heard of a tilt-shift lens. These lenses have the special ability to shift or tilt the lenses relative to the camera. In this article, I explain how the shift function of a tilt-shift works and what it is useful for.
A tilt-shift lens looks impressive, with all its buttons and wheels. It looks even more impressive when you see how such a lens can be tilted and shifted.
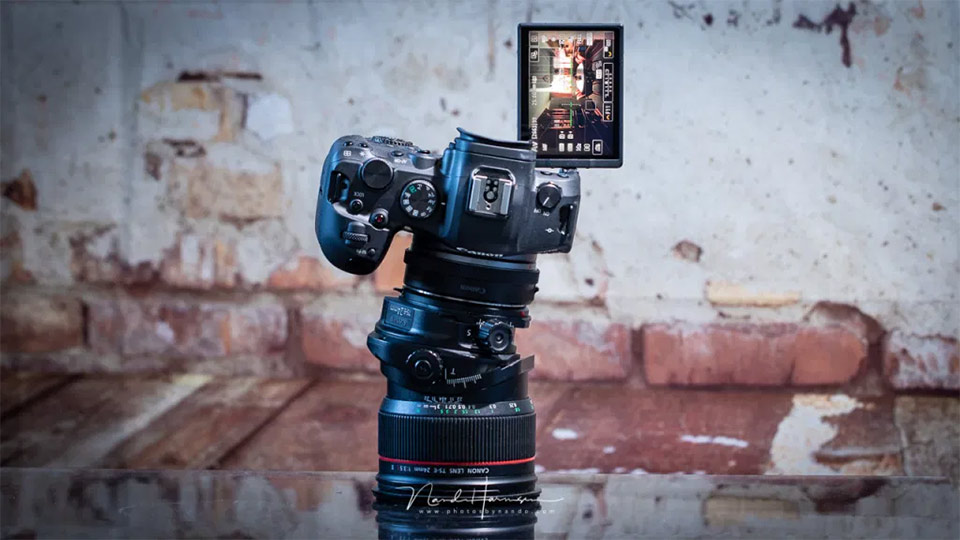
These expensive lenses give you two options, each producing very different results. The first is a tilt function, which changes the angle of the lens relative to the camera. This allows you to tilt the plane of focus, so you can create some very unusual effects.
The second is the shift function, which this article is about. This allows you to shift the lens relative to the camera upwards or downwards, or to the left or right. The question is, why would you want to use this?
Would you like to know more about the tilt function? Then read the follow-up article The tilt of a tilt-shift lens explained.
A solution, but what for exactly?
The shift function shifts the lens relative to the camera. Or rather, relative to the sensor. But what problem is this actually the solution to?
To answer that, we need to look at photographing large subjects, such as buildings. You know the situation, you are standing in front of a building and photographing upwards with a wide-angle lens to get it all in the frame.
The straight lines of the building suddenly run towards a vanishing point. These are called converging lines, a perspective distortion that is sometimes unwanted. If you want to keep the lines straight, there are essentially three possible solutions.
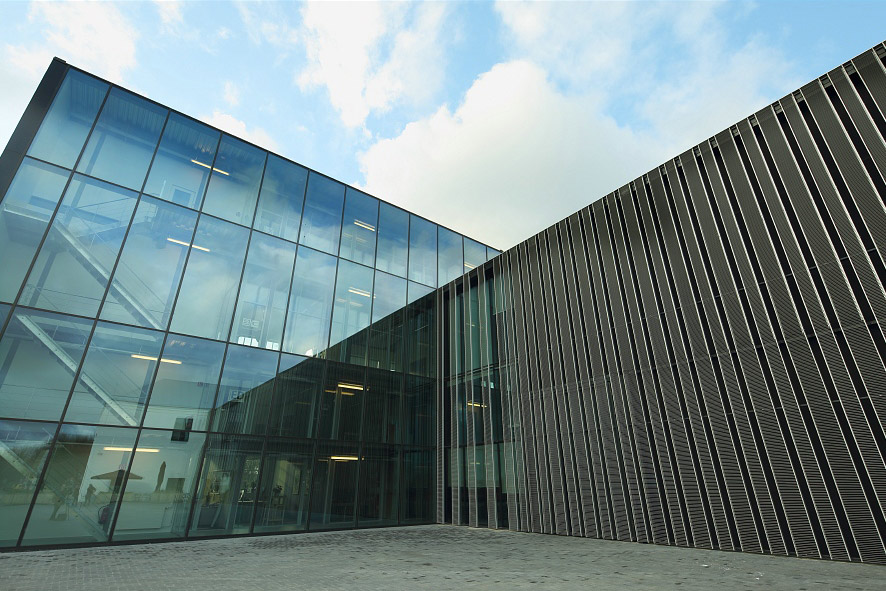
The first solution is to position the camera exactly halfway up the height of your building, so that you can keep the camera perfectly horizontal. The vertical lines will then run neatly vertically. The problem is that this is often impossible, especially with tall buildings.
The second solution is to stand further away and use a longer focal length. This also removes the perspective distortion, provided you can stand far enough away from your building. The problem is that this is often impractical or even impossible. There often is not enough space to move backwards.
The third solution is to use an even more extreme wide-angle lens, so that you can keep the camera exactly horizontal, but then you get an unnecessary amount of ground in the frame. You will then have to crop it out.
Did I say there are three solutions to the problem? No, there is a fourth, and that is the shift function of a tilt-shift lens.
How the shift function works
You may know that a lens has an image circle. This image circle is large enough to cover the surface of the sensor. A tilt-shift lens has a much larger image circle.
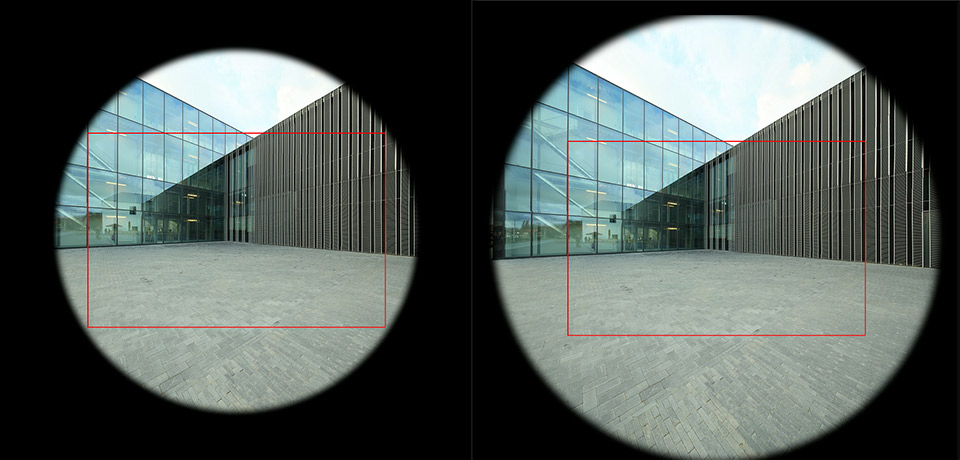
Because you have a much larger image circle, you can shift the area recorded by the sensor. More accurately, you can move the image circle by moving the tilt-shift lens relative to the sensor.
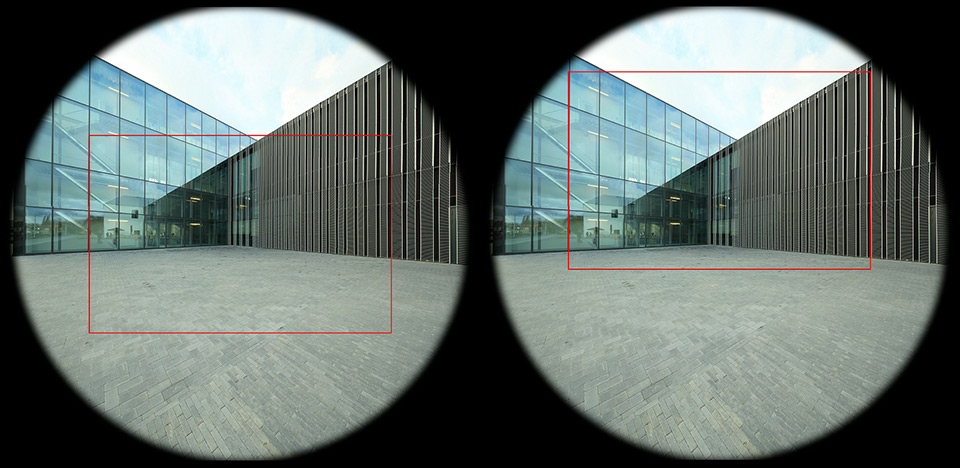
Keep your camera level
When you keep the camera exactly horizontal, you prevent converging lines. The problem is that you then get a lot of foreground in the frame and miss the top of the building. The large image circle of the tilt-shift does capture the top of the building.
By shifting the lens, you make sure that you use exactly the part of the image circle that you want to capture. The rest stays outside the frame. The photo below is the result, with neat, straight lines.
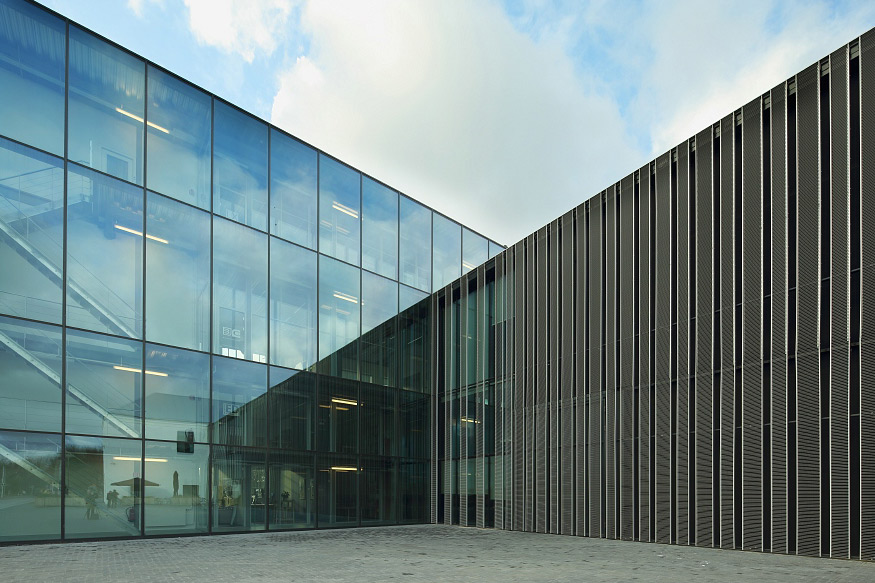
It is important to keep your camera perfectly horizontal. This is the only way to prevent those converging lines caused by perspective distortion.
Straightening with photo editing
Of course, these days it is very easy to straighten a photo in photo-editing software. This also works with the wide-angle perspective distortion that occurs when you point the camera upwards. You can easily correct the converging lines this way.
The consequence of this correction is, first of all, loss of image, particularly in the top left and right corners. That part of the photo has to be 'stretched' to make the vertical lines truly vertical in the photo.
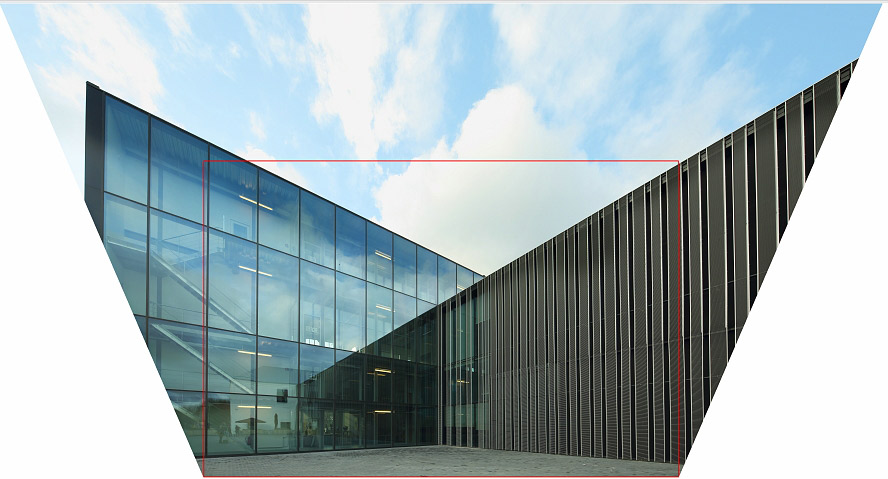
Stretching a photo is bad for the quality. Because you pull the pixels apart, the photo-editing software has to invent additional pixels. However good it has become at doing this, it cannot bring back any detail.
Incidentally, the stretching upwards was done to get the correct proportions of the building. Stretching only to the left and right makes the building look squashed.
Whether or not to get a tilt-shift
Of course, you can reduce a photo enough that the missing details caused by straightening it with software are no longer visible. In other words, there are always workable solutions you can come up with to end up with a good photo.
If you only need to make these corrections occasionally, buying a tilt-shift lens is of course not immediately necessary. Although, you can use one to photograph other things too. I will probably write another article about that at some point.
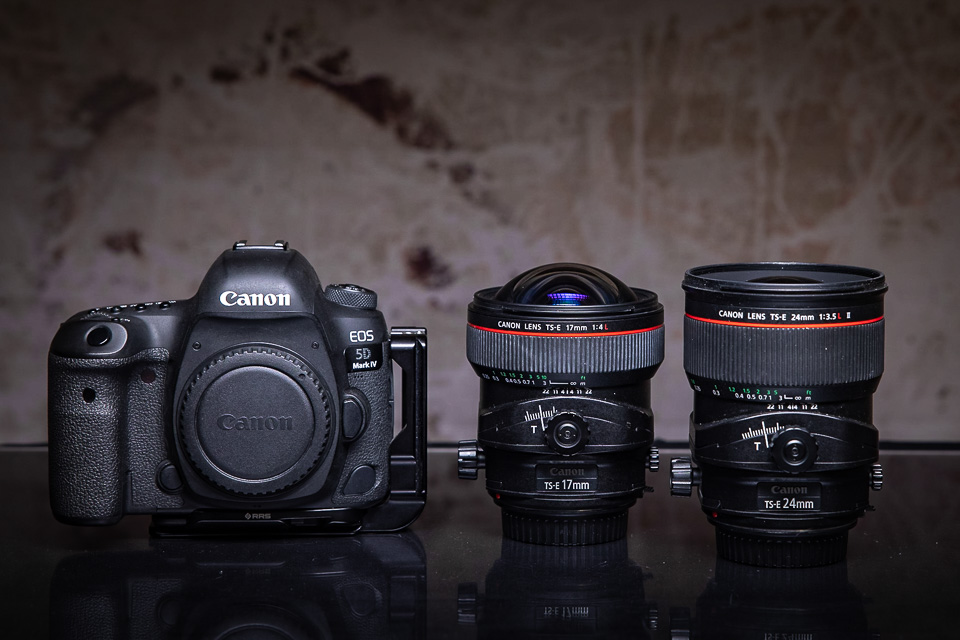
However, if you photograph a lot of architecture, interiors or perhaps even property, a lens with a shift function can be very useful. It means you do not have to use software tricks to straighten slanted vertical lines. And your workflow is simply much easier.
Do you often photograph buildings and structures? Do you also struggle with converging lines, or do you accept them? Would you consider getting a tilt-shift, or do you already have one? Share your experiences in a comment below this post.
About the author
Nando Harmsen has been photographing for more than 40 years. He specialises in wedding photography and landscape photography. Nando also gives talks, workshops, masterclasses and photo trips, and regularly reviews new and interesting equipment.
You might also like
-
 The tilt of a tilt-shift lens explained
by Nando Harmsen
-
Tilt-shift effect in landscape photography
by Nando Harmsen
-
 7 tips for architectural photography
by Michelle Peeters
-
 Human Interior - Thijs Wolzak
by Michelle Peeters
-
 Tilt-shift lens for extreme depth of field
by Nando Harmsen
-
 A tilt-shift adapter for the Canon RF mount
by Nando Harmsen
16 comments
-
 Dick wrote on Tuesday 9 March 2021 at 10:36 | reply
There is a 4th option, namely DxO ViewPoint: https://www.dxo.com/dxo-viewpoint/ for if you find a tilt-shift lens a bit too expensive after all.
Translated from Dutch. -

 Nando
wrote on Tuesday 9 March 2021 at 10:57
| reply
Nando
wrote on Tuesday 9 March 2021 at 10:57
| reply
@Dick:
Translated from Dutch.
it doesn't matter what software you use to correct perspective. The effect you get remains the same: loss of image area and a certain deterioration in image quality due to the editing.
But as I say in the article: for that one time, it's not so bad. But if you need this kind of editing every time, it might be worth considering a tilt-shift after all. There are also cheaper ones available than the original. -
 Donald Willemsen
wrote on Tuesday 9 March 2021 at 10:58
| reply
Donald Willemsen
wrote on Tuesday 9 March 2021 at 10:58
| reply
A great article. The other function, which was not directly covered, also produces remarkable results.
Translated from Dutch.
The downside of these lenses is the price. The ones from Canon (a choice of 3 lenses) all cost between €2000 and €2500.
Samyang's TS lens is more than €1000 cheaper. That makes me wonder what causes the enormous price difference. It can't just be the quality.
Nando, I hope you will also pay attention to the other function of the lens. -
Nando
wrote on Tuesday 9 March 2021 at 11:29
| reply
@Donald:
Translated from Dutch.
Canon has more than 3 tilt-shift lenses. A 17mm, a 24mm, a 50mm, a 90mm and a 135mm. Then there are the older 45mm and 90mm versions.
Samyang is cheaper with all its lenses, so it is not so surprising that this also applies to the tilt-shift lenses.
I will cover the tilt function in my next article. -
 Martinus wrote on Tuesday 9 March 2021 at 11:52 | reply
The distortion can also be removed quickly with Skylum Luminar AI.
Translated from Dutch. -
 Alex Leys wrote on Tuesday 9 March 2021 at 12:16 | reply
Simply explained, great article! As for the difference between an "expensive" Canon and a "cheap" Samyang, I would still like to add the following; when I wanted to start working with tilt-shift, I bought the Samyang because of the price. However, the quality (e.g. edge sharpness, chromatic aberration...) could not convince me. I rented the Canon 17mm for a weekend and was immediately sold, the difference is definitely worth the extra cost when you regularly do architecture and/or real estate photography!
Translated from Dutch. -
 André Kremer wrote on Tuesday 9 March 2021 at 12:18 | reply
Used to use a Linhof technical camera for architectural photography. But also used it for portraits where, with a half-profile, the plane of focus can be placed on both eyes at a wide aperture; gives a distinct effect. Unfortunately I no longer have the Linhof available, I am curious whether anyone has experience with this with current tilt-shift lenses.
Translated from Dutch. -
Donald Willemsen
wrote on Tuesday 9 March 2021 at 13:01
| reply
@André Kremer, photographer Tony Vingerhoets is a specialist in the field of TS lenses. Look him up on Google.
Translated from Dutch. -
 Martin
wrote on Tuesday 9 March 2021 at 17:10
| reply
Martin
wrote on Tuesday 9 March 2021 at 17:10
| reply
I have the Nikon 24 mm shift-tilt lens. A nice lens with which I can photograph buildings much better than with my other lenses. Unfortunately, it doesn't have autofocus and it turns out to be difficult to take photos that are 'tack sharp'. Maybe I should have the lens calibrated sometime or take the Focusing for Advanced Users course...
Translated from Dutch. -
 Bernard wrote on Tuesday 9 March 2021 at 21:52
| reply
Bernard wrote on Tuesday 9 March 2021 at 21:52
| reply
@Martin. My Canon "L" series TS24mm also has no autofocus. Enlarge the image on the display and then focus. The quality is excellent. Nando, thanks for your article, I’m curious about the "tilt" story.
Translated from Dutch. -
Nando
wrote on Wednesday 10 March 2021 at 09:47
| reply
@Martin;
Translated from Dutch.
@Bernard already said it: use your Live View and magnify the image to focus perfectly.
For real estate, I always use f/8 or f/11. Then the depth of field is large enough to get almost everything in focus. I also use the depth-of-field scale on the lens (with Canon). I don't know if Nikon has that too, but it's a useful guide.
Just keep in mind that the scale isn't always equally accurate. -
Donald Willemsen
wrote on Wednesday 10 March 2021 at 10:24
| reply
@Martin,
Translated from Dutch.
@Nando as an addition: a number of cameras have a depth of field preview button. Canon in any case (on the body close to the lens mount). The Nikon may also have such a button -
Martin
wrote on Wednesday 10 March 2021 at 14:54
| reply
@ Donald
Translated from Dutch.
@ Nando
There's also such a button on my Nikon D750, but when you press it, the image often becomes so dark that it's difficult to assess the depth of field. By the way: is it an idea to devote a course to tilt-shift lenses? -
-
Donald Willemsen
wrote on Thursday 11 March 2021 at 11:47
| reply
@Nando, I can also see you giving a tilt/shift course at Photofacts Academy at some point. That way you'll already have a better idea before moving on to such a relatively expensive purchase.
Translated from Dutch.
Maybe you'd also be interested in writing a review of the cheaper alternative: the Samyang TS lens. -
Have your say
Please note: Articles older than a week can only be commented on by signed-in visitors.Would you still like to comment? sign in or create a free account.
Become a better photographer every week
A practical photography tip in your inbox every week.
38,982 photography enthusiasts already receive the tips! More about the weekly mail. Or keep up to date via  Facebook.

Elja Trum
Photofacts; everything to do with photography!
Would you like to take better photos and keep up with what is happening in photography? Photofacts publishes articles that teach you something about photography — from a product announcement to a practical shooting tip or a look at a website. Photofacts covers photography every day and is a hobby project of Elja Trum's that got out of hand. The articles are written by a team of volunteer authors. If you would enjoy writing one or more articles for Photofacts, do get in touch.More about PhotofactsPhotofacts is made possible in part by
