

Greenscreen and replacing the background
Wednesday 12 December 2018, 20:54 by Michelle Peeters | 64,233 views | 4 commentsThis article was translated from Dutch with the help of AI. Read the original.
If you photograph someone in front of a greenscreen, or chromakey green background, you can remove and replace the background quite easily afterwards. You can use any background you like in your photo.
You have undoubtedly seen it before, weather presenters on TV giving their weather report in front of a special green screen, which is replaced by a weather map using software. The presenter only sees the green screen, but on TV you see a weather map.
In the past, placing a different background behind your subject was always difficult, if not impossible. It required a great deal of technical knowledge and experience. Now you can do this quite easily with a greenscreen, without needing too many Photoshop skills.
In fact, you use Photoshop to make the background transparent so that the subject can be placed in front of another background.
Photographing a subject, such as a model, in front of a greenscreen does require some skills and rules that you need to follow for an acceptable result.
In this article, I will show you how to do this easily in Photoshop after photographing your model correctly in front of a greenscreen.
How does chromakey work?
With your photo editor, you place two images on top of each other. You place the subject you photographed against a chromakey background on the top layer. By making the green colour transparent in the software, the underlying layer becomes visible.
A nearly fluorescent green background colour is usually used for chromakey. The colour of suitable backgrounds is often referred to as "chroma green". This shade occurs least often in skin tones. You obviously do not want to make the skin transparent.
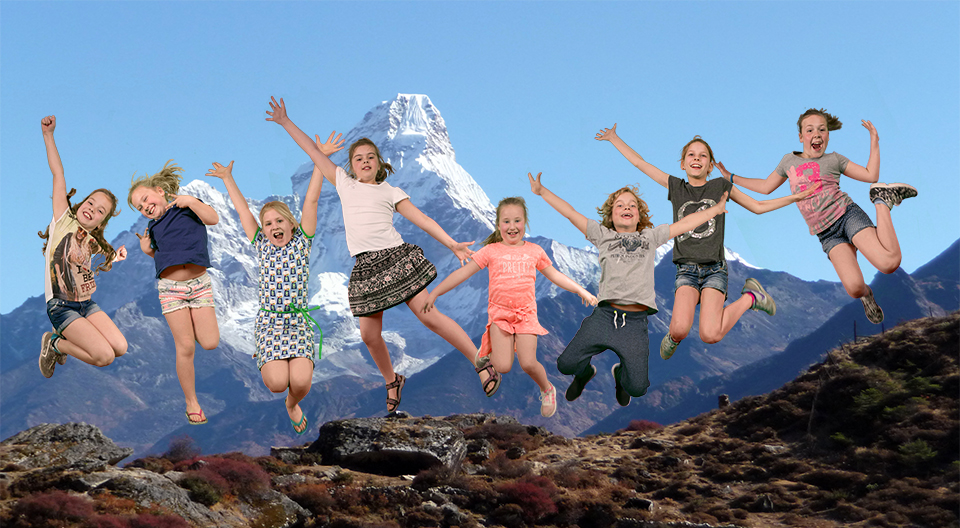
This allows you to photograph someone against a green background and easily "cut out" the person and place another background behind them, such as a beach, forest, city or the moon.
Cutting out hair is always a nightmare, especially if someone has a full head of hair. If you photograph your model in front of a greenscreen, you can often isolate them from the background with just a few mouse clicks.
Taking the photograph
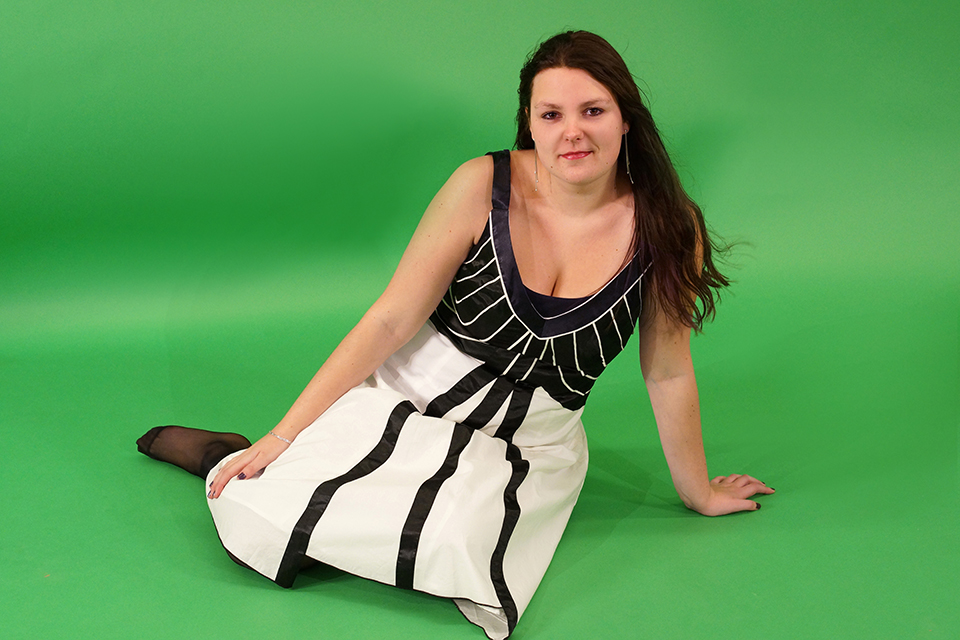
But how do you approach this and what should you look out for? Below is a step-by-step plan with tips for photographing your model properly in front of a greenscreen:
- Place the subject at a good distance from the background. Two metres is the minimum. This minimises shadows and ensures that the background does not cast a glow on the subject
- It is important to have a very even background. Folds and creases give the background a different colour in places, and those areas will not be filtered out.
There are various types of backgrounds: paper rolls, cotton background cloths or a foldable background screen. Because chromakey works best with a very even background, a paper background is by far the best choice: smooth, taut, even and non-reflective - Good studio lighting is very important. You can use flash or continuous light, daylight lamps, for this. Your lighting minimises shadows in the background and illuminates your model realistically.
To ensure that the background colour is as even as possible, it is best to light the background separately. The subject will then not cast a shadow on the background. You do this by directing one or two extra lamps only at the background - Equip your lamps with a large softbox, or place your lamps further away from your subject. More light then falls around the subject and the shadow is already greatly reduced
- You can use the same techniques for photographing in front of a greenscreen as for normal studio photography. So you use at least a main light and a fill light. In photography, a backlight, or rim light, is optional, but with a greenscreen it is actually essential for a really good result.
The backlight creates a light edge on the model's shoulders and hair. This creates more depth between the model and the background. The model does not appear to be "stuck" to the background - Both daylight and flash lamps produce bright white light: neutral daylight, roughly like daylight on an overcast day. The colour temperature is then approximately 5500K.
If you want to project someone onto a beach and the light in the background is very sunny, it looks more natural if you also light the subject in the studio with a more "sunny yellow" light.
A commonly used colour temperature for this is 3200K. This is warm yellow light. You do this by allowing the light to fall indirectly on your model via a gold-coloured reflector - Use as much depth of field as possible, meaning a small aperture. If you focus on the model's face and their collar is out of focus, the colours of the collar will blend into the background. There is then no clean line between the subject and the background. Result: the cut-out will not look good
- Your model is better off wearing no green clothing. A small green detail in the clothing is acceptable, as long as it does not touch the green background. A green pendant on a chain is fine, but green sleeves are not. This will be impossible to cut out later.
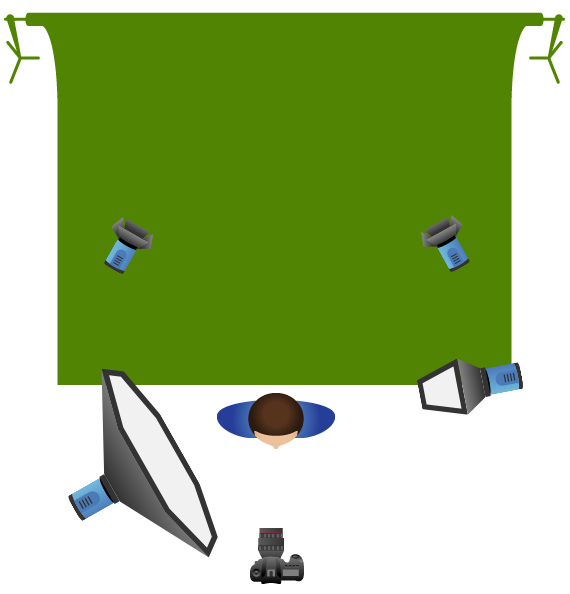
The perfect greenscreen setup
Because of the background lighting, the person will not cast a shadow on the background, so it is perfectly even. Your model stands well in front of the background and therefore does not get a green glow.
The main and fill lights give your model natural lighting: the main light is slightly brighter, so there will be a little more shadow on the left side of the body than on the other side.
Removing the background in Photoshop
Once the photo has been properly taken in front of the greenscreen according to the instructions above, you can start editing it in Photoshop, with a completely new background behind your model as the end result.
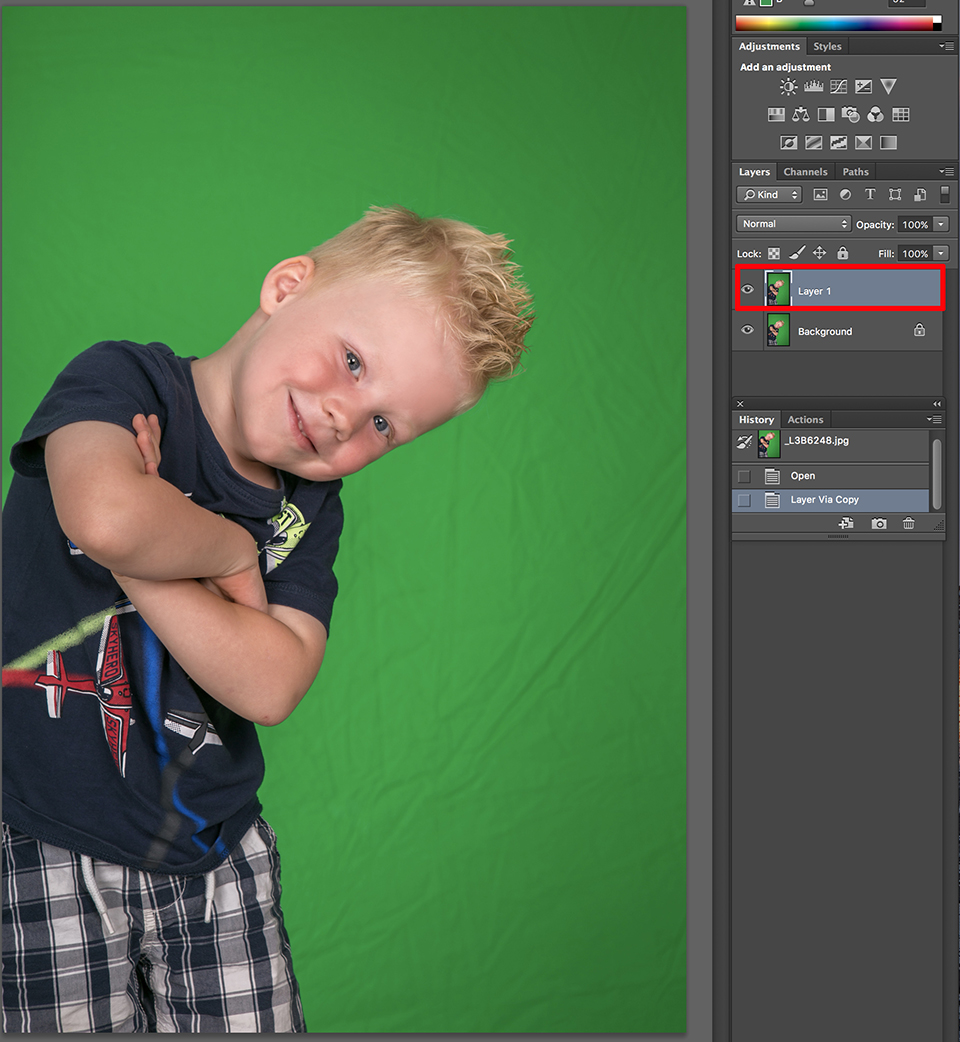
1. Open the photo with the green background in Photoshop. Make a copy of the layer by clicking Ctrl-J or Cmd-J on a Mac. You will now see two layers.
2. Choose Select > Colour Range, or Select > Color Range.
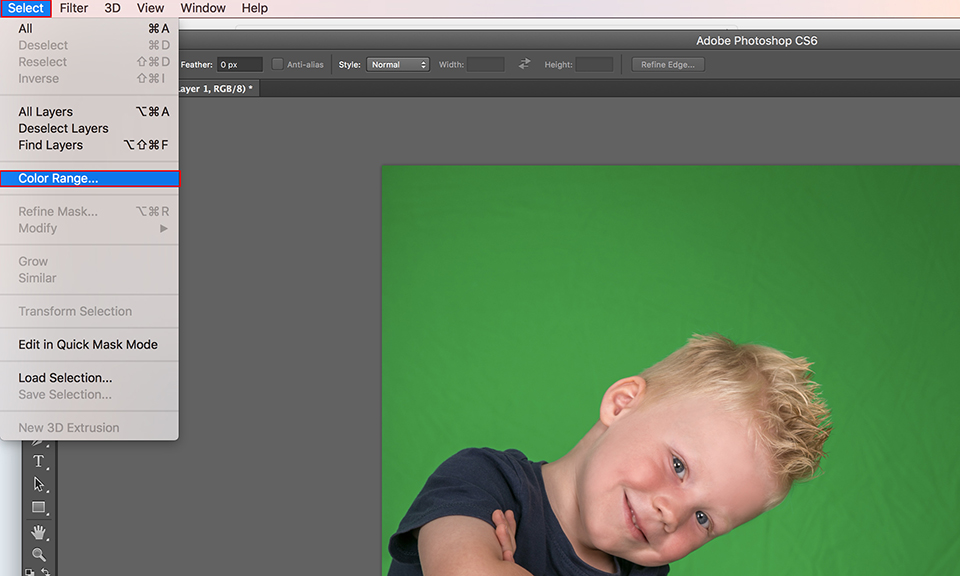
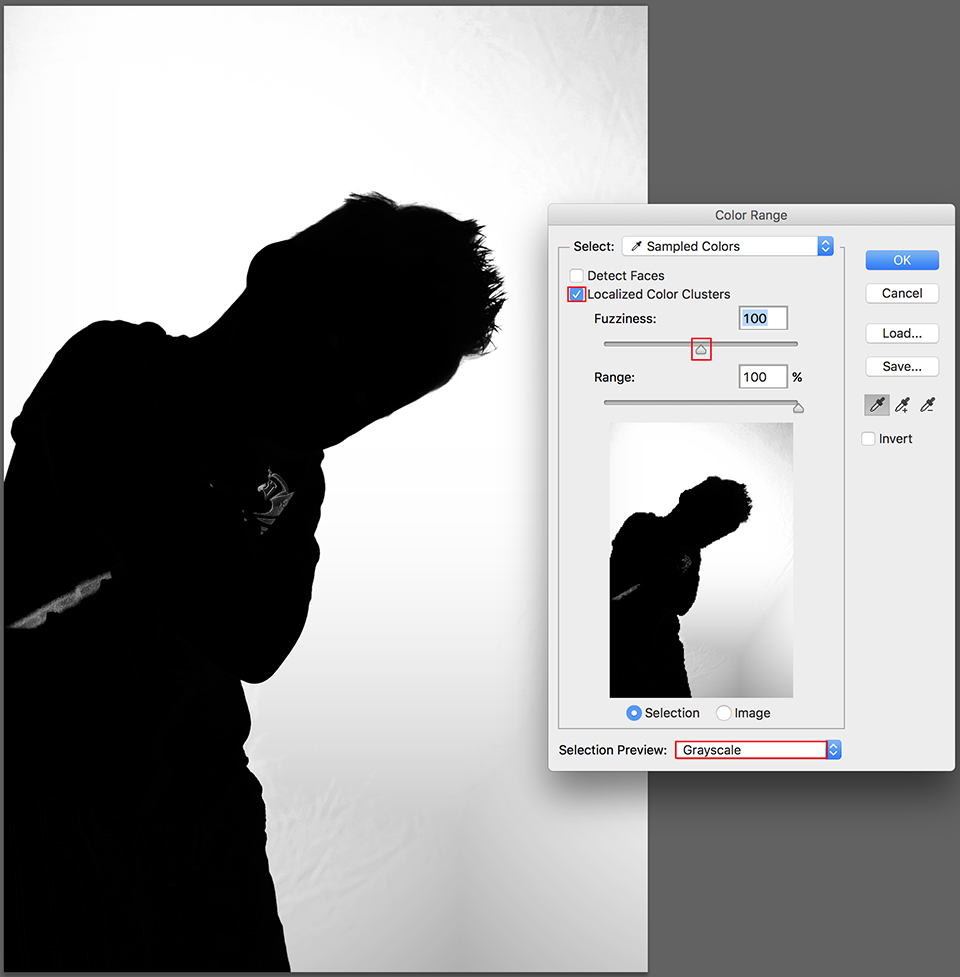
3. Make sure that the Localized Color Clusters option is enabled in the Color Range menu. This activates the eyedropper and allows you to choose sample colours in the image. If you select several colour ranges in the image, you can use this to create a more precise selection.
4. Select 'Selection' as the preview option. This displays a preview of the image created based on the sample colours in the image.
The white areas are selected pixels by default, the black areas are unselected pixels and the grey areas are partially selected pixels.
5. Choose an option for previewing the selection if you want to display a preview of the selection in the image window.
If you choose Grayscale, fully selected pixels are shown in white, partially selected pixels are shown in grey and unselected pixels are shown in black.
6. Change the colour range using the slider for Fuzziness or by entering a value. The Fuzziness setting determines how far the colour range extends in the selection and allows you to increase or decrease the number of partially selected pixels, the grey areas in the selection preview.
Set a low value here to limit the colour range and a high value to increase the range. I usually set it somewhere in the middle.
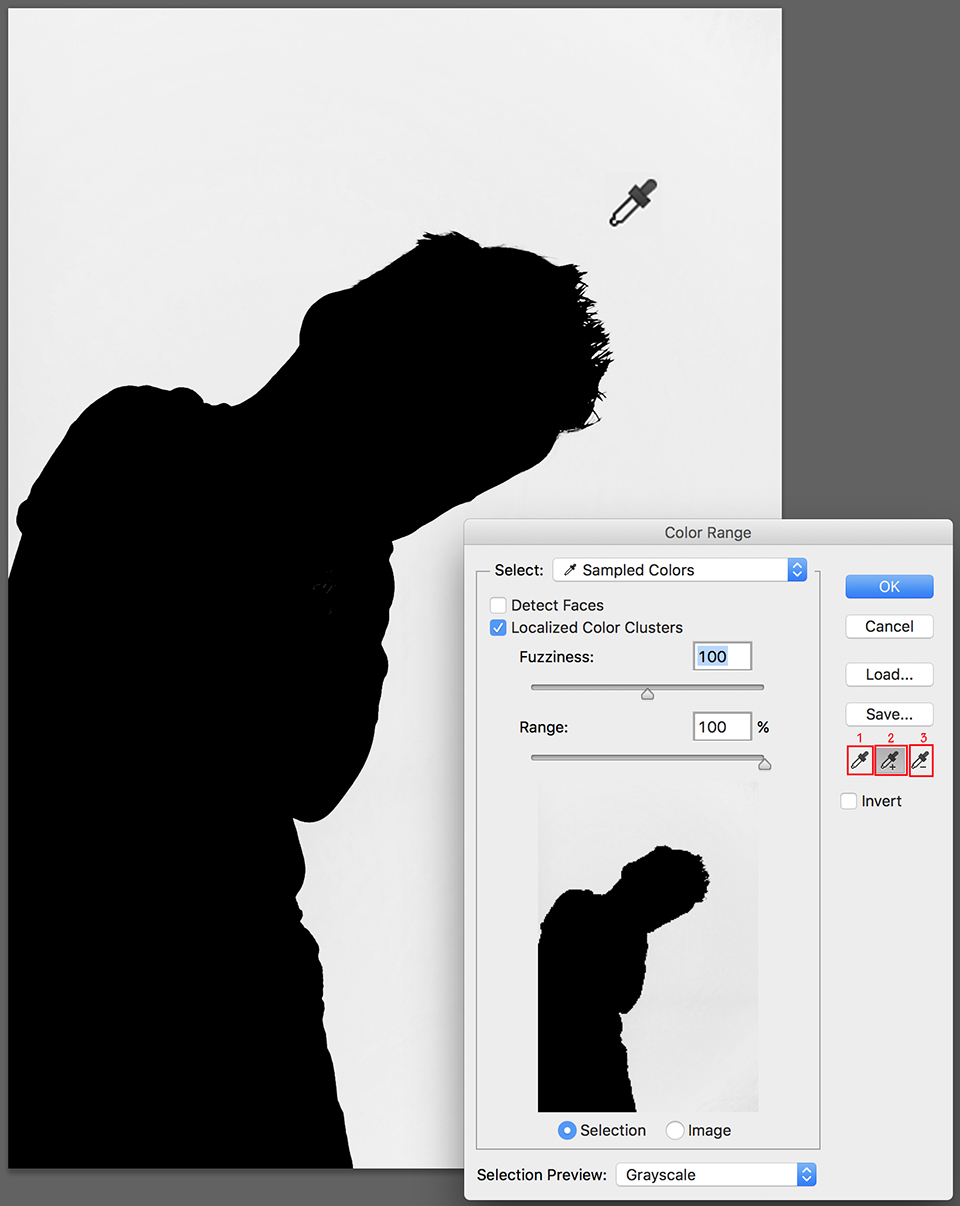
7. Click the first, leftmost eyedropper and click on a section of the green, now grey-white, background. So click on the green colour that you want to include in the selection. Then click the second, middle plus eyedropper and click on the rest of the background until everything is selected.
With this plus eyedropper, you are essentially adding colours to your selection. The background colour is never completely even or exactly the same shade of green. If you want to remove colours, select the minus eyedropper and click in the preview or the image. This removes parts from your selection.
8. The background is now completely white. Click OK.
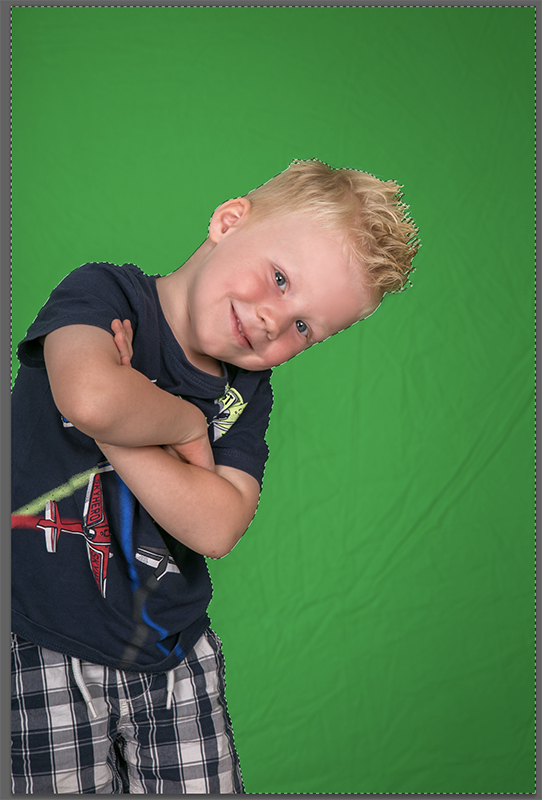
You can now see that the background is selected. There is a dotted line around the model and around the outer edge of the photo.
9. If you now press the BACKSPACE or Delete key, you remove the entire background. It is now transparent, as you can see from the grey and white chequered pattern.
You must first click the eye icon next to the background layer, the bottom layer, to hide it. You can also delete the background layer if you like, as you no longer need it.
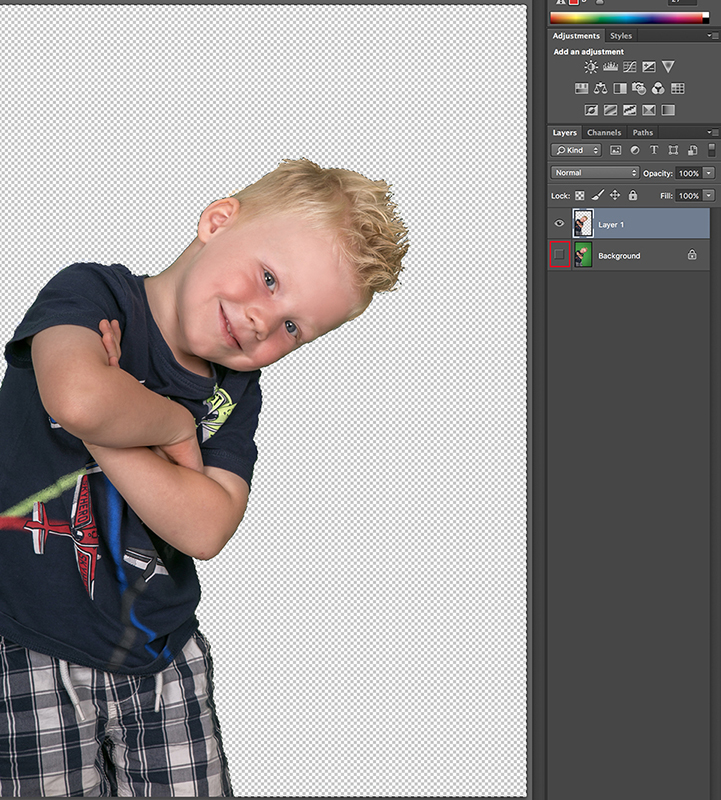
10. If, when zooming in, you still see a thin green line along, for example, the neck and face, and in this case in the hair, you can add a Vector Mask.
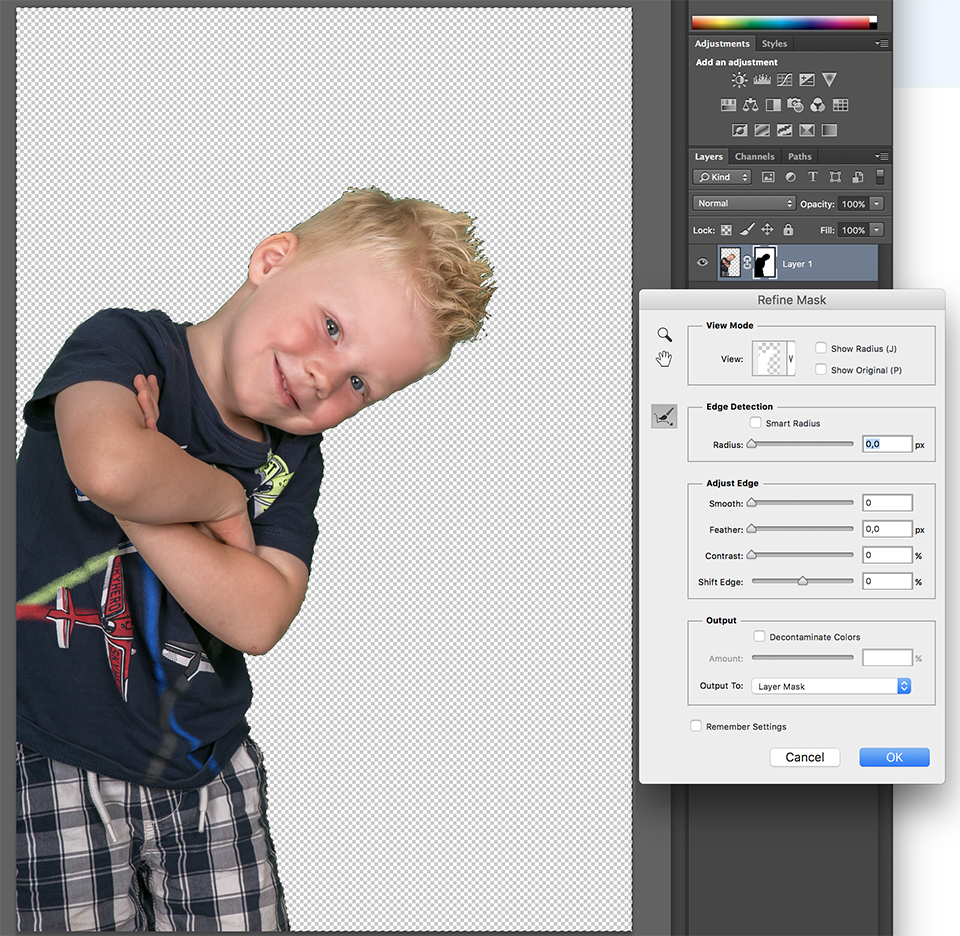
You can then go to Select, Refine Mask and adjust mainly Shift Edge to remove them completely.
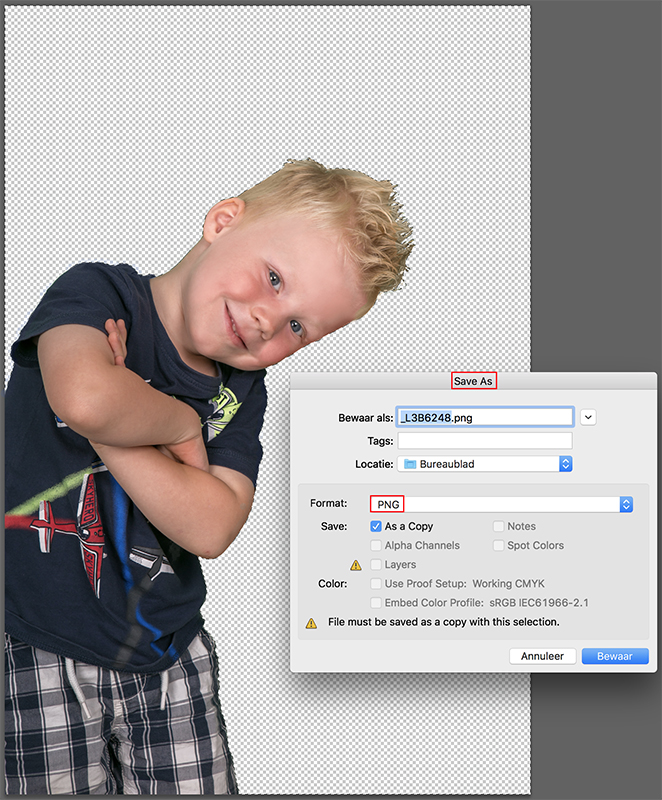
11. You can now save your photo as a .PNG file. This keeps the transparent background intact and allows you to use the photo several times, with different backgrounds for example.
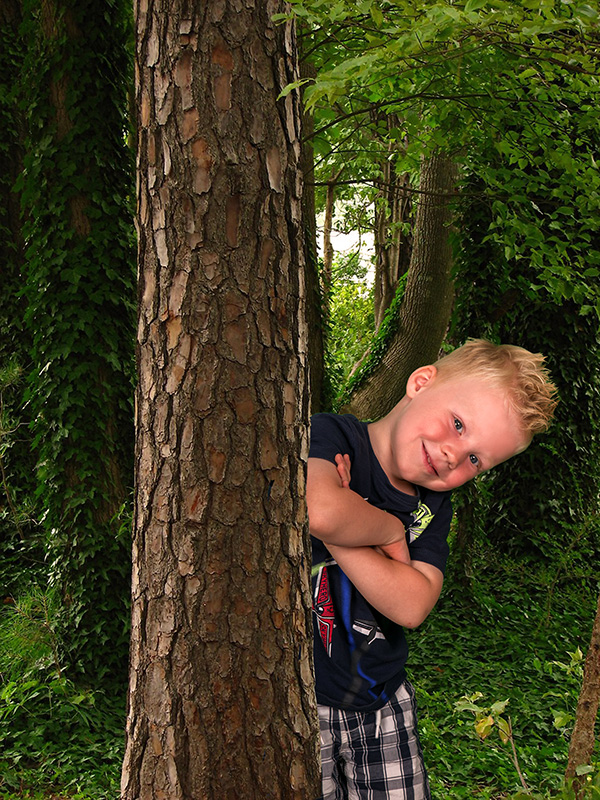
12. You can now combine your portrait photo with a transparent background with another photo or background you like. Open the portrait photo of your model with the transparent background. Then open a photo with a nice background on which you want to place the model.
13. Select the portrait photo, select everything, Ctrl-A, copy it, Ctrl-C, and paste it into the photo with the nice background, Ctrl-V. You will see that a new layer for the portrait photo has been created automatically.
14. Choose Ctrl-T for Transform, or Edit > Free Transform, to give your portrait photo the correct dimensions. Drag a corner handle to enlarge or reduce it. Hold down Shift to preserve the proportions. Move the selection by dragging it and position it roughly where you want it. Double-click when everything is in the right place.
And here is one possible end result with the portrait photo cut out from its background.
Below is a useful instructional video showing how to remove the green background with Color Range:
Your tips?
Do you have any more good tips for photographing with a greenscreen and/or cutting out your model afterwards? Let us know in the comments!
Want to learn more about Photoshop image editing?
At Photofacts Academy, our online learning environment for photographers, we have various courses on Adobe Photoshop.
- Photoshop for Beginners (Johan Elzenga)
- Photoshop for Photographers (Piet van den Eynde)
- Advanced Photoshop (Marit Hilarius)
- Photoshop Effects (Elja Trum)
And much more...
You can follow these courses for two weeks with a free trial membership.
About the author
Michelle Peeters is fotografe en oprichter van DeuxBleus Fotografie. Michelle herkent het bijzondere in het gewone en het gewone in het bijzondere. Ze heeft zich nooit willen specialiseren en is daardoor van alle markten thuis.
You might also like
-
 Photoshop now also has a sky replacement option
by Elja Trum
-
 Replacing skies in Photoshop is getting easier
by Johan Elzenga
-
 Having someone take a photo? Make sure everything is set up
by Nando Harmsen
-
 Luminar 4 introduces the first automatic Sky Replacement technology
by Michelle Peeters
-
 Is my smartphone replacing my system camera?
by Laura van der Burgt
4 comments
-
 Noor wrote on Tuesday 31 October 2017 at 15:58 | reply
All explained beautifully.
Translated from Dutch. -
 Eddy wrote on Tuesday 31 October 2017 at 17:17 | reply
Excellent !
Translated from Dutch. -

 Boudewijn wrote on Friday 19 July 2019 at 16:45
| reply
For anyone looking for an app to do event photography with a green screen (much faster than in Photoshop), you might want to check out AppForce.One/PictureMe. For both Mac and PC
Translated from Dutch. -
 Michelle Peeters wrote on Friday 19 July 2019 at 19:41
| reply
Thanks Boudewijn, I’ll do that!
Translated from Dutch.
Have your say
Please note: Articles older than a week can only be commented on by signed-in visitors.Would you still like to comment? sign in or create a free account.
Become a better photographer every week
A practical photography tip in your inbox every week.
38,764 photography enthusiasts already receive the tips! More about the weekly mail. Or keep up to date via  Facebook.

Elja Trum
Photofacts; everything to do with photography!
Would you like to take better photos and keep up with what is happening in photography? Photofacts publishes articles that teach you something about photography — from a product announcement to a practical shooting tip or a look at a website. Photofacts covers photography every day and is a hobby project of Elja Trum's that got out of hand. The articles are written by a team of volunteer authors. If you would enjoy writing one or more articles for Photofacts, do get in touch.More about PhotofactsPhotofacts is made possible in part by
