

How much DPI do you need in your photo?
Wednesday 12 December 2018, 15:01 by Michelle Peeters | 107,001 views | 52 commentsThis article was translated from Dutch with the help of AI. Read the original.
Printing a photo. You might almost wonder which photographer still does that. We find it difficult and expensive. Yet we should do it more often.
An (enlargement of a) beautiful printed photo or a lovely photo book of, for example, your holiday enhances the experience of your photography and is so much more intense than a photo on a tablet or smartphone.
So we should print more photos (large), but the subject is rather weighed down by terminology and things you need to take into account to produce a good print.
How much DPI do you need for an enlargement?
It is often said that if you want to print your photo at the highest quality, you need to do so at 300 dpi for the print to be sharp. But is that actually true?

What is DPI?
The unit DPI stands for dots per inch. This is the so-called print resolution and indicates how many pixels from the image are placed in one inch (= 2.54 centimetres) of the print.
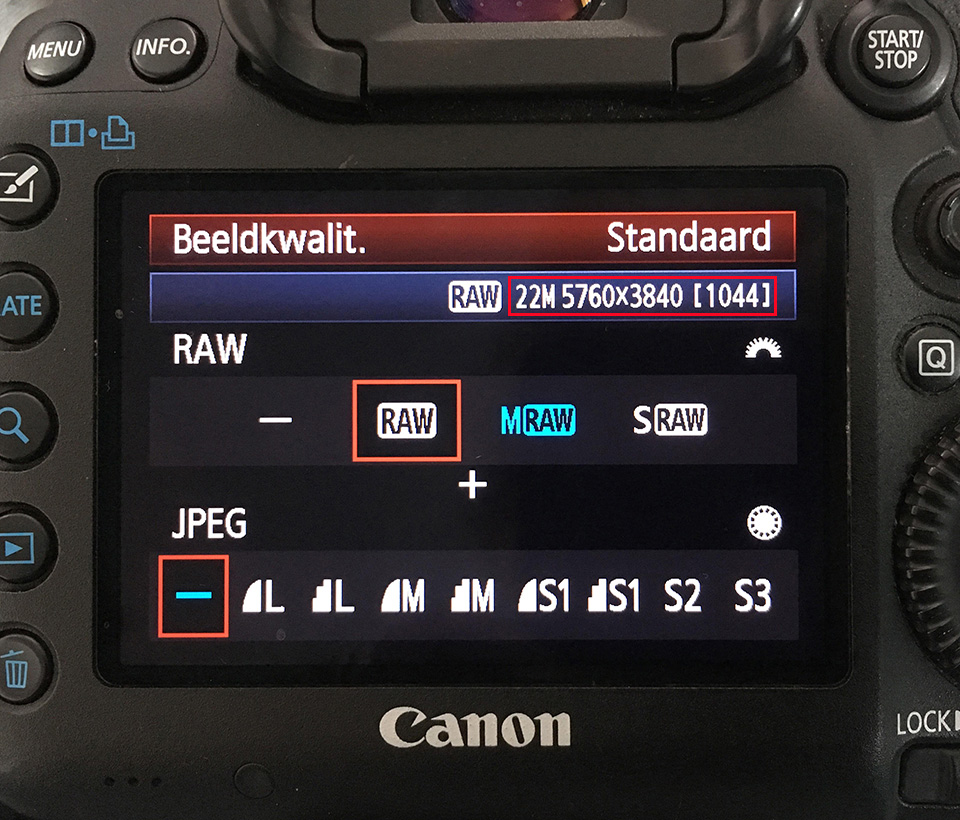
If you have a photo from the Canon EOS 5D mark III (22 megapixels) with a pixel size of 5,760 x 3,840 pixels (sensor resolution), a print at 300 dpi will be approximately 19.2 (= 5760/300) by 12.8 (= 3840/300) inches in size, or 48 by 32 centimetres. That is slightly larger than A3, a spread in a magazine.
A3 is not all that large, so what about those enormous enlargements?
You still see photos from this camera printed much larger, and that is possible by making a print at a lower print resolution instead of 300 dpi, for example 150 dpi.
The size of the print will then be twice as large in height and twice as large in width compared with a 300 dpi print, making it more than 96 by 64 cm.
Viewing distance
From very close up (30 centimetres), this poster print will indeed be less sharp than at 300 dpi, but you cannot see the whole photo at that distance.
So you need to stand further away from the print until you can see the entire image at a glance. This is called the viewing distance and is approximately twice the widest side of a photo.
The print of more than 90 by 60 centimetres at 150 dpi will look just as sharp at a viewing distance of one and a half metres as an A3 sheet at 300 dpi from reading distance (50 centimetres).
So if we assess the sharpness of a photo at the practical viewing distance, we can 'blow up' photos quite considerably in this way.
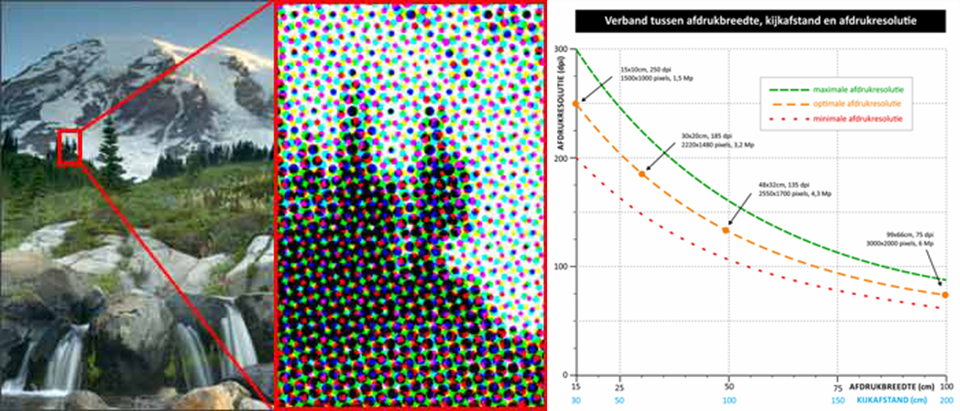
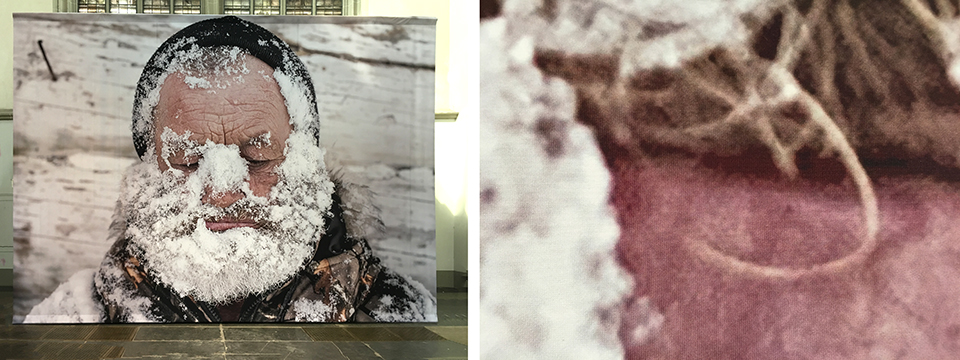
Filling a six-by-four-metre billboard with a photo from the EOS 5D mark III is therefore possible with a print resolution of approximately 25 dpi. That seems low, but at a viewing distance of more than ten metres, the image will still look sharp.
The 300 dpi misunderstanding
The digital photo itself has no dpi/ppi. You only calculate in this way whether your photo has enough pixels for the intended print size. If not, you add pixels by resampling. But the photo itself still has no dpi/ppi. A photo only has pixels.
It is only when you print that photo that there is a ppi (px/inch). So the ppi you see in Photoshop for your photo is the ppi of the print size shown alongside it, and not of the photo itself. When you open a photo in Photoshop, you sometimes see 72 dpi under image size, also in the EXIF data (this was sometimes the case with older Canon cameras).
The printer would then say that this photo did not meet the requirements, and that the dpi was far too low to produce a good print. However, the printer did not understand that the number 72 had merely been chosen arbitrarily by Canon and says nothing at all.
Only the number of pixels matters. You can simply erase or cross out the dpi number and enter another number.
Changing DPI in Photoshop
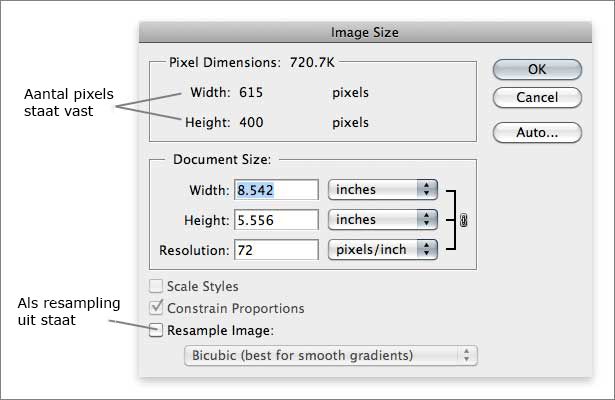
If you now turn off resampling in Photoshop, you can change the dpi as you wish. The pixel size stays the same and the print size changes. The reverse is also possible: change the print size and the dpi changes. But for placing an image on the web, this print size and the dpi have no meaning. Only the pixel size matters.
A photo file in a camera or (stored on) a computer therefore has no dimensions in centimetres or inches. And therefore no pixels per centimetre (or inch), so no ppi (or dpi). Such a file only has a subdivision, a resolution, in pixels.
It is only when you start printing that there is a particular size, expressed in inches or centimetres. So only then can you speak of pixels per inch (ppi, unfortunately usually called dpi).
What resolution do you need to print an image?
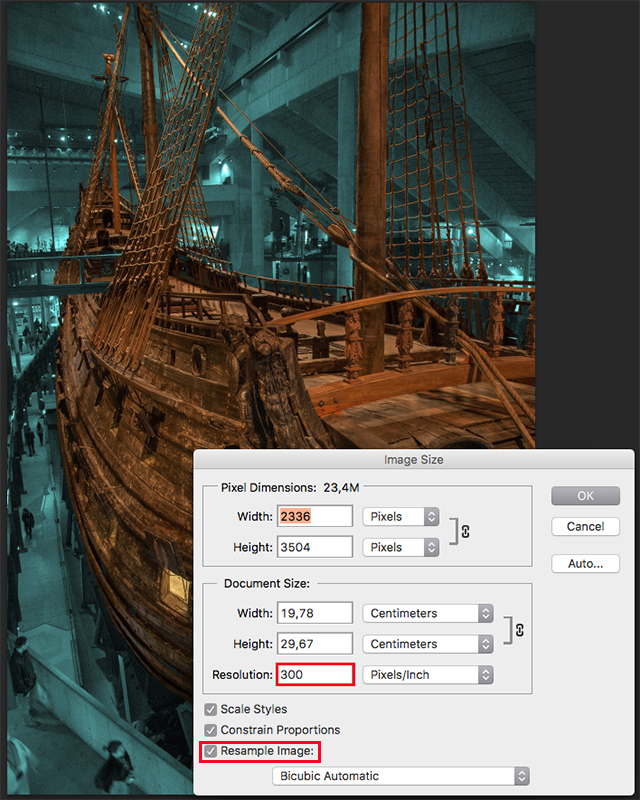
For printed matter, 300 DPI is usually required (this depends on the screen used). You can calculate in Photoshop whether your photo meets this 300 dpi/ppi requirement.
You do need to know the print size. Go to Image > Image Size, turn off resampling, enter the print size and Photoshop will show the dpi/ppi.
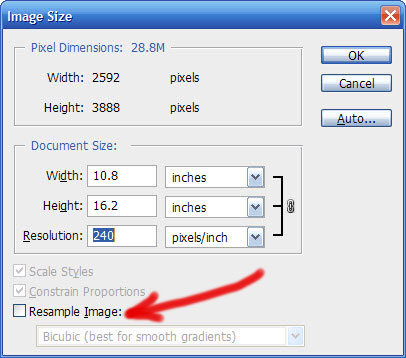
If the photo does not meet the requirement (the dpi is too low for that print size), set the dpi to 300, turn on resampling and your photo is suitable for printing.
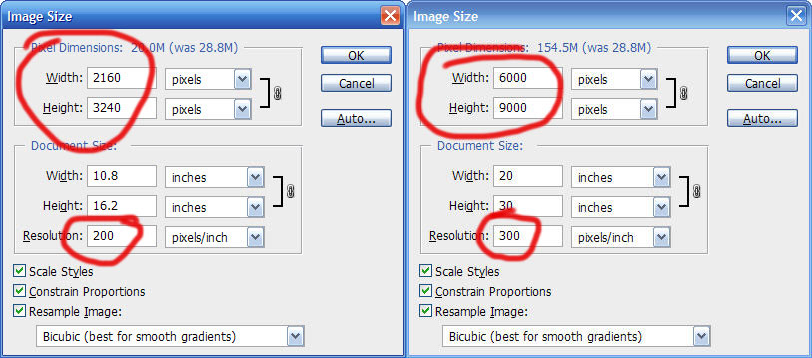
Resample to a maximum of 30% larger
Do bear the following in mind: if your photo is too far below 300 dpi, you can resample it to 300, but you will get a poor print. The difference must not be too large. A 30% enlargement gives an acceptable result.
You should also resample a photo whose dpi is much higher than 300 for that print size. The more pixels there are, the larger the file (in megabytes). And printers dislike large files because they take more time to process.
Printing images from the internet
What printers have so much trouble with is people downloading images from the internet to print. Suppose I want to have an image that is 178 pixels wide printed at 10 centimetres (= 3.9 inches) wide.
The DPI is 45.2 (178/3.9). The standard is 300 DPI, so 45.2 is far too low. Increasing it to the standard is possible by resampling, but this only works if the difference is not too large. And here it is.
Digital camera resolution
A photo does not have DPI, only pixels. As mentioned earlier, a digital camera may have a resolution of 2000x3000 pixels, for example, or a file size of approximately 18 megabytes. This is sufficient to make a high-quality A4 print.
Because the quality of a digital image is so good (there is no film grain), you can enlarge the image to A3 size or even larger.
My Canon EOS 5D mark III has 22 million pixels on a full-frame sensor. It will be clear that with 22 million pixels, you can record a great deal of detail. You can print photos more sharply or publish them larger.
With 22 dpi, a photo from the EOS 5D mark III comes out at a print size of 3 by 2 metres.
Advantages of lots of Megapixels
The quality of a camera is of course not only related to the number of megapixels. Other factors matter more, such as the quality of the lens and the size of the sensor. But it is true that the more pixels a photo contains, the larger you can print the photo.
This is especially important if you regularly make selections/crops. The number of pixels then becomes lower, which means the maximum print size becomes smaller (compared with the original photo).
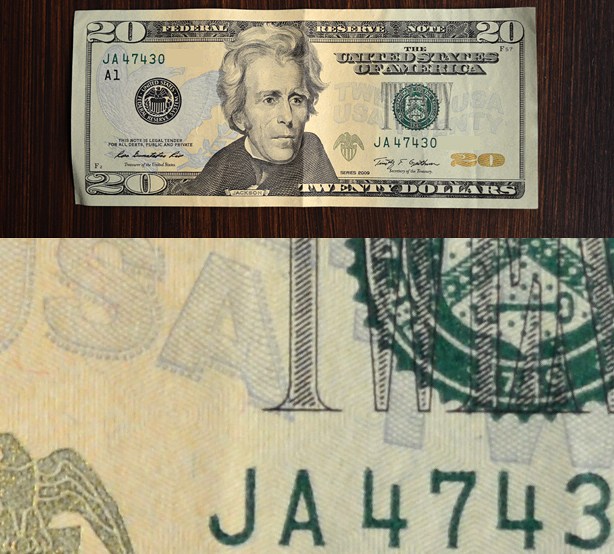
The disadvantage is the size of the files (in kilobytes or megabytes). Your memory card will therefore fill up sooner, and saving to the computer requires a lot of space.
Aspect ratios
A compact camera is usually based on taking photos at 4:3, for example 4000 x 3000 pixels (or 3000 x 4000 in portrait format). Most print shops supply sizes such as A2, A3, A5, and so on. All have aspect ratios of 2:3 or 3:2.
You will therefore need to crop your photo in post-processing to the print shop's aspect ratio, otherwise you risk important parts being cut off from your photo.
With a DSLR camera, this ratio is 3:2, for example 3,000 x 2,000 pixels. Or in my case (Canon EOS 5D mark III): 5,760 x 3,840 pixels.
If you maintain this ratio (so always crop while keeping the aspect ratio intact), nothing will be cut off from the image in the print.
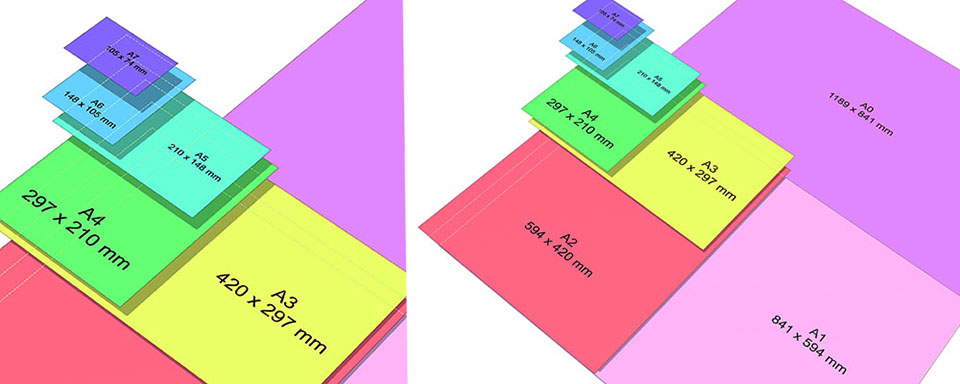
A square crop and/or print is of course also possible. In post-processing, make sure that the crop is exactly square.
Want to know more about printing and everything that comes with it?
At Photofacts Academy, our online learning environment for photographers, we have, among other things, a course on Business and Printing. You can follow this and other courses for two weeks with a free trial membership.
About the author
Michelle Peeters is fotografe en oprichter van DeuxBleus Fotografie. Michelle herkent het bijzondere in het gewone en het gewone in het bijzondere. Ze heeft zich nooit willen specialiseren en is daardoor van alle markten thuis.
You might also like
-
 Aspect Ratio, Very Important!
by Michelle Peeters
-
 How do resolution, dpi and ppi actually work?
by Nando Harmsen
-
The downside of a camera with lots of pixels
by Nando Harmsen
-
 How to check your resolution for a maximum print?
by Michelle Peeters
-
Everything you need to know about resolution
by Nando Harmsen
-
 The Golden Ratio rule of thumb
by Michelle Peeters
52 comments
-
 guest wrote on Tuesday 18 April 2017 at 10:20 | reply
A very long article with a lot of repetition. But you don't answer the question in the title: how much DPI do you actually need?
Translated from Dutch. -

 Michelle Peeters wrote on Tuesday 18 April 2017 at 10:33
| reply
It's a tricky subject that does require some explanation. How many dpi you need depends on what you want to do with your photo, which is explained in the article. You can resample (Photoshop then fills in extra pixels for you), but by no more than 30% larger. You can easily check in Photoshop whether your photo meets the dpi requirement for the image size you want to print it at.
Translated from Dutch. -

-

-
 Rob wrote on Tuesday 18 April 2017 at 11:18 | reply
As a rule of thumb, I use: 3500 px on the longest side for an A4 print
Translated from Dutch. -
Michelle Peeters wrote on Tuesday 18 April 2017 at 11:19
| reply
@Rob: that's a good rule of thumb indeed!
Translated from Dutch. -
 krissie wrote on Tuesday 18 April 2017 at 11:22
| reply
It is indeed a difficult subject, which can still sometimes be confusing even for experts, and which may well be covered in detail, repetitions included. In my training courses, I was taught that a photo for the internet always had to have 72 ppi. I only recently discovered for myself that it doesn't matter at all how many ppi a digital photo has.
Translated from Dutch. -
 huub wrote on Tuesday 18 April 2017 at 11:26 | reply
@krissie: you're absolutely right. A few years ago, I even experienced that teachers at the Fotovakschool (in Venlo in this case) didn't understand this whole subject and were spouting the biggest load of nonsense.
Translated from Dutch. -
 geerjanssen
wrote on Tuesday 18 April 2017 at 11:33
| reply
Also educational is, this video.
Translated from Dutch. -
Michelle Peeters wrote on Tuesday 18 April 2017 at 11:35
| reply
Haha, that one really is great indeed!
Translated from Dutch. -
 huub wrote on Tuesday 18 April 2017 at 11:35 | reply
@geerjanssen: hahahaha...great huh. And fits this article really well!!
Translated from Dutch. -
 Belinde van Bommel wrote on Tuesday 18 April 2017 at 11:36 | reply
Wonderful and clear article. Indeed difficult for laypeople to understand and difficult for professionals to explain. For not every photography issue is it easy to come up with a solution using Photoshop. In this way it does become clear that expertise does add value in photography.
Translated from Dutch. -
Michelle Peeters wrote on Tuesday 18 April 2017 at 11:39
| reply
Fortunately, more and more knowledge is becoming available, including for photographers. Previously, the print labs were the real 'experts'!
Translated from Dutch. -
 John vanderHeijden wrote on Tuesday 18 April 2017 at 11:50 | reply
It is quite clear that the writer owns shares in Canon: the examples apply to all brands and are not specific to Canon
Translated from Dutch. -
Michelle Peeters wrote on Tuesday 18 April 2017 at 11:56
| reply
@John: I understood that Nikon always had the dpi set to 300, while Canon didn't in the past (it does now, but it really doesn't make any difference at all, it's just a number). But as an avid Canon user, I indeed can't speak from experience... Most modern cameras have more than enough megapixels, that's true!
Translated from Dutch. -
Belinde van Bommel wrote on Tuesday 18 April 2017 at 11:56 | reply
I don't think it matters under whose name this is written. The expertise is shared for free, nowadays not everything is free anymore and then it's also perfectly reasonable to know who wants to share this useful info with others.
Translated from Dutch. -
 Arjan wrote on Tuesday 18 April 2017 at 13:10 | reply
Clear article. In your article you write "How much dpi you need depends on what you want to do with your photo" Here you are mainly referring to the viewing distance, according to me. what I miss in your article is the relationship between viewing distance and dpi. may I assume 50cm 300 dpi, 1m 150dpi, 2m 75dpi, etc.
Translated from Dutch. -
 Huub S. wrote on Tuesday 18 April 2017 at 13:34 | reply
@Arjan: there is a lot of info on the Internet about the concept of viewing distance. Roughly speaking, you can assume that the viewing distance is approximately 2 times the largest width of the photo.
Translated from Dutch. -
Michelle Peeters wrote on Tuesday 18 April 2017 at 13:41
| reply
@Arjan: I was actually referring to the dimensions at which you want to have your photo printed. A photo that you have downloaded from the internet generally cannot be printed in billboard format, because the image would have to be 'blown up' too much and there are often not enough pixels for that.
Translated from Dutch. -
guest wrote on Tuesday 18 April 2017 at 13:47 | reply
Resampling doesn't work. That 30% rule is just as nonsensical as Kelby's age-old myth. In all his books, he wrote that you could upscale in 10% increments without any repercussions. All nonsense: Photoshop can't add pixels. Take a photo with lots of detail and try it yourself, you'll see that the result is never better, and very often the quality actually gets worse.
Translated from Dutch.
And that a digital photo doesn't have ppi surely isn't that difficult to figure out for yourself? As if teachers at photography schools are the benchmark..... -
Michelle Peeters wrote on Tuesday 18 April 2017 at 13:53
| reply
Photoshop does add pixels! But whether that makes sense or looks good is of course the question. To be honest, I don't know which algorithm is used for that either, nor whether it always works out completely right (also with enlargements under 30%). A matter of trying it out indeed! I myself actually only use Photoshop (if necessary) to check whether my picture is good enough to print in a large format.
Translated from Dutch. -
 Jurgen Vandenberghe wrote on Tuesday 18 April 2017 at 14:13 | reply
It wasn't stated anywhere that resampling would improve the photo, was it? On the contrary, resampling ALWAYS reduces the quality.
Translated from Dutch.
I think that, as Michelle Peeters states, resampling enlargement up to 30% gives acceptable results.
Additionally, (higher) resampling can (e.g. if this is only necessary to meet the - often automatic preflighting - requirements of a printer) be better done in multiples of the original resolution - resampling 300 dpi to 450 or 600 for example, or 72 to 108 or 144, a matter of limiting the interpolation or duplication to a minimum.
In short: good article, maybe a bit too much repetition but you can't tell some things often enough :D
Therefore maybe once more, briefly, the rule of thumb I usually use in an explanation: Changes WITHOUT resampling = making the pixels themselves larger or smaller. Changes WITH resampling = making the NUMBER of pixels larger or smaller.. -
 Brian wrote on Tuesday 18 April 2017 at 14:46 | reply
Perfect article that gives a good explanation, but it goes slightly wrong in one area.
Translated from Dutch.
There is indeed a big difference between PPI and DPI. PPI is the number of Pixels Per Inch of a device, so a screen, a scanner, a sensor, etc. It therefore concerns the pixel density of the device.
DPI is a device's ability to print at a certain resolution. This does not necessarily have to be the resolution of the device's print head (we are always talking about printers with DPI), because if the print head is shifted slightly, it can fill the spaces in between.
DPI therefore always refers to print resolution, and PPI always refers to the actual resolution of the device itself. -
Michelle Peeters wrote on Tuesday 18 April 2017 at 15:06
| reply
Nice, all good tips!
Translated from Dutch. -
huub wrote on Tuesday 18 April 2017 at 15:07 | reply
@Brian: this is a very good and clear addition.
Translated from Dutch. -
 jangeene wrote on Tuesday 18 April 2017 at 15:20
| reply
I think there are a lot of armchair experts on the sea of photography (not to say ocean). You don't get much out of that kind of people, they just want to tell you that they know something about it too. Even humor doesn't silence them. I found it an understandable article and I learned quite a bit from it. Many thanks.
Translated from Dutch. -
 Robert wrote on Tuesday 18 April 2017 at 15:38 | reply
'In the past' I always had prints per m2 enlarged at the professional lab via a so-called inter-negative Michelle. That produced fine enlargements. I actually don't know whether that can or makes sense with digital either.
Translated from Dutch.
Photo-shooting regards Robert Vogels. -
 Henk wrote on Tuesday 18 April 2017 at 15:42 | reply
Clear explanation. However, I would never resample a jpg file. Due to the compression, the quality can become considerably worse when resampling. If I decide to resample, I do so on a TIF file.
Translated from Dutch. -
Michelle Peeters wrote on Tuesday 18 April 2017 at 16:42
| reply
@Henk: indeed, I can imagine that! Jpg handles the image points (pixels) from a photo and the millions of colors very cleverly. Due to compression, the color and position of each individual image point are no longer stored separately, so you have already lost a lot of information. RAW or TIFF files are stored 'losslessly' and are therefore also much larger and thus also better for the print world.
Translated from Dutch. -
 Ton wrote on Tuesday 18 April 2017 at 17:00 | reply
Maybe I'm not reading it correctly, but whenever I open a PS document it's always set to 72 dpi. Dimensions are 3456x5184 pixels (portrait), or 1.21m x 1.82 meters. It becomes 29 x 43 cm when I set the dpi to 300. If I do that with the resample option turned on, it becomes much larger in PS. In short, for printing (also if you want it large and/or sharp), just set it to 300 dpi without resampling?
Translated from Dutch. -
 rien wrote on Tuesday 18 April 2017 at 17:14 | reply
My experience is that printers DO know how dpi and image dimensions are connected and that photographers know that too (those who work with it professionally, that is) I always got the low-resolution phone calls from the clients who don't know what it's about. An automatic feature in a client's email program that makes the material I supplied nice and small when it's forwarded is also a real guarantee for communication problems.
Translated from Dutch.
My idea: for print work: image size at 240 dpi, for print 180 dpi for web 72 dpi. -
 Maelliaert Edgard wrote on Tuesday 18 April 2017 at 18:22 | reply
Interesting article and maybe a stupid question, how many dpi then for photos that aren't printed. I burn my photos to BluRay as a slideshow. And I put the best ones on Vieuwbug. Taken in RAW, converted to JPEG in Lightroom after editing and that is also set to 300 dpi.
Translated from Dutch. -
 gerard wrote on Tuesday 18 April 2017 at 19:50 | reply
Good article, clear and you can't repeat it often enough. Top job. This is very useful to us.. Thank you Michelle...
Translated from Dutch. -
 JohannesKiek wrote on Tuesday 18 April 2017 at 19:53 | reply
Nice article with, of course, the challenge of understanding it.
Translated from Dutch.
For that I had to read it several times and try it out in my photo editing program. -
 Joey wrote on Tuesday 18 April 2017 at 20:05 | reply
When converting Raw to jpeg in Lightroom, you are asked for the number of dpi. You can/must fill that in yourself. (Just like you can also determine the jpeg quality (compression) yourself, for example.) But as I read through this article, I gather that it doesn't matter at all??
Translated from Dutch. -
Michelle Peeters wrote on Tuesday 18 April 2017 at 20:17
| reply
@Joey: it's about the number of pixels, that's what counts!
Translated from Dutch. -
 Jan R. Smit wrote on Tuesday 18 April 2017 at 20:24 | reply
300ppi comes from the graphic world and thus are 300 pixels in the image on 1 inch of paper.
Translated from Dutch.
240ppi comes, as I understand it, from newspaper printing.
When printing, the RGB color is converted to the color in CMYK. A printer thus needs 4 colors to convert a pixel from your photo into a print. So for printers (most of them, such as inkjet etc) a conversion from pixels to dots is thus x4.
Printer drivers such as those from Canon and Epson convert the image from whatever the number of pixels per inch is to the pixels-per-inch resolution set in the driver, for example 360ppi with an Epson. Whether that is from, for example, 22 ppi or 1154ppi. (Depending, then, on how large your print has to be).
Subsequently these pixels are converted into drops of ink, up to 4 drops per pixel (simplified).
The article is therefore, as far as I am concerned, not very explanatory. -
 W.Mylius wrote on Tuesday 18 April 2017 at 21:14 | reply
Glad that this difficult subject for me is finally getting some extensive attention.
Translated from Dutch.
However, I do need to read the article several times before I (think I) understand it.
vreaag ; can that resampling also be done with the PSP X8 program ?
I've been using that for years and Photoshop is too complicated and too expensive for me. -
Michelle Peeters wrote on Tuesday 18 April 2017 at 21:21
| reply
@W.Mylius: I don't know PSP, but if I do a quick Google search I do come across the resample option for this application!
Translated from Dutch. -
 Robert De Schrijver wrote on Tuesday 18 April 2017 at 23:42 | reply
Dear Michelle,
Translated from Dutch.
This article is first-rate and explained with crystal clarity.
This explanation opens up perspectives and is enlightening regarding
the difficult subject matter that digital photography is for beginners like me. I thank you for that.
Best regards,
Robert -
 Ingrid wrote on Wednesday 19 April 2017 at 08:18 | reply
Coincidentally came up in the course yesterday, clear article.
Translated from Dutch. -
 Peter wrote on Wednesday 19 April 2017 at 09:21 | reply
Very good article. Thanks for sharing.
Translated from Dutch. -
Jan R Smit wrote on Wednesday 19 April 2017 at 10:43 | reply
No idea what the 30% resampling limit is based on. As I already indicated in an earlier comment, the printer driver resamples when necessary and does not adhere to these rules.
Translated from Dutch.
With good resampling tools, 300-400% is also perfectly possible. It does, however, also mercilessly expose the errors in your original file.
-
 Henk Hulshof
wrote on Wednesday 19 April 2017 at 12:13
| reply
nice to have this clear again!
Translated from Dutch. -
 Ron Maarschalkerweerd wrote on Wednesday 19 April 2017 at 21:34 | reply
Back in the day, come on, tell us again grandpa, a scanner needed two scan lines to generate a "dot". Hence that screen of 60 l/cm required a resolution of 120 L/cm, which converted to 304 dpi. You needed this because a "dot" (point) had to be physically created.
Translated from Dutch.
With the introduction of "PostScript", the description language of computer too plate, it was no longer physical but digital. So I can speak from experience that I linked image size to the resolution so that at 150 ppi your image could be printed larger without anyone seeing any loss of quality.
So saying that you have to supply 300 ppi to your printer is nonsense, only many printers don't know this.
Regards,
Ron Maarschalkerweerd -
 Marc V wrote on Wednesday 19 April 2017 at 23:17 | reply
Strange that you mix up ppi and dpi. They are not the same! Pixels per inch is indeed about the print size you want to achieve with the pixels in your photo file. Dots per inch is about the printing performance of your printer. How many ink spots per inch can your printer produce (for most (inkjet) printers, that is (much) more than 300. One printed pixel in the photo file can be "filled" with multiple dots. The other way around would be a problem, but that does not occur.
Translated from Dutch. -
 Hqnst wrote on Thursday 20 April 2017 at 10:31 | reply
Long-winded article but interesting, with a clear answer to the title/question but then there is a repetition and a jeremiad that actually adds little, in my opinion. But certainly the beginning is clear and now I know when and how I should interpret these numbers
Translated from Dutch. -
 Hans den Boer
wrote on Friday 21 April 2017 at 17:54
| reply
Funny actually that this subject is always "simple" for some people, while apparently a lot of others continue to struggle with it.
Translated from Dutch.
Regardless of all the ppi/dpi stories, the rule is: the more (good) pixels, the larger you can have your image printed.
In itself Marc V is of course right that dpi (e.g. 1200/1440 dots per inch, which a Canon/Epson printer can print) is something different from ppi (the number of pixels per inch in your file). That they are often (incorrectly) mixed up is another story -
 rondenbreems wrote on Monday 24 April 2017 at 18:43
| reply
An overall good explanation and answer to a frequently asked question.
Translated from Dutch.
The 72 in the EXIF came from the resolution of earlier displays; with the arrival of better, more expensive, professional displays and the unprecedented (and unnecessary?) high resolution of some phones and tablets, this number is no longer a standard either. For the internet, I believe 96 ppi is generally used nowadays. -
 Dick van Baren wrote on Thursday 7 September 2017 at 20:07
| reply
Given the comments, undoubtedly an excellent article.
Translated from Dutch.
Forgive me for my stupidity, it really must be me, but once again, after the umpteenth explanation, I have to throw in the towel. To give one example, right at the beginning, and I quote:
DPI stands for dots per inch... and indicates how many pixels
of the image are placed in one inch (= 2.54 centimetres) of the print. End of quote.
My problem: how can I fit pixels into an inch, which is a unit of length?
Or is a square inch meant here?
I could still imagine that.
But yes, if that were the case, then surely somewhere in the long line of teachers who came to explain this subject for the umpteenth time, there would have been one person who had mentioned in his/her text that it concerns a square inch? No, then.
Anyway, fortunately I have managed to solve the problem practically: my Canon EOS 5D Mark II produces enough pixels, dots, ppi's etc. per photo, and I can store these large files, even after editing, without any problems on increasingly cheaper storage, I can send them without any problems via WeTransfer and the print lab knows how to make excellent enlargements from them. So solved, but it naturally remains a bit frustrating that I cannot get my finger behind this theory. -
Michelle Peeters wrote on Thursday 7 September 2017 at 22:01
| reply
@Dick: I would focus on the number of pixels, that is essentially what it is about and the Canon EOS 5D Mark II produces more than enough of them!
Translated from Dutch. -
 Alissa wrote on Friday 17 November 2017 at 11:13
| reply
Hey Petra, thanks for the explanation! Would you advise always shooting at the highest number of pixels (that your camera allows)? I always use a large memory card, so that shouldn't be a problem. I'd love to hear from you. Thanks in advance!
Translated from Dutch.
Have your say
Please note: Articles older than a week can only be commented on by signed-in visitors.Would you still like to comment? sign in or create a free account.
Become a better photographer every week
A practical photography tip in your inbox every week.
38,765 photography enthusiasts already receive the tips! More about the weekly mail. Or keep up to date via  Facebook.

Elja Trum
Photofacts; everything to do with photography!
Would you like to take better photos and keep up with what is happening in photography? Photofacts publishes articles that teach you something about photography — from a product announcement to a practical shooting tip or a look at a website. Photofacts covers photography every day and is a hobby project of Elja Trum's that got out of hand. The articles are written by a team of volunteer authors. If you would enjoy writing one or more articles for Photofacts, do get in touch.More about PhotofactsPhotofacts is made possible in part by
