

Combining Coloured Light with Flashguns
Sunday 17 May 2026, 15:51 by Frank Doorhof | 1,237 views | 0 commentsThis article was translated from Dutch with the help of AI. Read the original.
Combining coloured light sources is great fun. Today we are adding an extra detail that gives you much more control over the colours and light in your photo. This article is all about combining coloured lighting with studio flashguns.
Workshop: combining light
During workshops, I always try to include as many techniques as possible in a single set. That also means I sometimes deliberately create a problem that we have to solve together.
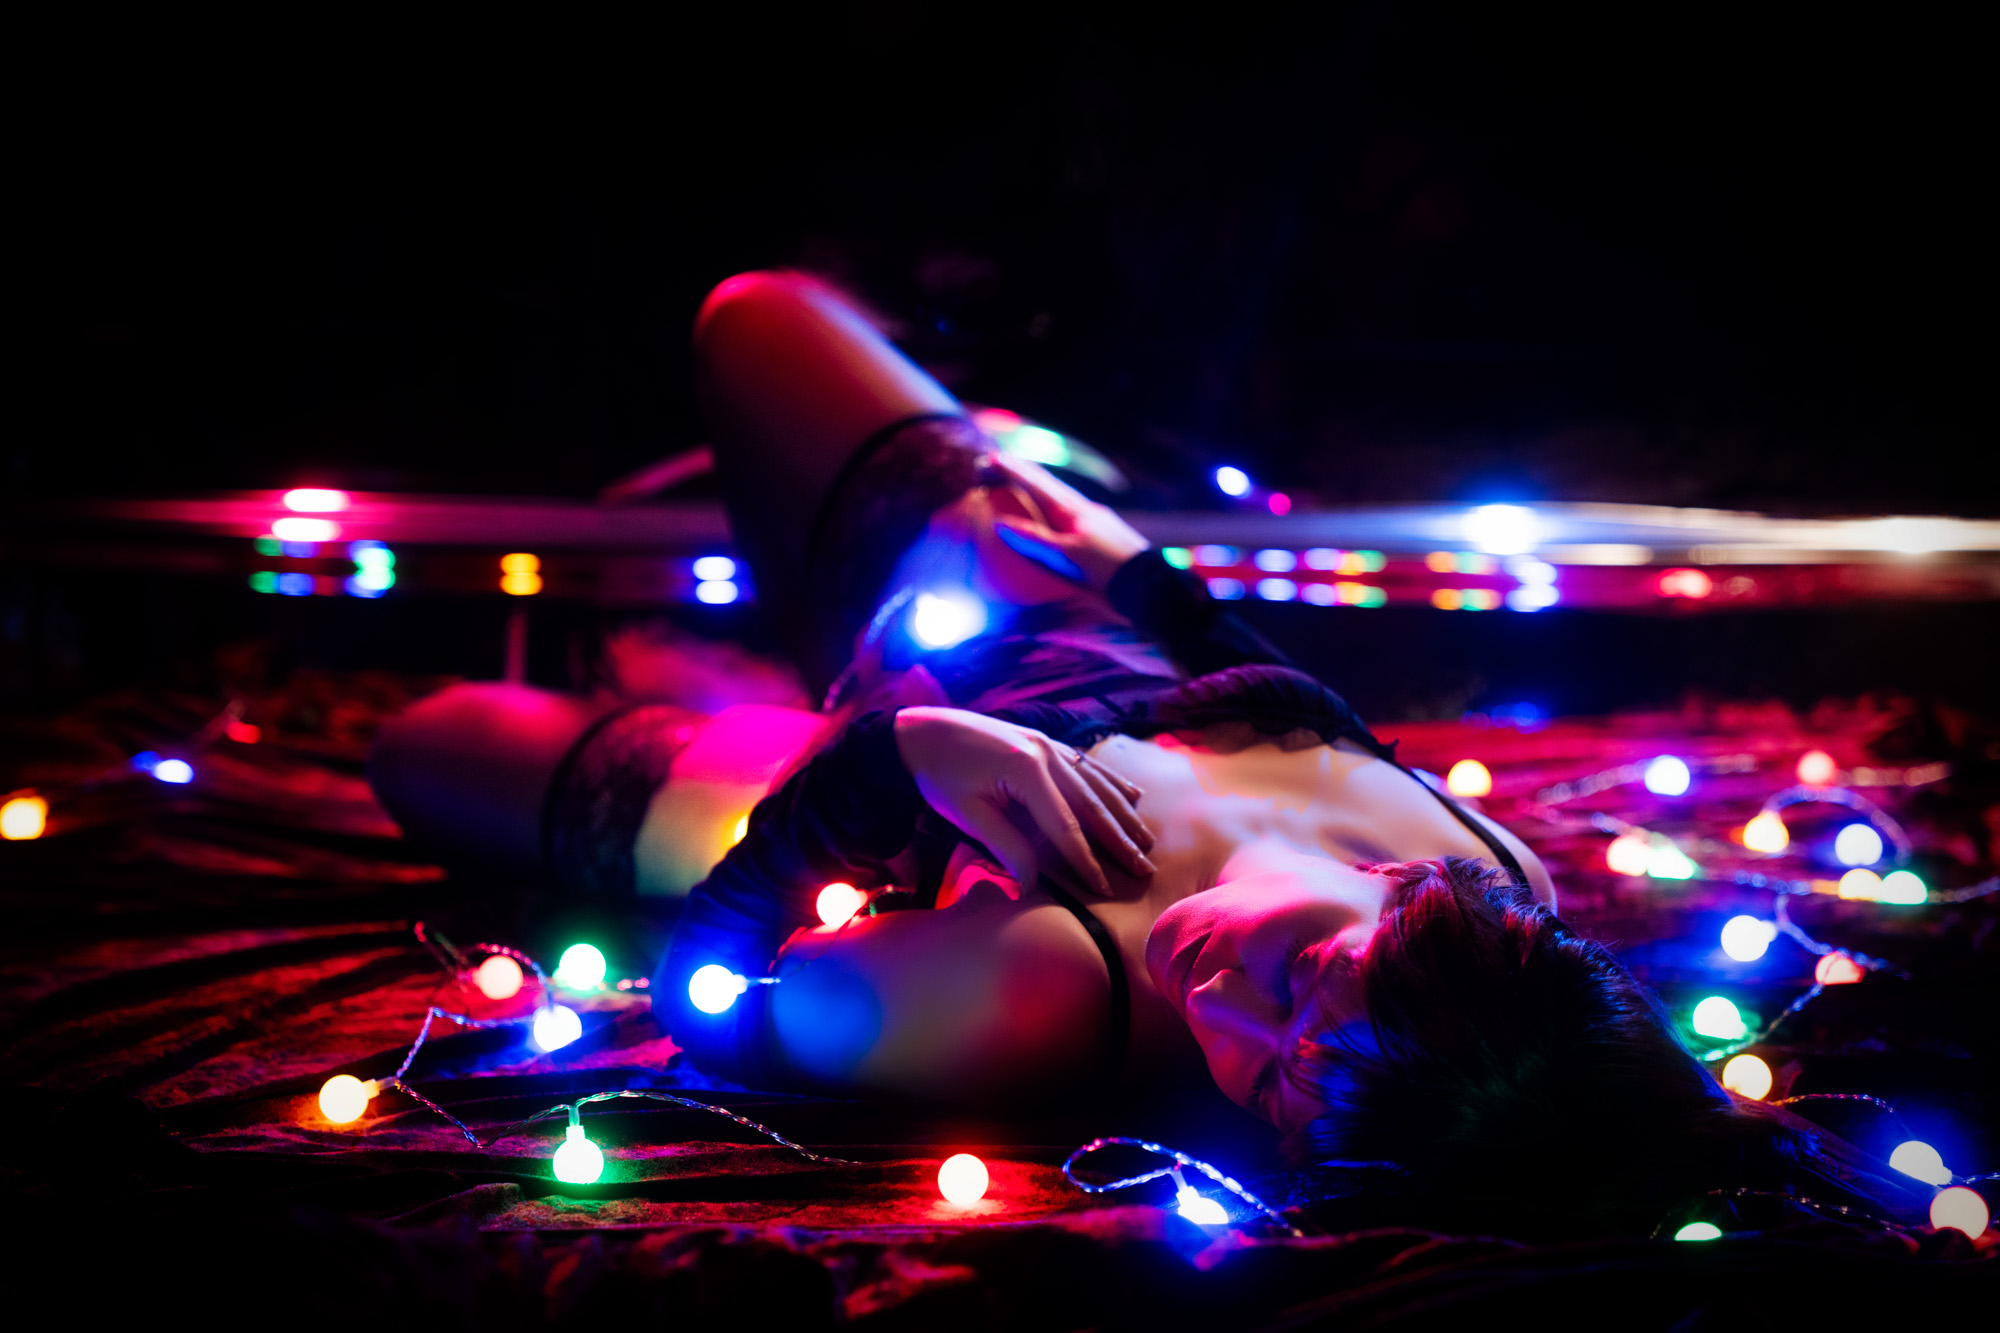
These images were taken during a glamour workshop with Claudia. In this kind of workshop, I like to work with a slightly darker, atmospheric setting and play more with the interaction between the model and the camera.
One of the sets I personally find very suitable for glamour photography is surprisingly easy to recreate yourself.
Shiny surfaces
You really only need one thing: material with a nice shiny surface that you can put on the floor for the model to lie on.
My personal favourite? Red velvet-like material, well, I have always loved the colour red.
Do be careful with these types of fabric: they can reflect light differently depending on the direction in which you lay them. Sometimes this produces an interesting effect, but if you want an even colour and are using several pieces of material, pay close attention to the direction in which they are laid.
In most cases, I light a set like this with one striplight or a small softbox, with the light gradually fading towards the legs. This really draws you into the scene in terms of depth, and combined with a small depth of field, it always produces fantastic results.
Today, however, we decided to add an extra element.
For this shot, I bounced two flashguns back into the set via a mirror wall. I used two Geekoto GT200 flashguns with a Rogue Magnetic Kit and two Rogue gels, one red and one blue. This already produced a beautiful effect, but for a workshop, of course, we want just a little more.
So, we are also adding continuous lighting.
Combining coloured lighting with flashguns: the setup
In the past, this was largely guesswork, which is of course one of the major advantages of shooting tethered, as you can constantly check the images. Fortunately, this has become much easier with modern cameras. In the past, before my time, you had to use quite a few Polaroids for this.
Normally, we work in the studio with the EVF set to 'optical viewfinder simulation mode'. In a dark studio, this lets you see your subject perfectly, often even better than with a traditional optical viewfinder. Given the problem many people encounter with the EVF, let's take a look at what the EVF can do.
Simulation mode explained
You have probably seen simulation mode in action before. Outdoors, with continuous lighting, it works perfectly and essentially shows you what the photo will look like when you take it.
If your camera is set up this way and you are working in a dark studio with flashguns, it can sometimes look as if something is wrong: the image becomes almost black.
But there is nothing wrong. The electronic viewfinder accurately simulates what happens when you take the photo. Because we often work with little ambient light and use flashguns, a black image makes sense.
For this setup, this mode is ideal.
How to create this photo: combining coloured light and flashguns
Step 1
Make sure the studio is as dark as possible and that no unwanted light sources affect the set.
Step 2
Choose the aperture based on the depth of field you want. Personally, I like to photograph these types of sets wide open or just slightly stopped down. This gives you a very nice focus transition in combination with the small lights, which strengthens the depth in the photo and really draws attention to the model.
Then choose a shutter speed that you are comfortable using handheld. Although the model is partly 'frozen' by the flashguns, there are many small light sources in the frame, so you want to limit movement as much as possible.
I usually aim for shutter speeds between 1/8 and 1/30 of a second.
Thanks to modern cameras with good high ISO performance, and good post-processing software, you can easily determine the right combination of ISO and shutter speed by looking through the viewfinder or at the LCD on the back of the camera:
Always remember the following rules.
. Longer shutter speed / higher ISO -> lights become brighter
. Shorter shutter speed / lower ISO -> lights become darker
Step 3
Congratulations, the hardest part is behind you. Now that your aperture, shutter speed and ISO are fixed, do not change your ISO or aperture any more.
The flashgun, which we are going to set now, is effectively the value of the aperture. You can always adjust the shutter speed, but if you change the ISO or aperture, the effect of the flash on the photo changes too.
Unless, of course, you change both 'in balance', because you need a faster shutter speed, for example.
Now take your light meter and meter the flashguns at the chosen aperture and ISO. Is the flash too powerful? Then you can do the following:
. place an ND filter on the flashgun (not on the camera ??)
. or bounce the flash light off a wall or ceiling
Step 4
The first images probably will not look perfect yet, and that is completely normal. With these types of sets, a technically 'perfect' exposure is often not immediately the best one.
Because you are working with two different light sources, you have enormous creative freedom.
You can:
. adjust the shutter speed to affect the continuous lighting
. lower the flash power for a darker, more saturated atmosphere
I often compare this to cooking: the basics have to be right, then you add the herbs and spices. With this type of setup, for example, I like to slightly underexpose the flash overall, so that the flash no longer stands out as the main light, and you can create a really beautiful dark atmosphere.
I sometimes say that the perfect exposure is not always the 'perfect/desired' exposure.
Step 5
The final ingredient: using light intelligently. Because of the many small light sources and coloured flashguns, it was difficult to light certain parts of the body and face perfectly.
The solution? Use those small light sources to accentuate problem areas. Together with the participants, we looked at the images directly in Lightroom, which is why we always shoot tethered, and could easily adjust small details during the shoot until we achieved the final result you see here in the examples.
.jpg "Combining")
Conclusion
Sometimes a prop is simply an accessory, even when it involves light. But sometimes you can also use a prop functionally to solve problems with your lighting.
In this set, we used lamps to light parts of the body and face that were not reached by the flashguns. With mixed-light setups, always remember:
. Aperture and ISO remain fixed for the flashgun
. You use the shutter speed to control the amount of continuous lighting
And very importantly: stay below the X-sync speed of 1/125s in the studio, depending on the camera.
About the author
Frank Doorhof blogt dagelijks in het Engels op zijn website en geeft wekelijks workshops model fotografie in zijn studio in Emmeloord, maar ook op locatie in binnen en buitenland. Van beginners tot gevorderde, iedereen kan bij Frank terecht. Ook voor specifieke 1 op 1 workshops, of maatwerk voor groepen.
You might also like
-
 5 Tips for Variety in the (Home) Studio
by Elja Trum
-
 5 Tips for Studio Portrait Photography
by Elja Trum
-
 Choosing between continuous light or flash for portraits
by Nando Harmsen
-
 Flash photography tip: Buy a generic flashgun
by Elja Trum
-
 Studio portraits with two flashes
by Elja Trum
0 comments
Be the first to share what you think!
Have your say
Please note: Articles older than a week can only be commented on by signed-in visitors.Would you still like to comment? sign in or create a free account.
Become a better photographer every week
A practical photography tip in your inbox every week.
39,079 photography enthusiasts already receive the tips! More about the weekly mail. Or keep up to date via  Facebook.

Elja Trum
Photofacts; everything to do with photography!
Would you like to take better photos and keep up with what is happening in photography? Photofacts publishes articles that teach you something about photography — from a product announcement to a practical shooting tip or a look at a website. Photofacts covers photography every day and is a hobby project of Elja Trum's that got out of hand. The articles are written by a team of volunteer authors. If you would enjoy writing one or more articles for Photofacts, do get in touch.More about PhotofactsPhotofacts is made possible in part by
