

The Lightroom interface in brief
Saturday 21 July 2018, 11:22 by Michelle Peeters | 7,425 views | 0 commentsThis article was translated from Dutch with the help of AI. Read the original.
If you have never worked with Lightroom before, the interface can look rather busy and confusing. Once you learn to understand it, a world opens up to one of the better photo-editing packages.
Catalogues
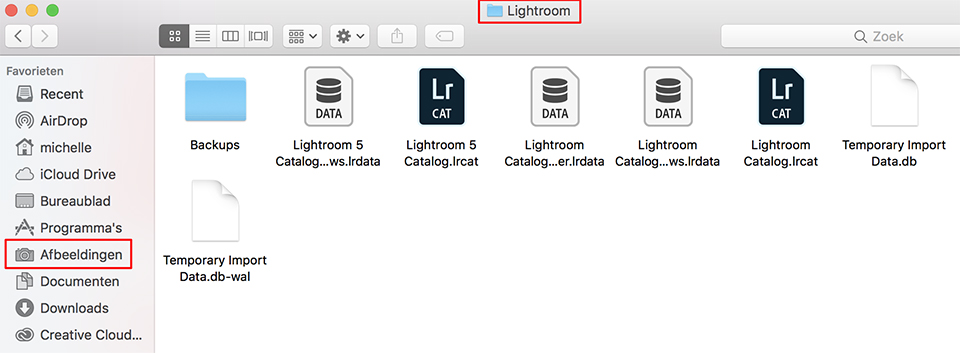
Lightroom works with a Catalogue into which you import your photos. In fact, you are telling Lightroom where your photos are stored. The advantage is that Lightroom works very quickly. You do this via File, New Catalogue.
If you want to create some order, you can create collections to group photos together. However, try not to move or rename files outside Lightroom. Otherwise, the link in the catalogue to your files will no longer work.
Importing photos
RAW offers the most possibilities, but Lightroom can handle almost all types of photo files. If you want to add photos to your catalogue, choose File, Import Photos and Videos. You can then specify your source in the left-hand column, such as a folder on your computer or a memory card.
By default, all files in a folder are selected. You can deselect them or choose 'deselect all', and then select the files you do want to use.
Once you have selected your photos, choose at the top how you want to add them to the catalogue. Copy, Move or Add.
Choose Add if you have already copied the files manually from your memory card to your hard disk. Choose Copy if the photos also need to be copied from the memory card while being imported into the catalogue
Depending on what you choose, you will see various settings in the right-hand column relating to the file name and destination.
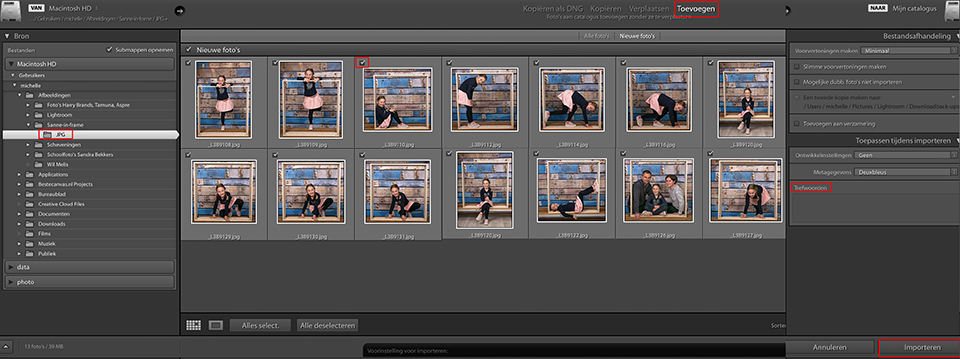
In the Apply During Import box, you can optionally add Keywords to your photos straight away. Continue with Import to actually add the images to your catalogue.
Navigator, Thumbnails, Histogram, Library
The Lightroom interface consists of four sections. On the left, you have the Navigator (1) for quickly zooming in or out. Below that is an overview of the Catalogue, Folders, Collections and Publish Services.
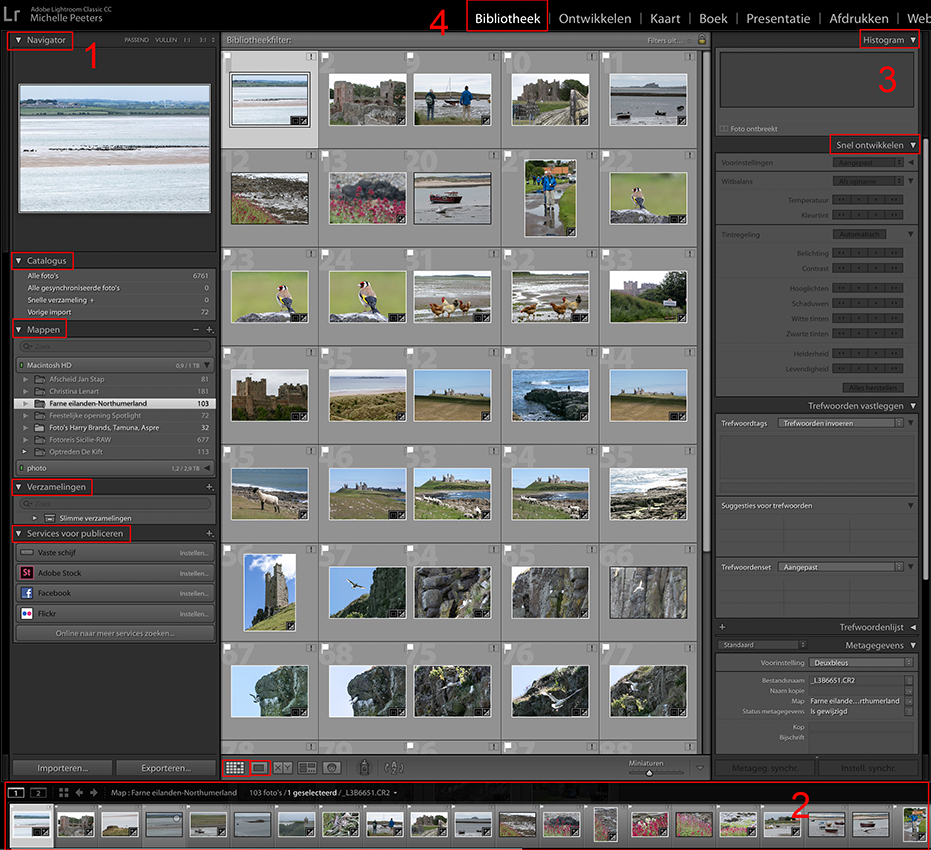
At the very bottom is an overview with thumbnails of imported photos (2). On the right, you will find, among other things, a Histogram and Quick Develop (3). In the centre, in the Library (4) module, there is a larger view of the selected thumbnail.
Develop
To switch to the non-destructive Develop section in Lightroom, click Develop in the top right. The left and right columns will now change.
On the left, you will see some Presets, and on the right, various options for editing your photos. Your edits are non-destructive, your RAW file remains untouched and you can always go back using the Previous button.
About the author
Michelle Peeters is fotografe en oprichter van DeuxBleus Fotografie. Michelle herkent het bijzondere in het gewone en het gewone in het bijzondere. Ze heeft zich nooit willen specialiseren en is daardoor van alle markten thuis.
You might also like
-
 Using Lightroom Without a Catalogue
by Nando Harmsen
-
 Lightroom Tip: Back Up More Than Just Your Photos and Catalogue
by Huub Keulers
-
 Taking your photo catalogue to another application
by Nando Harmsen
-
 Speed up Lightroom Classic by reinstalling it
by Elja Trum
-
 How do you get started with Lightroom Classic?
by Nando Harmsen
-
 Converting a Luminar AI catalogue to Luminar NEO
by Nando Harmsen
0 comments
Be the first to share what you think!
Have your say
Please note: Articles older than a week can only be commented on by signed-in visitors.Would you still like to comment? sign in or create a free account.
Become a better photographer every week
A practical photography tip in your inbox every week.
38,899 photography enthusiasts already receive the tips! More about the weekly mail. Or keep up to date via  Facebook.

Elja Trum
Photofacts; everything to do with photography!
Would you like to take better photos and keep up with what is happening in photography? Photofacts publishes articles that teach you something about photography — from a product announcement to a practical shooting tip or a look at a website. Photofacts covers photography every day and is a hobby project of Elja Trum's that got out of hand. The articles are written by a team of volunteer authors. If you would enjoy writing one or more articles for Photofacts, do get in touch.More about PhotofactsPhotofacts is made possible in part by
