

5 tips to work faster in Lightroom Classic
Monday 5 June 2023, 20:10 by Thijs Schouten | 5,979 views | 11 commentsThis article was translated from Dutch with the help of AI. Read the original.
Do you, like me, regularly edit your photos in Adobe Lightroom Classic? And do you sometimes wish you could work a little faster? Then this article is for you! Here are some useful tips to help you work faster in Lightroom Classic.
Would you like to get even more out of your Lightroom package after reading these tips? Then take a look at these Photofacts Academy courses.
A brief explanation of Adobe Lightroom
Adobe Lightroom is one of the most widely used photo programmes today. I have been using this programme for years. It is very easy to use, gives you good options for organising all your photos and makes editing your photos very straightforward.
Are you still looking for a good photo-editing programme? Then I can highly recommend this one. At the time of writing, the programme costs 12,09 per month and you can try it free for a month.
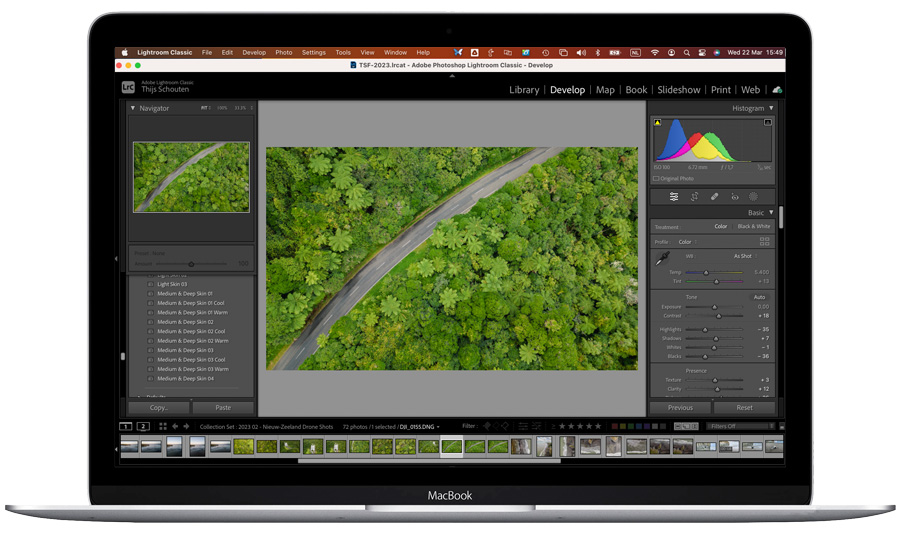
Tip 1: use the Auto Tone function
When you edit a photo in Lightroom, you can adjust a huge number of sliders to get your photo looking right. If you want to achieve a good result faster, you can also use the Auto Tone function.
This is an automatic setting that Lightroom uses to edit the photo as well as possible, based on the knowledge built into the programme. The software automatically adjusts the highlights, shadows and contrast, making the photo look much better straight away.
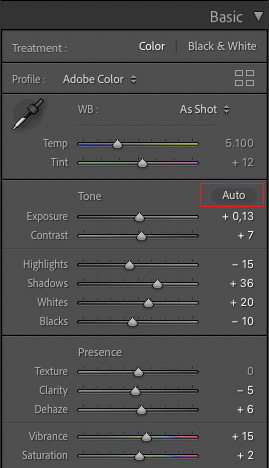
Of course, the question is whether you will be happy with the Auto Tone function alone, but it does at least give you a good base to continue working from. You will find the Auto Tone function on the right-hand side in the panel with the sliders, see the image below.
Tip 2: reset sliders
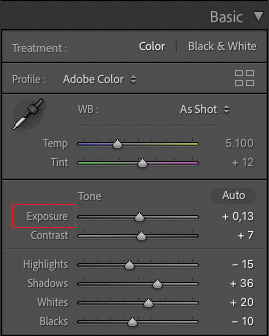
Do you work with the sliders in Lightroom a lot? And do you sometimes want to return a slider to its starting point?
Instead of fiddling with your mouse to get it back to 0, there is a simple trick for resetting the slider. Simply click the name of the slider, see the screenshot below, and your setting will jump back to 0. Super quick and easy!
Tip 3: use grids
As a photographer, you spend a lot of time thinking about composition. The golden ratio is a well-known compositional ratio, but there are several others too, such as the spiral.
Adobe Lightroom includes many of these grids, which can help you crop your photo. Fortunately, they are very quick and easy to use!
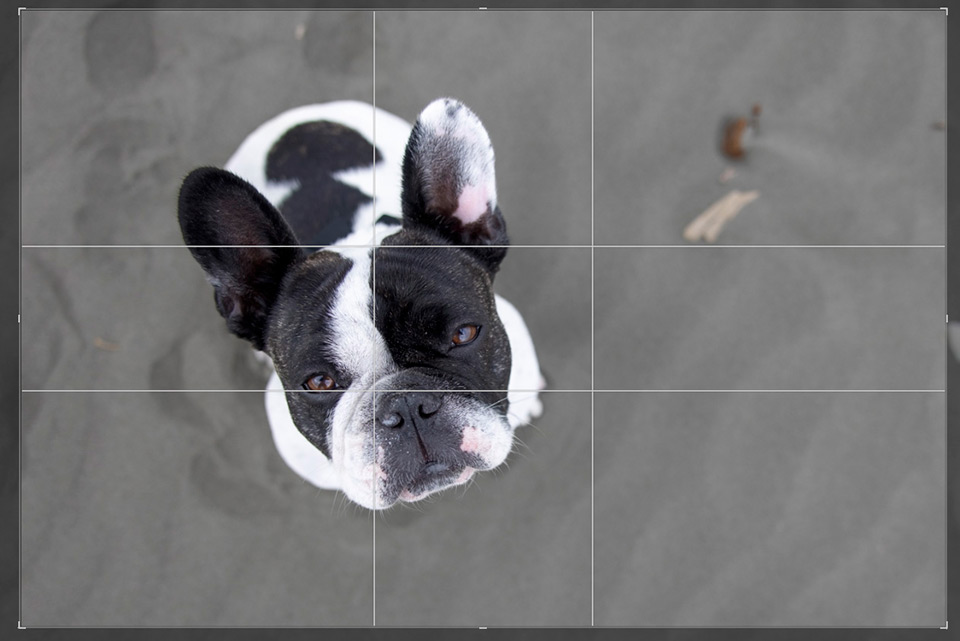
Simply go to the crop function, choose the function button on the right or press the letter R, and then press the letter O. You will now see the grid change.
There are several options, and you can switch between them by simply pressing the letter O each time. Would you like to mirror or rotate the grid? Press Shift + O and it will change. Below is an example of the Golden Ratio grid.
Tip 4: straighten your horizon quickly
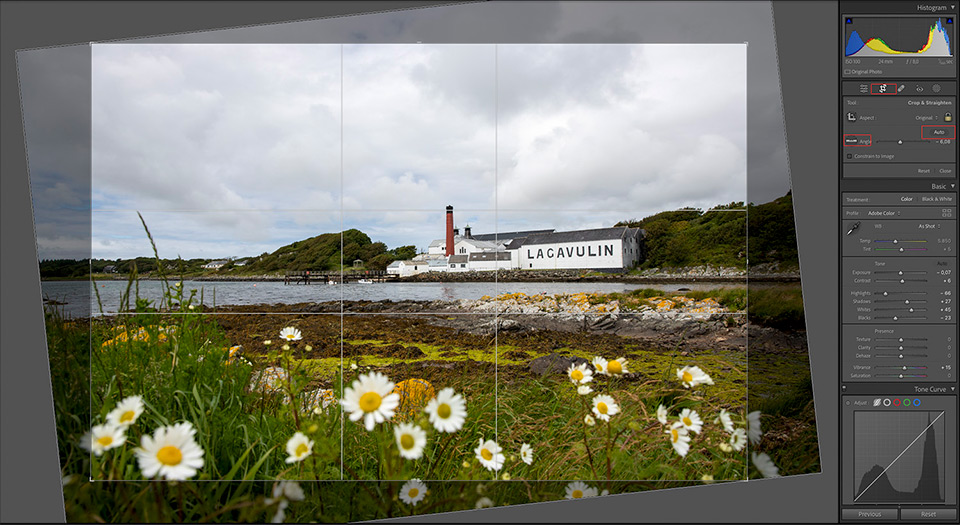
There is nothing more annoying than a wonky horizon in your photo. Fortunately, you can easily correct this in Adobe Lightroom Classic. In fact, the software has an automatic function that straightens the horizon for you.
You will find this under the crop function, then click the auto button, see the image below. Lightroom will automatically straighten the horizon based on the knowledge it has.
I must admit that it does not always work. In that case, you can also use the straighten tool, the spirit level. Simply draw a line across the horizon and the software will straighten it. Quick and easy.
Below is an example photo that I straightened in this way.
Tip 5: use masks
In Lightroom Classic, you edit your photo by adjusting sliders to change things such as the contrast, shadows or exposure.
However, if you adjust a slider, it will affect the entire photo. And that is not always what you want! Sometimes you may only want to adjust the sky, for example, and not the rest.
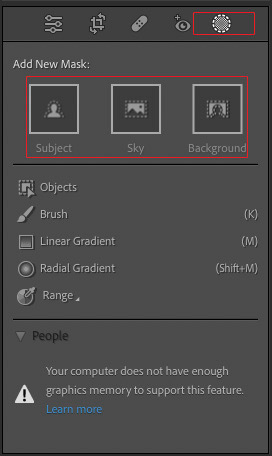
Fortunately, there is a simple solution, namely masks! These are now very quick and easy to use. Simply click the mask button, mask in English, and you will then get several options, see the image below.
Option 1: Subject
The software will automatically select the subject in your photo, such as a person or animal. If you adjust the sliders after selecting the subject, only the subject will be edited.
Option 2: Sky
The software will select only the sky, allowing you to edit it.
Option 3: Background
The software will automatically select only the background, so you can easily edit it. For example, you can make the background darker, as I did with the dog photo below.

I easily made the background of this photo darker using the background mask.
Extra tip: are you still not quite getting the result you want with the masks above? You can also use a brush, linear or radial mask. You can easily select these in the mask menu, then indicate in your photo where you want to apply the edit.
Do you also have useful tips for working faster in Adobe Lightroom? I would love to hear about your experience! Leave a comment below!
About the author
Thijs Schouten, 33 jaar en woonachtig in Amersfoort. Al meer dan 10 jaar actief met fotografie en als kind ook altijd een camera in zijn handen gehad. Fotografie is (naast zijn vriendin en twee dochters) zijn grote passie. Hij fotografeert vooral natuur, maar schrijft ook graag fotografie artikelen en productreviews.
You might also like
-
 Adobe updates Lightroom (Classic) with new AI masks
by Elja Trum
-
 4 Lightroom Classic Tips for Experienced Users
by Elja Trum
-
 What is the Comments tab in Lightroom Classic for?
by Nando Harmsen
-
 What's new in the Lightroom Classic 13 update?
by Nando Harmsen
-
 Speed up Lightroom Classic by reinstalling it
by Elja Trum

11 comments
-
 Luc Vancamp wrote on Tuesday 6 June 2023 at 12:44 | reply
A subscription to Lightroom and Photoshop costs no more than LR alone, so you get PS for free. Called photography bundle!
Translated from Dutch.
! -

-

-
 tineke wrote on Tuesday 6 June 2023 at 12:58 | reply
Do I need a credit card, or can I pay with my IBAN number?
Translated from Dutch. -

-
 guest wrote on Tuesday 6 June 2023 at 14:32 | reply
Raadsel: how do you turn a slider?
Translated from Dutch.
This is stated in the text. -
-
-
-
 Donald Willemsen wrote on Wednesday 7 June 2023 at 11:49 | reply
For that 12.09€ you get not only LrC and Ps. In addition, you also get ACR , Bridge, the mobile app of Lr and a few other apps such as Adobe portfolio. Of course, you also automatically get all updates and 20GB of storage. The latter is useful if you work online with the mobile apps or to immediately make a backup from your camera while on the go
Translated from Dutch. -


Have your say
Please note: Articles older than a week can only be commented on by signed-in visitors.Would you still like to comment? sign in or create a free account.
Become a better photographer every week
A practical photography tip in your inbox every week.
39,077 photography enthusiasts already receive the tips! More about the weekly mail. Or keep up to date via  Facebook.

Elja Trum
Photofacts; everything to do with photography!
Would you like to take better photos and keep up with what is happening in photography? Photofacts publishes articles that teach you something about photography — from a product announcement to a practical shooting tip or a look at a website. Photofacts covers photography every day and is a hobby project of Elja Trum's that got out of hand. The articles are written by a team of volunteer authors. If you would enjoy writing one or more articles for Photofacts, do get in touch.More about PhotofactsPhotofacts is made possible in part by
