

Create your own copyright watermark in 5 steps
Wednesday 12 December 2018, 14:53 by Michelle Peeters | 36,161 views | 20 commentsThis article was translated from Dutch with the help of AI. Read the original.
If you are missing a quick way to use your own copyright watermark on a photo, this trick from Scott Kelby is exactly what you are looking for. You can save your own copyright information as a brush, so you are always just one mouse click away from your watermark.
Step one:
Open a new document with a white background, then click the Create a new layer button at the bottom of the Layers palette to add a new empty layer.
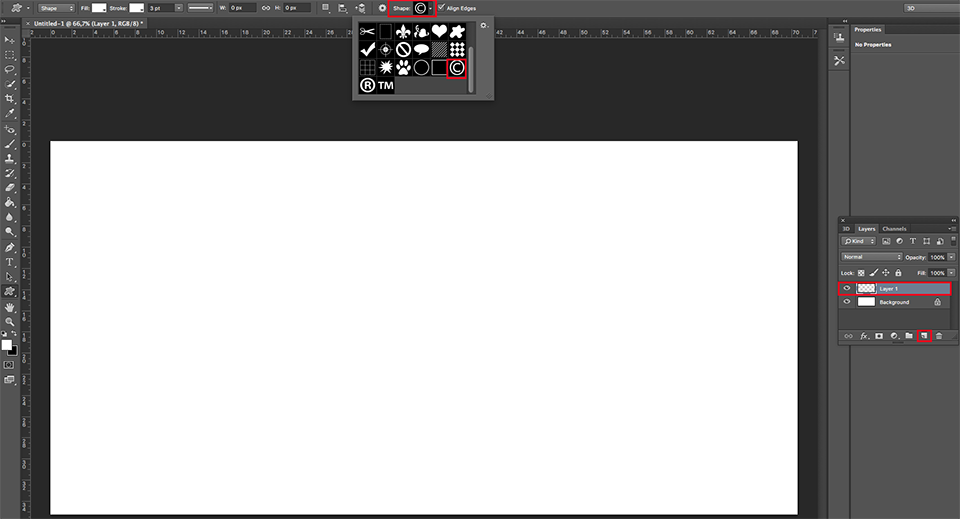
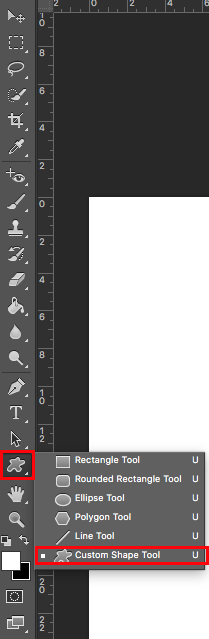
Press U for the Custom Shape tool. You will find this tool in the Tools palette above the Hand tool. You will now also see the Shape menu appear at the top of the menu.
Click the arrow to the right of the first symbol next to Shape to display a window with the available shapes. In the default set, choose the copyright symbol. Press the D key to set the foreground colour to black.
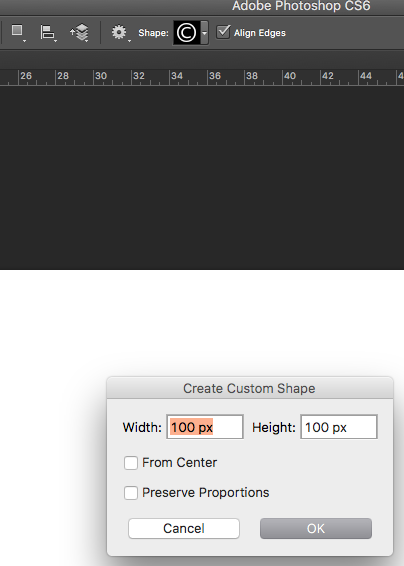
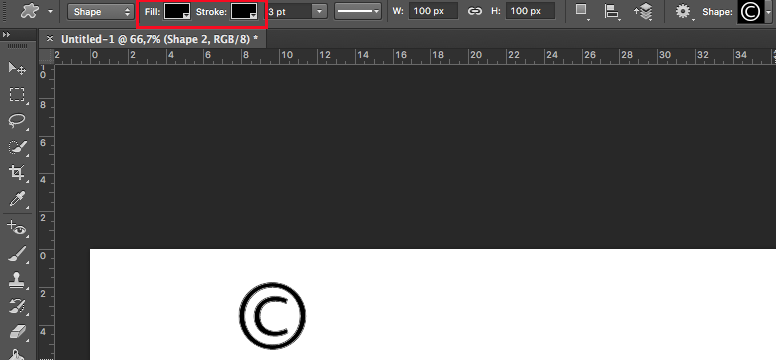
Place the copyright symbol in the document by clicking with the mouse in your new document. Then press Enter, after which the symbol will appear.
You can make the symbol larger or smaller with the Free Transform tool, which you can call up with Ctrl-T (Cmd-T on a Mac). Drag it to a suitable position in your document.
Step two:
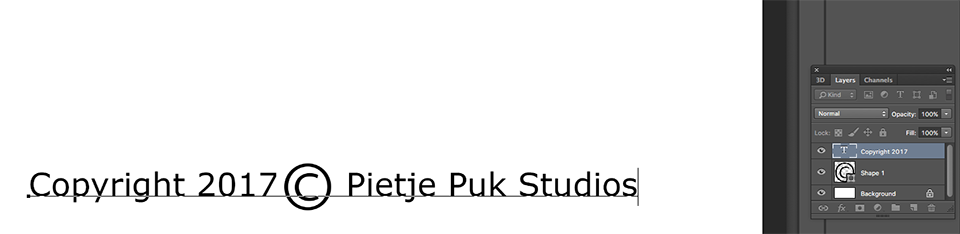
Press the T key for the Type tool and type in the copyright information. The Type tool adds a new text layer to the Layers palette.
Make sure you type a few spaces between the copyright date and your own name or the name of your studio, so that you can insert the large copyright symbol.
Step three:
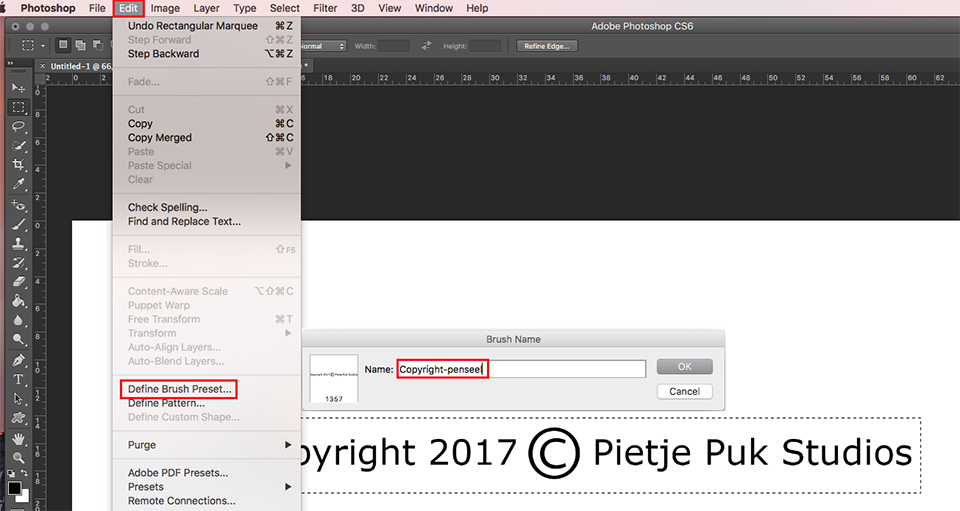
Press the M key for the Rectangular Marquee tool and select both the text and the copyright symbol. Now open the Edit menu and choose the Define Brush Preset option.
In the Brush Name dialogue box, choose a suitable name and click OK. The combined text and copyright symbol are added to the brush library together.
Step four:
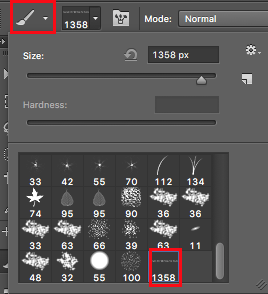
Press the B key for the Brush tool. In the options bar, click the preview to the right of the word 'Brush' and scroll down in the brush picker. At the very bottom you will see the brush you have just created yourself.
Step five:
Your own custom brush is ready to use. Open a photo and click the Create a new layer symbol at the bottom of the Layers palette. Click the Brush tool, choose the new copyright brush in the brush picker and click where you want to add the copyright information.
When you press ENTER, you actually place your copyright symbol in your photo, on the newly created layer.
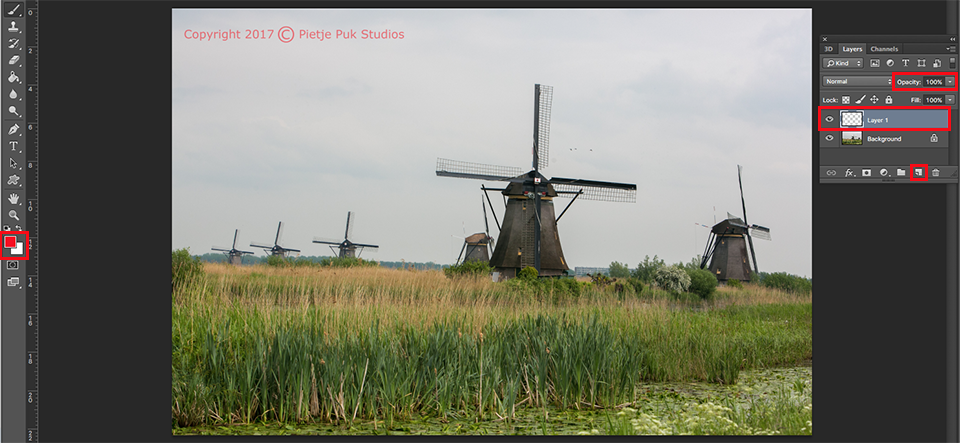
Reduce the opacity of the new layer in the Layers palette to around 20 per cent, so that the text and symbol become transparent.
Two things to remember: (1) try white as the foreground colour on a dark photo and (2) use the Master Diameter slider in the brush picker to set the size of the copyright symbol and text. You can also do this with the brackets. '[' makes your watermark larger and ']' makes it smaller.
Of course, you can also turn another shape or even an existing logo into a brush in this way.
Want to learn more about Photoshop image editing?
At Photofacts Academy, our online learning environment for photographers, we have several courses about Adobe Photoshop.
- Photoshop for Beginners (Johan Elzenga)
- Photoshop for Photographers (Piet van den Eynde)
- Advanced Photoshop (Marit Hilarius)
- Photoshop Effects (Elja Trum)
And much more...
You can follow these courses for two weeks with a free trial membership.
About the author
Michelle Peeters is fotografe en oprichter van DeuxBleus Fotografie. Michelle herkent het bijzondere in het gewone en het gewone in het bijzondere. Ze heeft zich nooit willen specialiseren en is daardoor van alle markten thuis.
You might also like
-
 How do you protect your copyright?
by Liesbeth van Asselt
-
 Do a photo meditation while brushing your teeth
by Elvira Smit
-
 7 useful camera tricks for Nikonians
by Michelle Peeters
-
 Selective editing in Lightroom
by Michelle Peeters
-
 Review: Portrait Photography with Natural Light by Scott Kelby
by Michelle Peeters
-
 Google adds copyright information
by Michelle Peeters
20 comments
-
 Leo-Jan wrote on Saturday 8 April 2017 at 16:40 | reply
A disgrace, it hurts my eyes.
Translated from Dutch. -

 Michelle Peeters wrote on Saturday 8 April 2017 at 18:43
| reply
Of course, you do need to place it subtly and not too large, reducing the opacity helps a lot!
Translated from Dutch. -
 patrick180 wrote on Saturday 8 April 2017 at 20:59
| reply
Do we really need to take this article seriously?\n\nEveryone knows how to make something like this, right? Besides, it can be done much faster and better.
Translated from Dutch. -
 Elja Trum
wrote on Saturday 8 April 2017 at 21:33
| reply
I think a lot of photographers don't know that you can make a brush yourself. So I think this is a useful tutorial.
Translated from Dutch.
That it can look a lot nicer than a copyright symbol and some text isn't really relevant for the example in my eyes.
Personally, I'm not really into adding a watermark, but there are plenty of photographers who do want that. -
 Arthur Wittendorp
wrote on Monday 10 April 2017 at 08:10
| reply
Seems like a rather cumbersome way to add a watermark to me. In Lightroom there is an easier way to do this. A logo or text can be added to the photo file during export. It only takes 1 click!
Translated from Dutch. -
Michelle Peeters wrote on Monday 10 April 2017 at 11:14
| reply
Thanks for the tip Arthur!
Translated from Dutch. -
 Louis Meulstee wrote on Tuesday 11 April 2017 at 11:31 | reply
If you're missing a quick way to use your own copyright watermark on a photo, then this trick by Scott Kelby is exactly what you're looking for.
Translated from Dutch.
(Post-)processing isn't a trick. They are workflows or methods. A trick is something Hans Klok, an illusionist, does. -
 Plaatjesmaker wrote on Tuesday 11 April 2017 at 12:31 | reply
Are you allowed to just use this ? Isn't there a copyright on the copyright symbol ?
Translated from Dutch. -
 Groef wrote on Tuesday 11 April 2017 at 17:36
| reply
I probably missed something, but it's not clear to me which application is being used here? Purely out of curiosity, because since the latest firmware update I can include copyright information in the EXIF with my Fuji camera
Translated from Dutch.
-
Michelle Peeters wrote on Tuesday 11 April 2017 at 18:28
| reply
@Groef: Adobe Photoshop
Translated from Dutch. -
Esther wrote on Tuesday 11 April 2017 at 19:09 | reply
I use the WaterMark V2 program myself........very handy to add a watermark or logo to an entire folder all at once !
Translated from Dutch. -
 Gerardus,Gelmers wrote on Tuesday 11 April 2017 at 21:21 | reply
so big that it ruins the photo a small c and name is enough
Translated from Dutch. -
Michelle Peeters wrote on Tuesday 11 April 2017 at 21:45
| reply
@Gerardus: absolutely agree! I hardly ever use it myself either and when I do, as inconspicuously as possible and in a corner where it doesn't ruin your photo.
Translated from Dutch. -
 Tony wrote on Wednesday 12 April 2017 at 00:41 | reply
After all those people with their criticism, I still want to say that for me it was a very interesting article, and indeed you can sometimes solve it more simply and add a watermark to all your photos with one click, but then you have to be satisfied with the place where it puts them.
Translated from Dutch.
For my part, I say: thanks for posting this. -
Michelle Peeters wrote on Wednesday 12 April 2017 at 11:38
| reply
@Tony: thanks, good to hear!
Translated from Dutch. -
 peter nadort wrote on Thursday 13 April 2017 at 08:58
| reply
Michelle, good piece!!! Let all the know-it-alls and top photographers write. But as long as drivers with a driver's license still cause accidents, fortunately there will still be people like you left to tell us that it can also be done differently. Please keep going. I am a beginner too. Regards, Peter
Translated from Dutch. -
 Hendrik De Bock wrote on Thursday 13 April 2017 at 10:18 | reply
Many thanks for the great tip!
Translated from Dutch. -
Michelle Peeters wrote on Thursday 13 April 2017 at 11:20
| reply
@Peter: thanks for your positive message! But critical responses are of course welcome too, they often lead to nice new tips, which can also be educational for me and others! It can always be better and it's good to keep developing yourself.
Translated from Dutch. -
 Math van de Laar wrote on Friday 14 April 2017 at 17:47 | reply
Faststone Photo Resizer is a free program that allows you to add text or logos very easily to individual photos or all at once to xxx number of photos.
Translated from Dutch. -
Michelle Peeters wrote on Sunday 16 April 2017 at 12:20
| reply
I came across The Photographers Logo. Looks very nice, much better than one of those standard copyright watermarks. You could also try designing something like that yourself! There’s now a nice video by Marit Hilarius available on Photofacts in which she explains all the creative things you can do with the Text tool in Photoshop, very useful for something like that!
Translated from Dutch.
Have your say
Please note: Articles older than a week can only be commented on by signed-in visitors.Would you still like to comment? sign in or create a free account.
Become a better photographer every week
A practical photography tip in your inbox every week.
38,764 photography enthusiasts already receive the tips! More about the weekly mail. Or keep up to date via  Facebook.

Elja Trum
Photofacts; everything to do with photography!
Would you like to take better photos and keep up with what is happening in photography? Photofacts publishes articles that teach you something about photography — from a product announcement to a practical shooting tip or a look at a website. Photofacts covers photography every day and is a hobby project of Elja Trum's that got out of hand. The articles are written by a team of volunteer authors. If you would enjoy writing one or more articles for Photofacts, do get in touch.More about PhotofactsPhotofacts is made possible in part by
