

Removing lens flare in Photoshop
Wednesday 12 December 2018, 14:42 by Michelle Peeters | 23,095 views | 10 commentsThis article was translated from Dutch with the help of AI. Read the original.
You took a beautiful photo at a unique moment. But once you get home, you see that your photo has been ruined by an ugly round spot: lens flare. Fortunately, Photoshop can help!
Lens flares, in other words reflections from the sun or another light source inside the lens, can seriously ruin your photo. What's more, they are not always easy to remove. But as always, Photoshop has a solution for this too, although you do have to put in a little effort.
You can often prevent lens flare by using a lens hood. It is caused by the sun or another light source shining into the lens. This creates a number of transparent rings in the photo.
In some cases, for example with a setting sun, lens flare can create a nice effect. But much more often, it is an unwanted phenomenon that can seriously spoil your photo.
The spots are not easy to remove, but with a few tricks you can go a long way.
1. Select the spot
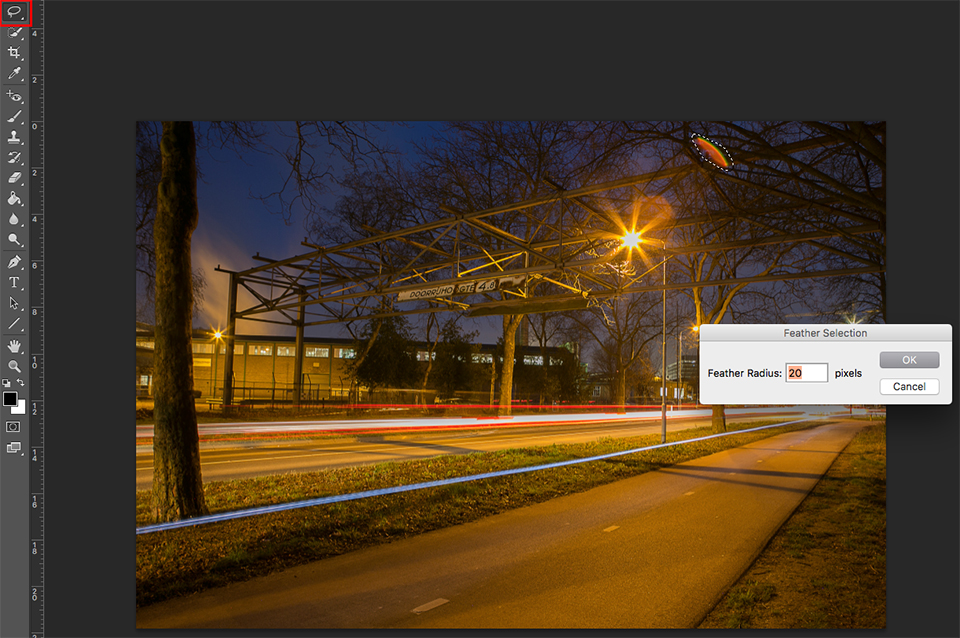
To begin, use the lasso to select the most distracting, moon-shaped lens flare. Then right-click inside the selection and choose Feather. Set the radius to about 20.
2. Create an adjustment layer
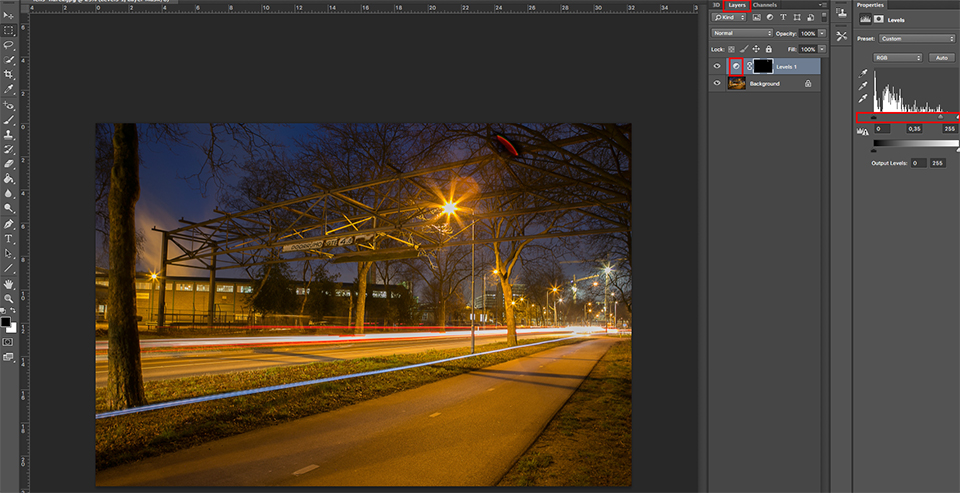
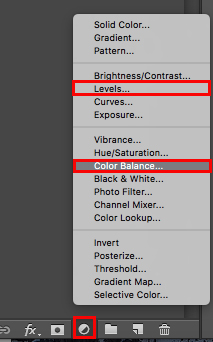
Now click the symbol with the black and white circle in the Layers panel. From this list of adjustment layer types, choose Levels.
While looking at your image, move the sliders in the Levels window until the spot better matches the contrast of its surroundings. Using a black brush with low opacity, around 20%, carefully paint away the areas that are still too dark.
3. Adjust the colour
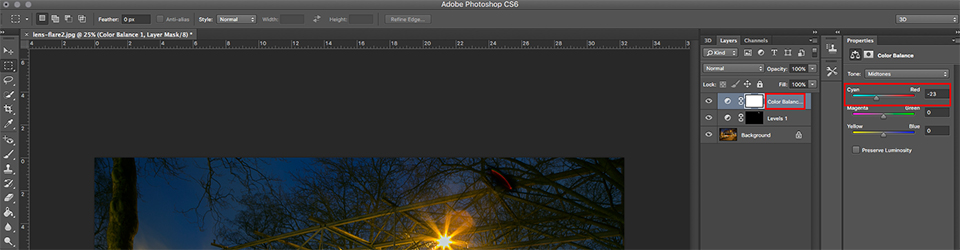
Do not deselect yet, but click the adjustment layer symbol in the Layers panel again. This time, choose Colour Balance. Use this option to adjust the colour of the spot.
If your spot is too green, for example, move the slider towards Magenta. If it is too red, as in this case, move the slider towards Cyan.
Keep doing this until the spot has disappeared. Repeat steps 1 to 3 for the other spots as well.
4. Touch up with the Clone Stamp
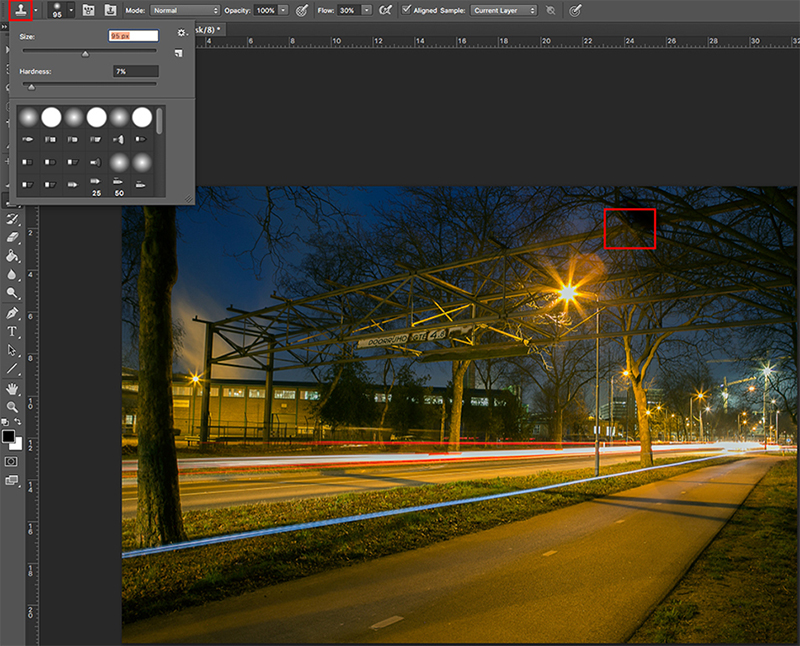
Use a small Clone Stamp to touch up any edges that are still too noticeable. Hold down the ALT key and left-click on an area outside the edge that you want to clone. Then hold down the left mouse button and paint over the edge until it is no longer visible or distracting.
Use the Burn tool, the hand icon, to darken areas that are too light. Alternatively, use Dodge to make areas lighter.
Want to learn more about Photoshop image editing?
At Photofacts Academy, our online learning environment for photographers, we have several courses about Adobe Photoshop.
- Photoshop for Beginners (Johan Elzenga)
- Photoshop for Photographers (Piet van den Eynde)
- Photoshop for Advanced Users (Marit Hilarius)
- Photoshop Effects (Elja Trum)
And much more...
You can follow these courses for two weeks with a free trial membership.
About the author
Michelle Peeters is fotografe en oprichter van DeuxBleus Fotografie. Michelle herkent het bijzondere in het gewone en het gewone in het bijzondere. Ze heeft zich nooit willen specialiseren en is daardoor van alle markten thuis.
You might also like
-
 Got flare in your HDR photo? Remove it with your finger
by Nando Harmsen
-
 How to prevent flare in a photo with the sun in it
by Nando Harmsen
-
 Lens flares: a nudge in the wrong direction
by Michelle Peeters
-
 Portrait photography tip: Shooting into the sun
by Elja Trum


10 comments
-
 Rick wrote on Saturday 18 March 2017 at 23:42 | reply
I like looking at Photofacts and in general I think you have great articles Michelle!
Translated from Dutch.
Unfortunately, this isn't particularly effective or interesting in the photo you showed, if you had said this was done with a black brush I would have believed it too. Your method will undoubtedly work in some photos, but in this case (at least based on the low-resolution website examples) I don't think it's particularly useful. There are, for example, countless examples to be found on YouTube with more effective methods, search for lensflare removal and you have plenty of options.
Personally, I think it's one of your lesser articles, but that's my opinion
-
guest wrote on Sunday 19 March 2017 at 07:58 | reply
I don't find this article that interesting.
Translated from Dutch.
Inappropriate comment edited by the editors -

 Michelle Peeters wrote on Sunday 19 March 2017 at 12:05
| reply
@Rick: the method is indeed somewhat old-fashioned and the photo isn't really very suitable for demonstrating the effect. But it does work! Of course, there are more ways that lead to Rome. Selecting the spot and removing it with 'content-aware' might be easier, provided the area isn't too large and the background is even. If you have better tips for removing lens flare, it would be nice if you would share them!
Translated from Dutch. -
 martinphili wrote on Sunday 19 March 2017 at 21:25
| reply
Fortunately, the commenters are also active on Photofacts. Courageously expressing anonymous and unfounded criticism.
Translated from Dutch.
Probably gives them a feeling of excitement in their lower abdomen. Mocking someone else, kicking someone who is down.
Elja, you can safely delete this comment. It is only intended as a bit of moral support for your team. I would give that guy an IP ban. -
 Huub wrote on Sunday 19 March 2017 at 21:29 | reply
@martinphili: great!!!
Translated from Dutch. -
Rick wrote on Sunday 19 March 2017 at 23:31 | reply
@michelle It was of course not meant as criticism, but rather as constructive feedback, it is once again of course just my opinion! However, personally I would have chosen a more suitable photo. I don't know this method, but if it works better for other photos, I would use the most ideal photo as an example.
Translated from Dutch.
I myself used this tutorial the last time I had to remove an annoying lens flare.
@martinphili I assume you are not referring to me in your response, as I am simply giving a substantiated opinion, whether it is justified or not doesn't matter in my opinion. -
Michelle Peeters wrote on Monday 20 March 2017 at 07:26
| reply
@Rick: your constructive criticism was of course fine! And thank you for sharing the tutorial!
Translated from Dutch. -

-
Michelle Peeters wrote on Tuesday 21 March 2017 at 16:06
| reply
@Evert: this is educational for me too! I will write a new article about this based on the best and easiest solution from critical readers for removing lens flare properly.
Translated from Dutch.
Have your say
Please note: Articles older than a week can only be commented on by signed-in visitors.Would you still like to comment? sign in or create a free account.
Become a better photographer every week
A practical photography tip in your inbox every week.
38,764 photography enthusiasts already receive the tips! More about the weekly mail. Or keep up to date via  Facebook.

Elja Trum
Photofacts; everything to do with photography!
Would you like to take better photos and keep up with what is happening in photography? Photofacts publishes articles that teach you something about photography — from a product announcement to a practical shooting tip or a look at a website. Photofacts covers photography every day and is a hobby project of Elja Trum's that got out of hand. The articles are written by a team of volunteer authors. If you would enjoy writing one or more articles for Photofacts, do get in touch.More about PhotofactsPhotofacts is made possible in part by
