

Create a collage in Affinity in nine steps
Saturday 7 March 2026, 13:13 by Nando Harmsen | 1,819 views | 0 commentsThis article was translated from Dutch with the help of AI. Read the original.
Want to create a collage from a selection of photos? It can be quite a puzzle to place them on a canvas in the way you want. In Affinity, you can create a template. This makes creating a collage child's play.
I've always found creating a collage from photos difficult. Especially working out what size and aspect ratio the photos should have in the collage. It's a constant process of adjusting the size and cropping.
In Affinity, you can create placeholders. You decide in advance what you want the photo collage to look like. You can make it as simple or complicated as you like. Filling it with photos, however, will be very easy.
I'll explain how to do it step by step. I am assuming that you know the basics of Affinity. If you don't, Photofacts Academy has a beginners' course, of course.
1 - Create a blank canvas
Start by creating a blank canvas. You can choose the dimensions in pixels, which is perfect for online use. Preferably, choose a size that's large enough. You can always make it smaller later.
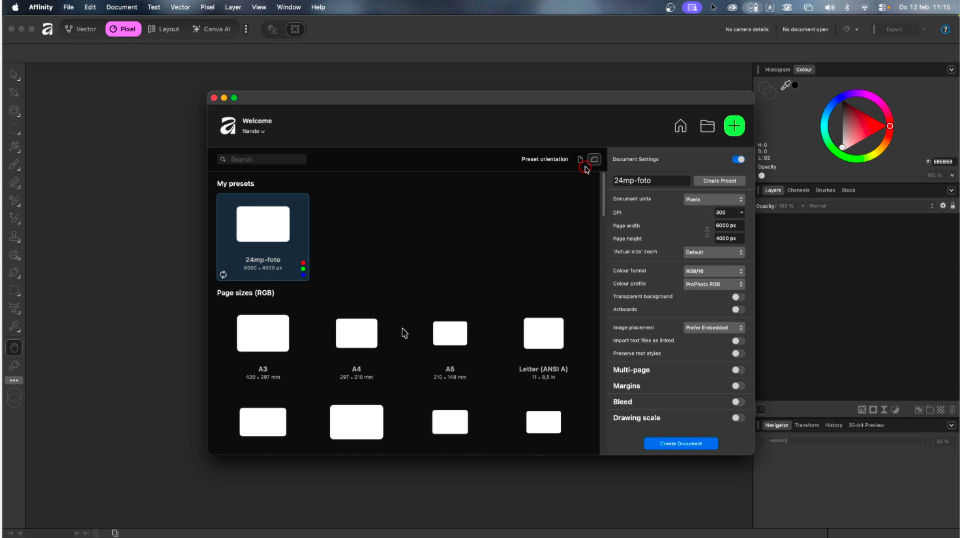
A collage intended for print can be entered in centimetres or millimetres. In that case, the DPI value is important. For example, choose 240-300 DPI. Here too, you can always reduce the size later.
2 - Use the Shape tool
You'll find the Shape tool in the menu. By default, this is the square, but there are countless shapes available under this tool. You can also use the U shortcut. Choose the shape you want to use, then draw a shape for each photo in the collage.
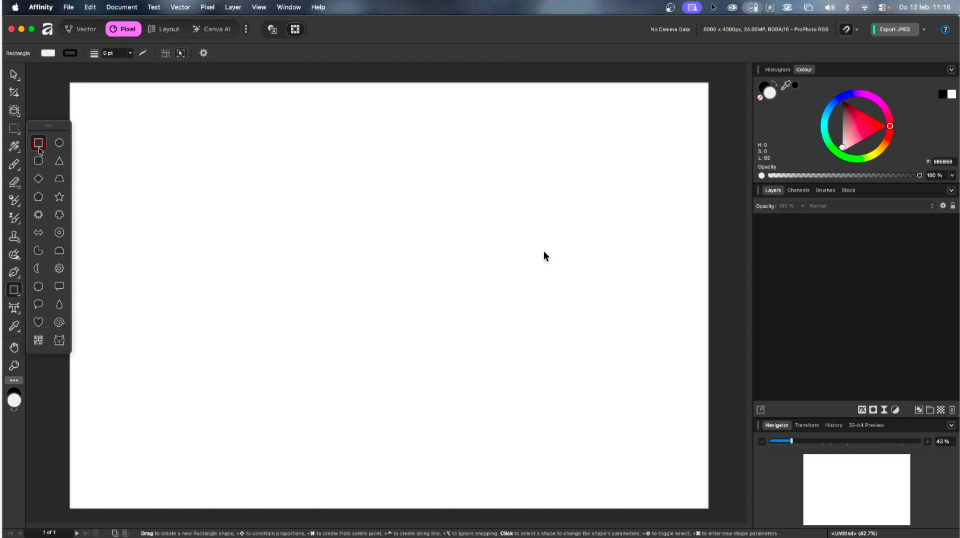
Each shape is placed on a separate layer. You can place the shapes on top of and next to each other. You can use as many different shapes as you like. The size of each shape can still be adjusted at any time.
3 - Give each shape its own colour
To distinguish the shapes clearly, it's a good idea to give each shape its own colour. It doesn't matter which colours you choose, as long as they are different.
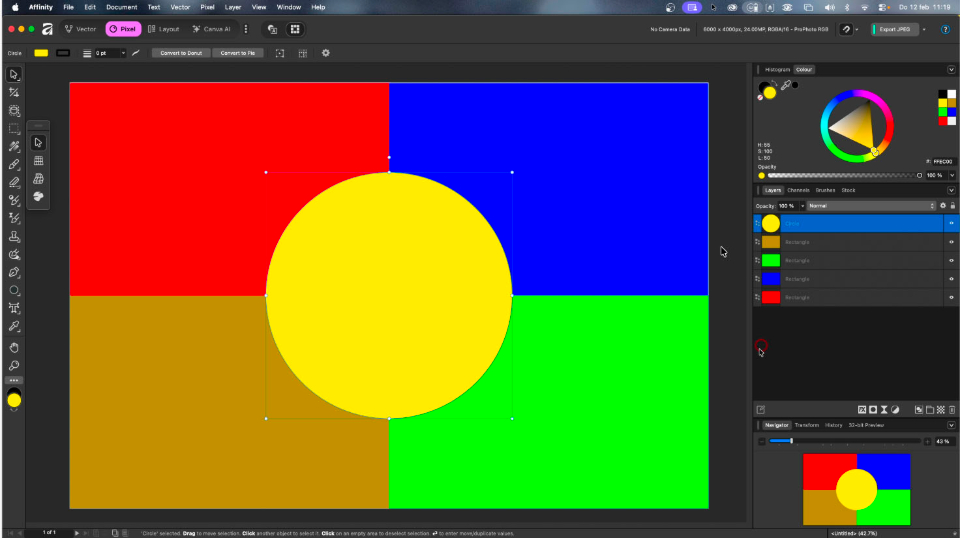
This has no other purpose than to make the different shapes visible on the canvas. This gives you a good overview of your collage. It also makes placing the photos much easier later on.
4 - Save the file as a template
Will you be using this collage more often? Then it may be useful to save it as a template now. You can simply save the file in Affinity's standard file format.
Name the file collage-template, or give it another recognisable name. You can then open it for each new collage and fill it again. It's also possible to adjust the shapes and layout at any time.
5 - Choose the Place tool from the menu
Now it's time to place the photos. In the menu, open the File > Place option. Select the photos you want to use in the collage. In principle, you can select any type of image file, including raw files.
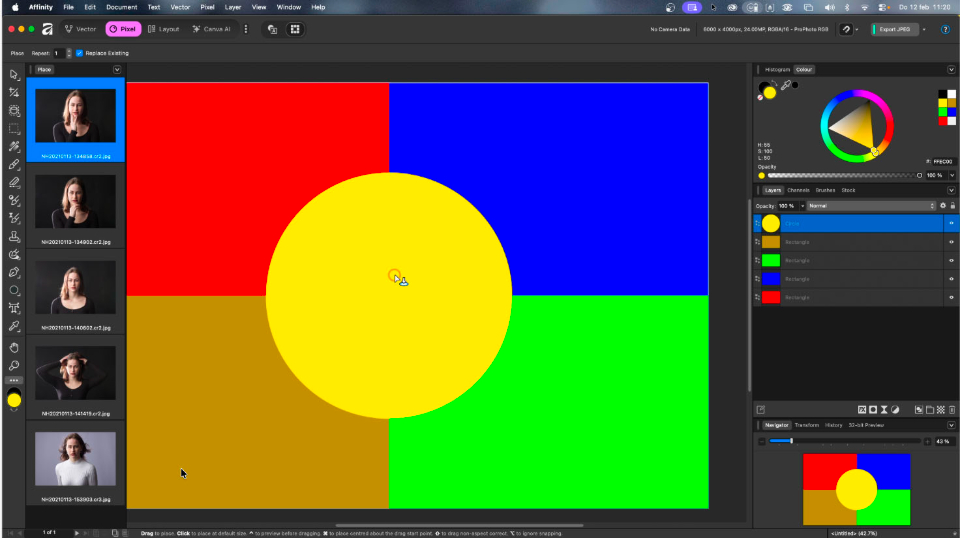
Once you've selected everything, the photos will appear in a filmstrip on the left. Drag each photo onto the canvas. It doesn't matter exactly where. This adds each photo as a separate layer and automatically removes it from the filmstrip.
6 - Drag the photos into the placeholder
You can now place each photo in the placeholder. Do this by dragging the layer with the photo onto the layer with the placeholder. Make sure you drag the photo onto the layer, not onto the thumbnail. Otherwise, it will become a mask.
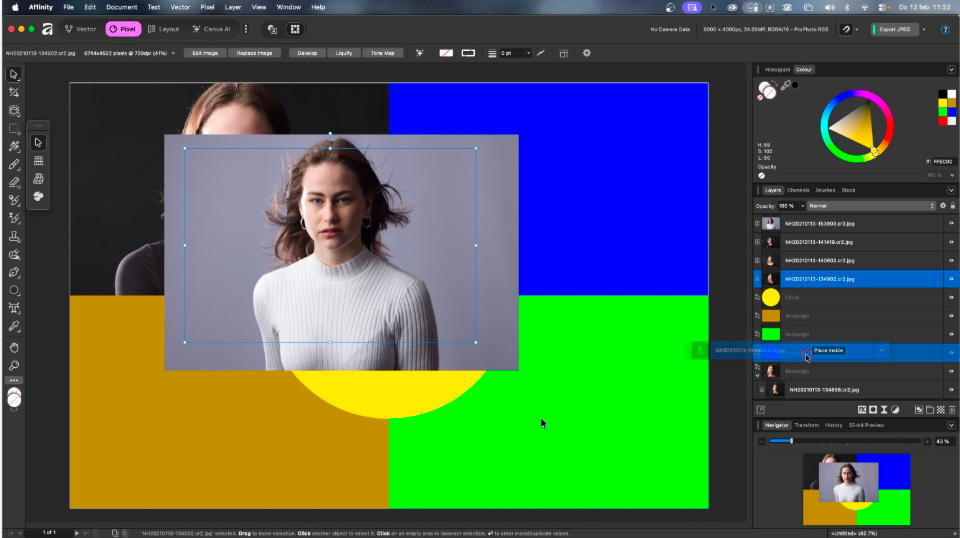
You can still adjust the photo's size, move it and rotate it as you like. The placeholder makes sure it fits neatly in the position you designed for it.
7 - Remove the shape colour and add a layer style
Now that all the photos have been placed, it's a good idea to remove the colours from the placeholders. This ensures that they don't appear as a border around the photo. Select all the layers with the placeholders and remove the colour in the colour panel.
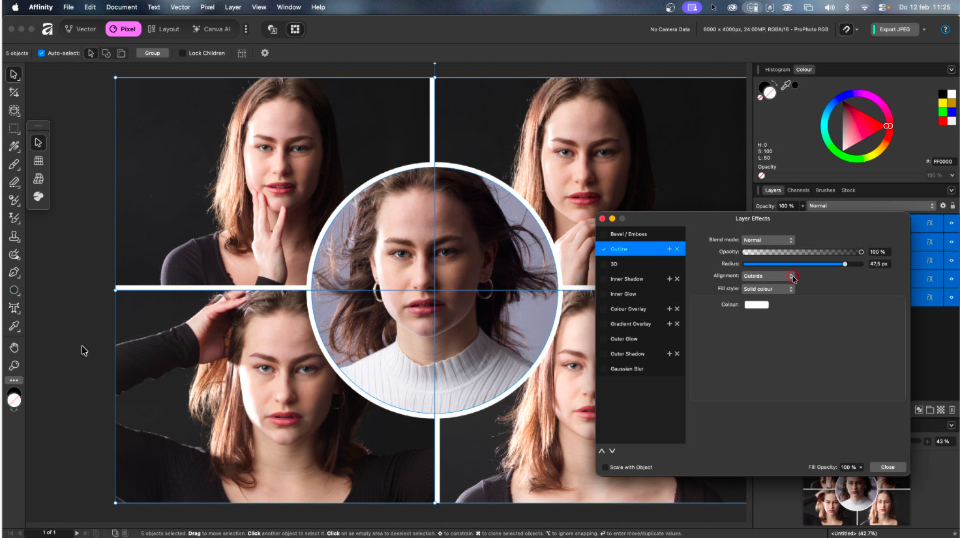
You can embellish the collage further by adding a layer style. For example, a border around the photo or a shadow. Don't overdo it, though. Simplicity is best.
8 - Save the result
You can now save the result as a new document. Don't use the Save option, but Save As. Give it a new name and save it with the photos you used for the collage. Or in another location of your choice.
This means you can still adjust the collage later. Especially if you realise that the layer style you chose is a bit too much after all. Or if you want the photo to be slightly larger or smaller in the frame.
9 - Export to a jpeg for use
The saved file can't be used outside Affinity. Do you want to have the collage printed? Or do you want to share it online? Then export the collage.
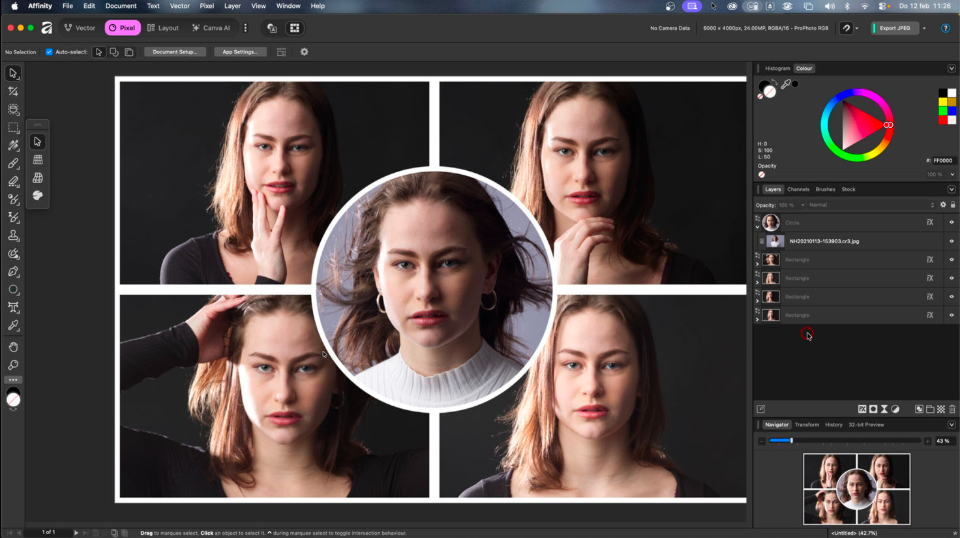
In most cases, a jpeg file is the best choice. Make sure it's in sRGB so that the colours are displayed correctly. You can also adjust the size of the collage during export.
Which version of Affinity?
Which version of Affinity is this for? The answer is: every version. You can do this in Affinity Photo, Affinity Photo 2, and Affinity by Canva. It works exactly the same in all three versions.
If you use Photoshop, you can work in a similar way. The exact process is just slightly different. But the principle is the same, with placeholders being used to create a beautiful collage.
About the author
Nando Harmsen has been photographing for more than 40 years. He specialises in wedding photography and landscape photography. Nando also gives talks, workshops, masterclasses and photo trips, and regularly reviews new and interesting equipment.
You might also like
-
 Making a Solar Eclipse Collage in Photoshop
by Nando Harmsen
-
 Affinity acquired by Canva
by Elja Trum
-
 Editing raw files in Affinity Photo
by Nando Harmsen
-
 8 things to consider when switching to Affinity
by Nando Harmsen
-
The new free Affinity Photo
by Nando Harmsen
-
 There is a major update for Affinity Photo
by Nando Harmsen
0 comments
Be the first to share what you think!
Have your say
Please note: Articles older than a week can only be commented on by signed-in visitors.Would you still like to comment? sign in or create a free account.
Become a better photographer every week
A practical photography tip in your inbox every week.
39,078 photography enthusiasts already receive the tips! More about the weekly mail. Or keep up to date via  Facebook.

Elja Trum
Photofacts; everything to do with photography!
Would you like to take better photos and keep up with what is happening in photography? Photofacts publishes articles that teach you something about photography — from a product announcement to a practical shooting tip or a look at a website. Photofacts covers photography every day and is a hobby project of Elja Trum's that got out of hand. The articles are written by a team of volunteer authors. If you would enjoy writing one or more articles for Photofacts, do get in touch.More about PhotofactsPhotofacts is made possible in part by
