

Making a Solar Eclipse Collage in Photoshop
Saturday 29 August 2026, 23:23 by Nando Harmsen | 797 views | 0 commentsThis article was translated from Dutch with the help of AI. Read the original.
I was asked to show how I make a solar eclipse collage in Photoshop. I show you how in this article. I use my photos of the 2026 total solar eclipse as an example.
Making a successful collage requires photos of the eclipse and a photo of the landscape. It is also good practice to keep reality in mind as much as possible.
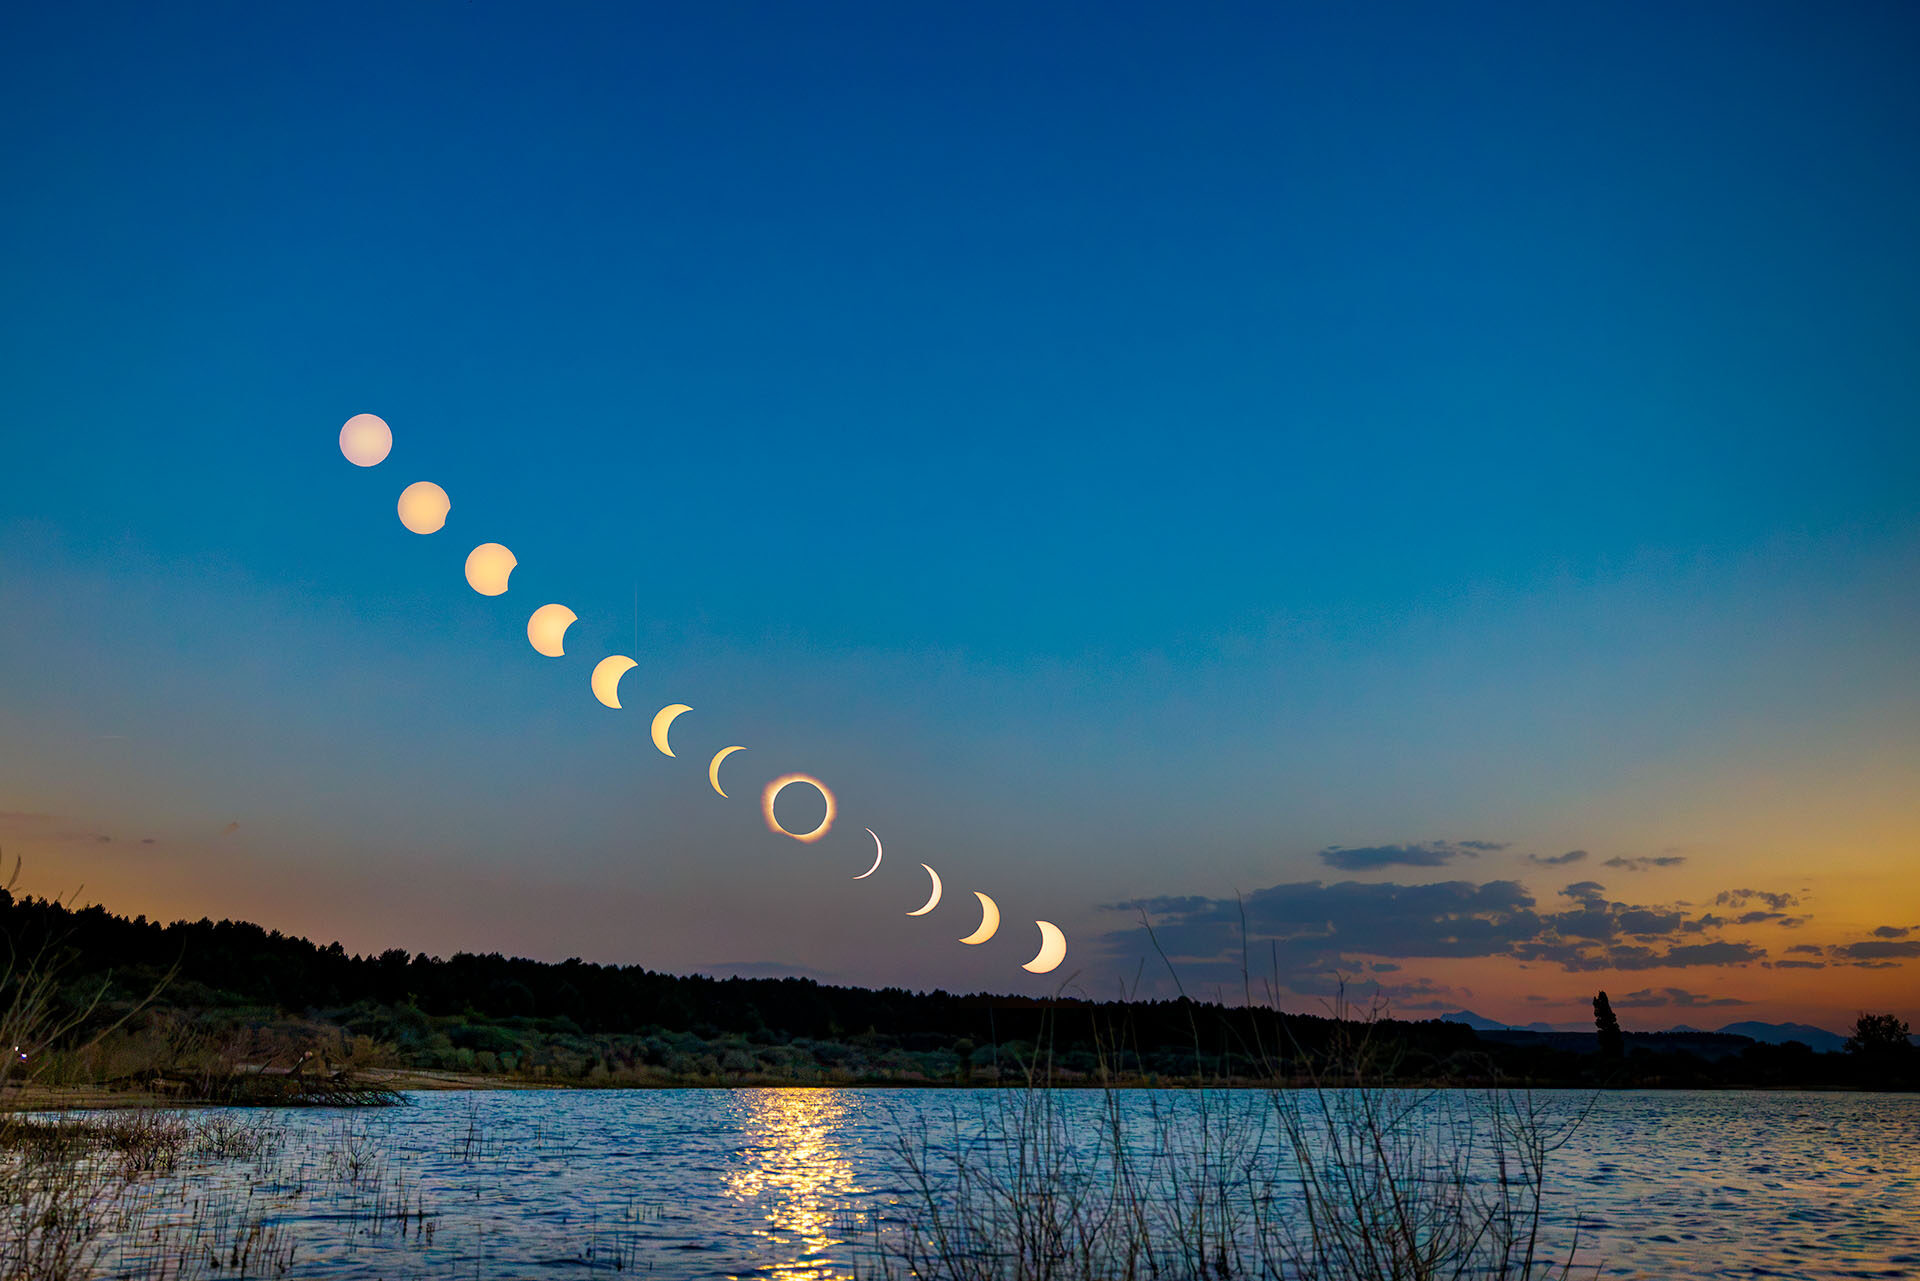
A compilation of the solar eclipse in Aguilar de Campoo, Spain
That means no strange line through the eclipse. Make sure the sequence follows the actual path of the sun as closely as possible. You can deviate from this, of course, for artistic reasons.
The right software is essential. You need to use Photoshop or Affinity. In these programmes, you can work with layers and blending modes. In this article, I assume you have sufficient knowledge of one of these programmes.
The eclipse photos
First, you of course need photos of the solar eclipse. You need to have the eclipsed solar disc clearly in the frame. This requires photographing with a telephoto lens and through a solar filter.

The selected and edited photos of the solar eclipse, taken with a solar filter, except during totality, when no filter was used, and 400mm on an MFT camera, with a 2x crop factor
In these photos, you see the sun against a black background. Only the solar disc is visible. Edit these photos so that the solar disc is as bright as possible, almost white. Avoid underexposure.
The landscape photo
Next, you need a photo of the surroundings, without a solar filter. Preferably one taken when the sun was at maximum eclipse. This photo should also be edited properly.

A photo of the landscape during totality. This will be the base photo.
Make sure the sky is not too bright. Avoid a dull sky, which can quickly happen if you underexpose too much or adjust the contrast excessively.
Is the sun a spot that is too bright? Remove it. You end up with a sky without a sun. This is not always necessary and depends on the appearance of the photo and your preferences.

To make the compilation easier, the sun and band of clouds were removed in Photoshop. Use your favourite removal tools.
Position the separate photos
Now it all comes together. Place all the separate eclipse photos as layers on the landscape photo. Adjust the size of these layers until the sun has a realistic or slightly larger diameter.

Place all the eclipse photos as layers on the base photo and adjust the size of the solar disc to your liking.
Set the blending mode of these layers to 'lighten'. This shows only the lightest pixels. Then neatly arrange all the individual layers along the curve made by the sun in the sky.

Set the blending mode to lighten and move the individual layers until you achieve a realistic path of the sun's movement. Make sure the totality is above the reflection in the water.
The final fine-tuning
As a final step, you can refine the brightness of the photo further. Particularly that of the sky. You can do this on the final result, but also on the background alone. The choice is yours.

Check all the layers carefully and remove distracting elements or make adjustments where necessary. Be precise here and take your time.
The eclipse compilation is then finished. Do keep in mind that its success depends on the photos. Were there clouds in the frame? Then it can become more difficult. Or even very difficult.
Would you like to know how to work with layers in Photoshop or Affinity? Then I recommend learning more about this software. You can do that through the courses at Photofacts Academy, of course.
About the author
Nando Harmsen has been photographing for more than 40 years. He specialises in wedding photography and landscape photography. Nando also gives talks, workshops, masterclasses and photo trips, and regularly reviews new and interesting equipment.
You might also like
-
 Are you ready for the solar eclipse?
by Nando Harmsen
-
 Replacing skies in Photoshop is getting easier
by Johan Elzenga
-
 Are you going to photograph the solar eclipse on 25 October 2022?
by Nando Harmsen
-
 Photography tips for the solar eclipse on 10 June
by Nando Harmsen
-
The 2026 solar eclipse
by Nando Harmsen
-
 Create a collage in Affinity in nine steps
by Nando Harmsen
0 comments
Be the first to share what you think!
Have your say
Please note: Articles older than a week can only be commented on by signed-in visitors.Would you still like to comment? sign in or create a free account.
Become a better photographer every week
A practical photography tip in your inbox every week.
39,078 photography enthusiasts already receive the tips! More about the weekly mail. Or keep up to date via  Facebook.

Elja Trum
Photofacts; everything to do with photography!
Would you like to take better photos and keep up with what is happening in photography? Photofacts publishes articles that teach you something about photography — from a product announcement to a practical shooting tip or a look at a website. Photofacts covers photography every day and is a hobby project of Elja Trum's that got out of hand. The articles are written by a team of volunteer authors. If you would enjoy writing one or more articles for Photofacts, do get in touch.More about PhotofactsPhotofacts is made possible in part by
