

5 steps to great strobist photos
Wednesday 12 December 2018, 20:46 by Michelle Peeters | 13,147 views | 7 commentsThis article was translated from Dutch with the help of AI. Read the original.
You have probably heard of the term strobist. The core of this technique is taking your flashgun off your camera. This lets you create beautiful lighting on location.
The example photos and descriptions of how they were created are by Rob Kluitenberg of Pok Producties.

1. Flashguns
You can do strobist photography with any flashgun. The flash does not need to be able to communicate with your camera via TTL (Through The Lens). What is important is that you can set the flash manually.
2. Tripod
It is useful to put your flashgun on a tripod, at a fairly high position. Then point the flash slightly downwards for natural lighting. If you cannot mount your flashgun directly on your tripod, it is useful to attach an umbrella holder.
Even if you do not use an umbrella to fire through or into, it still gives you the option of attaching your flashgun to your tripod. This also lets you point your flashgun upwards or downwards.
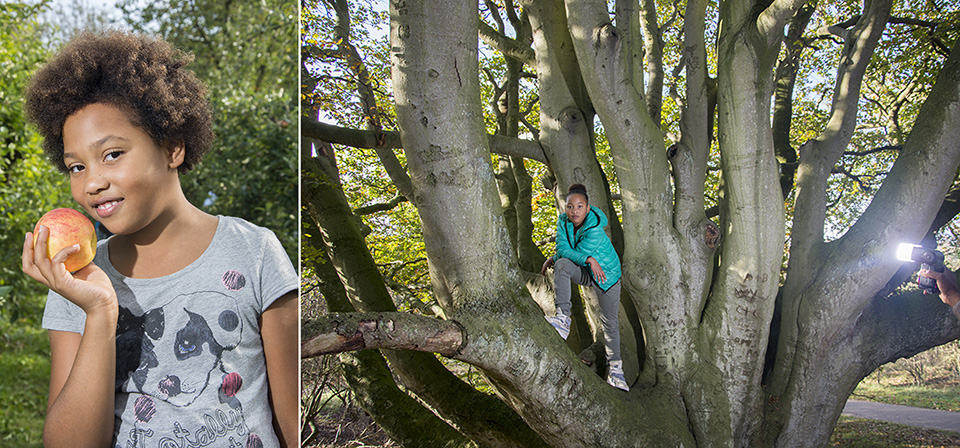
3. Location
With strobist photography, you can shoot on location without needing large flash systems and a power supply. Find a nice location and place your flashguns at a reasonably short distance from your model.
Do bear in mind that your flashguns have less power than large studio lights.
4. Trigger
Because you take your flashgun off your camera, the two still need to communicate with each other. You need a transmitter and receiver for this.
If you use several flashguns, you need a separate receiver for each flashgun. You slide the transmitter into the hot shoe of your camera.
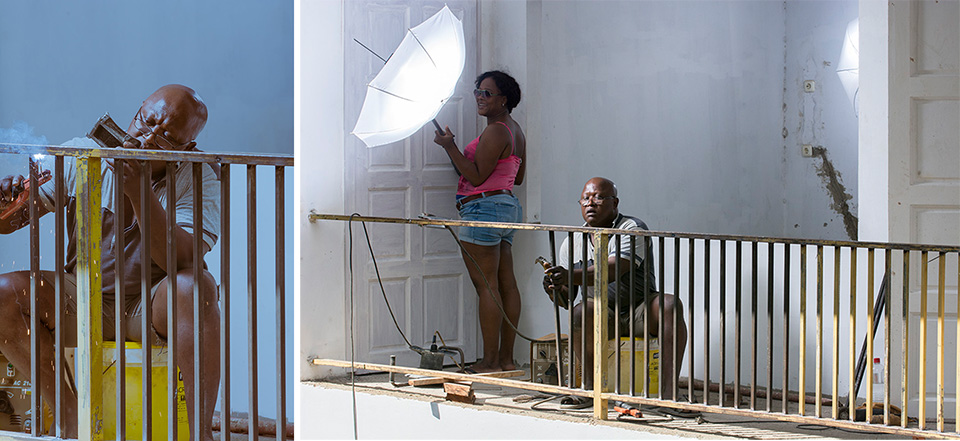
5. Ambient light
I like mixing the flash light with the ambient light. You control this with the shutter speed. The flash fires so quickly that a longer shutter speed has no effect on the flash light itself.
You use the aperture to control, more or less, how much light falls on the subject itself. The shutter speed controls the ambient light.
By setting the shutter speed slightly longer, you let more ambient light reach your sensor. Always remember that your shutter speed must not be faster than your camera's flash sync speed, usually 1/250th of a second.
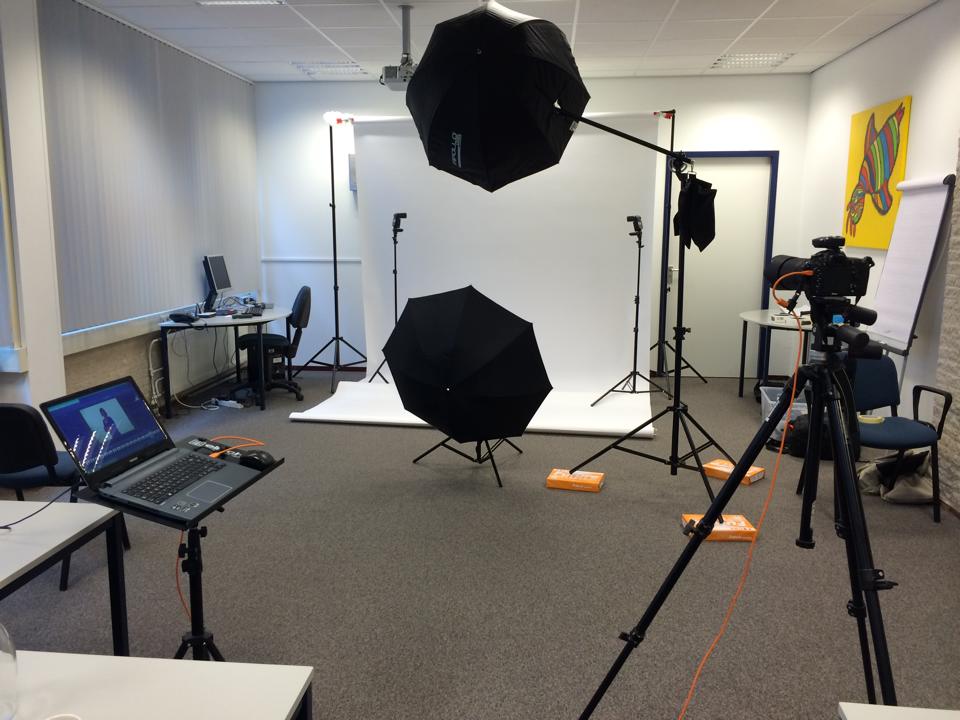
Possible setup
A possible setup used to create portraits of employees for a company. For reasons of efficiency, traditional 'clamshell lighting' was chosen. At the client's request, there was also a super-white background.
All flashguns are controlled with a trigger. The orange cable also provides tethering, sending the data directly from the camera to the laptop.
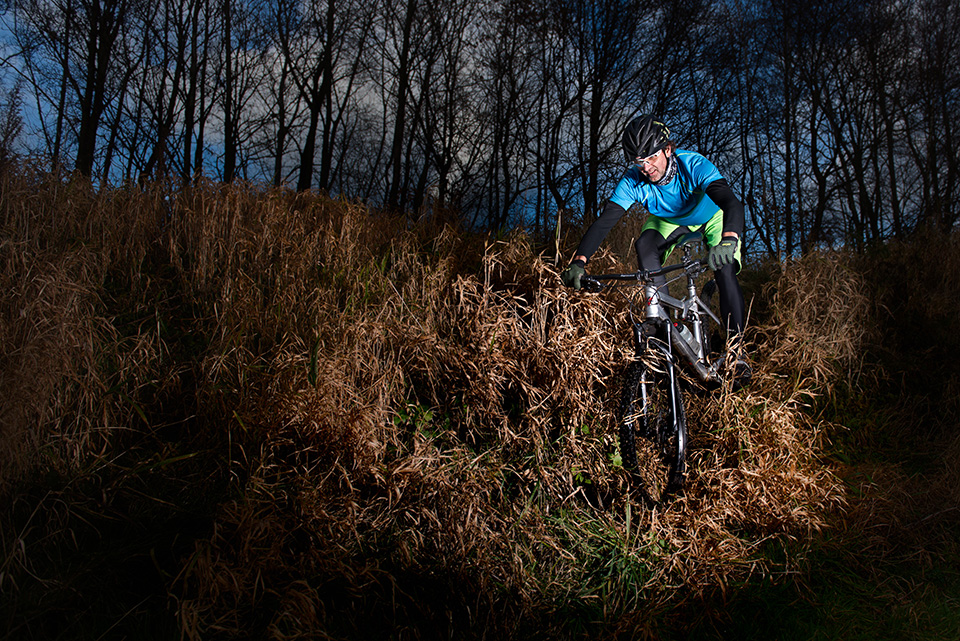
Approach for a strobist photo of a mountain biker
A (semi-)professional Elinchrom light powered by an ELB400 battery was used for this photo.
With the right trigger, you can use these flash lights at faster shutter speeds than the standard sync speed. Depending on your camera, this can be as fast as 1/1600. This can be useful in situations where you want to work with a wide aperture (1.4 - 2.8) while the sun is shining.
Instead of such an expensive flash system, you can of course achieve more or less the same effect with an ND filter (neutral density filter).
Such a neutral density filter ensures that much less light reaches the sensor, allowing you to photograph with a wide aperture and a shutter speed up to the maximum sync speed.
The downside is that focusing becomes more difficult with such 'sunglasses' on the lens. With action photos, you do want to use a fast shutter speed to avoid motion blur.
Then only the Hi-Sync method works. The trigger and flash light are adjusted to each other so that the flash fires at exactly the right moment. This method was used for this photo.
The flash light itself was fitted with an Elinchrom Maxi Silver Reflector 40 cm. An assistant kept the light aimed at the mountain biker.
Approach for a strobist photo of a rabbit
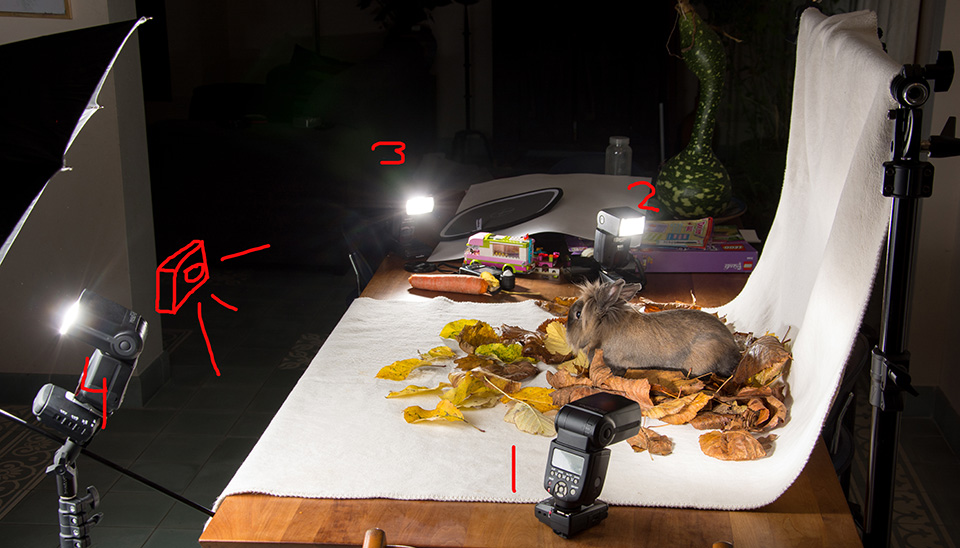
A small blanket was used as a background for this setup. Flashguns one and two were adjusted so that the background becomes pure white. You do this by setting the exposure so that this part is slightly overexposed.
Flashgun four fires into an umbrella for indirect soft light on the 'model'. This is also the 'key light'. Flashgun three provides some extra light on the (camera) left side.
Read the full article about Flashing according to the strobist method.
Video course on strobist photography
Want to discover more about using flashguns off-camera on location? At Photofacts Academy, you will find an extensive video course explaining everything in detail.
» Basic course: Flashing on Location
About the author
Michelle Peeters is fotografe en oprichter van DeuxBleus Fotografie. Michelle herkent het bijzondere in het gewone en het gewone in het bijzondere. Ze heeft zich nooit willen specialiseren en is daardoor van alle markten thuis.
You might also like
-
 Which Strobist kit would you recommend?
by Elja Trum
-
 Motorcyclist with his motorbike, strobist style
by Elja Trum
-
 Combining Coloured Light with Flashguns
by Frank Doorhof
-
 'Speedlight Mastery' by Damien Lovegrove now free on YouTube
by Erik van Rosmalen
-
 Godox announces V100 flashgun
by Elja Trum
7 comments
-
 Huub Sanders wrote on Monday 4 September 2017 at 17:10 | reply
interesting article.
Translated from Dutch. -
 Roland Oomens wrote on Tuesday 5 September 2017 at 15:29 | reply
Good afternoon everyone,
Translated from Dutch.
I have to photograph fast-moving dancing (Lindy Hop) couples soon for promotional purposes for an enthusiasts' club.
The available light will probably be mediocre, so I intend to attach my 580 EX with a yellow diffuser to my 6D for this little assignment and thus at least retain and supplement the warm light in that room..
I am an enthusiastic amateur who prefers to work with natural light and achieves good results with it, so I am now venturing into reasonably unfamiliar territory.
I will probably go for the partially frozen dancers/faces where movement nevertheless remains visible, but also for completely sharply and crisply freezing the couples in acrobatic poses. Ambient light, ISO, shutter speed, aperture, the flash, it all plays a major role, I know.
Have you had good experiences in this area and can you give me some tips and technical background about it that will give me a small head start ?.
I appreciate it ! -

 Michelle Peeters wrote on Tuesday 5 September 2017 at 15:38
| reply
@Roland: are you sure you’re even allowed to use flash during the dance performance? Because this can be quite disturbing, it’s often prohibited.. It’s always useful anyway to ‘time’ the moment when the model briefly stops moving. Often that’s the highest point in the air, but it can also be a sideways movement. Study the pattern beforehand so you can anticipate it.
Translated from Dutch.
Freezing with flash only works if you can get reasonably close, so that the ambient light starts to play a smaller role. And then you’re disturbing things very badly again...
Maybe it would be useful in this case to use auto ISO mode with shutter speed priority. I think you can’t exceed the maximum sync speed of 1/250th of a second, so you’ll have to make do with this.
A major advantage with many dance performances is that the lighting is often already well arranged, so you can make use of that. The lead performer is often already quite well in the ‘spotlights’.
Photograph in RAW so you can still adjust your white balance. You prevent color casts (very well!) with that yellow diffuser. And then just hope that the rest of the lighting has the same color temperature, of course..
Nothing else comes to mind at the moment. In any case, good luck, take plenty of photos, use burst mode! -
 Erwin S|tok wrote on Tuesday 5 September 2017 at 17:11 | reply
Tip: if you like using flash in bright sunlight at a wide aperture, you can also manage perfectly well without high-speed sync. Put an ND filter or variable ND filter in front of your lens and reduce the daylight as much as you like. Then use a simple (dumb) flash or multiple flashes to add the missing light. This way, you can stay below your camera's maximum sync speed and don't need any special high-speed sync equipment.
Translated from Dutch. -
Roland Oomens wrote on Tuesday 5 September 2017 at 20:43 | reply
Yes, that's also a point Michelle, 'may' I use flash there... A friend asked me to shoot the promotional pictures and I know the 'venue' (a small warehouse fitted out for music and theatre, especially amateur music and local activities) so I think so, but hopefully proper mood lighting has indeed already been provided. I'll inquire about that so it doesn't surprise me.
Translated from Dutch.
Finding the dead point in a movement is a good one, and actually logical too. I carry the flash along as 'emergency equipment' and will go for natural light after all I think. The 6D handles high ISOs well, and with fast glass you can get quite far.
I always shoot in RAW and let Lightroom loose on it, perfect combination.
@Erwin: I've become a bit rusty at it because I haven't used flash in a long time, but it's a very beautiful different world with beautiful and also strange possibilities. What you say is also so logical really, I'll try that sometime too, see what comes out of it. Thanks !
It's not until October, but if I remember I'll post a link here to the results (probably FB site) of the dance evenings.
Thanks to both of you for the tips ! -
Michelle Peeters wrote on Tuesday 5 September 2017 at 22:00
| reply
@Erwin: focusing does get more difficult with such 'sunglasses' on the lens (it also says so in the article) and manual focusing isn't an option with action photography either.. How do you deal with that?
Translated from Dutch.
@Roland: using a flash off-camera might still be a slightly better option, that should be possible with your flash, without a trigger set. Then at least you have nice light from the side, always better than from the front! -
 2019$5527$P wrote on Friday 8 January 2021 at 15:58
| reply
If you want to photograph with shutter speeds faster than 1/250 sec, do you then need to buy a trigger set that is specifically suitable for that? Or do you only need a flash that can handle it?
Translated from Dutch.
Have your say
Please note: Articles older than a week can only be commented on by signed-in visitors.Would you still like to comment? sign in or create a free account.
Become a better photographer every week
A practical photography tip in your inbox every week.
38,765 photography enthusiasts already receive the tips! More about the weekly mail. Or keep up to date via  Facebook.

Elja Trum
Photofacts; everything to do with photography!
Would you like to take better photos and keep up with what is happening in photography? Photofacts publishes articles that teach you something about photography — from a product announcement to a practical shooting tip or a look at a website. Photofacts covers photography every day and is a hobby project of Elja Trum's that got out of hand. The articles are written by a team of volunteer authors. If you would enjoy writing one or more articles for Photofacts, do get in touch.More about PhotofactsPhotofacts is made possible in part by
