

How do I select my photos in Lightroom?
Friday 26 August 2022, 13:31 by Elvira Smit | 2,980 views | 2 commentsThis article was translated from Dutch with the help of AI. Read the original.
Each week I take between 100 and 200 photos for various projects I am working on. But then what? How do I make something useful out of that mass of images? Time for an explanation of my organically developed workflow.
A photographer's selection process naturally starts with choosing where, when and how to photograph the subject. But what I want to focus on now is the moment you get home: you are left with a full memory card. And then? They move to Lightroom in my case.
I usually look at the results in Lightroom on the same day. I do that as follows:
I look through all the as-yet unedited photos in chronological order. I do that very quickly: I look at 100 photos in two minutes. I use three buttons on my keyboard for this:
X: Clearly unsuccessful photos get an X, and I delete them immediately afterwards.
F: If I like an image, I press F (Fullscreen). This makes the photo appear at full size.
P: If I still like the image or if I am unsure, I press P (Pick). The photo gets a flag.
2. Slow selection in Lightroom
Ideally, I do not look at the images for a few days now. That helps my judgement.
After a few days or a week, I look at the images again. The photos with a flag now get plenty of attention: I start editing them. If I am happy with one, I give it a star as well as the flag. I do that by pressing 1.
I then go through all the photos without a flag once more. Sometimes I have overlooked a good image, and pick it out then. Or I have given a blurry photo a flag, and it is removed after all.
3. Time to print
The photos with a flag and a star can enter the physical world: I print that selection in sets of four photos on an A4 sheet. It looks like this:
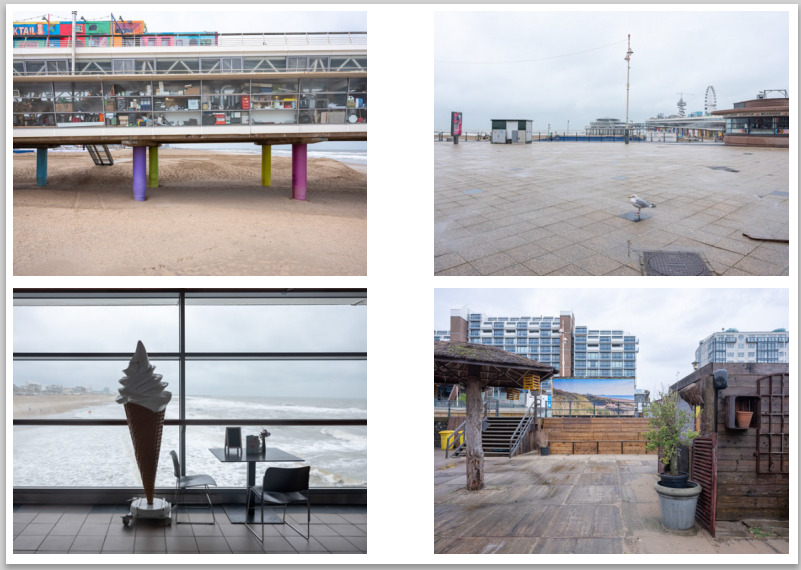
I cut them into individual photos with a paper cutter.
4. Looking and rearranging
Because I work in series, it is useful to see the images in relation to each other. I therefore hang the prints on a board on my wall. You could also use a noticeboard or your fridge.
Back to that board: now I look and rearrange. This is a process that takes days and sometimes even weeks. Because by looking at the prints often, I see new things again.
5. Printing larger
If an image has made it through steps 1 to 4, it can be printed large: in A4 format. The advantage of my previously printed small photo is that I already know whether I like the print, or whether I want to edit it further.
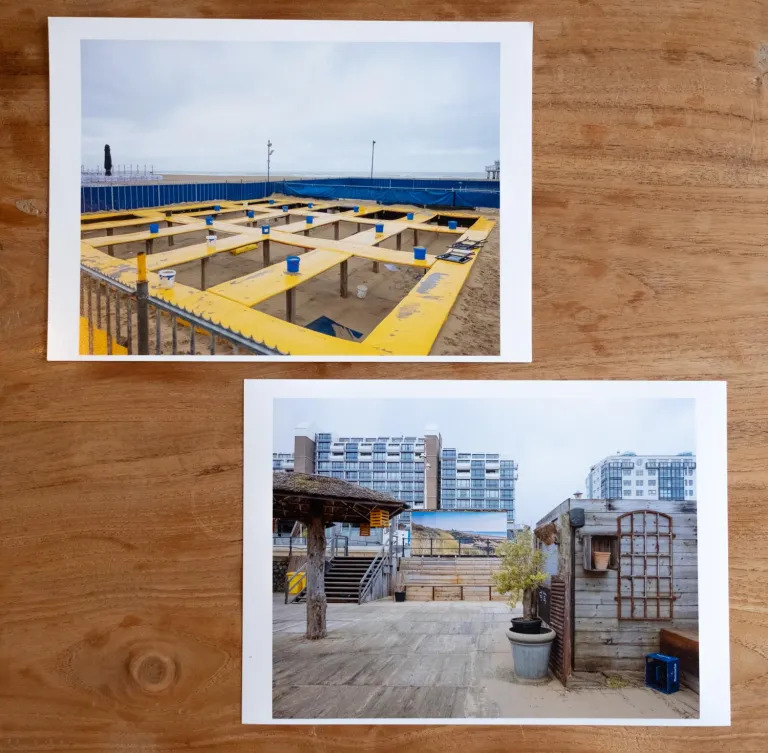
Those large prints can also go on the board. And if all goes well, they will become part of the final series. I then publish that on my website, as with this photo series about Scheveningen. And sometimes I publish the series in a booklet.
What do you do with the photos you are proud of?
About the author
Ik heb een eigen fotografieblog, Kronkeling. Daar schrijf ik om de week twee artikelen. Over hoe je je blik kunt scherpen, je creativiteit kunt aanwakkeren, en over fotografen die mij inspireren. Geen technische zaken, wél over hoe je leert kijken. En dat blijkt nog een hele klus. Een mooi startpunt zijn de Kronkeltips, die vind je hier.
You might also like
-
 Speed up Lightroom Classic by reinstalling it
by Elja Trum
-
 5 tips to work faster in Lightroom Classic
by Thijs Schouten
-
 How do you get started with Lightroom Classic?
by Nando Harmsen
-
 5 Tips for Managing Photos in Lightroom Classic (and Other Software)
by Nando Harmsen
-
 An honest comparison between DxO PhotoLab and Lightroom Classic
by Nando Harmsen
-
 Een wit kader met afgeronde hoekjes maken in Lightroom
by Nando Harmsen
2 comments
-

 ErikvanRosmalen
wrote on Saturday 27 August 2022 at 12:03
| reply
ErikvanRosmalen
wrote on Saturday 27 August 2022 at 12:03
| reply
The most difficult part of photography. For me at least. Especially with portraits, which is the majority of my work. Which expression is REALLY the best? What will the person portrayed like better later on? I also work roughly according to your method, but it remains a struggle....
Translated from Dutch. -
 Hans van Sterkenburg wrote on Tuesday 30 August 2022 at 15:01 | reply
Hi Elvira. Interesting article!
Translated from Dutch.
In brief: my photos go onto the external SSD on the Mac in a folder created for that purpose by date. This date folder has subfolders, such as CR3-develop. and jpeg. During an initial assess-ment, technically failed photos are deleted. Then assign a name and number. The first photo then goes to AcR, is developed, and goes on to the Jpeg folder. The developed CR3 goes to the folder CR3 develop. So that the next photo to be developed is always at the top. That one also goes to AcR and is developed, any editing I do in Photoshop, and then also on to the jpeg subfolder. etc. etc. Sometimes a photo still goes to the trash.
This method works perfectly.
-Every 3 months I have the best jpeg's printed.
-jpeg's also go to Instagram, Facebook and my site.
One more thing: on the advice of, among others, your colleagues at Photofacts, I switched to LrC, and after three quarters of a year now back to AcR. Why? I learned early on that whoever has to get from the floor to the attic uses a ladder. And climbing a ladder is best done rung by rung, my father used to say. A wise man. So too with photos develop/edit.
Step by step.
Regards, Hans
Have your say
Please note: Articles older than a week can only be commented on by signed-in visitors.Would you still like to comment? sign in or create a free account.
Become a better photographer every week
A practical photography tip in your inbox every week.
38,982 photography enthusiasts already receive the tips! More about the weekly mail. Or keep up to date via  Facebook.

Elja Trum
Photofacts; everything to do with photography!
Would you like to take better photos and keep up with what is happening in photography? Photofacts publishes articles that teach you something about photography — from a product announcement to a practical shooting tip or a look at a website. Photofacts covers photography every day and is a hobby project of Elja Trum's that got out of hand. The articles are written by a team of volunteer authors. If you would enjoy writing one or more articles for Photofacts, do get in touch.More about PhotofactsPhotofacts is made possible in part by
