

11 tips: How do you take product photos?
Monday 5 March 2018, 15:30 by Michelle Peeters | 41,983 views | 11 commentsThis article was translated from Dutch with the help of AI. Read the original.
Do you want to start your own online shop, or have you been asked to photograph products? Then you will have to pull out all the stops to produce acceptable product photos. The requirements are quite strict!
In this article, I will explain in 11 tips how you can quickly achieve a good result.
The days when you could manage with just a description are behind us. At least one good photo is required, and preferably more. With a bright white background, as much depth of field as possible and perfect lighting so that the product is clearly visible.
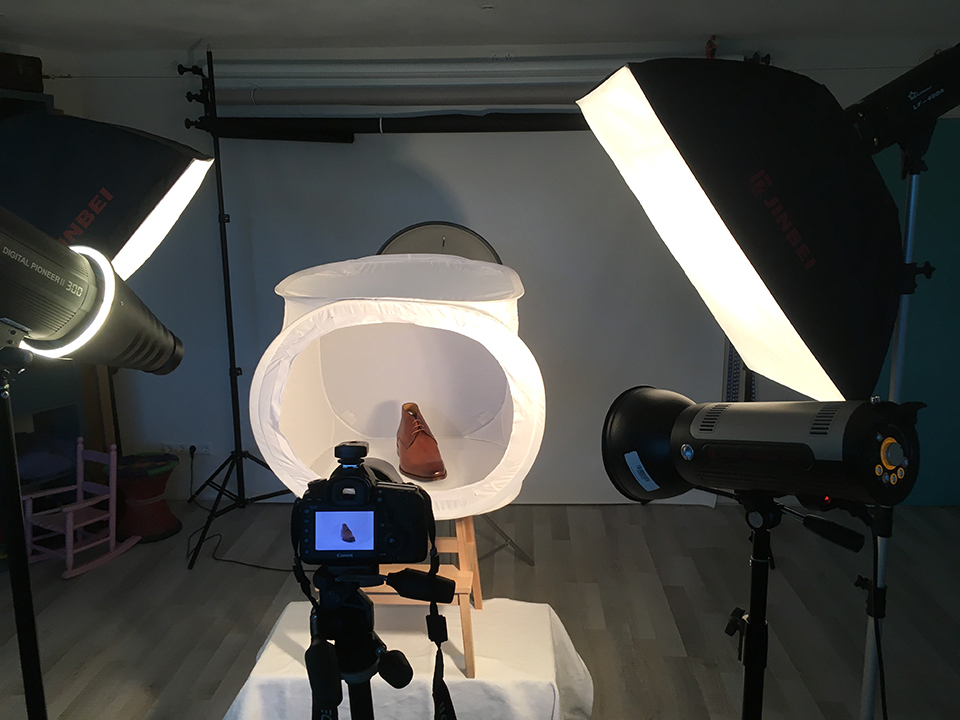
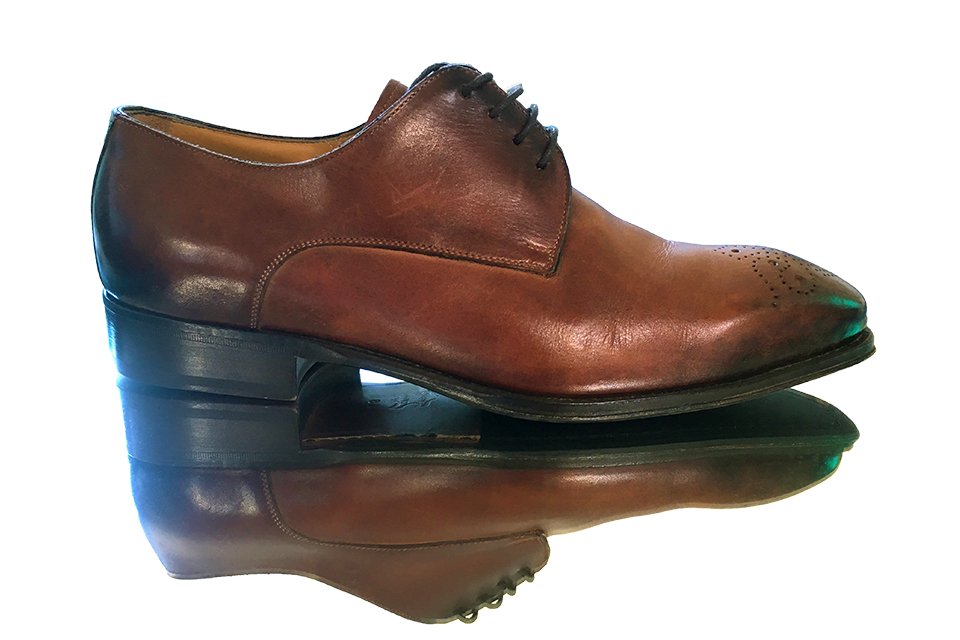
I had to photograph a batch of smart shoes for a client. An extra difficult product because of the reflections. Reflections quickly cause overexposure, which is of course not allowed in product photos. It immediately makes the photo look locally out of focus. But you still want the beautiful shine to remain visible in a photo of shiny shoes.
After a lot of testing with different lighting setups, using a light tent and five photographic lights, with a softbox and a snoot, turned out to be the only option left.
The light tent provides very diffuse light, which looks beautiful, but removes all the shine. So I used a snoot at the front to bring some of the shine back.
There are two flash units with softboxes on both sides of the shoe. There is also a lamp at the back. This blocks direct flash light, leaving only reflected light in your image. Reflections from outside are prevented this way.
This is especially important with shiny objects, because otherwise they appear too harsh and 'unlined' in your image. The white surface also creates some reflection from below on the curve of the shoe.
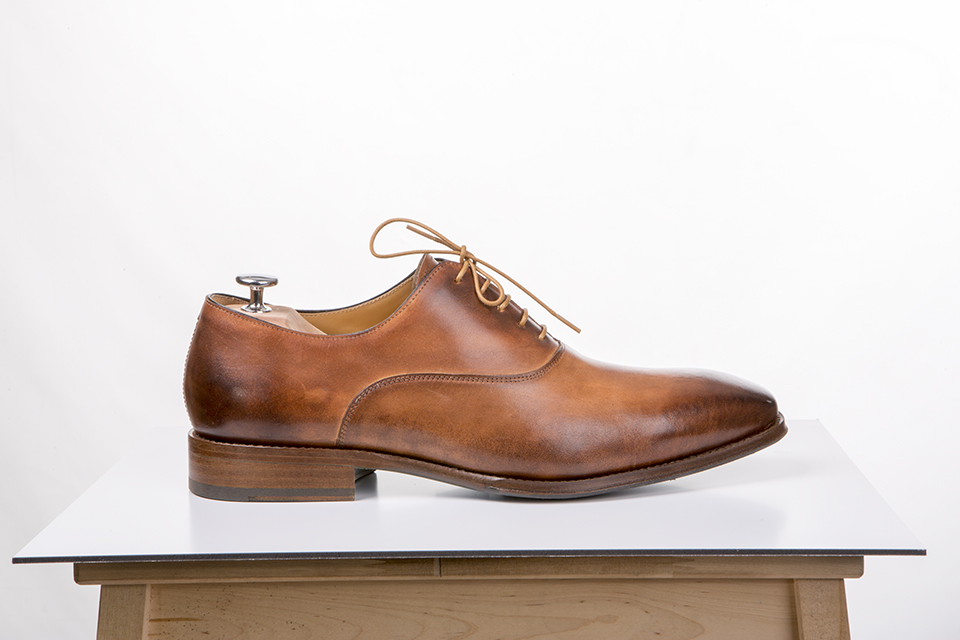
But to return to the basics for a moment, not all products have reflections and are therefore easier to photograph well, here are some general tips for taking good product photos:
1. Good camera
Use a good camera, preferably one that you can operate manually, such as a high-end compact camera, a DSLR or a mirrorless camera. In any case, use a camera with a large sensor so that you can capture plenty of detail.
2. At least two photographic lights
Make sure you have plenty of light so that you can work with a small aperture, for maximum depth of field. Daylight lamps, continuous light, are preferable because you can see exactly how the light will fall and will not get any surprises.
Two lamps are the minimum, though. This allows you to create a consistent setup, so you can reproduce exactly the same exposure result every time.
3. Tripod
A sturdy tripod is essential. This allows you to use the same angle and perspective for each product, creating consistency. Set the height of your tripod. It is often best to photograph from slightly above, at an angle between 15 and 30 degrees. But this naturally depends on your product.
It also allows you to work with a very small aperture and the lowest ISO setting, and possibly longer shutter speeds if you do not have enough artificial light.
It is also advisable to use the self-timer or a remote control to achieve an absolutely shake-free image.
4. White background
Good product photography depends on the background. A calm, preferably white, background makes sure that all attention goes to the product.
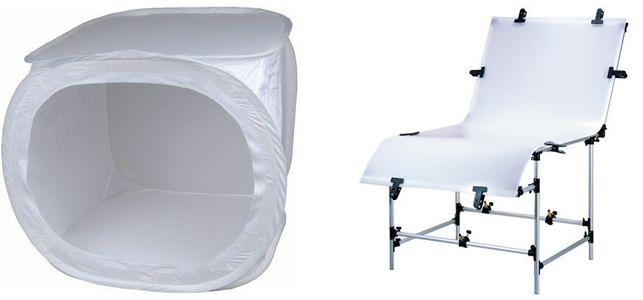
A roll of white paper and a back wall to attach the paper to are an option if you do not have a light tent. If you have to improvise, you could, for example, turn a small table on its side and attach the paper to it.
Make sure that the paper runs over the floor in a nice curve. You can buy a special 'shooting table' that already has this curve built in.
You can also do this on a table, which gives you a more convenient working height. There are several creative ways to create a white background, but there are also solutions for this in post-processing.
5. Light tent
A light tent, or light cube, offers many advantages. You can place your lamps around it, close to the tent. In any case, place one lamp to the left and one to the right of the tent.
A lamp at the back is useful for lighting it properly, in white. A light tent provides very diffuse light, dampens reflections and softens shadows.
6. Camera settings
Make sure you have as much depth of field as possible, so choose a small aperture. An aperture setting of f/11 to f/16 often gives the best results. Keep the ISO setting as low as possible, for example at 100.
Photograph in RAW, so that you have much more flexibility in post-processing to reduce overexposure or recover blocked-up shadows. Adjust the shutter speed to your exposure, starting at, for example, 1/60th.
White balance: when using flash or daylight lamps, you can set the white balance to daylight or flash, or to a value around 5500 Kelvin.
7. Light the background separately
To make the background as white as possible, you need to light it separately. Place an extra lamp on the background to prevent it from becoming grey.
You will often still need to take some extra steps in post-processing to make it 100% white. This will be covered in a separate article on the subject.
8. No wide-angle lens
Do not use a wide-angle lens for product photography. You will get too much of your surroundings in the image, and to fill the frame with your product you will have to stand 'on top of it'. The result is distortion.
Use a medium zoom lens. With a crop-sensor camera, a 50mm lens is suitable, while with a full-frame camera around 70mm is suitable. Frame carefully!
9. Cleaning
Clean the products carefully before photographing them. It is better to clean them beforehand than to have to correct things afterwards. The same applies to the background. The cleaner, the better.
10. Take several shots
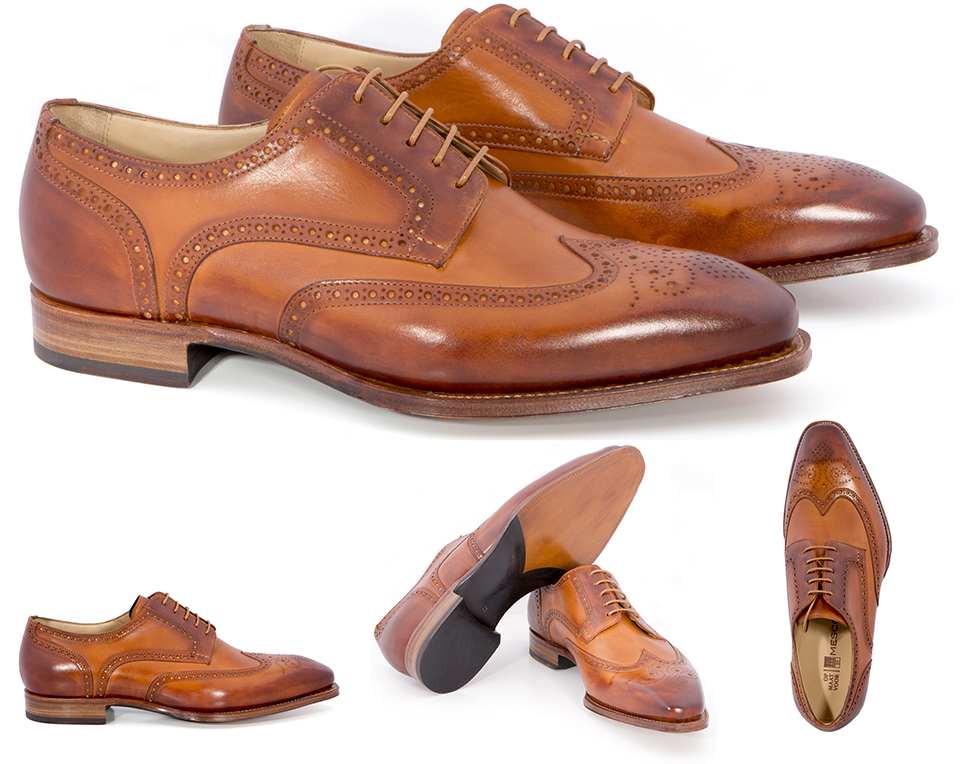
Give as complete a view of the product as possible. You do this by photographing the product from several angles.
This gives visitors to an online shop a better view of the product, and research has shown that this can increase sales by as much as 59%! Think of fun setups in which the product looks its best.
11. Pay attention to the colours
Make sure that the colours in your photos match reality. It is a shame if your customers return products because the product photos do not match reality.
If you photograph with daylight or flash and set the correct white balance, there is often little to worry about. And if you photograph in RAW, there is still plenty that can be changed in post-processing.
About the author
Michelle Peeters is fotografe en oprichter van DeuxBleus Fotografie. Michelle herkent het bijzondere in het gewone en het gewone in het bijzondere. Ze heeft zich nooit willen specialiseren en is daardoor van alle markten thuis.
You might also like
-
 How to cut out product photos
by Michelle Peeters
-
 Taking Product Photos in the Living Room
by Rob Zwart
-
 Street photography tip: Don't let bad shoes ruin your day
by Michiel Heijmans
-
 iPhone 11 Pro versus 100-megapixel medium-format camera
by Michelle Peeters
-
 11 Tips for Creating the Most Beautiful Photo Albums
by Hermine Snellink
-
 Red Dot Award: Product Design for Nikon
by Michelle Peeters
11 comments
-

 hypofocus
wrote on Tuesday 6 March 2018 at 10:48
| reply
One more tip: monitor calibration...
Translated from Dutch.
Most photos still have some light grey spots around the white that have not been cleaned up properly.
The teddy bears in particular are spotty all around, but also the shoes here in the last series of pictures.
A good display of the photos is essential for editing. Because product photos that reach the customer with spots will of course be rejected. -
 Michelle Peeters wrote on Tuesday 6 March 2018 at 11:26
| reply
@hypofocus: good tip, thanks! There will be another article soon about making the background white (100%) properly (and flawlessly) in post-processing. If you don't want to make your product photos into cutouts, at least, which is often nicer anyway. Painting white often doesn't work well, it's better to use the white eyedropper in Levels. But more on that later!
Translated from Dutch. -
 Jorn Gijzen wrote on Tuesday 6 March 2018 at 13:51 | reply
Useful and valuable article Michelle. What can also help with intense reflections is using a polarizing filter. I often use this when photographing light-colored, reflective objects (e.g. made of aluminum). Don't forget to lower the shutter speed by 2-3 stops to get the same exposure. Kind regards Jorn Gijzen | jorngijzen.com
Translated from Dutch. -
Michelle Peeters wrote on Tuesday 6 March 2018 at 13:53
| reply
Now those are some useful tips, thanks Jorn!
Translated from Dutch. -
Jorn Gijzen wrote on Tuesday 6 March 2018 at 19:53 | reply
You're welcome Michelle
Translated from Dutch. That's how we help each other towards better photography, right?
Just to add something about aperture settings, do you have small products and can't get your entire subject sharp even at f/14, f/16 (I wouldn't go smaller because of diffraction)? Then take several photos, with various focus points and merge them later in photo editing. Assuming you're using a tripod
Curious about your tips on levels. Is that about Photoshop or Lightroom? Kind regards Jorn Gijzen | jorngijzen.com -
Michelle Peeters wrote on Tuesday 6 March 2018 at 20:21
| reply
@Jorn: that'll be Photoshop. Tnx for your additions!
Translated from Dutch. -
 Luc Vancamp wrote on Wednesday 7 March 2018 at 12:27 | reply
Hypofocus: what do you mean by spots ? I can't see any anywhere and I have a professional Eizo monitor.
Translated from Dutch. -
 100
wrote on Friday 9 March 2018 at 01:37
| reply
@Jorn Gijzen
Translated from Dutch.
"What can also help with strong reflections is using a polarizing filter. I often use this when photographing light-colored, reflective objects (e.g. made of aluminum)."
Polarizing filters can only reduce reflections from non-metallic surfaces (glass, water, etc.). Aluminum is a metal and the reflected light from metal surfaces is precisely NOT polarized, so a polarizing filter has no effect in that case.
@Luc Vancamp
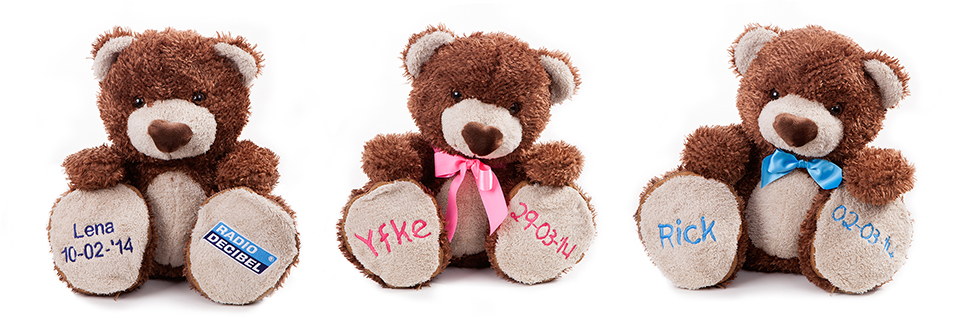
If you look closely, you can see with the little bears, for example around the ears and arms, that the background is not completely white. You can also simply check this in Photoshop, for example, with the Color Picker. If, for example, you measure just above the bear's arm with Radio Decibel on the paw, you can see that the background has the following RGB values: R247 - G245 - B246. With completely white, all values are 255. In short, this is quite a significant deviation from completely white that should be visible on a somewhat decent monitor. -

-
 Jan
wrote on Wednesday 29 March 2023 at 11:58
| reply
Very useful article and relevant tips! We can certainly emphasize the tip about properly cleaning the products. With a sharp camera, every speck of dust or bit of dirt on the product can be seen. Unfortunately, we experienced this firsthand after shooting a large number of product photos.
Translated from Dutch. -
 adam.moors wrote on Wednesday 30 August 2023 at 17:45
| reply
Hi Michelle,
Translated from Dutch.
Useful article! I also want to start photographing products myself. I only have a good camera, but no other equipment such as a light tent and photography lights. And I find it expensive to buy everything new! Is it easier to outsource this to a company such as https://boefkik.nl/ ?
Have your say
Please note: Articles older than a week can only be commented on by signed-in visitors.Would you still like to comment? sign in or create a free account.
Become a better photographer every week
A practical photography tip in your inbox every week.
38,836 photography enthusiasts already receive the tips! More about the weekly mail. Or keep up to date via  Facebook.

Elja Trum
Photofacts; everything to do with photography!
Would you like to take better photos and keep up with what is happening in photography? Photofacts publishes articles that teach you something about photography — from a product announcement to a practical shooting tip or a look at a website. Photofacts covers photography every day and is a hobby project of Elja Trum's that got out of hand. The articles are written by a team of volunteer authors. If you would enjoy writing one or more articles for Photofacts, do get in touch.More about PhotofactsPhotofacts is made possible in part by
