

Ways to Photograph a Tree
Monday 12 December 2022, 20:10 by Nando Harmsen | 9,825 views | 17 commentsThis article was translated from Dutch with the help of AI. Read the original.
Photographing a tree doesn't have to be difficult, does it? I set out to capture a tree and ended up with several possibilities. It shows how careful observation, experimenting and making a conscious choice can greatly influence the final result.
This article isn't about right or wrong. It's intended to show that you can't just point your camera and take a successful photo. It takes more than that. Are you in the right position? Do you have the right perspective? Are you using the right focal length? Are there any distracting things in the frame?
The subject was a tree in the middle of a field in the German Eifel. As it was a solitary tree, I thought it would be nice to photograph it. Normally, I don't consciously think about this. I take my time, look carefully, find the right spot and the right position, and only then take the photo.
This time, I took several photos to make the process clear to myself as well. I want to take you through this process to show that it pays to pay attention to many things.
Pay attention not only to the tree, but also to the background. Your position, perspective and focal length all play a major role here.
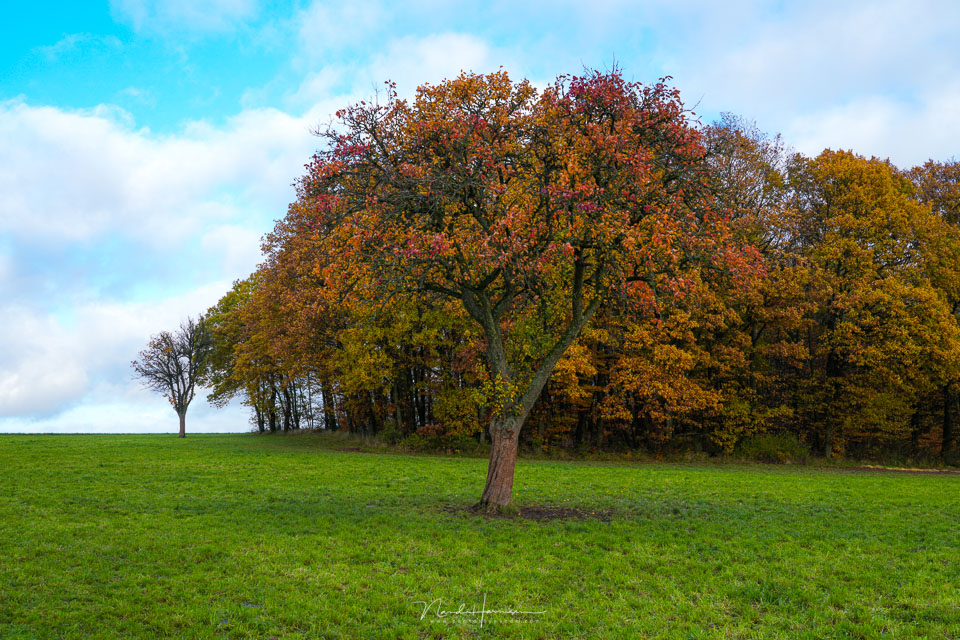
Photographing the tree the moment you see it doesn't produce a successful photo. The tree is in front of the background, so it doesn't stand out. The tree gets lost this way, so you need to find a new position where it separates from the background.
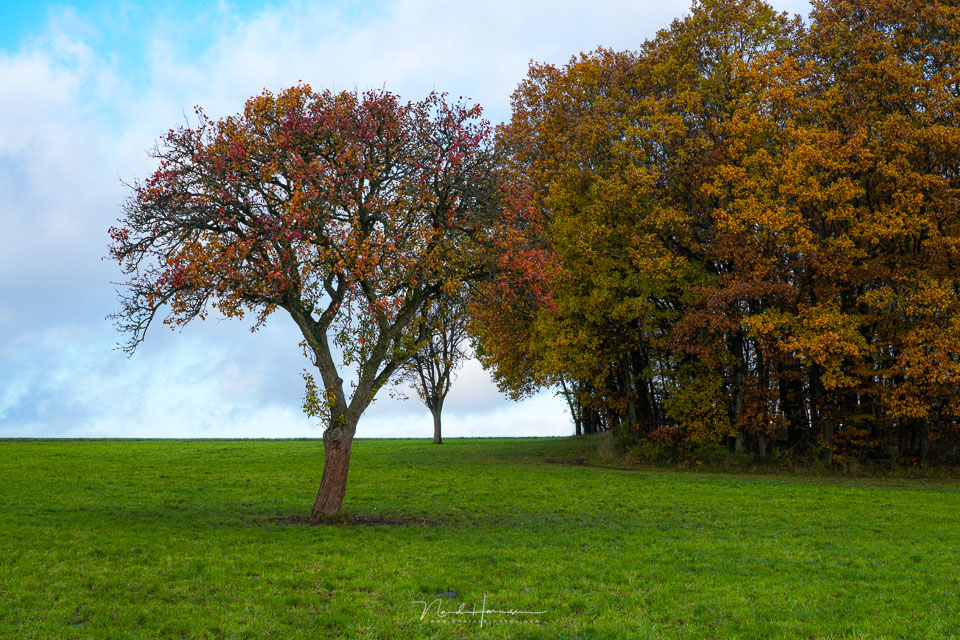
I haven't moved far enough to the right, because although the tree is separated from the background, it isn't completely. The branches still touch the woodland in the background. I need to move further to the right. While I was at it, I also moved further back because I saw that there was more woodland. This time on the left.
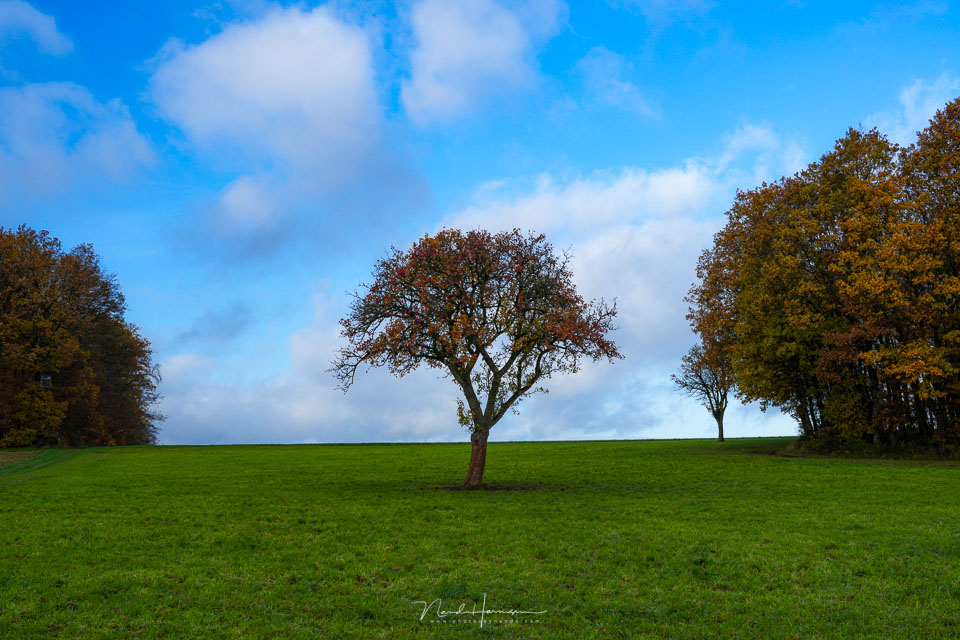
By moving further away, the woodland came into the frame on the left and right, with the solitary tree between it. This creates a nice effect, but a small problem has appeared.
By focusing only on the woodland on the left and right, I failed to place the tree properly in the centre. There is no symmetry, which is a shame.
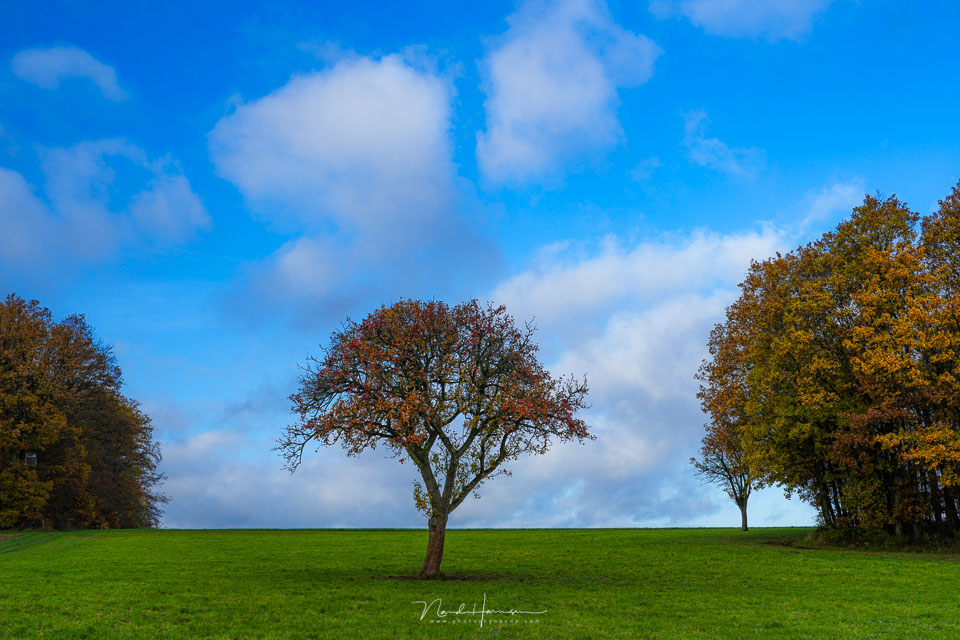
I moved a little further to the right to get the tree exactly in the centre. This symmetry makes the photo more pleasant for me to look at.
But because of the distance I took, the tree has become a little too small in the frame. It gets a bit lost between the woodland on the left and right. So the tree needs to become larger. Waiting for the tree to grow a bit more isn't an option, so we need to use another trick.
Zooming in isn't possible, because that would make not only the tree larger, but also the woodland in the background. The difference in size between the two wouldn't change. What's more, I would get less of the woodland in the frame because the angle of view would become smaller.
Moving closer is another solution. But with the angle of view I have at this focal length (40mm), the tree would no longer fit completely in the frame. So I need to compensate for this by not only moving closer, but also zooming out a little.
I changed the angle of view from about 40mm to 24mm. This changes the relative size of the tree and the woodland in the background. I also made sure that the tree's branches remained separate from the woodland at the sides.
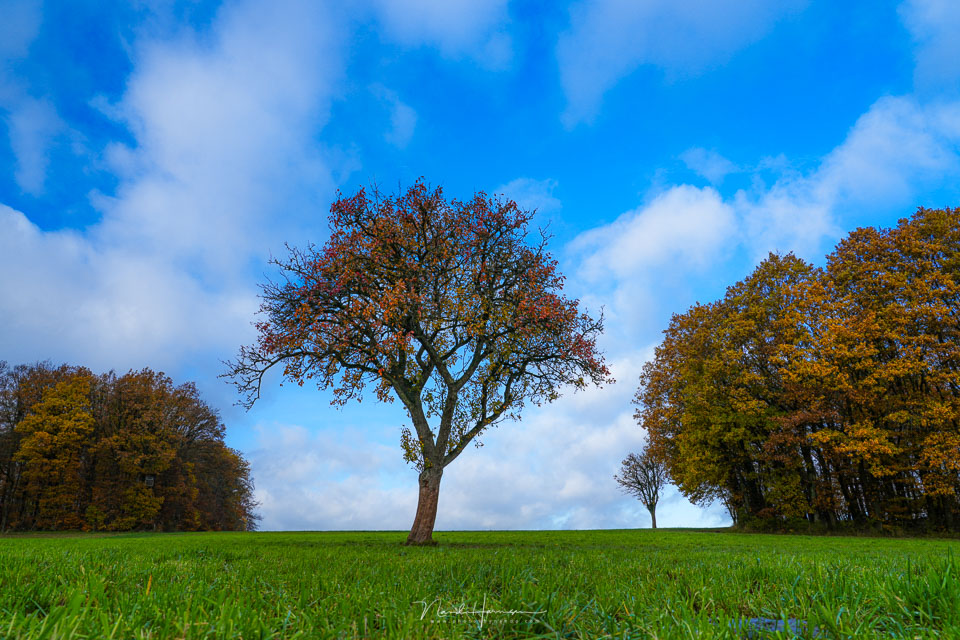
I found a nice balance by moving closer and zooming out. But perhaps it would also be nice to have the tree completely on its own in the frame. So no woodland on the left or right.
For this, I shouldn't move even closer to the tree, but further away. At the same time, I need to zoom in so that the angle of view becomes small enough for the woodland on the left and right to fall outside the frame.
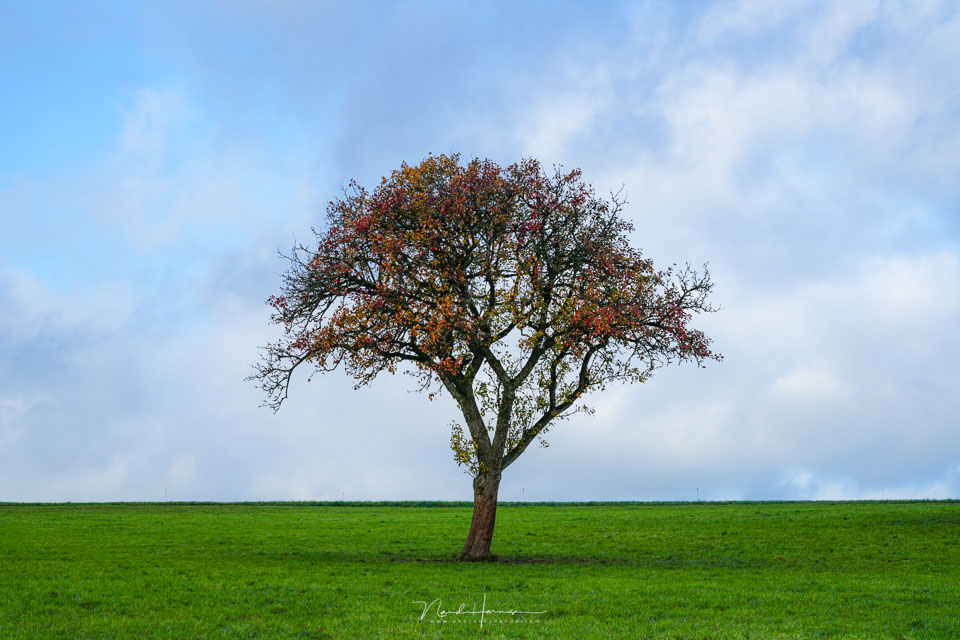
I was simply standing upright and photographing the tree from that position. Can you see how the trunk starts below the horizon? If you don't want that, you can choose a low viewpoint so that the tree rises up from the horizon.
So I held the camera low above the grass, making the tree rise above it.
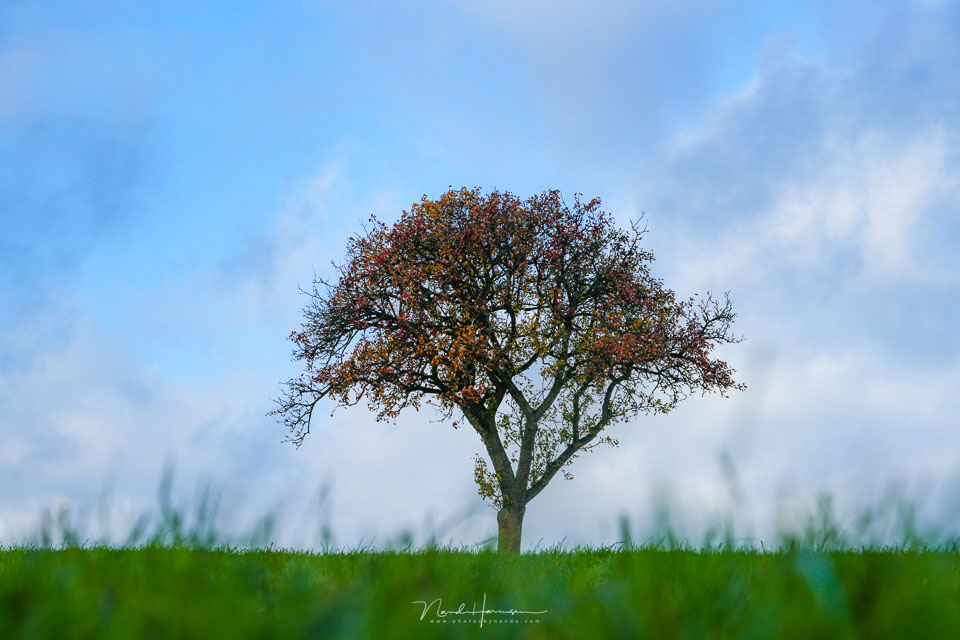
The result of this low viewpoint is the blades of grass sticking above the horizon. This makes sense, because the viewpoint is low. If you don't want those blades of grass, you need to hold the camera at a height that still gives you a low viewpoint, but isn't incredibly low.
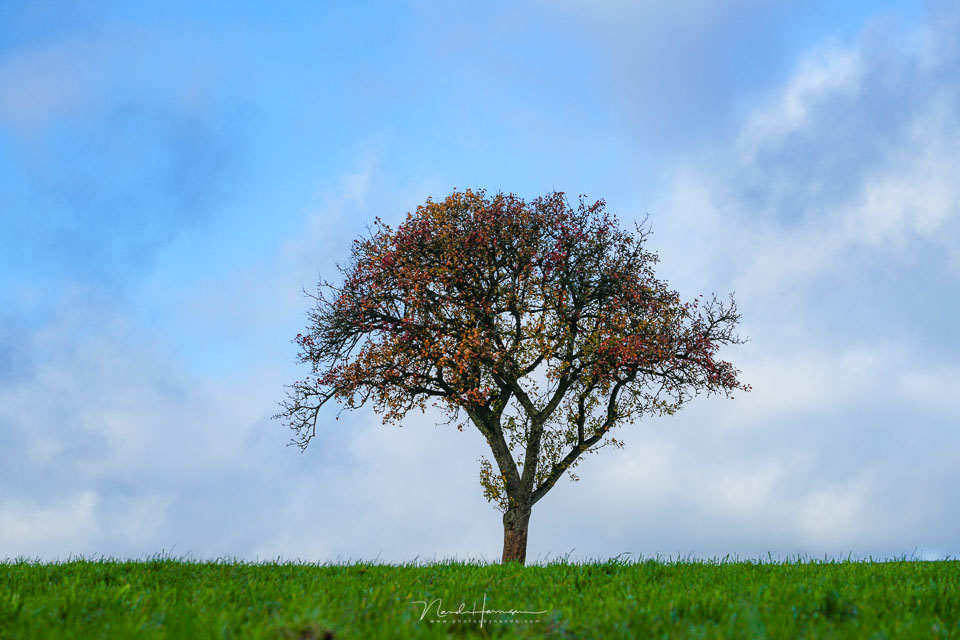
You can see that a tree can be captured in different ways. Here, of course, I had the space to do this. That's not always the case. But it does show that looking carefully and making choices about your viewpoint, position, perspective and focal length will make a big difference to your composition.
This way, you can capture a tree in the way you want, in the way you think looks good. This doesn't just apply to a tree, of course. It applies to every subject you photograph. Just try it for yourself.
About the author
Nando Harmsen has been photographing for more than 40 years. He specialises in wedding photography and landscape photography. Nando also gives talks, workshops, masterclasses and photo trips, and regularly reviews new and interesting equipment.
You might also like
-
 A tree fully in the frame? Or not?
by Nando Harmsen
-
 Central composition, or not?
by Nando Harmsen
-
 10 Mistakes When Creating a Composition
by Nando Harmsen
-
 3 practical tips for portrait composition
by Elja Trum
-
 Low, lower, lowest: finding the right viewpoint
by Erik Nevels
17 comments
-
 Lepere wrote on Tuesday 13 December 2022 at 10:12 | reply
Nice series. Flashing a solitary tree, even in the middle of summer, can lead to a beautiful result.
Translated from Dutch. -

-
 Robert wrote on Tuesday 13 December 2022 at 10:23 | reply
Well done Nando! Great explanation .
Translated from Dutch.
Photo-shooting greetings Robert Almere. -

 Donald Willemsen
wrote on Tuesday 13 December 2022 at 10:52
| reply
Donald Willemsen
wrote on Tuesday 13 December 2022 at 10:52
| reply
Nice article. Something I once did myself was photograph the same tree during the different seasons. That also gives nice images and often you don't have to go far to find a tree that you want to use for such a purpose.
Translated from Dutch. -
 Harry Iwema wrote on Tuesday 13 December 2022 at 11:14 | reply
I always read your photofacts with great pleasure, clear, educational and infectious.
Translated from Dutch.
Thank you Nando.
Harry Iwema -
 Peggy wrote on Tuesday 13 December 2022 at 11:36 | reply
Clear explanation with the photos included makes it top-notch.
Translated from Dutch. -
 Liesbeth wrote on Tuesday 13 December 2022 at 12:06 | reply
Nice article, educational for me. I often see a beautiful tree, but I can't get it isolated. I'm going to try it with these steps.
Translated from Dutch. -
 Peter wrote on Tuesday 13 December 2022 at 12:25 | reply
Hi nice explained how to photograph the tree. I myself photographed a tree for a whole year. I would love to hear your reaction to my tree. But I don't see any way to post this photo
Translated from Dutch. -
 Jellie van Althuis wrote on Tuesday 13 December 2022 at 12:35 | reply
Nice story !!!! Thanks!
Translated from Dutch. -
 Herman De Poorter wrote on Tuesday 13 December 2022 at 14:01 | reply
As I already knew: you are a good "teacher".
Translated from Dutch.
I will try to apply the same tactic with other subjects. Regards Herman -
 guest wrote on Tuesday 13 December 2022 at 14:02 | reply
Nice how you explain your theory and take a photo each time!
Translated from Dutch.
It's very visual!
beautiful! -
 Henk wrote on Tuesday 13 December 2022 at 16:00 | reply
Nice how you manage to tell a story with such a simple subject!
Translated from Dutch. -
Bert wrote on Tuesday 13 December 2022 at 17:36 | reply
Nice explanation, it indeed shows that a snapshot can often be better. Just getting back to that flash fill: of course that can be done off-camera ...
Translated from Dutch. -
Nando
wrote on Friday 16 December 2022 at 09:55
| reply
@Bert:
Translated from Dutch.
Indeed. Off-camera could work, although the flash will then be visible in the frame.
And yet, given the size of the tree, the flash would have to be placed quite a bit further away to light everything, perhaps even too far away to be effective. -
guest wrote on Tuesday 13 December 2022 at 17:54 | reply
Nice and clear explanation.
Translated from Dutch. -
 Eduard Barreveld wrote on Tuesday 13 December 2022 at 20:43 | reply
How a "simple" subject can produce multiple beautiful and interesting photos. Great explanation! I enjoyed it again.
Translated from Dutch. -
 luc.vc@icloud.com wrote on Friday 16 December 2022 at 03:25
| reply
luc.vc@icloud.com wrote on Friday 16 December 2022 at 03:25
| reply
This is what photography is about, not: pixels, technicality, brands, prices, coatings, etc.etc. .... but: composition, colour, perspective, viewpoint ... to create a beautiful photo. Thanks Nando.
Translated from Dutch.
Have your say
Please note: Articles older than a week can only be commented on by signed-in visitors.Would you still like to comment? sign in or create a free account.
Become a better photographer every week
A practical photography tip in your inbox every week.
39,079 photography enthusiasts already receive the tips! More about the weekly mail. Or keep up to date via  Facebook.

Elja Trum
Photofacts; everything to do with photography!
Would you like to take better photos and keep up with what is happening in photography? Photofacts publishes articles that teach you something about photography — from a product announcement to a practical shooting tip or a look at a website. Photofacts covers photography every day and is a hobby project of Elja Trum's that got out of hand. The articles are written by a team of volunteer authors. If you would enjoy writing one or more articles for Photofacts, do get in touch.More about PhotofactsPhotofacts is made possible in part by
