

How do you apply lens corrections in Lightroom?
Thursday 13 December 2018, 11:17 by Michelle Peeters | 9,247 views | 3 commentsThis article was translated from Dutch with the help of AI. Read the original.
Lens distortion and vignetting are two major problems caused by lenses that you have probably encountered at some point.
In this article, a great tutorial on how to use Lightroom's lens correction panel properly to solve these problems.
The lens correction panel is often overlooked in Lightroom, but it is an extremely powerful tool for improving a photo. In this tutorial, Lucy Martin explains how these adjustments can be used to solve the problems mentioned above.
Lucy starts with a photo taken with a wide-angle lens. This lens caused two problems: distortion at the edges, with curved lines that should have been straight, and green fringes around certain parts of the image.
First, she shows that Lightroom already has an option to correct these problems automatically for most lenses. This option is easy to find and does a reasonably decent job automatically.
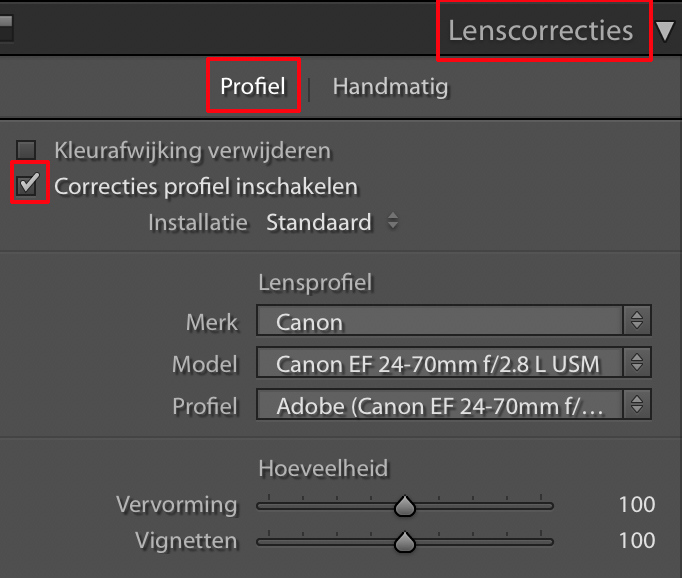
Notice that under 'Lens Profile', the type and model of your lens are filled in automatically! This method works well, but is not quite perfect yet.
So she moves on to the manual tab to improve the photo further. Here she demonstrates the benefits of correcting lens distortion.
She is able to improve the image by accurately adjusting the size of the subject and the lines along the edge of the photo.
She can then use Lightroom's adjustment sliders to remove the exact colours that need to be corrected in the image and completely solve the problem of green chromatic aberration.
Finally, the light falloff tool is used to remove the natural vignette produced by the lens.
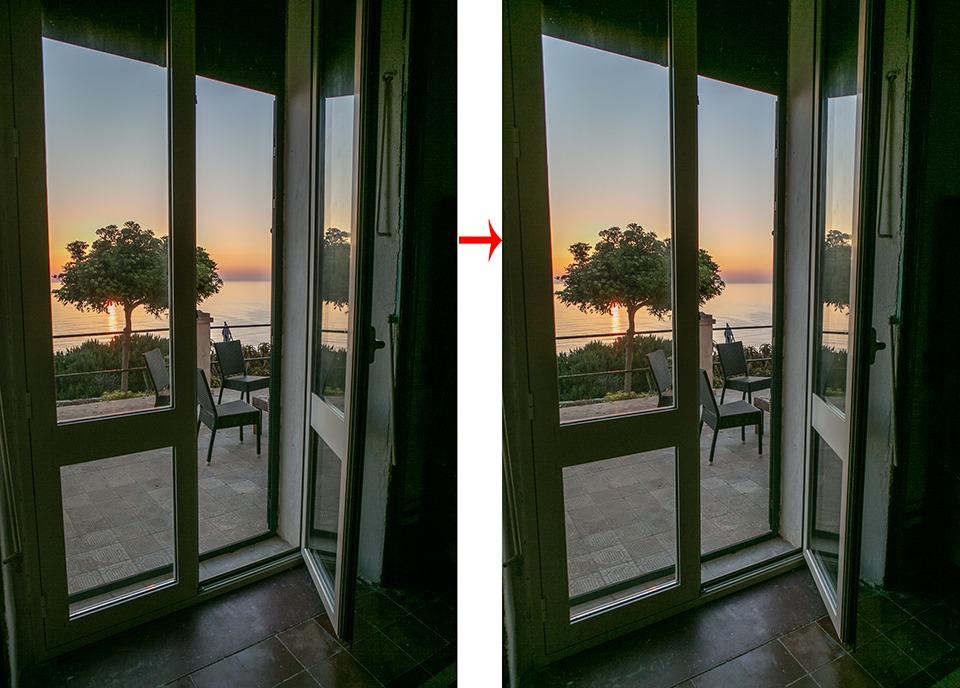
In the photo below, I have ticked 'Enable Profile Corrections' in the automatic mode (profile). It is a little difficult to see, but this immediately straightened out the spherical shape of the middle door panel. 'Remove Chromatic Aberration' did not do much for this photo.
Every lens you photograph with, regardless of its quality, ultimately has a problem that needs to be corrected. This video explains very clearly how to solve these problems quickly and how to adjust a photo back to how it was originally captured.
Want to learn more about Lightroom?
Then follow one of Piet van den Eynde's Lightroom courses at Photofacts Academy. The Lightroom Workflow tips & tricks course is a very useful one to start with.
You can follow this and other courses for two weeks with a free trial membership.
Dit artikel is voor het laatst bijgewerkt op 13 december 2018.
De eerste publicatiedatum is zaterdag 30 juni 2018, 20:02.
About the author
Michelle Peeters is fotografe en oprichter van DeuxBleus Fotografie. Michelle herkent het bijzondere in het gewone en het gewone in het bijzondere. Ze heeft zich nooit willen specialiseren en is daardoor van alle markten thuis.
You might also like
-
 5 Tips to Prevent Distortion
by Michelle Peeters
-
 Are manufacturers relying more and more on digital image correction?
by Nando Harmsen
-
 17 Lightroom tips for editing architecture photos
by Michelle Peeters
-
 How selfies make your nose 30 per cent larger
by Michelle Peeters
-
 Portrait photography tip: Use a wide-angle lens
by Elja Trum
-
 Sony FE 8-14mm f/3.5 Fisheye G lens
by Elja Trum
3 comments
-

-
 Jan wrote on Wednesday 4 July 2018 at 17:28 | reply
Once I marked my camera Sony A65 as lens correction in the library module, when I export photos. In the develop module my lens correction is always set to Sony A65 and it recognizes the lenses I use. Now I am trying to find this setting in LR classic CC at an acquaintance's, doesn't work for me. Anyone who knows.......
Translated from Dutch. -

 Michelle Peeters wrote on Wednesday 4 July 2018 at 21:49
| reply
@Jan: in Lightroom Classic the setting is in the same place, under ‘Lens Corrections’
Translated from Dutch.
Have your say
Please note: Articles older than a week can only be commented on by signed-in visitors.Would you still like to comment? sign in or create a free account.
Become a better photographer every week
A practical photography tip in your inbox every week.
38,886 photography enthusiasts already receive the tips! More about the weekly mail. Or keep up to date via  Facebook.

Elja Trum
Photofacts; everything to do with photography!
Would you like to take better photos and keep up with what is happening in photography? Photofacts publishes articles that teach you something about photography — from a product announcement to a practical shooting tip or a look at a website. Photofacts covers photography every day and is a hobby project of Elja Trum's that got out of hand. The articles are written by a team of volunteer authors. If you would enjoy writing one or more articles for Photofacts, do get in touch.More about PhotofactsPhotofacts is made possible in part by
