
How do you take a panoramic photo?
Saturday 30 December 2017, 13:31 by Bernard Veerman | 11,139 views | 18 commentsThis article was translated from Dutch with the help of AI. Read the original.
Well, to explain how to take one, it is probably better to first explain what a panoramic photo actually is. Searching the internet for the word 'panorama' produces a variety of descriptions.
It is often about landscapes, seascapes and what you see from a mountain. It is not particularly clear-cut, but all the descriptions have 'wide' in common, indicating that width is an important aspect.
In my own words, I would think of it as: an image that cannot be captured in a single photo in terms of width. This does not have to be limited to the subjects mentioned above, but could also be a cityscape or harbour view, for example.
In technical terms, it is about the difference in human vision, which can be 150° to 180°. This immediately shows how it relates to a (standard) photographic lens.
A standard 50mm lens on a full frame camera has a field of view of approximately 45°. It is therefore not possible to capture the entire 'panorama' in a single shot.
How do you take a panoramic photo?
This may be a bit simplistic, but this is what it comes down to: take several photos in a horizontal movement and join them together. This sounds simple, but that is all there is to it. The technique for taking a panoramic photo is a little more technical.
Questions that arise are: how do I overlap the photos, how do I join the photos together, how do I prevent visible seams, how many photos do I need and how should I set up my camera?
To achieve a good spread for the panorama, I start with a view of 150° to 180° and prefer to take at least 5 photos. The trick is to keep the camera vertical and take the 5 photos in one smooth movement, in steps of 30°.
The shots then overlap each other to a considerable extent. The computer programme uses this to eventually create one panoramic photo. Some tripod heads have a degree scale, which makes things easier.
Shooting handheld is quite manageable, but it requires a little practice and a good computer programme for joining the photos together.
Camera settings
Just as with baking a cake, there are several recipes. In the end, you will bake the cake that best suits your own interpretation of the recipe. When I want to make a panorama, I do the following:
- If possible, I put the camera on a tripod;
- Tilt the camera so that it is “vertical”;
- On my full frame camera, I use a 50mm lens or a zoom lens set to approximately 50mm;
- For a panoramic photo with a field of view of 150° to 180°, I try to determine a good composition in steps of approximately 30°;
- Set the exposure metering to an average exposure;
- Autofocus must be switched off, and I focus manually once on the 'middle' photo;
- Choose a small aperture, f/11 or f/16. This depends on the performance of the lens, but is mainly related to depth of field;
- ISO as low as possible, preferably fixed at 100.
The photos should be exposed as evenly as possible. You can achieve this by fixing the aperture.
The light may vary slightly from shot to shot, but because the aperture is set (and cannot change), the camera's exposure metering will adjust the shutter speed. This produces a well-exposed panoramic photo when the images are joined together.
Taking the photos
If you take a panoramic photo of a landscape or seascape, for example, the distance to the subject is practically the same in all the photos. One or two metres at a distance of 50 metres is negligible. The result is a beautiful, wide 'distant view'.
If, on the other hand, you take a panoramic photo of a city, the difference in distance between the first, last and middle photo will be significant.
At the far left and right, this could be 50 metres, for example, while the middle photo is taken from approximately 20 metres away. This results in a 'cylinder'-like photo.
It looks a little like a shot taken with an ultra-wide-angle or fisheye lens. The computer programme can adjust the 'projection' of the shot slightly and reduce this effect.
Joining the photos into a panoramic photo
So far, I have kept talking about joining the photos together. This actually comes from the days when a panoramic photo was literally stuck together. A stack of photos was neatly and precisely cut out and glued together to form a panorama.
In the digital age, the cutting and pasting is done with a computer programme that “stitches” the photos together. We call this 'stitching', which means sewing. The parallel with sewing goes even further, because the places where the photos are “stitched” together are called 'seams', the English word for 'naad'.
As with many computer applications, there are also quite a few computer programmes on the market for stitching a panoramic photo, for example:
- ICE (Image Composite Editor) from Microsoft (free, but only for Windows);
- Autopano (not cheap, but very good);
- Photoshop and Lightroom, in the newer versions;
- PhotoStitch, supplied with a Canon EOS camera;
- Autostitch, with a free demo;
- PTGUI (contains the same core as Autopano, but is cheaper).
It is a matter of trying things out, or looking at someone else's work, and seeing which computer programme suits you and your wallet best.
Points to consider
The finest panoramic photos are made when nothing is moving and everything is static. The panoramic photo is created from several shots taken shortly after one another, in which moving subjects have changed position.
In practice, this means you need to pay attention in the following situations:
- Moving subjects such as people, bicycles, cars, boats and aeroplanes;
- Rippling water;
- Clouds moving past;
To put the theory in this article into practice, I will add a few examples.
Example one: Honfleur
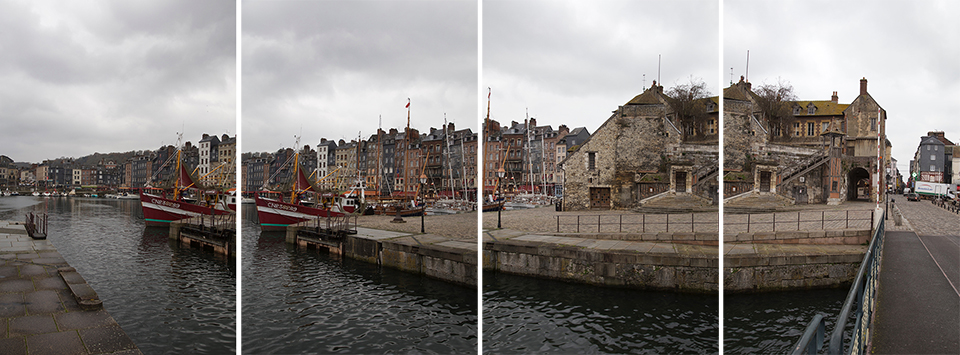
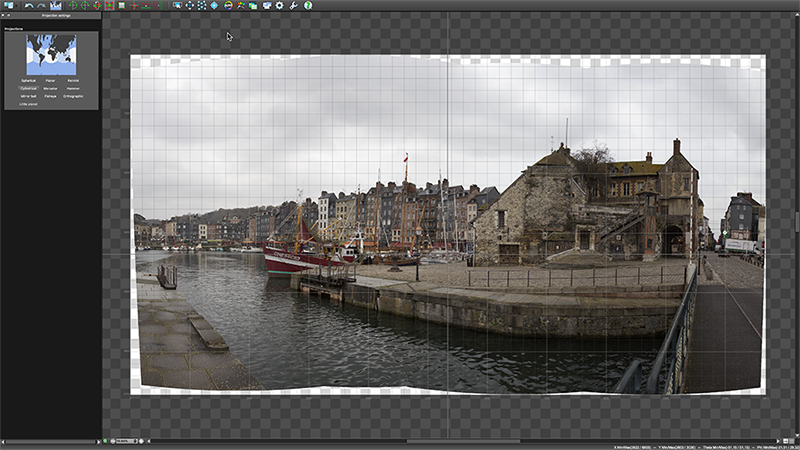
The Autopano computer programme stitches the four photos together into one panoramic photo. To make the photo look as natural as possible, I choose 'Cylindrical' projection.
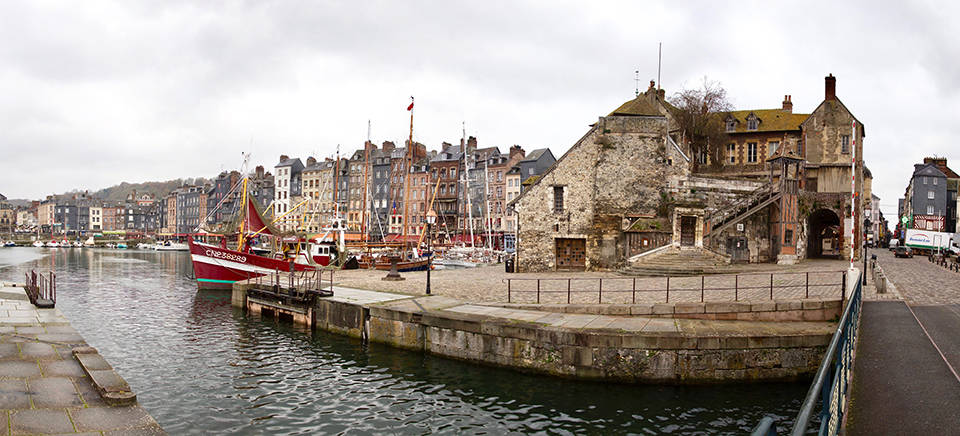
After cropping and saving, I give the photo to the 'Photos' editing programme on my iMac, and after a bit of touching up, this is the result.
Example two: Château Tourville-sur-Arques
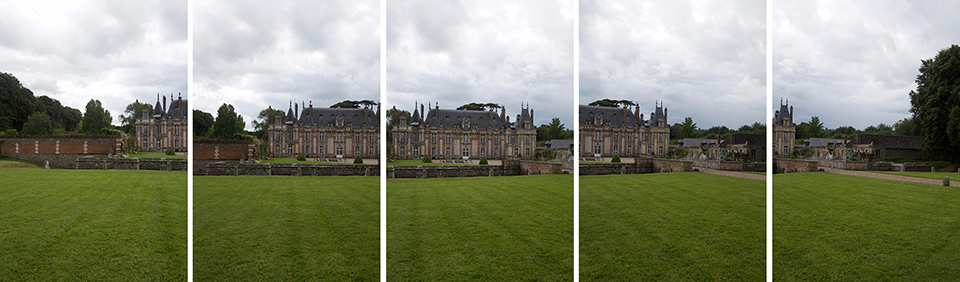
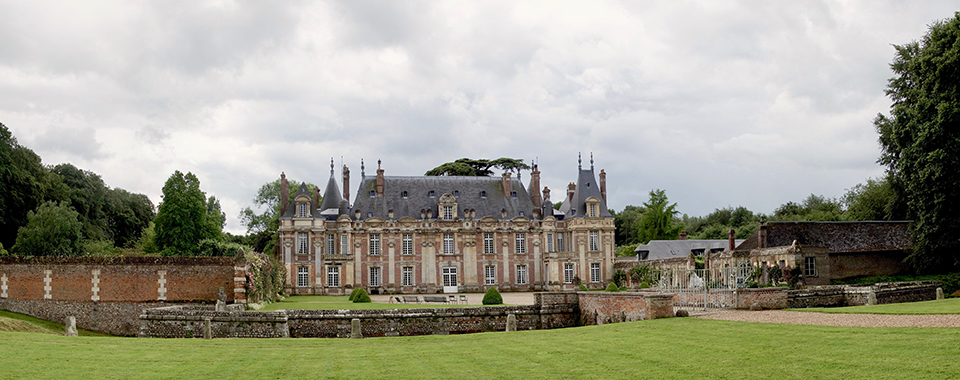
The cylindrical effect is clearly visible in the panoramic photo of the harbour of Honfleur. This is because the distance between the left and right sides of the photo is considerably greater than the distance to the quay, somewhere in the middle of the photo.
In the panoramic photo of the château of Tourville-sur-Arques, the distance on the left, in the middle and on the right is almost the same. The result is a beautiful distant view without cylindrical distortion.
About the author
Ik fotografeer al vanaf dat ik een jaar of 14 was. In het tijdperk van de digitale fotografie ben ik gestart met Fuji, later Panasonic en de laatste jaren ben ik toch weer terug bij mijn oude liefde: Canon. Ik ben getrouwd met Gerda, die Vlaamse is.
You might also like
-
 Improve your panorama with a nodal slide
by Nando Harmsen
-
The Biggest Disadvantage of a Panorama
by Nando Harmsen
-
A panorama or a panorama crop?
by Nando Harmsen
-
 A little short on wide angle? Make a panorama
by Nando Harmsen
-
 When to use which type of panorama?
by Nando Harmsen
-
Ten tips for panorama photography
by Nando Harmsen
18 comments
-
 Thieu wrote on Monday 1 January 2018 at 12:23 | reply
In the list of programs I miss GIMP. Open source, free and available for multiple platforms (Windows, Mac and Linux)
Translated from Dutch.
Where: https://www.gimp.org/
How: https://www.youtube.com/watch?v=t5U3x6tqST0 -
 Barend B wrote on Monday 1 January 2018 at 13:52 | reply
Why would you go to all that trouble when you can capture this in one go with a wide-angle lens?
Translated from Dutch. -

 Bernard wrote on Monday 1 January 2018 at 14:34
| reply
@Thieu, thanks for your response and for adding GIMP. I didn't intend to be exhaustive, I only listed the programs known to me
Translated from Dutch. -
Bernard wrote on Monday 1 January 2018 at 14:43
| reply
@Barend B, thanks for your response. Unfortunately, you can't capture the two photos I used as examples in one go with a wide-angle lens. For a full frame, this applies:
Translated from Dutch.
24mm - angle of view 84℃
14mm - angle of view 107℃
16mm fish eye - angle of view 180℃
By using the panorama technique, you also avoid distortion, which you will definitely get with an ultra-wide-angle or fish eye lens. -
Bernard wrote on Monday 1 January 2018 at 15:11
| reply
For ℃, "degrees" should be read
Translated from Dutch. -
 Verbraeken G wrote on Tuesday 2 January 2018 at 11:28 | reply
@Barend B, the resolution of a panorama photo is much higher than the resolution of the photo taken with a wide-angle lens.
Translated from Dutch. -
 MaschinenZimmer wrote on Tuesday 2 January 2018 at 11:32
| reply
@Barend B, With a 24mp camera you get a print of approx. 34/50cm at 300ppi, with a 50mp camera you can of course go twice as large in surface area: 50/75cm. If you really want to print large, you need high resolutions. A number of 'large' photographers also apply these techniques to obtain a larger canvas at a sufficiently high resolution. Just take a look at Ellen Kooi (NL) Frieke Janssens (B). They both make pano's of the surroundings, the space, allowing them to make panels several metres in size.
Translated from Dutch. -
 Toon Loonen wrote on Tuesday 2 January 2018 at 19:31 | reply
180 degrees doesn't have to be the maximum. From a church tower (in Hamburg) I took about 12 photos that were "stitched" with autostitch into a panorama of over 360 degrees. The same building is on the far left and far right of the photo.
Translated from Dutch. -
Toon Loonen wrote on Tuesday 2 January 2018 at 19:33 | reply
Most of the better smartphones already have a function for taking panoramic photos built in.
Translated from Dutch. -
 Tonny wrote on Tuesday 2 January 2018 at 20:35 | reply
Bernhard, good information. I understand that you can't be exhaustive, especially with computer programs, but I really do miss Corel Paint Shop Pro from the list. This is an affordable program with, I think, capabilities comparable to Photoshop
Translated from Dutch. -
Bernard wrote on Tuesday 2 January 2018 at 20:39
| reply
@Toon Loonen, I believe a 360º photo isn't called a panorama photo, but a "360-degree photo". This is to indicate the difference. I got this definition from Wikipedia.
Translated from Dutch. -
Bernard wrote on Tuesday 2 January 2018 at 20:41
| reply
@Toon Loonen, it's true that you can take a panorama photo with most smartphones. It's just that the resolution isn't comparable and the smartphone photo is certainly not suitable for mega enlargements
Translated from Dutch. -
Bernard wrote on Tuesday 2 January 2018 at 20:53
| reply
@Tonny, once again apologies that your preference isn't included in the list, but it is a good addition and I agree with you that Corel PaintShopPro is an affordable program. I don't know whether it is also available for iMac (IOS).
Translated from Dutch. -
 Donald Willemsen
wrote on Tuesday 2 January 2018 at 22:25
| reply
A good article with a clear explanation. To create a panorama, I work with Bridge and Photoshop. That works fine.
Translated from Dutch.
What I notice is that the photos are cropped all around after merging.
If we look at the image below the individual photos of Honfleur, you can see space with transparency. What I do now is, after selecting those spaces in PS, first fill them using content-aware fill. That generally works very well. You make the photo slightly larger, as it were. I then touch up any visible edges with the spot healing tool. Only then do I crop a little if necessary. -
Bernard wrote on Wednesday 3 January 2018 at 09:02
| reply
@Donald Willemsen. Thanks for your comment, which once again shows that there are multiple recipes for baking a cake
Translated from Dutch.
The image below the individual photos of Honfleur is a copy of the screen at the moment Autopano merged the photos. It is impossible to create a straight edge there, because of the projection of the individual photos, unless you enable "autocrop". For me, this is the advantage that I can decide for myself what I crop off. -
Donald Willemsen
wrote on Wednesday 3 January 2018 at 10:19
| reply
@Bernard, I also decide for myself how and what I want to crop. The only difference is that I fill in the transparent space around the composite photo, as in the screenshot, myself using Fill with Content-Aware. You do have to place those areas in a selection first and then fill them. The selection edges may still be visible, but you can solve that with the healing brush. After that, you can crop as you wish. In the example of Honfleur above, for instance, you keep more sky with clouds at the top. That doesn't mean your method isn't fine too. With my method of filling in around it, you create a little more photo, which can make cropping somewhat easier. Sometimes you then actually need to cut away less.
Translated from Dutch. -
Bernard wrote on Wednesday 3 January 2018 at 10:38
| reply
@Donald, thanks again for your response, which also draws my attention to the fact that I could/should have mentioned that with vertical photos you have to take projection into account and therefore have to sacrifice some of your photo. I always take that into account myself, but didn't mention it. Of course you can "fill in" as you do, but I don't see that as an option for myself. Once again: there are many recipes for baking a cake
Translated from Dutch. -
 Panoman wrote on Friday 5 January 2018 at 10:13 | reply
Also take a look at Hugin and PTAssembler
Translated from Dutch.
Have your say
Please note: Articles older than a week can only be commented on by signed-in visitors.Would you still like to comment? sign in or create a free account.
Become a better photographer every week
A practical photography tip in your inbox every week.
38,836 photography enthusiasts already receive the tips! More about the weekly mail. Or keep up to date via  Facebook.

Elja Trum
Photofacts; everything to do with photography!
Would you like to take better photos and keep up with what is happening in photography? Photofacts publishes articles that teach you something about photography — from a product announcement to a practical shooting tip or a look at a website. Photofacts covers photography every day and is a hobby project of Elja Trum's that got out of hand. The articles are written by a team of volunteer authors. If you would enjoy writing one or more articles for Photofacts, do get in touch.More about PhotofactsPhotofacts is made possible in part by
