

Focus stacking: experimenting is learning
Saturday 7 November 2020, 14:28 by Juliette Gribnau | 5,229 views | 14 commentsThis article was translated from Dutch with the help of AI. Read the original.
Every photographer will know that learning is often a long road of trying and practising. In this report, I take you from beginning to end through an experiment to photograph small slime moulds, from a species I have not yet identified, found on a tree trunk.
On an old, rotting tree trunk
During one of my trips through the woods, I often pass an old fallen tree trunk that has been rotting away for several years. All sorts of things grow on it: mushrooms, fungi and mosses. This time I discovered small blue and white balls, which I suspected were slime moulds.
With a small pocket knife, I cut off a little piece and took it home to examine it and, if possible, photograph it properly. To be clear, each ball is about the size of the ball in a ballpoint pen.
My living room as a studio
As an amateur photographer, I do not have the facilities of a professional studio, with all its conveniences, but I got to work in my living room. I set up two table lamps on a low table, sitting on the pouffe, to provide some light.
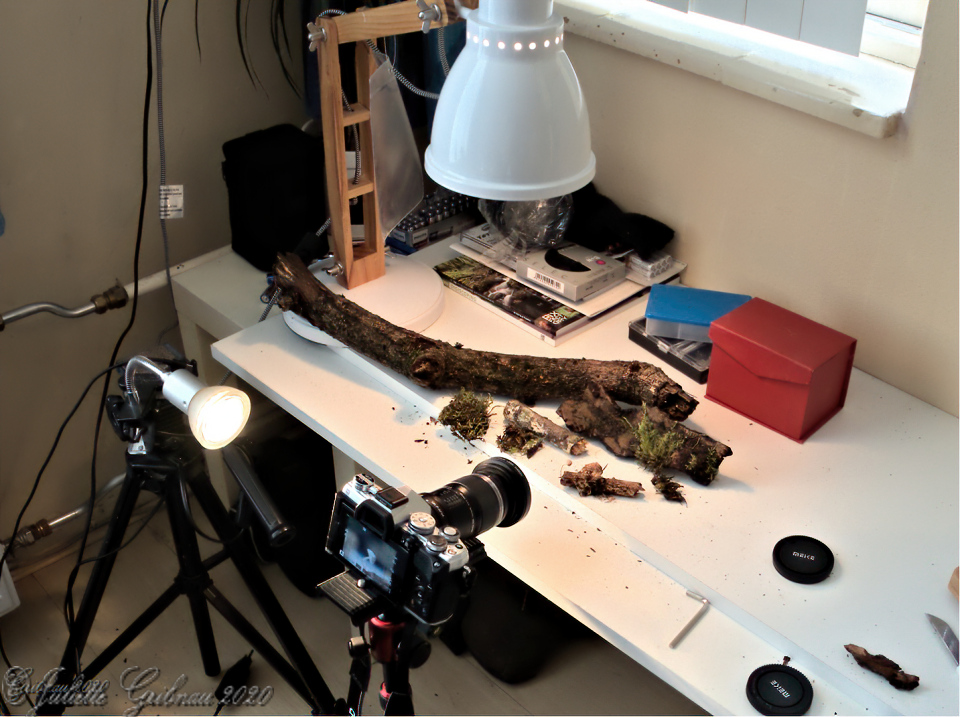
Equipment
1. A tripod
Indoors, I can manage with a tripod, although I am not very good with it.
2. A rail mounted on the tripod, which allows you to move the camera forwards or backwards in very small steps once it has been placed on the rail.
3. The camera: I use the Olympus M5 mark3, with the 60mm macro lens.
4. Extension tubes: I used two Meike extension tubes, the 10mm and the 16mm.
5. A macro conversion lens. I used the Mcon-40, a lens dating from the old camera era, a predecessor of olympus.
6. And above all: limitless patience
7. Software for stacking many photos. I use Helicon focus for this.
Getting started
First I had to find a good position for the small piece of moss with the blue and white dots. Preferably at a height that allowed me to see clearly through the camera what I was doing. So that is what I did.
And then the camera settings... first turn on both table lamps and point them at the piece of moss, then half-press the shutter to see how much light there is.
I choose an ISO of 400, as there seems to be enough light. The aperture can be small, because I want to make a series of 500 photos using focus bracketing. I let the camera choose the shutter speed, and as long as it does not drop below 1/5s, I can sit through the whole series.
I set the first focus manually as much as possible on the foremost point, then move it a fraction forwards for safety, and the first series begins.
I hardly dare move, because the floor in my living room is laminate, so the slightest movement makes the tripod, and therefore the camera, move. With this kind of precision work, that is enough to make one of the photos differ so much that the whole series can no longer be merged properly.
First time merging the series
Once I have transferred the whole series to the computer, I can load them all into Helicon focus and do very little else.
It takes some time, but eventually you have a merged photo... which is very disappointing.
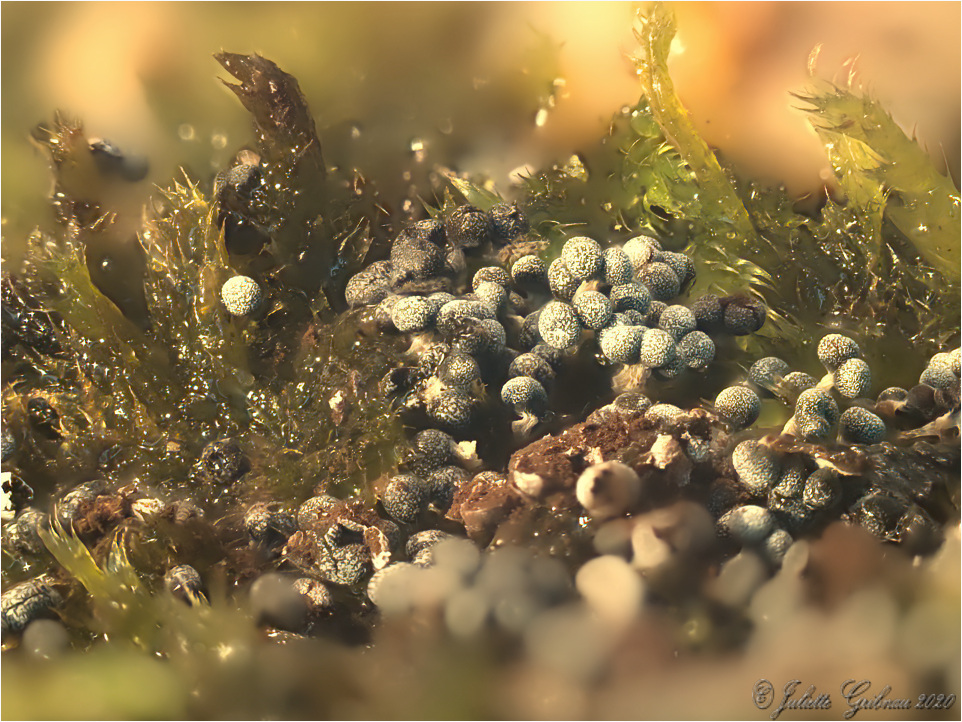
The programme indicated that there was too great a difference in exposure. I learn my first lesson: when the weather is half cloudy and half sunny, I have to close the curtains because that creates too much difference in the exposure.
Apart from that, I am rather disappointed by the colours. The green of the moss looks almost orange.
Searching, puzzling and thinking. What could be the reason?
My second lesson: I still had the white balance set to 'cloudy'. In this situation, I would be better off choosing 'tungsten'.
The poor photo below is of another piece of moss with blue and white balls, but this photo shows best that the photo was taken with the wrong exposure.
Another attempt
First I focused again right on the foremost point, then moved it a little further forwards,
as in the photo below.
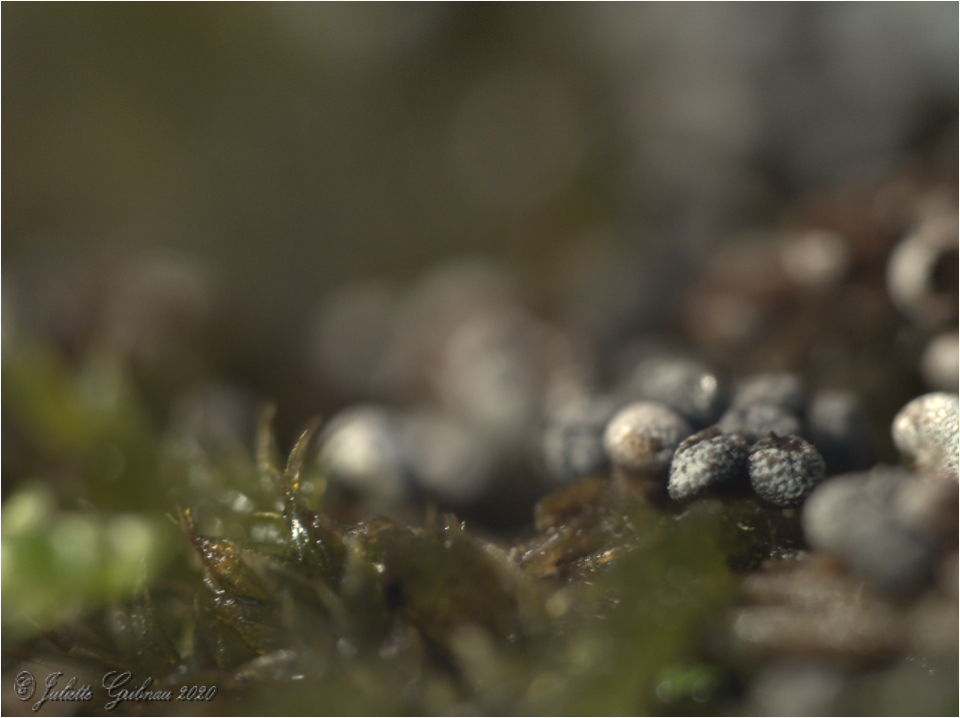
And the last photo in this series of 500 photos looks like the photo below:
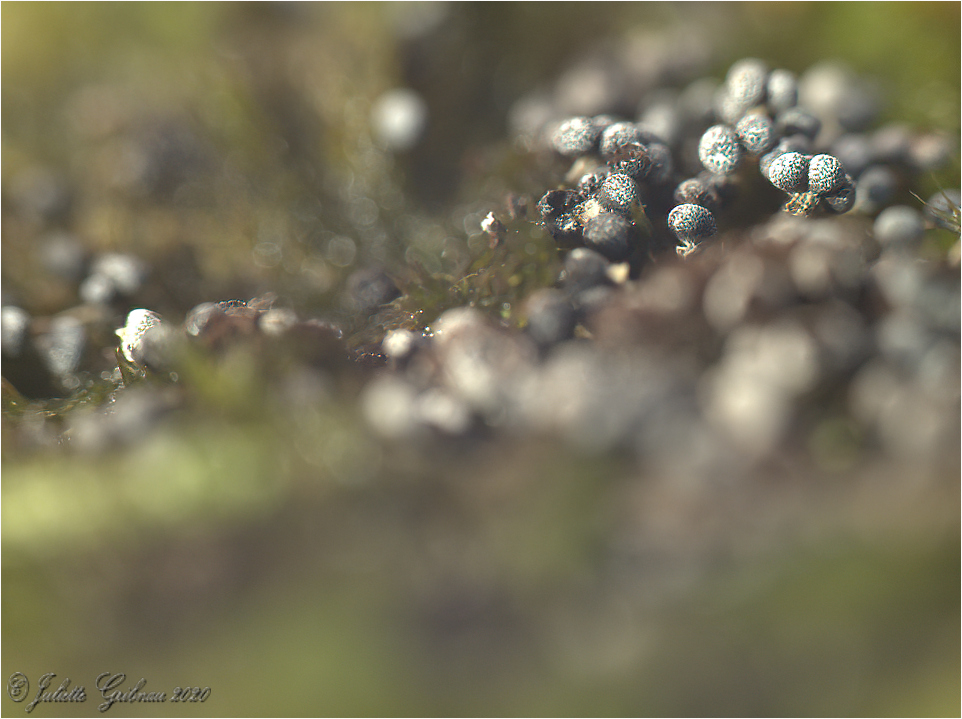
As you may already see, I immediately learnt another new lesson here. The first photo of the 500 is much darker than the five-hundredth photo.
I learn here that I need to work out very carefully how to point the two table lamps at the subject. The whole series had to be thrown away. Helicon-focus indicated that the exposure difference was 35 per cent!
The third attempt. Again with a series of 500 photos. Lessons learnt. The result makes me reasonably happy, but... I will have to repeat this many more times before I really have everything under control.
And I enjoy doing it!
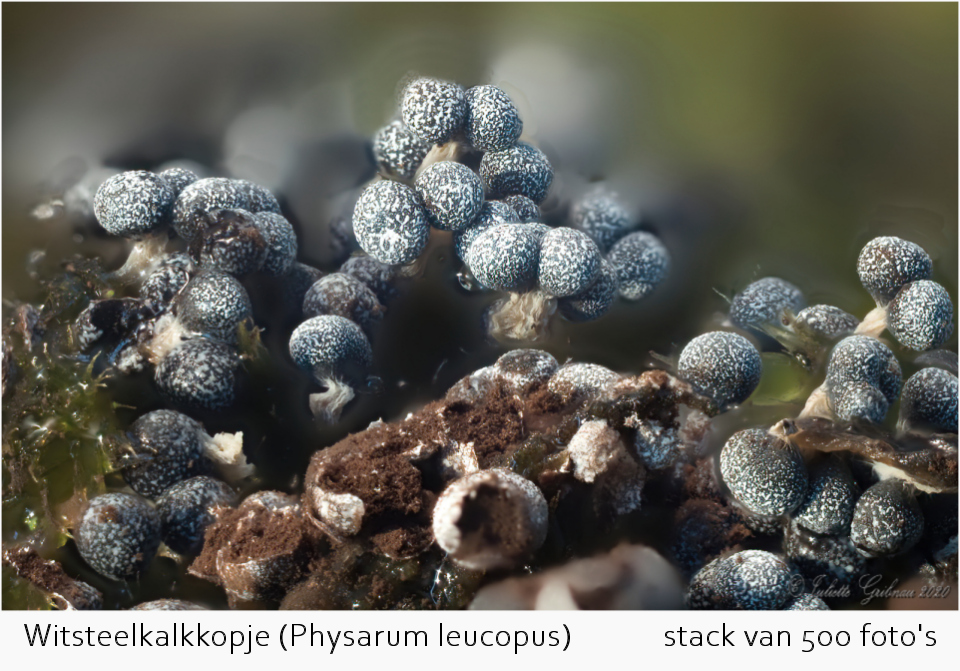
The photo below is my best result so far, but I suspect there is much more that can be achieved with it. A nice project for the coming winter.
About the author
Juliette fotografeert nu meer dan 15 jaar. Haar specialisme ligt bij natuurfotografie. Zij fotografeert vooral vogels en insecten vanuit haar scootmobiel tijdens de vele lange ritten door de natuur.
You might also like
-
 To stack or not to stack
by Erik Nevels
-
 You have to practise to learn
by Nando Harmsen
-
 Which is better? Stacking or noise reduction?
by Nando Harmsen
-
 7 Tips for Macro Photography
by Mike Muizebelt
-
 Not enough depth of field in your landscape? Use focus stacking.
by Nando Harmsen
-
 The right way to learn from a book or video
by Nando Harmsen
14 comments
-
 guest wrote on Monday 9 November 2020 at 06:59 | reply
Now you can probably add a few more cliks to your camera. 😂
Translated from Dutch. -

 scoot-shooter
wrote on Monday 9 November 2020 at 08:45
| reply
scoot-shooter
wrote on Monday 9 November 2020 at 08:45
| reply
Absolutely Guest !!, and clicked with pleasure
Translated from Dutch.
Kind regards
juliette -
 guest wrote on Tuesday 10 November 2020 at 10:53 | reply
Is 500 photos not a bit too much and wouldn't it be better to experiment with a dozen photos and increase the number as your knowledge grows?
Translated from Dutch. -
 Piet Nicolaas wrote on Tuesday 10 November 2020 at 12:09 | reply
I seem to remember having read somewhere, but I could be mistaken, that you had to take all the photos with the same exposure settings to prevent precisely the problems mentioned above.
Translated from Dutch. -
scoot-shooter
wrote on Tuesday 10 November 2020 at 12:10
| reply
Thank you for your response; yes 500 was too many, that was also one of the many lessons I learned by experimenting. I indeed should have started with fewer photos
Translated from Dutch.
kind regards
juliette -
scoot-shooter
wrote on Tuesday 10 November 2020 at 12:35
| reply
Thank you Piet Nicolaas. Yes, that's correct, but... because I was so close to the subject with the camera, there was still a difference.. the focal length keeps changing, which means that the light (and the camera's shadow) changes slightly as well. Thank you for thinking along with me
Translated from Dutch.
kind regards,
juliette -
 Gede wrote on Tuesday 10 November 2020 at 12:52 | reply
I usually use 150 um (0.15 mm) per step (with configsys rail-stackshot) I use ZereneStacker It is and remains experimenting. but very fascinating.
Translated from Dutch.
-
 Henk Kleijberg wrote on Tuesday 10 November 2020 at 14:03 | reply
I regularly make stack photos ,but use considerably fewer photos for that . With orchids (in the room)I use at most 50 photos . Shot with a macro at aperture 11 because of the depth of field.I calculate how much the depth is e,g, 5 cm and then take a photo for each mm.works fine .Helicon has no trouble with that. in Photoshop it works too ,but not as nicely as in Helicon
Translated from Dutch. -
 Jaap wrote on Tuesday 10 November 2020 at 17:54 | reply
I myself have been working with focus stacking for a number of years, especially with mushrooms, and that works perfectly with Helicon Focus. Make sure you have everything set to manual, exposure, focusing and white balance.
Translated from Dutch.
I like working with my 100-400 telezoom, which can focus from about 80 cm, the lens has internal focusing so the perspective does not shift. So I don't move the camera, but the focus of the lens.
With a beanbag, by hand, or from a tripod, I shift the focus backwards in about 30-40 steps, that works great.
I work with RAW files, Helicon Focus can handle those perfectly well too and can even export DNG files, which you can further edit in Photoshop or something.... -
scoot-shooter
wrote on Tuesday 10 November 2020 at 18:07
| reply
Thank you Gede for your response. I don't know that rail; the steps are determined in my case by olympus ( in camera)... I then choose the smallest step. I'll google the rail you mention in a moment.. curious. I first used Zerene but prefer Helicon-focus
Translated from Dutch.
kind regards
juliette. -
scoot-shooter
wrote on Tuesday 10 November 2020 at 18:10
| reply
Thank you Henk , for your response. I think that with something as big as a flower ( compared to the ball of a ballpoint pen) 50 shots is indeed more than enough. For my slime molds I really had to try some things out. ultimately I think I could have managed with 150 to 200.
Translated from Dutch.
Kind regards
juliette -
scoot-shooter
wrote on Wednesday 11 November 2020 at 10:00
| reply
Thank you for your response Jaap. Your tip to set everything manually regarding exposure and white balance (I did have focusing set to manual) is definitely a very good one!! thank you for that. You work with a completely different lens and I am also going to try something in that direction (the 40-150) today. But also in your case: mushrooms are much bigger than those tiny slime molds. I’m going to get to work with your tips and am curious what I’ll learn this time!
Translated from Dutch.
rds
juliette -
 Hans den Boer
wrote on Wednesday 11 November 2020 at 21:28
| reply
Hans den Boer
wrote on Wednesday 11 November 2020 at 21:28
| reply
I would definitely photograph in RAW and then export as DNG. That way you retain full control right to the very end. Unfortunately, Zerene cannot handle RAW files. Correcting your RAW files in an intermediate step (often possible in a batch) and exporting to (16-bit) TIF works too, but takes quite a bit of disk space (and extra time).
Translated from Dutch. -
scoot-shooter
wrote on Thursday 12 November 2020 at 10:56
| reply
Thank you Hans, for your response. I photographed everything in raw, and fortunately Helicon Focus can handle that well. DNG is not much use to me because I don't work with Photoshop or Lightroom,,, I use Corel's PaintShop Pro, which can also handle raw.
Translated from Dutch.
greetings
juliette
Have your say
Please note: Articles older than a week can only be commented on by signed-in visitors.Would you still like to comment? sign in or create a free account.
Become a better photographer every week
A practical photography tip in your inbox every week.
39,078 photography enthusiasts already receive the tips! More about the weekly mail. Or keep up to date via  Facebook.

Elja Trum
Photofacts; everything to do with photography!
Would you like to take better photos and keep up with what is happening in photography? Photofacts publishes articles that teach you something about photography — from a product announcement to a practical shooting tip or a look at a website. Photofacts covers photography every day and is a hobby project of Elja Trum's that got out of hand. The articles are written by a team of volunteer authors. If you would enjoy writing one or more articles for Photofacts, do get in touch.More about PhotofactsPhotofacts is made possible in part by
