

Review: Luminar 2018
Friday 17 November 2017, 17:17 by Michelle Peeters | 13,456 views | 6 commentsThis article was translated from Dutch with the help of AI. Read the original.
On 1 November, Skylum (formerly MacPhun) announced the new version of its flagship application, Luminar. Luminar 2018, now available to pre-order, is a major upgrade over the current version, Luminar Neptune.
This does not look like an incremental update, but a dramatic upgrade, and it feels almost like a completely new application, now available for both Mac and Windows platforms.
What is (not yet) included
Before I go into more detail, a brief note about what is not included in this version. The recently announced asset manager is not yet included in the first version of Luminar 2018.
This will not be added until next year, during the update cycle for the 2018 version. What is included is a new user interface, some important performance improvements and a significantly improved RAW engine.
Skylum seems serious about taking on Adobe. The development team has certainly listened to user feedback while working on the new version.
Although there is still room for improvement, 2018 makes great progress in this area. The previous version had some problems processing raw files. The quality was okay, but not particularly good.
Secondly, there was no option for applying lens correction or removing aberration. The biggest problem, however, was the way it handled noise reduction. It used the company's technology from the "noiseless" application and applied it as a separate layer. It was extremely slow and cumbersome.
All of this has now been replaced by a completely new way of working.
Main new features
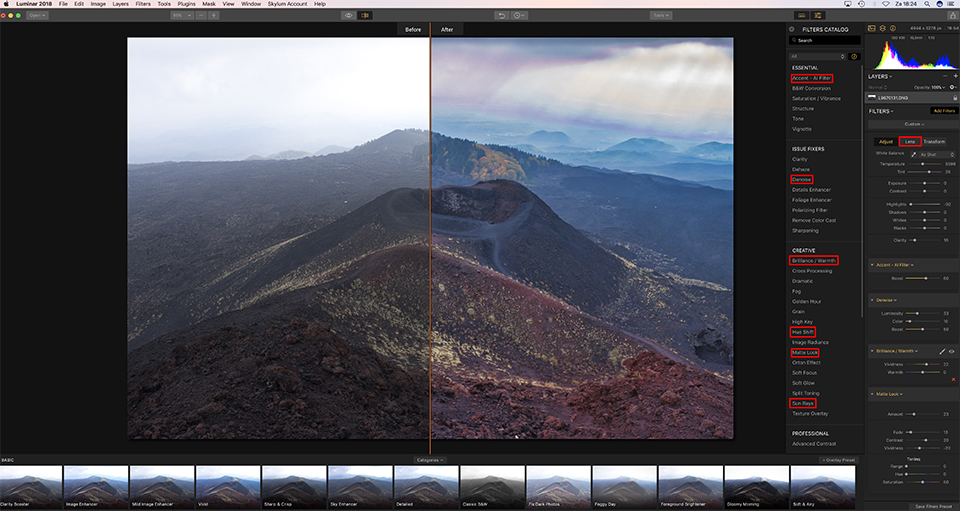
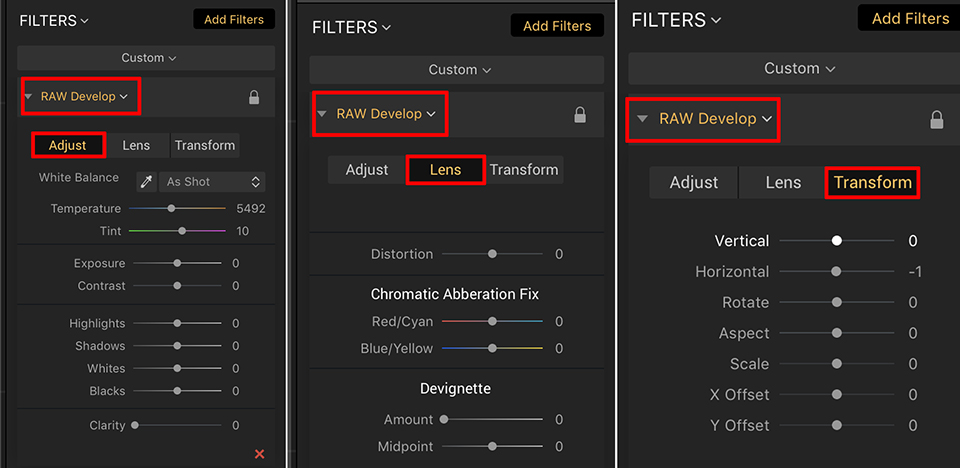
First, there is a new "Raw Develop" filter, which consists of three tabs. The first gives you the usual basic controls, such as exposure, highlights and so on.
The second tab contains controls for lens correction and aberration correction, while the third has controls for geometry, allowing you to correct perspective distortion.
Unfortunately, lens corrections can only be carried out manually at this point. This applies to both distortion correction and chromatic aberration correction. That is a little disappointing, as most other software does these things automatically or based on a profile.
The manual distortion correction is similar to the kind you find in Lightroom, for example, and works with a simple slider. This works fine for most lenses, but for severe distortion, such as that found on compact cameras, it is not enough to correct it completely.
The software really needs lens profiles. I suspect there is an open source database they could use for this, so hopefully this will be added in a future version.
Despite these limitations, you can now at least correct these image problems in the software without having to switch to another application. You will simply have to accept that it is somewhat cumbersome to use.
The third tab contains controls that let you apply all kinds of transformations and straighten your image.
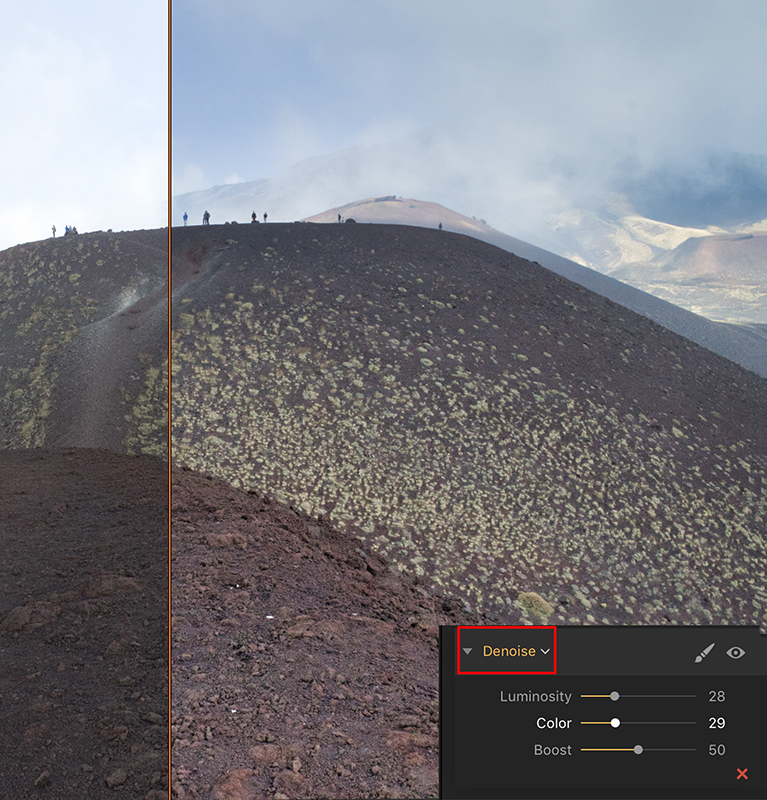
The noise reduction system has been completely replaced. Noise reduction is no longer a separate step, but is now a proper filter. It also works effectively in real time. This is such a big difference from the previous version that the two are hardly comparable.
You have sliders for luminance, colour noise and a boost slider that controls the overall effect. It works quickly and reasonably well. You really only need small amounts of luminance reduction for it to be effective.
The sharpening has also been improved and the controls are slightly different from the previous version, with the addition of a "halo reduction" option. The combination of these two new filters gives you much more control over the quality of your image and makes a huge difference to the result when used carefully.
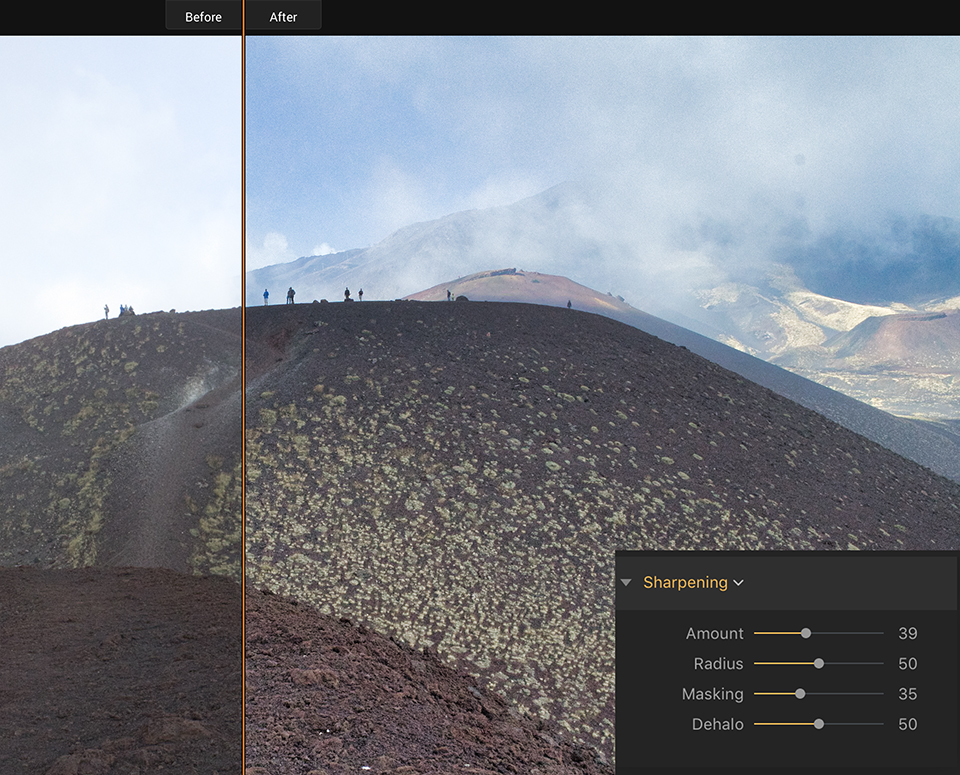
The overall performance of the application has increased considerably. Loading is much faster and decoding raw files is noticeably quicker too. I opened the same file in Luminar Neptune and then in 2018.
2018 was at least twice as fast, if not faster, when opening a raw file. The whole thing feels much simpler, and the difference is very noticeable!
RAW quality
And now for the most important update: the quality of the RAW conversions. The previous version had a problem where RAW images were sometimes loaded looking a little flat or bland, and the conversions were not always particularly well profiled.
This has now been improved, and images have much better contrast and colour when you load them. They are still not as good as properly profiled images based on the cameras' own colour profiles, but this may be addressed with one of the software's other features, the LUT tool, which I will return to later.
The images still look a little flat, but they look about as good as those in Capture One or Lightroom. Noise is reduced much better and, even before using the new sharpening tool, the images generally look sharper.
The only problem that can significantly detract from the quality is the lack of automatic chromatic aberration correction. This now has to be done by hand and is quite time-consuming.
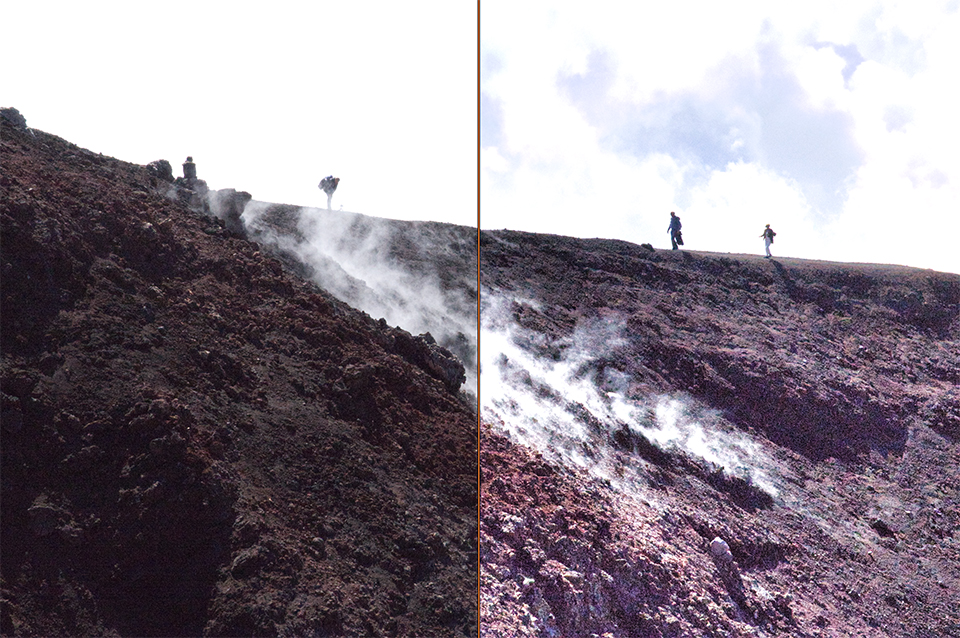
For shots taken with cheaper lenses that have significant aberrations, this is the only issue that really degrades the image. Overall, they all look free of noise and sharp, without any obvious artefacts.
There is, however, a very useful new filter that could provide the basis for correcting this in the future. There is a new filter called LUT mapping (LUT = Look up Table). You can load a standard LUT file and apply it to your image.
LUTs are quite common in the video editing world. Many of them are used for creative purposes. They can be used for all sorts of things, from correcting log gamma to film colour simulations.
Other new filters
There are a few other new filters that may be interesting. Here are two of my favourites:
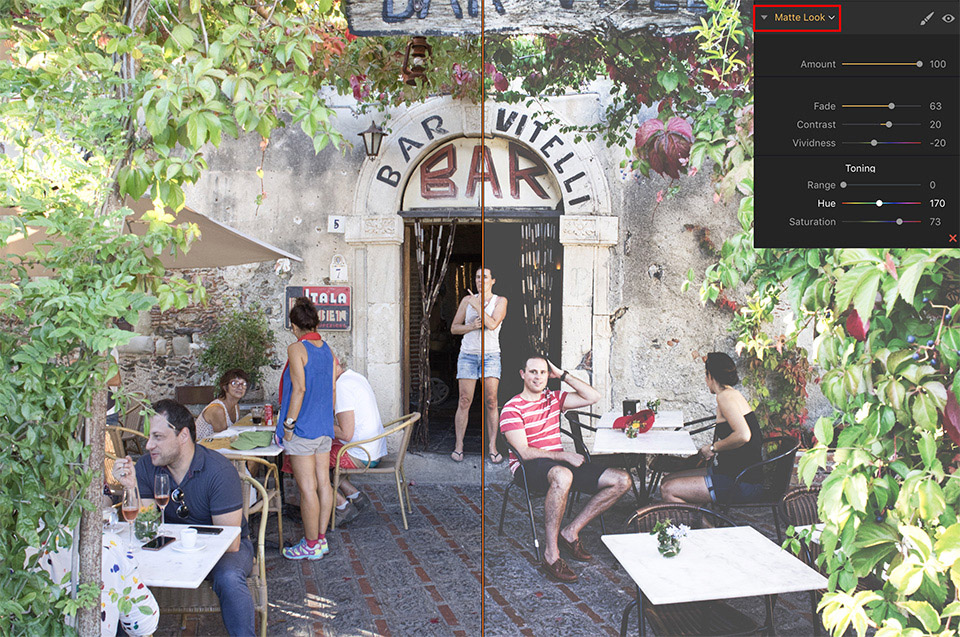
Matte Look gives you a tool for creating a faded film look. You would normally achieve this effect with the curve tool, by raising the black point and lowering the white point.
The Matte Look filter goes much further than this, however, and has a range of options for simulating colours and effects normally associated with a "film" look, especially aged film.
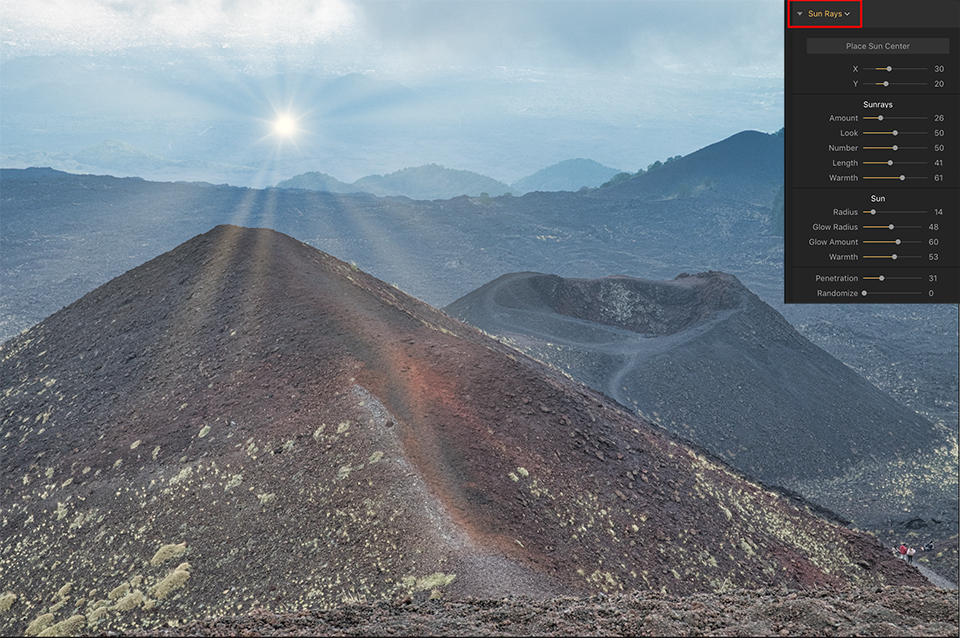
The other cool new filter is the Sun Rays filter. At first it looks like a gimmick, but it is actually quite good. I do not know how they do it, probably some kind of luma key, but the rays look as if they really come from behind part of the scene.
For example, if you drag the effect over trees, it looks as if the rays are coming from behind the trees.
The result is quite realistic, especially if you spend some time adjusting the settings. It is probably most useful for improving shots that already contain a sun flare.
Another nice new filter is Brilliance / Warmth, which adds a set of two controls. One is called "Vividness" and looks a little like Vibrance.
I do not know exactly how it works, but it works. The other control lets you give the image a warmer or cooler effect, and this works slightly differently from simply adjusting the white balance. It produces natural-looking results.
A few more new features
There were a few other things that caught my attention while trying it out. You can now use your Photoshop or other applications' plug-ins as plug-ins in Luminar.
This means that you can use the effects from Nik software within the application, for example. They are added to your files as a new layer in Luminar as soon as you finish using the plug-in.
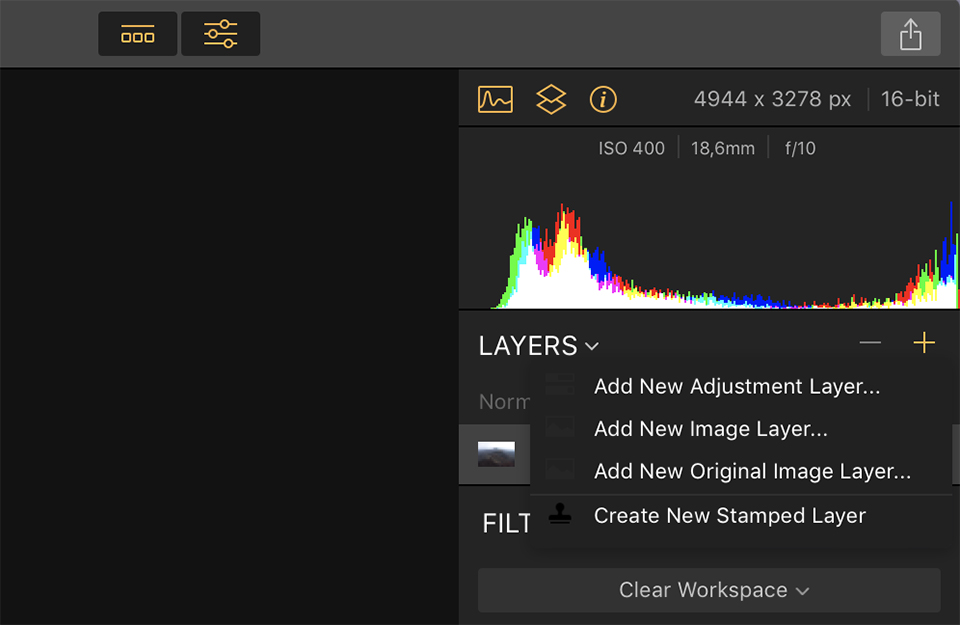
There is also now a handy little button above the presets panel to quickly add a new layer, which is useful if you want to apply presets as a new layer. You do not have to go to the top of the interface first, you can simply click it from the presets panel.
Overall impression
Overall, I am very impressed with Luminar 2018. It is a major upgrade, but more than that, Luminar is becoming a significant player. Now that the RAW conversion has been considerably improved, it is becoming a competitor to take seriously.
Especially once they add the previously announced asset management features. Automatic lens corrections also still need to be added, of course, because in my opinion users will demand them.
And although the current method is better than having no lens corrections at all, it certainly will not be good enough for those used to Lightroom, where metadata- and profile-based lens corrections are the norm.
To be honest, this is my only real criticism of the software. I also encountered relatively few bugs, which is remarkable considering that I was using a beta version.
The only other change I would like to see, which I think would be useful, concerns the way presets work. When you apply a preset, it overwrites everything currently in your filter stack.

This makes it difficult to use presets for saving general settings for individual filters, as you would in Lightroom.
For example, if you save sharpening settings as a preset and then want to apply them to another image, you remove any other filters you currently have when you select the sharpening preset you created.
You can get around this by adding another layer, but I would like to see an option to add to the current layers instead of overwriting them.
With Luminar 2018, you can create seriously advanced setups. And you can carry out much more complicated edits than in Lightroom. Although Lightroom can perform masked selective adjustments, for example, these are limited.
In Luminar, each filter can have its own mask and blending mode. On top of that, filters can be grouped into layers, and each layer can also have a mask and blending mode. You can also combine multiple images in the same document for multiple exposure effects, textures and so on.
Combined with the ability to use plug-ins now, Luminar is becoming a very comprehensive and sophisticated editing application. They are doing this by following their own direction instead of trying to become a "Lightroom-like" clone.
I cannot wait to see the asset management side of Luminar when it is released. Its preview looked very good, so if they put as much energy into this as they have into the rest of the software, I think we will have a serious heavyweight competitor in imaging software.
About the author
Michelle Peeters is fotografe en oprichter van DeuxBleus Fotografie. Michelle herkent het bijzondere in het gewone en het gewone in het bijzondere. Ze heeft zich nooit willen specialiseren en is daardoor van alle markten thuis.
You might also like
-
 Review: Macphun Noiseless 2016
by Michelle Peeters
-
 Macphun Becomes Skylum
by Michelle Peeters
-
 Macphun Luminar for Windows announced
by Michelle Peeters
-
 Review: Luminar 2018 version 1.2 Jupiter
by Michelle Peeters
-
 Review: Macphun Snapheal CK
by Michelle Peeters
-
 Review: Luminar 3 with library feature
by Michelle Peeters
6 comments
-
 CC wrote on Friday 17 November 2017 at 21:03 | reply
A heavyweight? Come on: the combination Bridge, ACR, Photoshop isn't even approached by Luminar! A nice replacement for Lightroom perhaps, but nothing more.
Translated from Dutch. -
ldoetje wrote on Monday 20 November 2017 at 00:01 | reply
Agree with CC. I think the program is a joke. In the Windows version there isn't even an eyedropper for white balance.
Translated from Dutch. -
 Roger wrote on Tuesday 21 November 2017 at 13:56 | reply
Have Adobe CC, with Lightroom, PS and Bridge, and now also Luminar 2018. Granted, Luminar can't really do everything the Adobe combo can, but for the average hobby photographer it's great, especially considering the price, one-time € 59 versus monthly € 13........
Translated from Dutch. -
guest wrote on Wednesday 22 November 2017 at 16:31 | reply
After the latest update from Adobe, the "new" Lightroom Classic CC works even more slowly (how is that possible?). I am seriously considering stopping with Adobe and their cloud subscription. Perhaps Luminar is a good alternative and certainly worth trying. I have been working with Lightroom for years and the program is quite good, but not perfect either! I think it is time for a change.
Translated from Dutch. -

 hein9@xs4all.nl wrote on Saturday 2 December 2017 at 10:27
| reply
I recently bought Luminar as an alternative to Lightroom.
Translated from Dutch.
One problem with Luminar that does not go away is that every time I want to crop an edited photo Luminar closes .
By now I have sent 5 emails to Macphun support.
Only automatically generated replies received asking me to be patient because thousands of problems are reported daily, that they cannot handle it with the current staff and that extra personnel needs to be hired to be able to tackle the problems.
Be very careful when purchasing Luminar!
Lightroom works quickly and stably for me, I just wasn't very charmed by a subscription
Hein Leenstra -
 Koen Van de moortel
wrote on Tuesday 16 January 2018 at 17:26
| reply
I spent a few hours playing around with Luminar 2018 (for Windows) and can inform you that it is still FULL of flaws! At this point this is definitely not yet a worthy replacement for Lightroom!
Translated from Dutch.
Have your say
Please note: Articles older than a week can only be commented on by signed-in visitors.Would you still like to comment? sign in or create a free account.
Become a better photographer every week
A practical photography tip in your inbox every week.
38,836 photography enthusiasts already receive the tips! More about the weekly mail. Or keep up to date via  Facebook.

Elja Trum
Photofacts; everything to do with photography!
Would you like to take better photos and keep up with what is happening in photography? Photofacts publishes articles that teach you something about photography — from a product announcement to a practical shooting tip or a look at a website. Photofacts covers photography every day and is a hobby project of Elja Trum's that got out of hand. The articles are written by a team of volunteer authors. If you would enjoy writing one or more articles for Photofacts, do get in touch.More about PhotofactsPhotofacts is made possible in part by
