

Review: Macphun Noiseless 2016
Friday 5 January 2018, 17:17 by Michelle Peeters | 5,631 views | 10 commentsThis article was translated from Dutch with the help of AI. Read the original.
Macphun (soon to be Skylum) released a package to reduce noise in your photos back in 2015: Macphun Noiseless. As is usually the case with Macphun, the software is only suitable for Apple computers.
The new Luminar 2018 (which can also run on Windows) also has a noise reduction tool (Denoise), but it has far fewer options than Noiseless.
I was curious to see whether the programme would work better than the noise reduction tools in Lightroom and Photoshop, so I tested Noiseless 2016 version 1.3.2 (887). These are my findings.
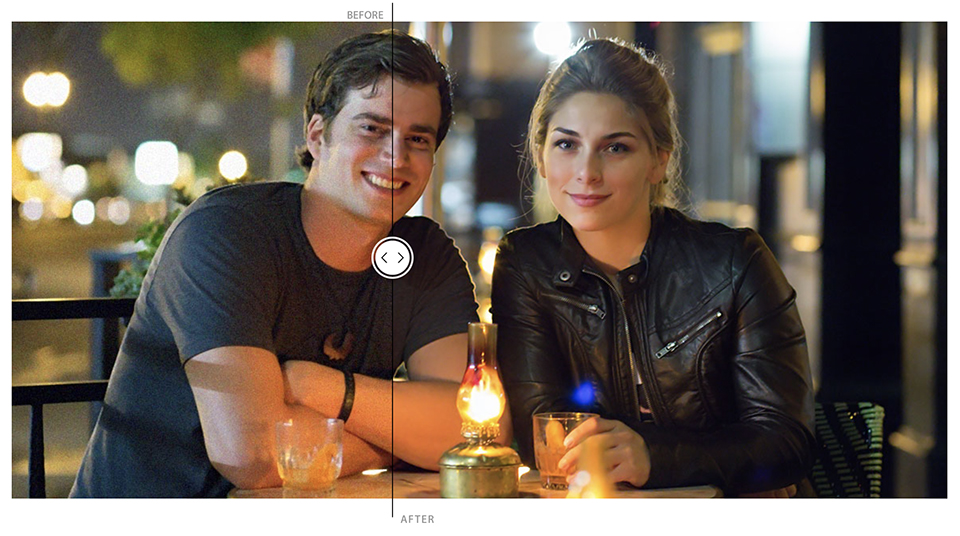
I got started with the Pro version. The biggest differences compared with the regular version are built-in plug-ins for other programmes such as Photoshop, as well as a higher price. The standard version of Noiseless costs 17.99 euros. The Pro version, on the other hand, costs 70 euros.
Functionality
Noiseless basically has just one function, namely removing noise. The programme immediately starts analysing the noisy photo you have loaded. A suitable filter for removing noise from that specific photo is automatically selected for you.
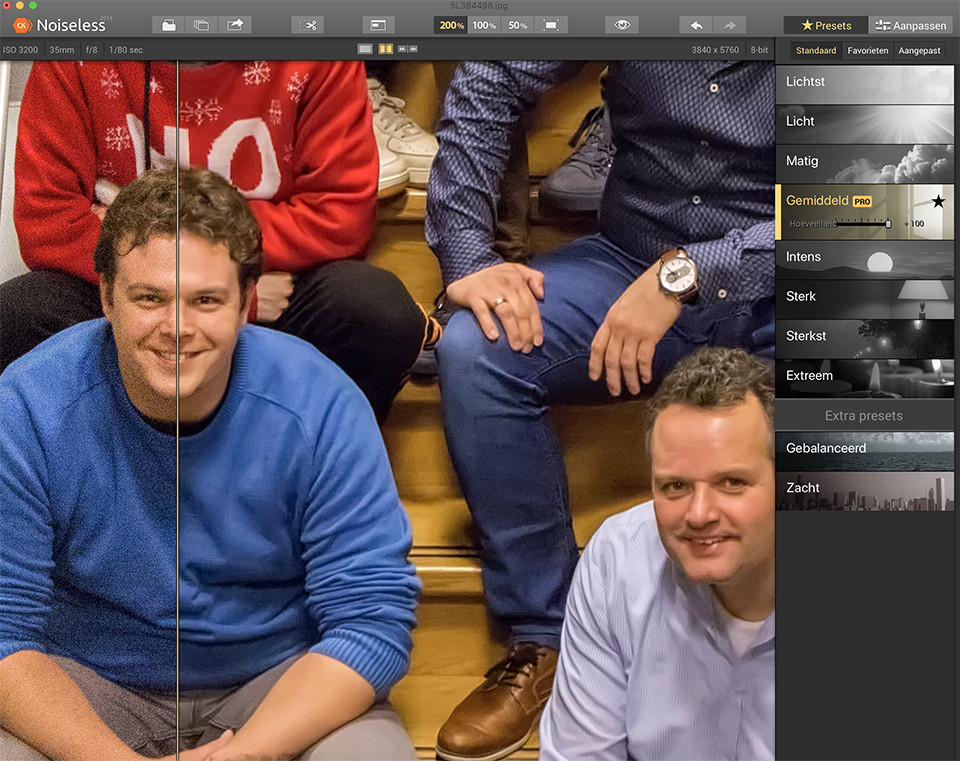
The screen is divided into a 'before' and 'after' section, so you can clearly see the improvements. You can zoom in as required: 50 to 200%.
There are eight levels of noise reduction, from "Lightest" to "Extreme". There are also four additional filters, two of which are intended for RAW files.
You can adjust each filter level and save it as your own 'preset'. This lets you specify exactly how strongly and in what way the noise should be blurred.
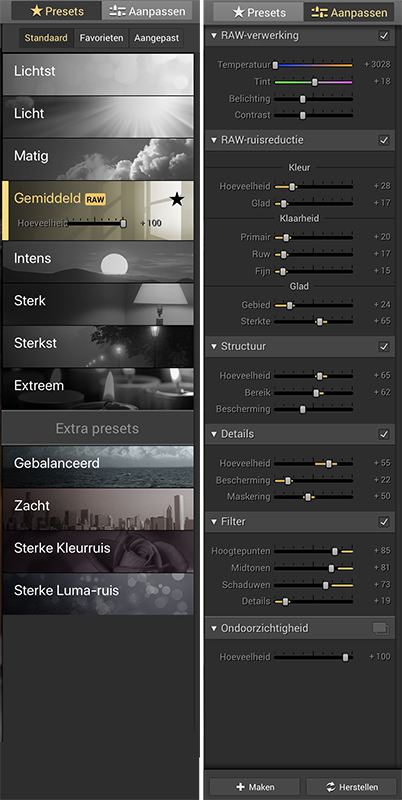
You can do this by moving the sliders in the sidebar, increasing or decreasing the opacity from 0 to 100. This is useful if the standard presets do not give you the desired result, as you can still fine-tune a few things yourself.
Pros
You can improve your photos and remove all noise with Noiseless without much effort. I was very enthusiastic about the result, although you need to be careful not to remove too much noise and lose detail through blurring.
The different views make it easy to compare the difference before and after noise removal, and then refine the result further if necessary.
Cons
One disadvantage is that the noise filter is not calculated just once. Every time you do something, such as zooming in or out or moving the photo, the filter is recalculated. As a result, the programme works more slowly than you would like.
You can also only work with one photo at a time. So you have to open each photo one by one. I think Noiseless would work best as a plug-in for Photoshop or Lightroom. But of course, you need to have those programmes.
Compare with Lightroom/Photoshop
I compared the result of my repaired, grainy photo with the results from Lightroom and Photoshop, and still achieved a slightly better result. More detail was preserved, while it took very little effort to reach a very acceptable and presentable end result.
Conclusion
Macphun Noiseless is interesting if you like working with presets to achieve quick and distinctive results. The application is self-explanatory and therefore easy to use.
If you have some experience with Photoshop or Lightroom, you can also achieve many of these effects in those programmes. However, this requires much more time and knowledge.
If you do not have Lightroom or Photoshop, Noiseless will serve you well. Both RAW and JPG files can be edited. The quick tests I did with it did not show any difference in the result between JPG and RAW files. Noiseless can be a useful addition to your workflow.
About the author
Michelle Peeters is fotografe en oprichter van DeuxBleus Fotografie. Michelle herkent het bijzondere in het gewone en het gewone in het bijzondere. Ze heeft zich nooit willen specialiseren en is daardoor van alle markten thuis.
You might also like
-
 Review: Macphun Snapheal CK
by Michelle Peeters
-
 Macphun Becomes Skylum
by Michelle Peeters
-
 Review: Luminar 2018
by Michelle Peeters
-
 Removing noise? Use it in moderation
by Nando Harmsen
-
 New update for Lightroom Classic enables AI noise reduction
by Nando Harmsen
-
 Macphun Luminar for Windows announced
by Michelle Peeters
10 comments
-
 Dirk wrote on Friday 5 January 2018 at 17:37 | reply
A comparison with Lightroom/Photoshop only makes sense if you explain which tools you used for that and show the results. A “slightly better result” doesn't say much.
Translated from Dutch. -

 Michelle Peeters wrote on Friday 5 January 2018 at 18:56
| reply
@Dirk: my biggest problem with Photoshop and Lightroom is that you basically have no idea what you're doing with those noise reduction tools. You just move all the sliders around and look at the result. I've often tried to delve into it, but I never manage to understand it well enough. I happened to have a grainy photo that needed fixing. Spent hours on it (trial and error) with both Lightroom and Photoshop. Noiseless did it automatically for me with a slightly (not by much) better result. So no major differences, it's mainly the ease of use.
Translated from Dutch. -
Arie wrote on Friday 5 January 2018 at 20:33 | reply
You are absolutely right Michelle! All that Adobe software is just way too complicated! I'll take a simple little app with at most one slider. Much cheaper too! Where can I download this little thing?
Translated from Dutch. -
Michelle Peeters wrote on Friday 5 January 2018 at 21:32
| reply
@Arie: in the article there are a couple of links where you can download it too
Translated from Dutch. -
 Donald Willemsen
wrote on Tuesday 9 January 2018 at 10:59
| reply
Michelle, there are different types of noise. Did you also take that into account in the comparison?
Translated from Dutch. -
Michelle Peeters wrote on Tuesday 9 January 2018 at 11:08
| reply
@Donald: the color and luminance noise can be adjusted separately with sliders. You can see that in the image. Noiseless itself determines which type of noise is most disturbing and restores that as nicely as possible. That is, in my opinion, the strength of the program. You can achieve really nice results without having too much knowledge about it!
Translated from Dutch. -
Donald Willemsen
wrote on Tuesday 9 January 2018 at 11:19
| reply
@Michelle, thanks for your response.
Translated from Dutch. -
 Hans wrote on Tuesday 9 January 2018 at 17:19 | reply
Michelle, great program on my iMac !
Translated from Dutch. -
 Bianca van Schaik wrote on Tuesday 9 January 2018 at 19:15 | reply
For luminance noise, Photoshop is fine, but you do indeed have to know what you're doing. But doesn't that apply to everything?
Translated from Dutch.
For both types of noise, you can get good results in Photoshop's raw converter and in Lightroom's editing section. Luminance noise (noise caused by contrast in light and dark pixels) and color noise (contrast in the colors of the pixels) can be edited very easily across the entire image in the raw converter by going to "details" and moving the noise reduction sliders there. With noise reduction, the hard contrasts in pixels are reduced. With "luminance", by making dark tones lighter and lighter tones darker, the more you do, the less detail remains in your photo because the edges fade as a result, while with the sharpening tool the opposite happens. You can preserve some detail by adjusting luminance detail, then the contrast lines in your image are looked at intelligently instead of just looking at individual pixels. In portraits and photos with lots of small details, it's better not to bring luminance noise beyond 30, that really is an absolute maximum. With an image with large areas and little detail (for example architecture), you can reduce it further. For "color noise", basically the same applies, only then it looks at irregularities in color and brings them closer together. This effect causes less detail loss because different parts of your photo almost never have the same color. However, you still have to be careful with this, sometimes the photo can become a bit gray. If you want to reduce noise a bit more precisely, you can use the blur tool for that, the smaller your pointer, the more detail is preserved in your photo (as long as you keep drawing in a targeted way) and sometimes the movement you make also makes a difference. If you draw along with the lines you want to keep sharp, they stay tighter. if you go across them, it blurs a bit more.
Of course, as with everything in Photoshop. There are also other ways to achieve the same result. And maybe there are even better ways. But that's how I do it and I'm quite happy with it. I could also tell you more about the other options, but it's not my article. -
Michelle Peeters wrote on Tuesday 9 January 2018 at 19:18
| reply
@Bianca: thanks for your detailed explanation!
Translated from Dutch.
Have your say
Please note: Articles older than a week can only be commented on by signed-in visitors.Would you still like to comment? sign in or create a free account.
Become a better photographer every week
A practical photography tip in your inbox every week.
38,836 photography enthusiasts already receive the tips! More about the weekly mail. Or keep up to date via  Facebook.

Elja Trum
Photofacts; everything to do with photography!
Would you like to take better photos and keep up with what is happening in photography? Photofacts publishes articles that teach you something about photography — from a product announcement to a practical shooting tip or a look at a website. Photofacts covers photography every day and is a hobby project of Elja Trum's that got out of hand. The articles are written by a team of volunteer authors. If you would enjoy writing one or more articles for Photofacts, do get in touch.More about PhotofactsPhotofacts is made possible in part by
