
The basics of flash photography explained
Saturday 15 June 2019, 13:13 by Huub Keulers | 10,906 views | 7 commentsThis article was translated from Dutch with the help of AI. Read the original.
A lot has been written about flash photography over the years, often from a technical or creative point of view. Sometimes it is explained in a way that also makes sense to less experienced hobby photographers. In practice, I often get two answers when I ask people whether they have ever used flash.
One group keeps well away from flash because they find it intimidating or have tried it before and were disappointed with the result. The other group sticks to the opinion that natural light is much more beautiful, which is essentially true, of course.
For both groups, however, there is another way of looking at it. Flash photography really is not difficult once you understand the basic principle, and it can definitely add something to your natural-light photos. Flash gives you an extra light source, allowing you to create an even better balance between sunlight and artificial light.
Natural light is sometimes called available light, but the strange thing is that all light is available, whether it comes from the sun, a lamp or your flash. If it is present, it is available and you can use it. A flash in your camera bag is therefore also simply available to you.
A photo taken with flash always consists of ambient light and flash light. Ambient light is sunlight, but also any artificial light sources that may be present. The aim is to balance the ambient light and flash light in your photo to create a successful flash photo.
To achieve this, it is important to understand the facts described below. Once you know this and also know how to operate your flash, the world of flash photography will open up to you, whether you own a reportage flash or work with studio lights.
- Shutter speed and ISO value are the most important factors determining the exposure of your background. This means that the longer your shutter speed and the higher your ISO value, the more of the background will be visible in your photo.;
- The amount of flash light determines how your main subject, which you are focusing on, will be lit. The most important factors influencing this are the aperture of your lens and the power setting of your flash.
The wider your aperture (smaller number), the more flash light reflected from your main subject will be captured by your camera sensor.
In other words, with an aperture of f/2.8, your main subject will be lit more by your flash than with an aperture of f/5.6. It is useful to know that the aperture also has a definite effect on the exposure of the background in a flash photo.
This is often not written or talked about. In itself, this is logical, because the wider the opening of your lens, the more ambient light will be recorded by your camera sensor, and therefore affect the exposure of your photo; - You can set the flash power in two ways. If your flash is set to (e)TTL, the correct amount of flash light is automatically added to your photo to expose your subject as correctly as possible.
I deliberately say 'as correctly as possible', because just like your camera's automatic exposure mode, your flash can also get it wrong.
That is why you can adjust the power of your flash using Flash Exposure Compensation (FEC). In most cases, this can be set from -3 to +3. You can compare this with your camera's Exposure Compensation, but instead of using it with ambient light, you use it with flash light.
You mainly use (e)TTL in two situations. First, when the conditions are constantly changing, and I mean lighting conditions and the distance between the camera and the subject. Examples include an event, reception or party.
The second situation is when you use your flash off-camera and bounce it indirectly, against a wall, ceiling or reflector. In this situation, your flash sends the correct amount of light towards your subject.
You can also set your flash to 'M'. Think of this as a dimmer for your living room lamp. By manually adjusting the capacity of your flash, you decide how much light comes out of it. For most flashes, you can set this from 1/128th to 1/1. In the latter case, you are working at the full capacity of your flash.
The advantage of manual flash is that you always have exactly the same flash output and therefore know precisely how your subject will be lit. You use manual flash in situations where the conditions will not change quickly, giving you complete control over the power of your flash. This is often the case during a model or portrait shoot, whether on location or in a studio; - The distance from your flash to your subject is another variable that affects the flash light falling on your subject. The first factor concerns the quality of your flash light. The closer the flash, possibly with a softbox, is to your model, the softer the light will be. The further away it is, the harder the light will become.
For many people, this is strange reasoning, but it is actually very easy to explain. The key to this statement is that a flash placed close to your subject, meaning your model, has a larger surface area relative to your subject than a flash placed further away. The smaller the light source, the harder the light. Just think of the sun.
The distance between the sun and the earth is very large, so the sun is relatively small compared with how large it would be if it were very close. That is precisely why the sun often creates a hard shadow. The same applies to the built-in flash on your camera. This is also very small in proportion and therefore 'spits' out fairly hard light.
It is not without reason that softboxes are placed on flashes. You increase the surface area, which makes the light softer. The material of a softbox also makes the light more diffuse.
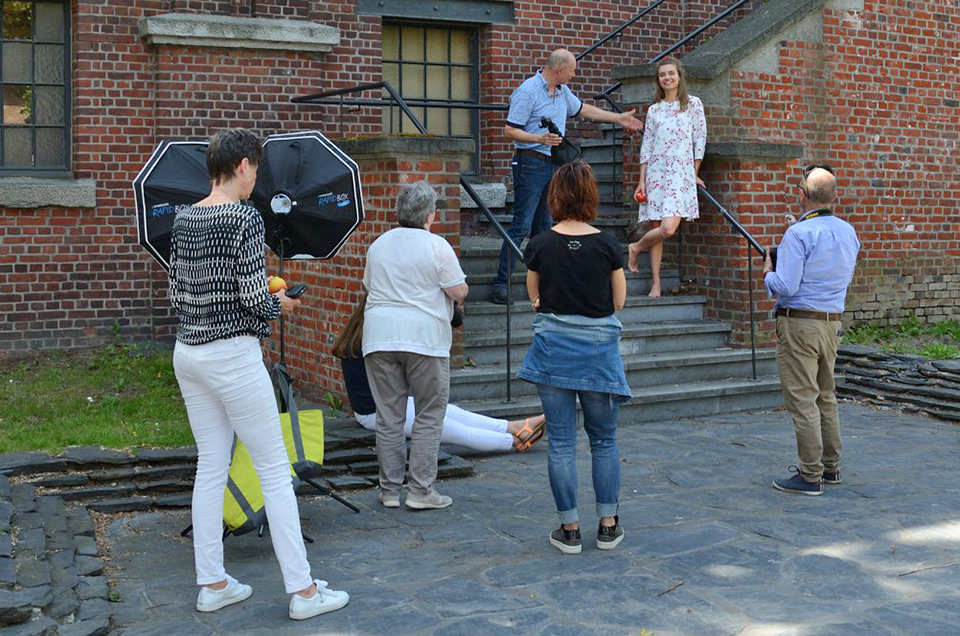
There is also an effect on the amount of flash light falling on your subject. The further away you place your flash, the less light will obviously fall on your subject. This makes sense because the power of your light source becomes lower over distance.
In fact, light loses intensity as it has to travel further. This effect happens very quickly. So quickly that doubling the distance results in four times as much light being lost. If the distance becomes three times as large, the reduction in light is even nine times greater.
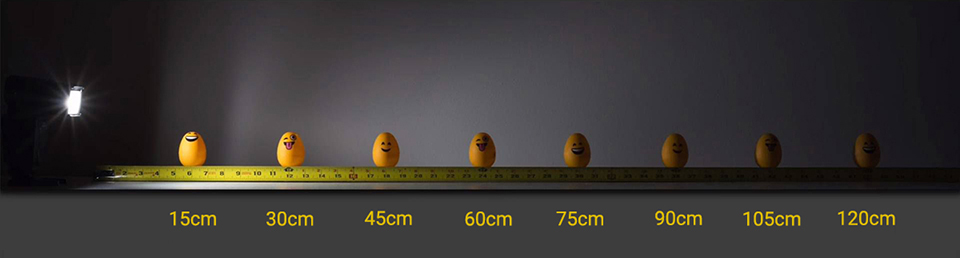
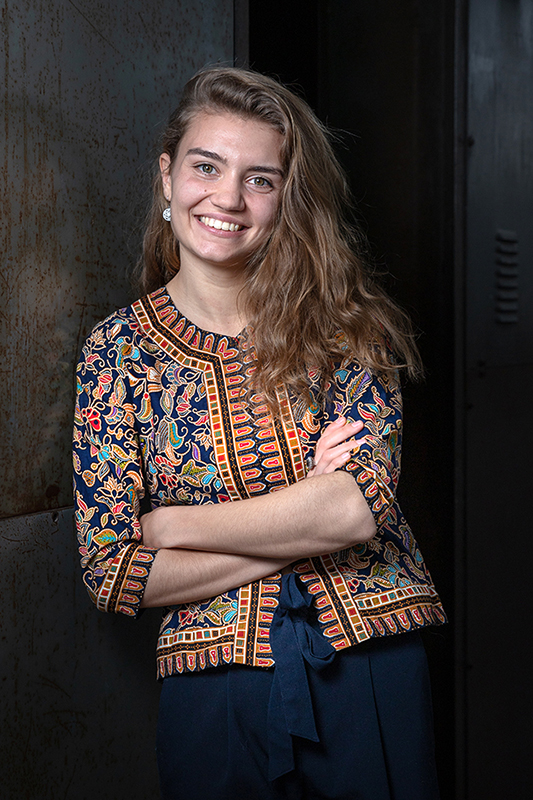
But there is another factor that is just as important: The closer your flash is to your subject, the faster this reduction in light will occur, also known as light fall-off. Suppose you want to photograph a model from head to waist, but only want her head and upper body to be properly lit, with the rest of her body appearing slightly darker.
You can achieve this effect, for example, by placing the flash with a softbox at a 45-degree angle, slightly above her face. Take a look at the photo below. Because the light decreases so much over this short distance, it will quickly fade and not reach her waist. The further away your flash is, the slower this light fall-off will be.
There is of course much more to say about flash photography, but this article is mainly about the most important variables that allow you to influence flash light. I also hope that, if you already own a flash or are considering getting one, you will find using it well worth the effort.
Hopefully, this article will also help you get over the hurdle of using your flash more often. It could become a good friend of yours 
If you have any questions about flash photography or this article, please let me know.
About the author
Huub Keulers is een enthousiasmerende veelzijdige freelance fotograaf woonachtig in Elsloo (Li). Hij is gespecialiseerd in sport-, bedrijfs-, straat-, honden en portretfotografie. Daarnaast is Huub auteur van diverse educatieve fotografieboeken en verzorgt hij allerlei fotoworkshops, masterclasses en lezingen.
You might also like
-
 Review: Special Photography Techniques, Panoramas, HDR, Virtual Tours and More
by Michelle Peeters
-
 The basics of photography in 10 minutes
by Elja Trum
-
 Dokaboek 2.0, all the basics of analogue photography in one book
by Erik van Rosmalen
-
 Have you ever heard of the Pep Ventosa technique?
by Nando Harmsen
-
 15 practical tips for sharper panning photos
by Huub Keulers
7 comments
-
 Jacqueline de Groot wrote on Saturday 15 June 2019 at 23:22 | reply
Thank you, Huub! Despite your super workshop, I can certainly use this little memory aid!
Translated from Dutch. -

 Bernard wrote on Tuesday 18 June 2019 at 18:10
| reply
Pleasant and easy-to-read article. I also belong to the available light group, but I'm going to try using flashes again anyway.
Translated from Dutch. -
 Huub Keulers
wrote on Thursday 20 June 2019 at 09:53
| reply
Thank you Jacqueline. Nice to read and hear from you
Translated from Dutch. Always a pleasure! -
Huub Keulers
wrote on Thursday 20 June 2019 at 09:55
| reply
Thank you Bernard. Nice to read. And yes, feel free to give it a try sometime. If you run into anything, I'd be happy to hear about it.
Translated from Dutch. -
 marion wrote on Thursday 20 June 2019 at 16:21 | reply
nice explanation thank you
Translated from Dutch. -
Huub Keulers
wrote on Thursday 20 June 2019 at 16:37
| reply
Thank you Marion. You're welcome. If you have any more questions, I'd be happy to hear them.
Translated from Dutch. -
 guest wrote on Thursday 20 June 2019 at 16:56 | reply
An educational explanation
Translated from Dutch.
Have your say
Please note: Articles older than a week can only be commented on by signed-in visitors.Would you still like to comment? sign in or create a free account.
Become a better photographer every week
A practical photography tip in your inbox every week.
38,938 photography enthusiasts already receive the tips! More about the weekly mail. Or keep up to date via  Facebook.

Elja Trum
Photofacts; everything to do with photography!
Would you like to take better photos and keep up with what is happening in photography? Photofacts publishes articles that teach you something about photography — from a product announcement to a practical shooting tip or a look at a website. Photofacts covers photography every day and is a hobby project of Elja Trum's that got out of hand. The articles are written by a team of volunteer authors. If you would enjoy writing one or more articles for Photofacts, do get in touch.More about PhotofactsPhotofacts is made possible in part by
