

Setting tip: eye detection combined with back button focus
Thursday 14 April 2022, 22:11 by Thijs Schouten | 5,630 views | 0 commentsThis article was translated from Dutch with the help of AI. Read the original.
Back button focus is a technique already used by many photographers. However, with the arrival of eye detection, many photographers are switching back to autofocus behind the shutter release button. Eye detection systems recognise eyes automatically.
In many cases, this works perfectly, but there are moments when the camera struggles with eye detection. Think of situations with messy backgrounds or when photographing small animals, such as mice.
I have run into this myself and have now found a setup that works very well for me. Back button focus combined with eye detection! In this article, I will explain more about it.
What is useful about back button focus?
Back button focus is a technique where you place a camera's autofocus behind a specific button. By default, autofocus is behind the shutter release button. In other words, when you press the shutter release button, the camera focuses and takes a photo.
Because you do not want to adjust the focus in some situations, it is useful to place it behind a specific button. An example is a post where you expect a bird to land.
The advantage of back button focus is that you can determine the focus, and when you think the bird will land, you only press the shutter release button, after which the camera takes photos without adjusting the autofocus.
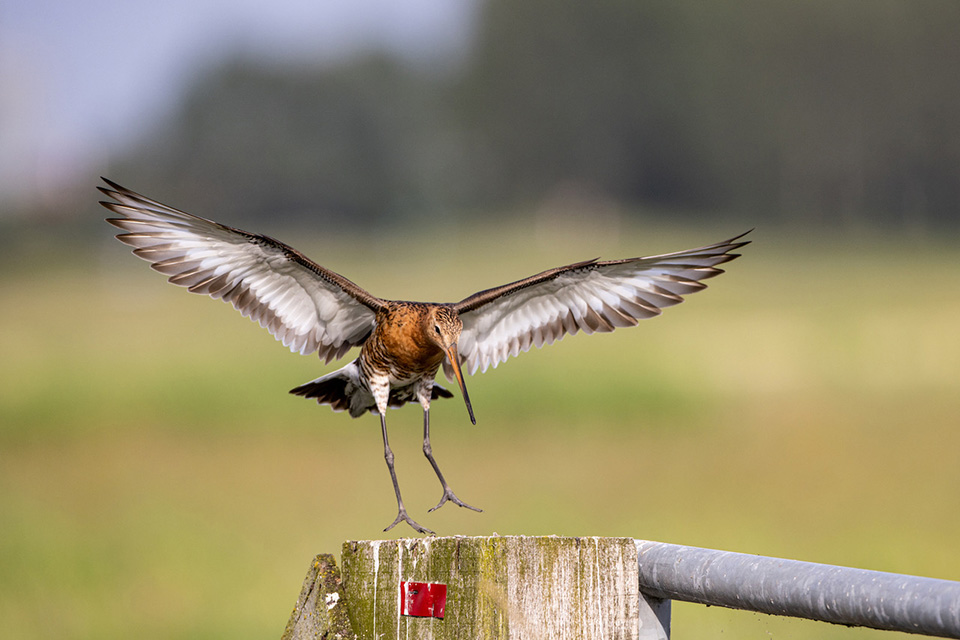
The result is that your subject flies into your focus, resulting in a sharp photo. Below is an example photo of a Black-tailed Godwit.
What is useful about eye detection?
Cameras with eye detection automatically recognise your subject's eye and then focus on it. Ideal, because this lets you switch very quickly and place the focus in the right spot.
In practice, eye detection works very well and I personally swear by it. I have noticed, however, that eye detection struggles in certain situations. Think, for example, of a busy background or very small animals, such as mice.
In these situations, eye detection may have to search, causing you to miss the moment. My tip: combine back button focus with eye detection!
What is the advantage of this combination?
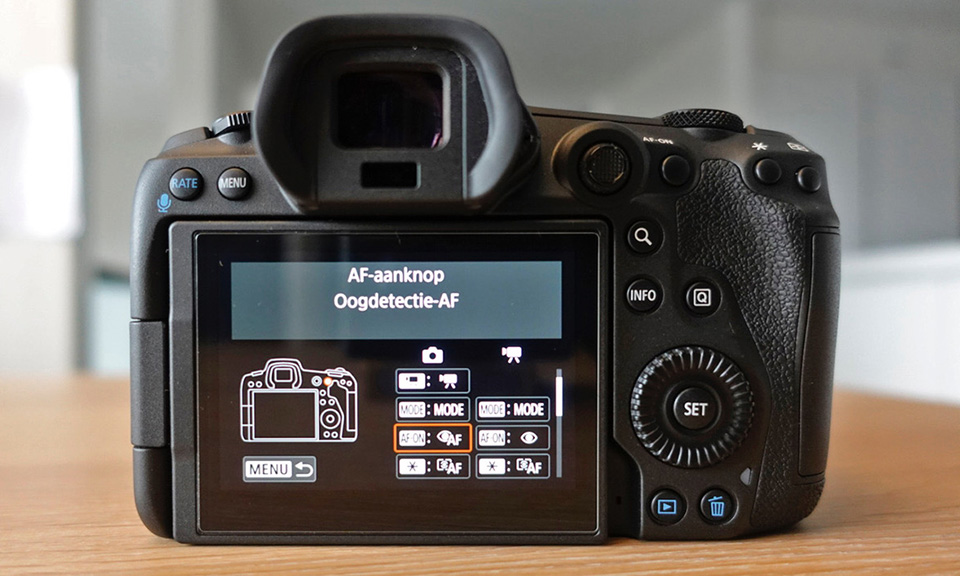
By setting your camera up with both eye detection and back button focus, you are very flexible in choosing your autofocus system. You place back button autofocus behind one button and eye detection behind another button.
You can then choose which autofocus system you want to use for each situation. I have been working this way on my Canon EOS R5 for a while now, and it gives me the flexibility to switch quickly in situations where one works better than the other.
How do you set this up?
Setting up Back Button Focus and Eye Detection differs between cameras and even between models. Below, I will explain where you can generally find these settings. Are you unable to work it out completely using the steps below?
Just Google back button focus + your camera model. It may be located somewhere else in the menu on your model.
Canon
Do you have a Canon camera? Then you can customise the buttons in the Custom Functions Menu (C.Fn). We need to change the following things:
1. Make sure the shutter release button is changed from 'Metering and AF start' to 'Start metering'
2. Set 'eye detection AF' behind the AF-ON button
3. Set 'Metering and AF start' behind the * button
Nikon
Do you have a Nikon camera? Go to the Custom Setting Menu, the pencil icon. Here, you can customise the buttons under 'controls'. We need to change the following things:
1. Make sure the shutter release button is changed from 'Release + Focus' to 'Release'
2. Set 'eye detection AF' behind the AF-ON button
3. Not every Nikon has two buttons on the back that you can customise. For this reason, you can also customise the Fn1 button on the front, for example. This button is next to the lens. Set it to 'AF-ON'
Sony
Do you have a Sony camera? Go to the settings menu, the cogwheel, and then to 'custom key setting':
1. Set AF with shutter to 'off'
2. Set the function of the 'AEL button' to 'eye detection'
3. Set 'AF-On' behind another button, such as C2
Do you have another camera?
Check your camera's manual and see whether you can set the following:
- Set your shutter release button to only take the photo
- Set eye detection autofocus behind the AF-on button
- Set the AF-on function behind the star button or another button
Done? I am curious about your experience!
Leave a comment below!
About the author
Thijs Schouten, 33 jaar en woonachtig in Amersfoort. Al meer dan 10 jaar actief met fotografie en als kind ook altijd een camera in zijn handen gehad. Fotografie is (naast zijn vriendin en twee dochters) zijn grote passie. Hij fotografeert vooral natuur, maar schrijft ook graag fotografie artikelen en productreviews.
You might also like
-
 Changing autofocus behaviour in a Canon camera
by Nando Harmsen
-
 Eye autofocus is a joy for portrait photographers
by Elja Trum
-
 Better autofocus with a wide aperture
by Nando Harmsen
-
 Review: Laowa 10mm f/2.8 Zero-D autofocus
by Nando Harmsen
-
 5 Tips for Film Noir Photography
by Elja Trum
-
 Automatic subject recognition, or not?
by Nando Harmsen
0 comments
Be the first to share what you think!
Have your say
Please note: Articles older than a week can only be commented on by signed-in visitors.Would you still like to comment? sign in or create a free account.
Become a better photographer every week
A practical photography tip in your inbox every week.
39,080 photography enthusiasts already receive the tips! More about the weekly mail. Or keep up to date via  Facebook.

Elja Trum
Photofacts; everything to do with photography!
Would you like to take better photos and keep up with what is happening in photography? Photofacts publishes articles that teach you something about photography — from a product announcement to a practical shooting tip or a look at a website. Photofacts covers photography every day and is a hobby project of Elja Trum's that got out of hand. The articles are written by a team of volunteer authors. If you would enjoy writing one or more articles for Photofacts, do get in touch.More about PhotofactsPhotofacts is made possible in part by
