

Zone focus: a good friend in 'tough' autofocus situations
Saturday 27 October 2018, 14:41 by Huub Keulers | 9,073 views | 4 commentsThis article was translated from Dutch with the help of AI. Read the original.
We have become so used to the autofocus (AF) on our lenses that we sometimes forget there are other ways to get your main subject sharp in your photos. One of these methods is called zone focus, also known as pre-focus.
Zone focus has traditionally been used a lot in street photography, mainly so you can take photos quickly and inconspicuously. However, this technique can also work well in landscape, sports and action photography.
In this article I will explain what zone focus is and when and how you can use this method. This is how I work, but I realise there are several methods that can produce the desired result.
What is zone focus
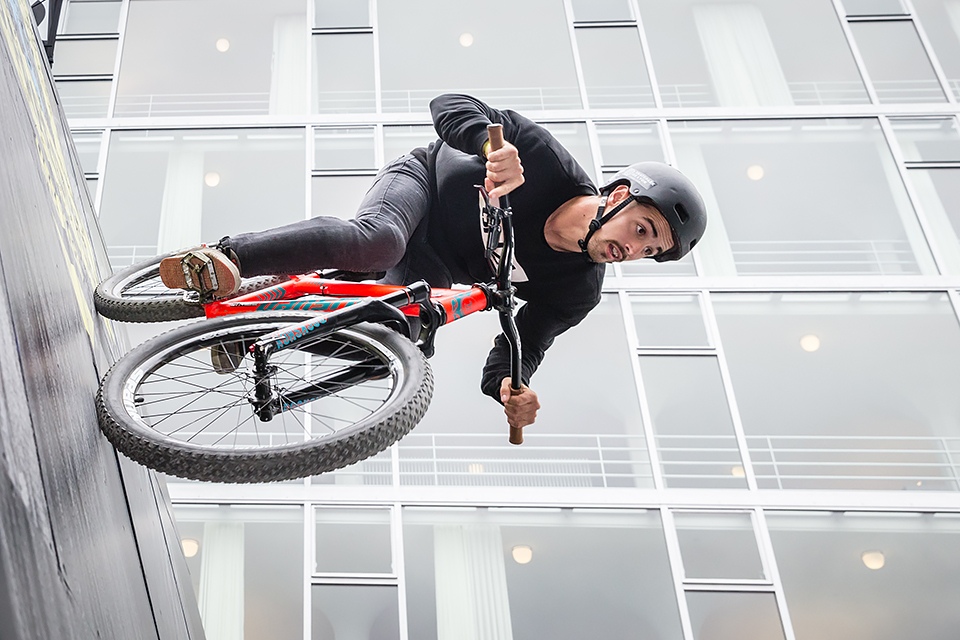
In sports and street photography, zone focus works on the principle that your moving main subject, which you want to show sharply in the photo, passes a point that you have focused on beforehand. If you take the photo at that moment, it can hardly go wrong and your main subject will be sharp, depending of course on the shutter speed you have chosen.
It is important that you switch off the autofocus on your camera or lens after focusing. Otherwise, your camera will focus again when you press the shutter button.
The zone focus method is used most often with the shorter focal lengths, wide angles from 12 to 35mm. These focal lengths give you a considerable depth of field, which means there is a good chance that your subject will be within this depth-of-field area and will therefore be sharp.
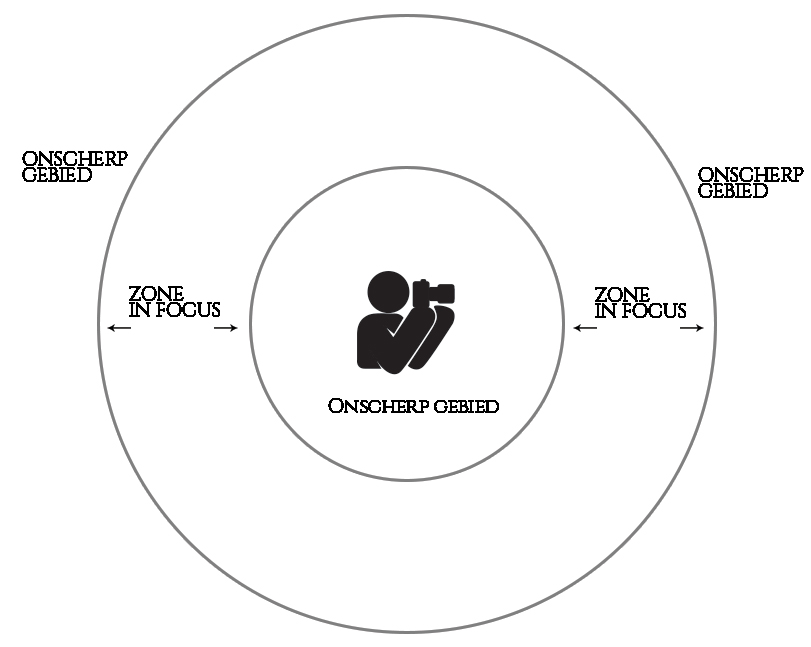
As you probably know, there is always one point in your photo that is at its sharpest. This is the point you focused on, leaving aside any back or front focus of your lens. From this point, the sharpness in your photo decreases towards the front and back, until the sharpness has completely disappeared to our eyes.
Another term for depth of field is DOF, Depth of Field. Depth of field is therefore the distance in metres between the sharpest point furthest to the front in your photo and the point furthest to the back.
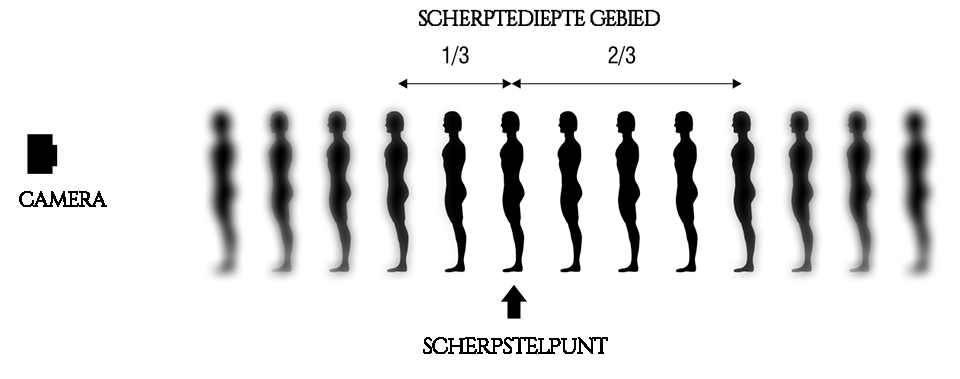
You always have less depth of field in front of your focus point than behind it. The ratio of this depth of field is roughly 1/3 to 2/3. This means you have more sharpness in metres behind your focus point than in front of it. So if you want a lot of depth of field in your photo, the point you focus on is very important.
When it comes to depth of field and using zone focus, there are a few rules you need to know in advance:
- The shorter your focal length, meaning the wider the angle, the larger your depth-of-field area will be. With a telephoto lens, from 100mm onwards, you will therefore have a reasonably small depth-of-field area;
- A small aperture opening, with a high aperture number, such as F11 or F16, gives you more depth of field than a large aperture opening, such as F2.8 or F4;
- The smaller the sensor in your camera, the larger your depth-of-field area will be. Crop-sensor cameras therefore create greater depth of field than full-frame cameras.
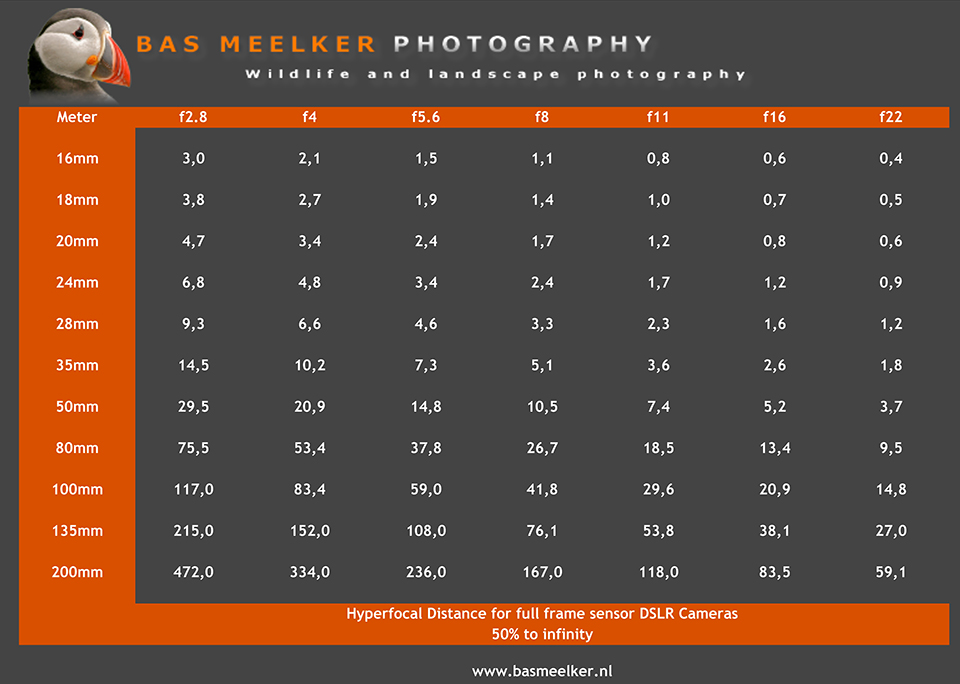
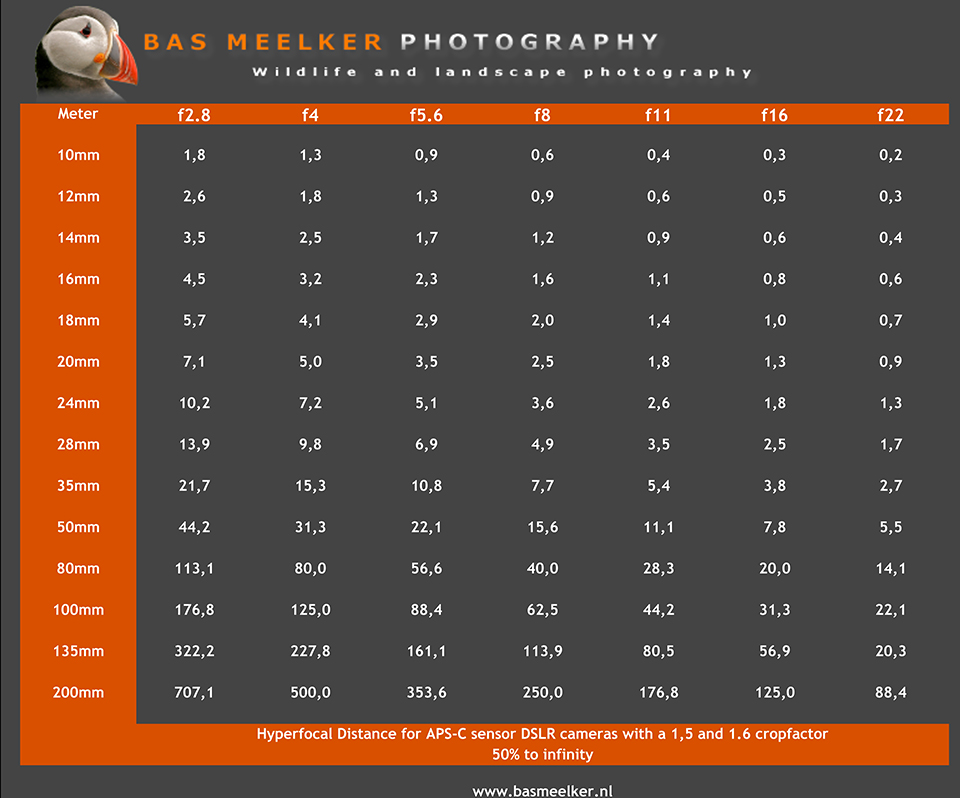
In every situation there will always be one focus point where you have the greatest possible depth of field. This focus point is also called the hyperfocal distance. Since nobody knows this from memory, there are useful tools to help you find out how large your depth-of-field area is.
Examples include specific apps for your phone, such as Hyperfocal Pro for Android and Simple Dof Calculator for Apple's iOS. There are also tables that you can print out and keep in your camera bag.
My colleague Bas Meelker has made some useful tables for full-frame camera sensors and crop-sensor cameras. If you focus at the desired hyperfocal distance, the sharpness in your photo runs from 50% of this distance to infinity. So in the example of a 24mm focal length and aperture F11, your sharpness runs from 0.85 metres to infinity.
When do you use zone focus
To use zone focus properly, you do need to have some feel for distances. Not everyone is equally good at this, by the way. You may be surprised at how many people struggle if you ask them to focus at 3 metres in front of them.
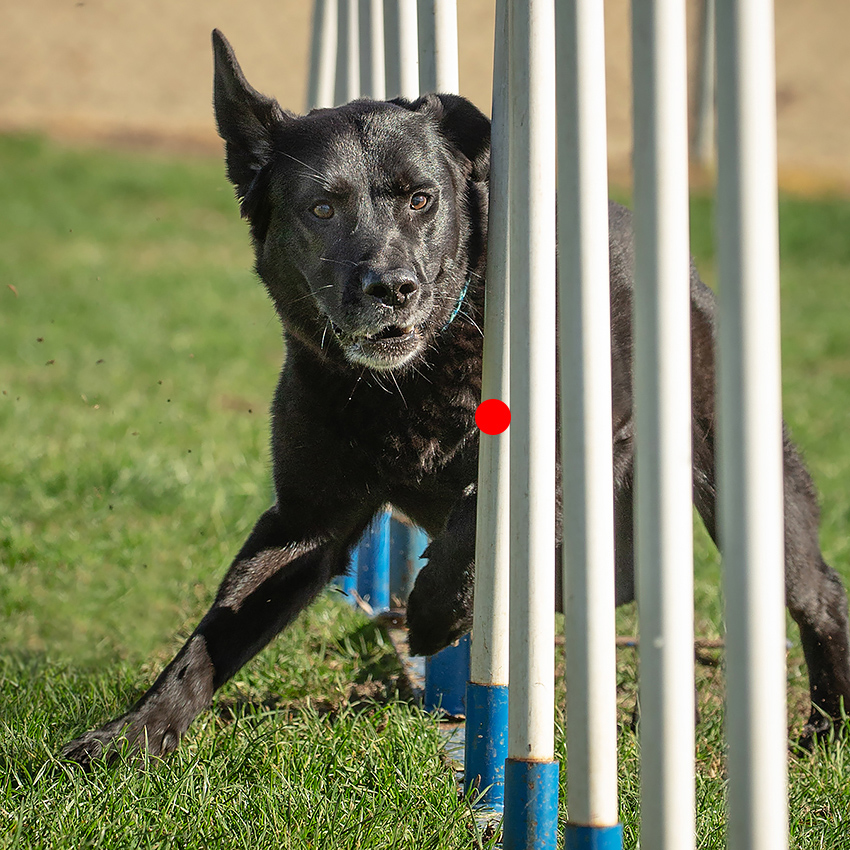
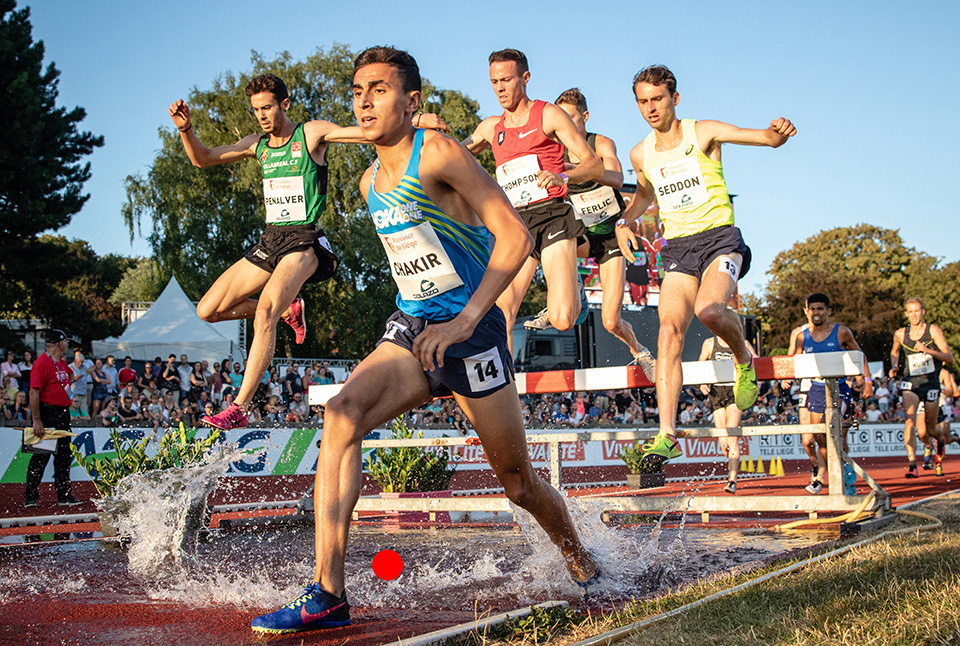
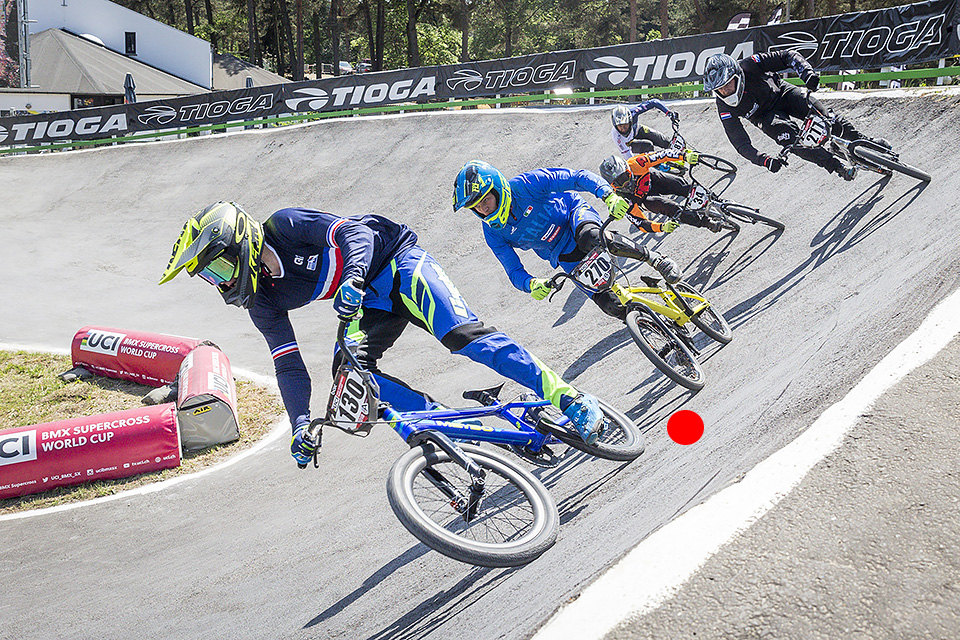
You can actually use zone focus at any time, but it is especially useful when your moving subject follows a known route or when your autofocus is too slow to focus. Think of fast sports or running dogs.
If your 'subject' also has little contrast, such as an even colour without detail, AF may sometimes struggle and zone focus is a possible alternative.
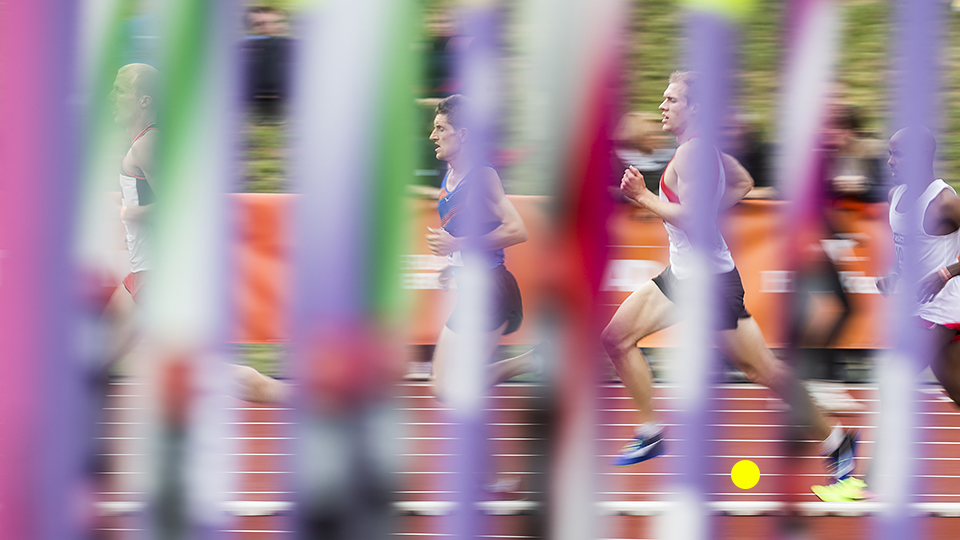
You can also use zone focus when your subject suddenly appears in the frame and you have no time at all to focus, but you do know where your subject will pass. Or when there are obstacles between you and your subject and you know where your subject will pass.
Here are some examples of these situations.
Important: Make sure you stay in the same place after focusing in advance on a specific point. If you do not, you will change the distance between you and your subject, which may put it outside the depth-of-field area and mean it will not be sharp.

How do you use zone focus
- Stand in a place where you get a good composition in your photo;
- Set your aperture value. With moving subjects, make sure your shutter speed is fast enough to freeze the action;
- Focus on the desired focus point. You can do this with your autofocus, but make sure you switch it off afterwards. People who use the Back Button Focus method do not need to do this. Their AF is already disconnected from the shutter button;
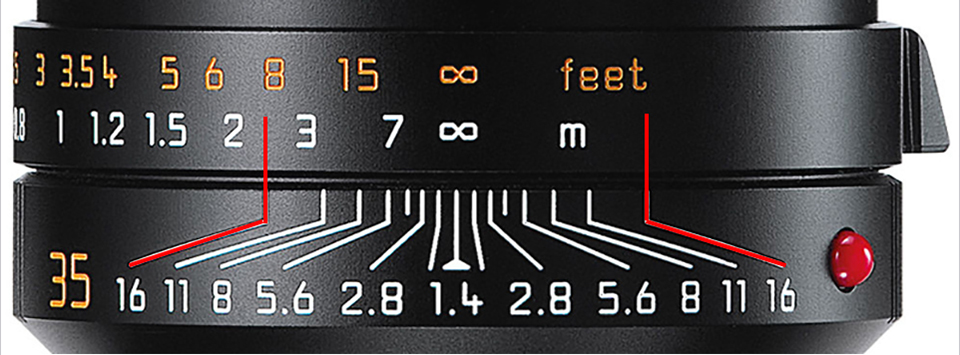
Another method is to set the hyperfocal distance manually on your lens. Your lens must have a distance scale for this; - Take your photos when your subject passes your focus point or is within the depth-of-field area;
- Check your photos for sharpness and composition and adjust your focus point or camera settings if necessary.
I always explain zone focus to my students during a street or sports photography workshop. They are often surprised by how simple and reliable this method can be.
Give it a try in practice and let me know what you thought of it and whether it is useful to you.
Good luck and have fun taking great, in-focus photos.
About the author
Huub Keulers is een enthousiasmerende veelzijdige freelance fotograaf woonachtig in Elsloo (Li). Hij is gespecialiseerd in sport-, bedrijfs-, straat-, honden en portretfotografie. Daarnaast is Huub auteur van diverse educatieve fotografieboeken en verzorgt hij allerlei fotoworkshops, masterclasses en lezingen.
You might also like
-
 3 Autofocus modes, when do you use them?
by Michelle Peeters
-
 Changing autofocus behaviour in a Canon camera
by Nando Harmsen
-
 Eye autofocus is a joy for portrait photographers
by Elja Trum
-
 Zone focus, another way of focusing
by Michelle Peeters
-
 Better autofocus with a wide aperture
by Nando Harmsen
-
 Street photography tip: Use zone focusing
by Michiel Heijmans
4 comments
-
 Hugo VdV wrote on Saturday 27 October 2018 at 19:28 | reply
An addition to "rule 1":
Translated from Dutch.
That of course only applies when the distance between camera and subject is the same.
At the same magnification, the depth of field is the same, regardless of the focal length of the lens. -
 jkopprno1970@hotmail.com wrote on Saturday 27 October 2018 at 23:40 | reply
An article to keep, Huub. Thanks for it! Ever since the course I took with you, I’ve been using the BBF. Still to my complete satisfaction. And that despite the fact that I generally don’t photograph moving subjects. Your (and Marcel’s) book on Sports Photography is still on my list too! I still don’t have the time to study it just yet. Thanks again!
Translated from Dutch. -

 Huub Keulers
wrote on Sunday 28 October 2018 at 11:44
| reply
Dear Hugo, you're absolutely right about law 1. Good addition. Thanks for your comment.
Translated from Dutch. -
Huub Keulers
wrote on Sunday 28 October 2018 at 11:47
| reply
Hi Jacqueline, you're very welcome and thank you for the lovely compliment. Your photos of non-moving subjects are also a pleasure to look at.
Translated from Dutch.
Have your say
Please note: Articles older than a week can only be commented on by signed-in visitors.Would you still like to comment? sign in or create a free account.
Become a better photographer every week
A practical photography tip in your inbox every week.
38,886 photography enthusiasts already receive the tips! More about the weekly mail. Or keep up to date via  Facebook.

Elja Trum
Photofacts; everything to do with photography!
Would you like to take better photos and keep up with what is happening in photography? Photofacts publishes articles that teach you something about photography — from a product announcement to a practical shooting tip or a look at a website. Photofacts covers photography every day and is a hobby project of Elja Trum's that got out of hand. The articles are written by a team of volunteer authors. If you would enjoy writing one or more articles for Photofacts, do get in touch.More about PhotofactsPhotofacts is made possible in part by
