

Workflow: Bringing Order to the Chaos
Wednesday 12 December 2018, 14:21 by Michelle Peeters | 10,627 views | 4 commentsThis article was translated from Dutch with the help of AI. Read the original.
Many articles have already been written about editing your photos. But what happens next? How do you bring order to the chaos of all the photos you have taken, how do you deliver your photos to your client and in what format? And what if your client wants a printed version, how do you handle that?
In this article, I describe my own workflow. Note: there are other, and perhaps better, ways of doing this. So do share your method in the comments!
Copying RAW files to your computer
You may already be photographing in RAW format, but if you are not, now may be a good time to switch.
When you photograph in JPEG, you lose a lot of image information that your camera did capture. You can often use this information during post-processing to perfect an image.
A fixed folder structure
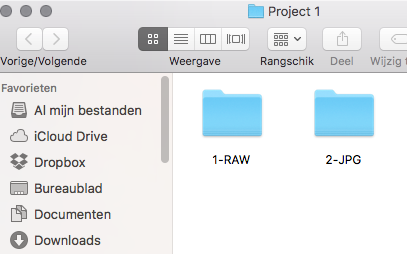
It is useful to use a fixed folder structure in which you save the unedited RAW files and the edited JPEGs in two separate folders. You can then place these separate folders inside another, newly created folder.
You could give this folder the name of the client you photographed for, for example. You can then place all client/project folders in the Projects folder, for example.
Importing the RAW files into the Lightroom library
After copying your RAW files to a fixed folder, you can import them into Lightroom. Make sure that 'Add' is selected, so that it does not also physically copy the files again. They only need to be added to the latest library.
Selecting the best images from your session
This is very easy to do in a programme such as Lightroom. In the Library module, you can quickly separate the good photos from the less good ones. For example, you can go through your photos at a large size while using a simple keyboard shortcut to accept or reject a photo.
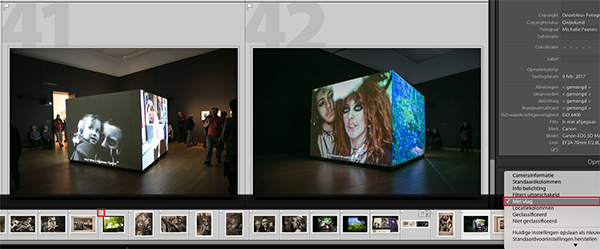
You can also leave a photo unrated, so you can work at three levels. You reject the really bad ones, such as out-of-focus or blurred photos, and can later remove them from your computer with one simple action.
Be strict when selecting
Be particularly strict when selecting photos. Try to keep only around 100 out of your 600 photos. You can then give these a minimal edit, after which you can properly work on the ten to twenty best photos with special editing.
You can then perhaps choose one or two of these ten photos to include in your portfolio.
Carrying out standard and extensive edits
A programme such as Lightroom is not always enough for what you want to do as a photographer. Many standard edits, such as adjusting the overall exposure, white balance, levels, cropping and so on, can be done quite well in Lightroom. They can also be applied automatically to a series of photos with, for example, the same exposure.
If you want to make selective adjustments, work with layers or perform more complex edits, it is easier to switch to Photoshop.
These days, Lightroom and Photoshop are almost integrated, and you can easily switch between the two programmes while editing a photo before saving it.

Exporting the photos in the right format
For a print, you basically want to use the highest possible quality, but for a photo on the web you do not need to use the full resolution.
Photos are usually viewed at a low resolution anyway. With a programme such as Lightroom, you can create different presets for exporting your photos.
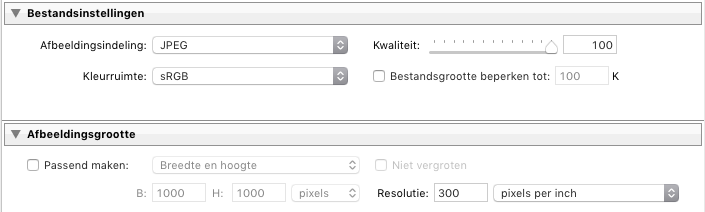
You think once about the ideal format for the medium you want to use the photo for and save these settings as a preset. You should never deliver your files to the client as RAW files, but in a print-ready format instead. Use the highest possible quality, as you can always make it smaller later.
This is usually JPG or PNG format. sRGB is safer than AdobeRGB with most printing equipment. This way, you can be sure that the colours are correct when you have your photos printed by a print centre.
Backing up the edited photos
Most photographers have come up with a particular method for this. For example, you can save the photos in two locations immediately after a photo shoot, the hard drive in your computer and another medium such as an external hard drive.
That procedure sometimes gets overlooked. The bottleneck is that manual work often falls by the wayside in practice. Fortunately, there are automated options too.
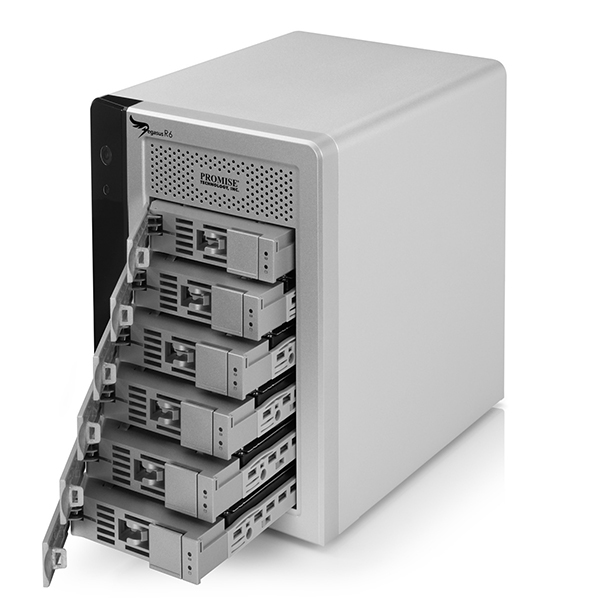
I use a fairly simple and effective method with an external disk with 'RAID' functionality. This allows you to link two, three or more hard drives together. If one hard drive fails, the data is still on the others.
With two hard drives, you have a mirror, where the second is simply a copy of the first. With three or more drives, a clever setup called RAID5 is used, in which data is written to all three drives.
If one drive fails, the other two contain enough data to reconstruct the missing drive. The great thing is that this process happens entirely automatically, without you having to do anything.
How do you send the photos to your client and what should you consider?
It often happens that the client wants to receive the photos digitally, so they can decide what to do with them: print them in any desired size or on any material, or use them digitally, for example on social media.
In general, you can deliver the photo at the highest resolution. The highest resolution is the resolution of the image as it comes from the camera. So without reducing its size. But in printable JPG format, and not RAW, of course.
The disadvantage of this method is that your photo may be too large to send by email. The solution is to send the file for free using WeTransfer.com.
Using WeTransfer
WeTransfer is a free service that lets you send up to two gigabytes of files. Ideal for sending a whole lot of photos to your client at once.
They receive an email containing a link. After clicking this link, the files can be downloaded to their own computer. They will appear there in a zipped folder in the 'download' folder.
The sender receives an email as soon as the client has downloaded the files. Here is an instructional video:
How do you show the selected photos to the client?
Some photographers show the client all the photos they have taken on a computer screen immediately after the photo session. This is an option, but the disadvantage is that the client sees all the unedited photos, including the unsuccessful ones. It is also very time-consuming.
It is better to give the client a quick look at your camera screen, so they get an impression of the photos taken and can assess whether everything went satisfactorily. You can arrange a new appointment with the client and show them your selection of photos on your computer.
Another option is to sell your photos through Oypo. You can create a free account with Oypo and put your photos online on their website. You send your client a link to the relevant folder on the Oypo site, and they can view all the photos at their leisure and place an order.
Oypo takes all the work off your hands and supplies both digital files and prints in all kinds of formats and on all kinds of materials.
Think of canvas, dibond, aluminium, key rings, mugs, T-shirts and so on. When the client places an order through this site, 21 per cent goes to Oypo. You can set the prices you want to charge for the relevant photo products yourself.
What if the client wants a printed version, what are the options?
As mentioned above, Oypo can take care of this for you completely. But of course, that is not necessary. You can also handle customer orders yourself.
For this, choose a supplier with whom you have good experience in terms of print quality. Make sure that your crops always have the correct 2:3 or 3:2 ratio. This prevents parts of your image from being cut off when it is printed. With a square crop, you naturally have a 1:1 ratio.
What is your workflow?
This is how I currently work, but of course it can be adjusted whenever useful tools or other solutions become available. I am curious about your workflow. Perhaps I can get some good tips from it. Let me know in the comments!
Courses about Workflow
At Photofacts Academy, we have several courses that touch on the subject of 'workflow', including
Lightroom Workflow Tips & Tricks by Piet van den Eynde and Practical keyboard shortcuts by Elja Trum.
You can take these courses for two weeks with a free trial membership.
Dit artikel is voor het laatst bijgewerkt op 12 december 2018.
De eerste publicatiedatum is donderdag 23 februari 2017, 20:02.
About the author
Michelle Peeters is fotografe en oprichter van DeuxBleus Fotografie. Michelle herkent het bijzondere in het gewone en het gewone in het bijzondere. Ze heeft zich nooit willen specialiseren en is daardoor van alle markten thuis.
You might also like
-
 Workflow tips for Lightroom Classic in 7 steps
by Nando Harmsen
-
 Workflow for the ideal camera settings
by Michelle Peeters
-
 The pros and cons of a backup camera
by Nando Harmsen
-
 Online Backup: Backblaze versus Crashplan Pro
by Elja Trum
-
 My 10-step Lightroom Classic workflow
by Nando Harmsen

4 comments
-
 Brian wrote on Tuesday 28 February 2017 at 12:18 | reply
Hi Michelle,
Translated from Dutch.
My workflow is fairly similar, but differs in a few small respects.
I import my photos from the memory card via Lightroom and have Lightroom immediately save the photos in two different places. On the hard drive connected to my PC, so I can work with them directly, and on the network hard drive that isn't even in my house, but in my shed, so that I have a safe copy in case something should ever happen such as a technical failure, theft or fire. This way of working means that I immediately have a backup available.
I no longer define the structure. I used to do this, but nowadays I work with Lightroom's virtual folders and this allows me to keep things together more effectively. For recurring assignments from one and the same company, for example, I have everything together as I want it. By company, by type of part they sell, by the employee's name, etc. All of this simply by making smart use of the tags you search by. This is a bit of extra work when importing, but in the workflow this is a very important point for me.
When it concerns product photos (I make a lot of these) I also scan the EAN code right away. This makes it easy to place the right photo with a product in automated shop systems. This saves not only me, but also my client a great deal of time.
I always provide clients with the versions for the purpose they want to use them for. For social media they get photos with a different resolution than for print or the Internet. Smart actions in Lightroom make this very easy, which also means this action can be completed super quickly.
For a number of clients I have also arranged the storage of the files. For this I have clients' own hard drives that are kept at my place. I do this both in the house and in my shed, which is physically further away. In this case, however, they are not photo clients, but video clients. In general, they have a bit more budget to arrange backup solutions. -

 Michelle Peeters wrote on Tuesday 28 February 2017 at 12:34
| reply
Extensive story Brian, thanks for sharing! I think you have arranged a number of things more efficiently than I described in my story. You make (very well!) use of Lightroom's extensive cataloguing and management tools. So you let Lightroom take a lot of work off your hands and I think that is better than wanting to keep everything in your own hands.
Translated from Dutch.
I am also very curious about those EAN codes. How exactly do you scan them and how do you link such a code to the corresponding photo file?
I assume that you keep your files (including your RAWs), even after delivering photos (in the resolution they requested) to the client? In case they ever want to do something else with the files than just use them for the internet?
A nice extra backup service that you can provide this way! Is there still much demand for that with all the cloud storage options available nowadays? -
 LoekVoesten wrote on Tuesday 29 August 2017 at 14:17
| reply
Hello Michelle,
Translated from Dutch.
Under the heading "Backing up the edited photos"
I can't find whether and, if so, where you save the edited photos. I don't save them since I can always quickly reproduce them through a selection in Lightroom and, if necessary, write them out (temporarily). If you do save them, what is your rationale for doing so?
Best regards
Loek -
Michelle Peeters wrote on Tuesday 29 August 2017 at 14:29
| reply
@Loek: I always take my photos in RAW, I save the edited end result as a JPG. First on my hard drive, then on my disk system (NAS - Network Attached Storage). If you want to do something with your photos (for example, print them), then JPG is a great format for that. You can't do much else with a RAW file.
Translated from Dutch.
Have your say
Please note: Articles older than a week can only be commented on by signed-in visitors.Would you still like to comment? sign in or create a free account.
Become a better photographer every week
A practical photography tip in your inbox every week.
38,764 photography enthusiasts already receive the tips! More about the weekly mail. Or keep up to date via  Facebook.

Elja Trum
Photofacts; everything to do with photography!
Would you like to take better photos and keep up with what is happening in photography? Photofacts publishes articles that teach you something about photography — from a product announcement to a practical shooting tip or a look at a website. Photofacts covers photography every day and is a hobby project of Elja Trum's that got out of hand. The articles are written by a team of volunteer authors. If you would enjoy writing one or more articles for Photofacts, do get in touch.More about PhotofactsPhotofacts is made possible in part by
