

Lightroom Classic tip: Create smart presets
Sunday 4 January 2026, 20:10 by Elja Trum | 2,432 views | 1 commentThis article was translated from Dutch with the help of AI. Read the original.
Last year, Lightroom Classic gained lots of useful automatic masks. These can speed up your workflow considerably. Combine automatic masks with presets to edit your photos in no time.
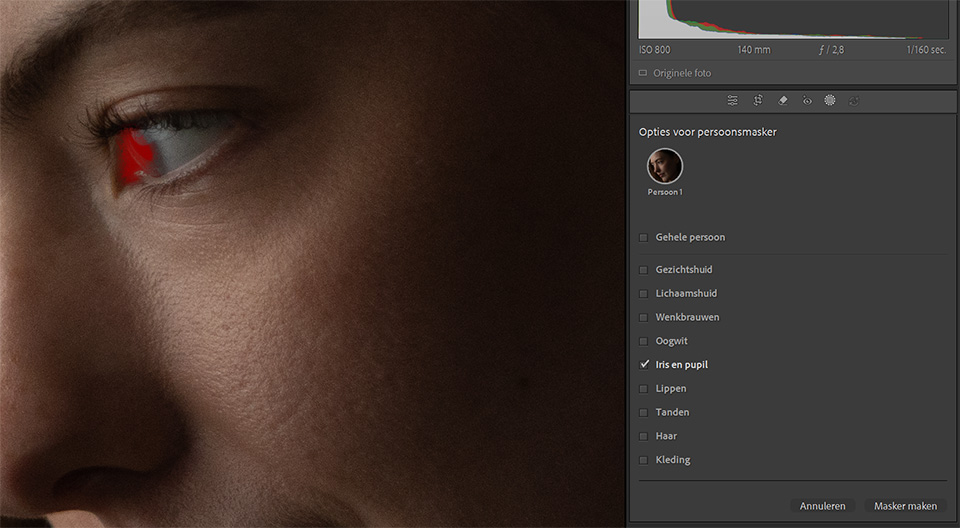
With a smart mask, you can automatically select the pupils in a portrait, for example, to sharpen them slightly. Or the background to make it a little darker. Or soften the skin.
Because Lightroom makes the selection for you, it saves you a lot of time. With just a few clicks, you can quickly create several useful selections in your photo.
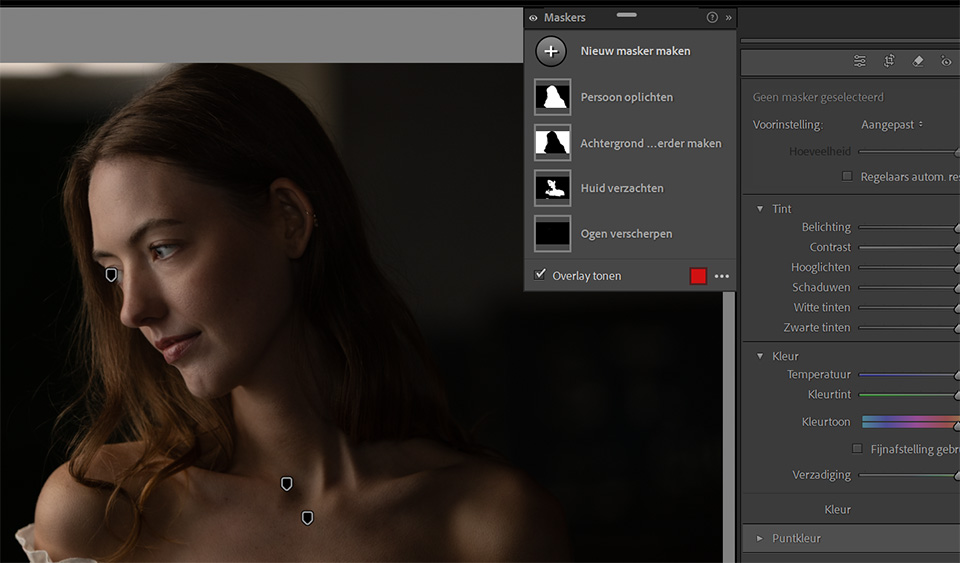
With an average portrait photo, I often quickly create around five different smart masks, each making a small improvement to the portrait. That is reasonably quick, but you have to do it again for every photo.
There is, however, a useful way to create these masks even faster. Take a portrait, or a landscape, which works just as well as an example, and create as many smart masks as you often use in your photo editing.
Give each smart mask a clear name. That way, you can immediately see exactly what each mask does.
Also apply other edits that you often use to your photo. For example, add a vignette or bring down the highlights slightly.
Have you applied all the smart masks and standard edits you could think of? If necessary, with only minimal adjustments. Then the next step is to create a preset from this photo.
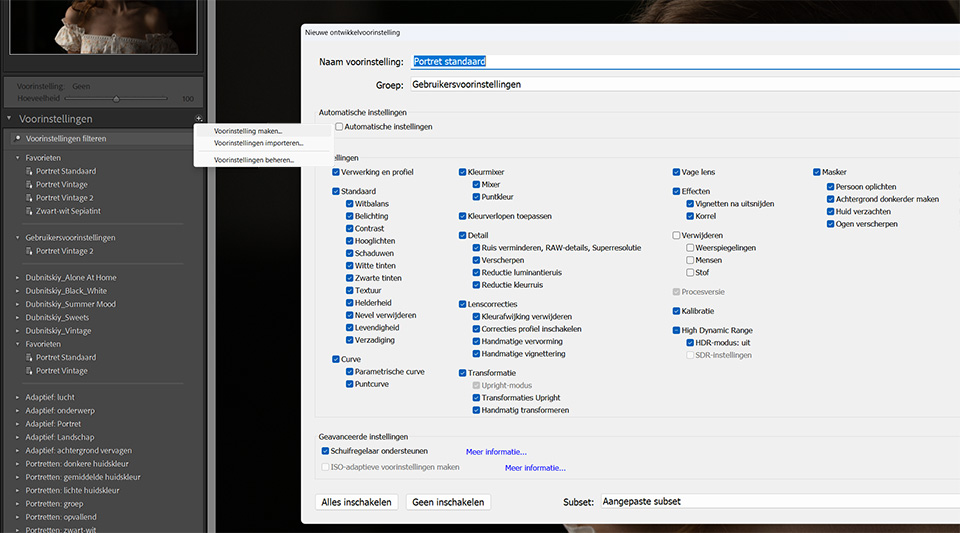
Tick all the settings you have adjusted. Above all, do not forget to include the masks in your selection. Give the preset a clear name, such as 'Portrait standard'.
Whenever you edit a portrait photo, you can start with this preset. It applies your basic corrections, but also immediately creates all the smart masks with the settings you chose.
It is easy to adjust an existing mask. In any case, it saves you the time of creating all those separate smart masks.
A useful way to save a lot of time when editing your photos.
About the author
Elja Trum is the founder of Photofacts and online photography course website Photofacts Academy. He has been writing about photography since 2006. Elja is also the author of (Dutch) books on composition, black-and-white photography, flash photography and portrait photography.
You might also like
-
 A critical note on the new landscape masks in Lightroom
by Nando Harmsen
-
 Presets in Lightroom Classic
by Nando Harmsen
-
 Adobe updates Lightroom (Classic) with new AI masks
by Elja Trum
-
 How do you get started with Lightroom Classic?
by Nando Harmsen
-
 New update for Lightroom Classic enables AI noise reduction
by Nando Harmsen
1 comment
-
 Donald Willemsen wrote on Tuesday 6 January 2026 at 14:46 | reply
I do wonder about something. If you make presets from edits and masks of a particular (portrait) photo, then you can't apply those masks one-to-one to another (portrait) photo, can you? Because every photo has a different composition, right? The masks relate to certain parts of a photo. The same goes for landscapes. If you use a mask to brighten a dark area, for example, that dark area may be in a different place in another photo. Aren't you then constantly adjusting the mask (but not what the mask does)?
Translated from Dutch.
I should add that I have never worked with presets, because I edit every photo separately.
Have your say
Please note: Articles older than a week can only be commented on by signed-in visitors.Would you still like to comment? sign in or create a free account.
Become a better photographer every week
A practical photography tip in your inbox every week.
39,079 photography enthusiasts already receive the tips! More about the weekly mail. Or keep up to date via  Facebook.

Elja Trum
Photofacts; everything to do with photography!
Would you like to take better photos and keep up with what is happening in photography? Photofacts publishes articles that teach you something about photography — from a product announcement to a practical shooting tip or a look at a website. Photofacts covers photography every day and is a hobby project of Elja Trum's that got out of hand. The articles are written by a team of volunteer authors. If you would enjoy writing one or more articles for Photofacts, do get in touch.More about PhotofactsPhotofacts is made possible in part by
