

Landscape photography tip: exposure to the right
Thursday 18 February 2021, 16:32 by Nando Harmsen | 5,586 views | 6 commentsThis article was translated from Dutch with the help of AI. Read the original.
Large differences in contrast are not unusual in landscape photography. This can mean that parts of a photo are too light or too dark. By using exposure to the right, you set the exposure as optimally as possible.
A camera can capture more differences between light and dark than you can see on the back of your camera after taking the photo. After all, that is a jpeg image and its associated histogram, even if you shoot in raw.
Much of that image information is, as it were, hidden in the dark areas of the histogram. This does not apply to a jpeg image because it does not contain any more stored information, but it more or less does apply to a raw image.
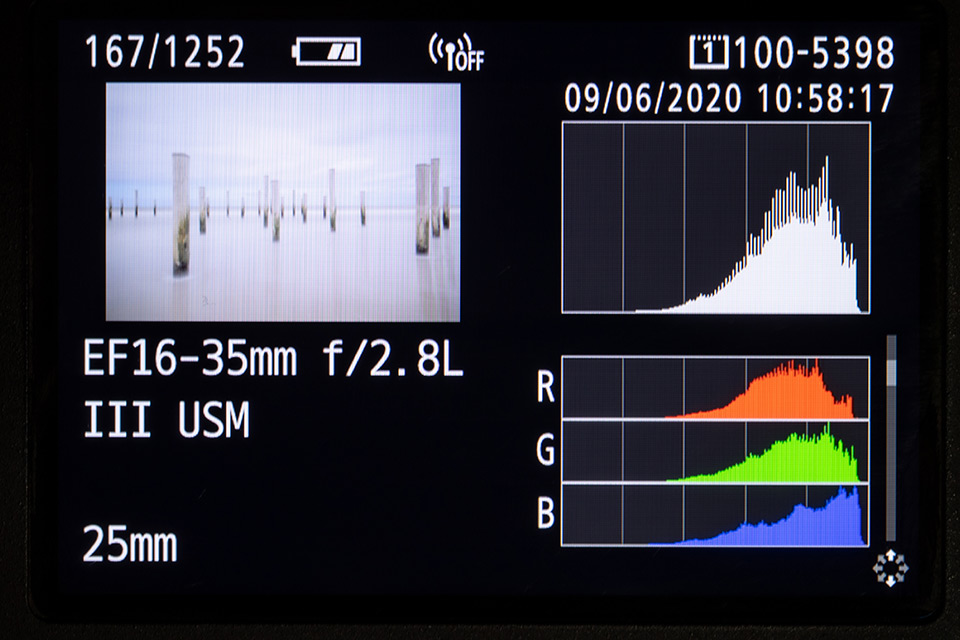
By lifting the shadows in that raw image, you can make that hidden information visible. Unfortunately, the consequence is that the quality of the image in those lightened dark areas deteriorates to some extent.
To capture as much image information as possible in those dark areas, it is best to expose the photo as brightly as possible. In other words, you should try to get the histogram as far to the right as possible.
But be careful not to let the pixels turn white. White means an oversaturated pixel, and it contains no information at all. In other words, you cannot correct blown highlights.
Set the exposure so that the photo is as light as possible without creating blown highlights. This means you lift the shadows while taking the photo, preserving the maximum amount of image information and quality in the dark areas of the photo.
This is called Exposure to the Right, abbreviated to ETTR. In Dutch, this is called exposing to the right.
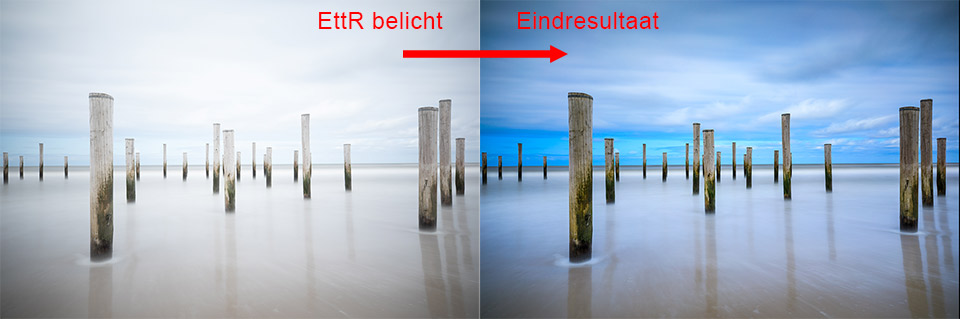
Bear in mind that you will then have to edit the photo to achieve a good final result. Don't like editing, or do you prefer to shoot directly in jpeg? Then Exposure to the Right is not suitable for you.
The Landscape Bible, with 101 tips for magnificent landscape photos
This tip is part of the book De Landschapsbijbel, in which I give 101 tips for magnificent landscape photos. The book, full of beautiful photos, gives you all the information you need to start creating your own fantastic landscape photos.
Don't have De Landschapsbijbel yet? Order it via the order page and buy the book separately, or at an attractive discount in combination with a Photofacts Academy membership.
About the author
Nando Harmsen has been photographing for more than 40 years. He specialises in wedding photography and landscape photography. Nando also gives talks, workshops, masterclasses and photo trips, and regularly reviews new and interesting equipment.
You might also like
-
 Editing an EttR photo in Lightroom Classic
by Nando Harmsen
-
 Landscape photography tip: add contrast to your photo
by Nando Harmsen
-
 Prefer High Contrast in Your Nature Photos
by Nando Harmsen
-
 Playing with black and white contrast in Lightroom Classic
by Nando Harmsen
-
 Unusual photos with unique Photoshop edits
by Elja Trum
6 comments
-

 martinphili wrote on Sunday 21 February 2021 at 08:23
| reply
martinphili wrote on Sunday 21 February 2021 at 08:23
| reply
I've been exposing to the right for years, and I like it a lot. What I still notice, though, is that you sometimes qualify photos as inferior because of the flatness that simply comes with a RAW or NEF file. Exposing to the right makes that even more pronounced. Only after some adjusting and tweaking of exposure, contrast and saturation do the nice photos emerge.
Translated from Dutch. -
 Nando
wrote on Tuesday 23 February 2021 at 11:25
| reply
Nando
wrote on Tuesday 23 February 2021 at 11:25
| reply
@martinphili:
Translated from Dutch.
That could indeed be mentioned as a disadvantage, I think. That unattractive image on your camera screen.
You could possibly apply a picture style to that image by setting contrast and saturation to maximum. This does not affect your raw image, but it can provide a more attractive preview on your camera. -
 Francis wrote on Tuesday 23 February 2021 at 12:06 | reply
I would actually like to see the difference between this (ETTR) and exposing "correctly". Because to present the photo you shift the entire image back "to the left" because it was too bright; so why not put it directly in the "right place"?
Translated from Dutch. -
-
martinphili wrote on Tuesday 23 February 2021 at 19:57
| reply
The JPGs on the camera screen do look a bit better, that's right. You could also shoot both RAW and JPG and then make your selection from the JPGs, I realize now.
Translated from Dutch. -
 primefoto.nl wrote on Thursday 25 February 2021 at 12:29
| reply
primefoto.nl wrote on Thursday 25 February 2021 at 12:29
| reply
The LCD screen is merely a guide for the composition. It always has been because the image is based on the JPG preview, which in turn depends on the reflective light meter in your camera that averages the measured values, then turns that into 18% middle gray, and slathers the in-camera settings for JPG over it, and not on the RAW file and not based on the light itself. Francis, the difference is that with ETTR you just don't clip and with an 18% middle gray metering you can still clip both upwards and downwards. You then don't get the maximum out of it that you do with ETTR. By shooting ETTR you get a better SNR (Signal to Noise Ratio). A better SNR results in fewer disturbances such as noise. In addition, you have more sensor saturation, which gives you better colors and also more data to post-process. So it gives you more room to work with and the quality of the image is the maximum achievable. Most of the data in your image is in the right half of your histogram. Well, 2x more than in the left half. Actually, for the best image quality you should only shoot ETTR because that way you can get the best out of your digital camera. If you use a 1-degree external spot meter, shooting ETTR is very simple and very precise to do. At least that is my experience.
Translated from Dutch.
Have your say
Please note: Articles older than a week can only be commented on by signed-in visitors.Would you still like to comment? sign in or create a free account.
Become a better photographer every week
A practical photography tip in your inbox every week.
39,077 photography enthusiasts already receive the tips! More about the weekly mail. Or keep up to date via  Facebook.

Elja Trum
Photofacts; everything to do with photography!
Would you like to take better photos and keep up with what is happening in photography? Photofacts publishes articles that teach you something about photography — from a product announcement to a practical shooting tip or a look at a website. Photofacts covers photography every day and is a hobby project of Elja Trum's that got out of hand. The articles are written by a team of volunteer authors. If you would enjoy writing one or more articles for Photofacts, do get in touch.More about PhotofactsPhotofacts is made possible in part by
