
Boosting a Single Colour in Photoshop
Saturday 22 June 2019, 13:31 by Michelle Peeters | 7,598 views | 2 commentsThis article was translated from Dutch with the help of AI. Read the original.
If you want to boost just one colour in a photo rather than the overall colour, it is best to do this in Camera Raw. Assuming you shot in Raw, of course... Click the HSL adjustment icon below the histogram, the fourth from the left.
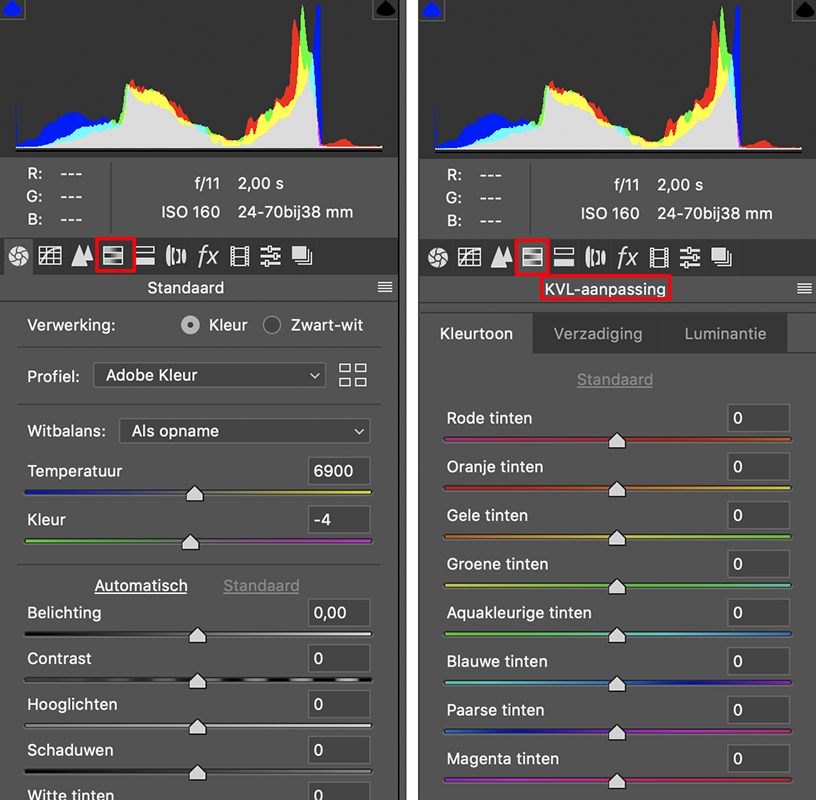
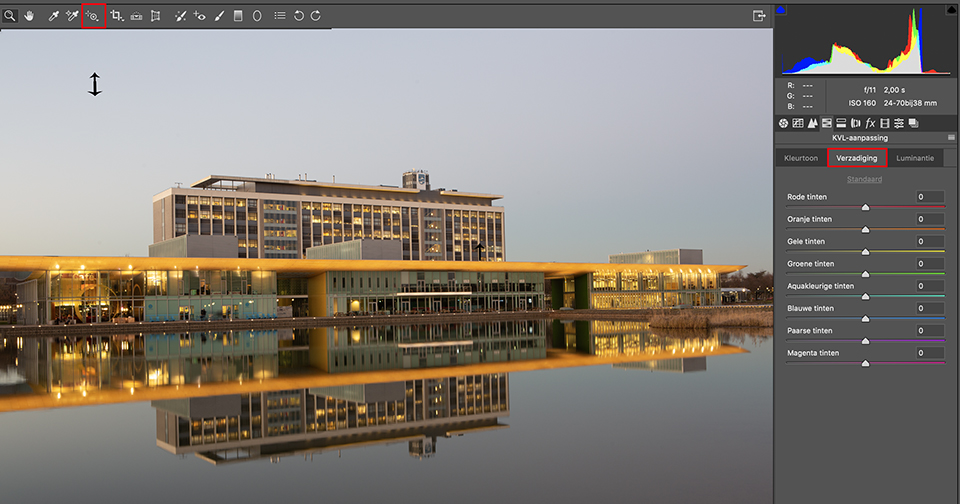
When the panel appears, click the Saturation tab. HSL stands for Hue, Saturation and Luminance. Then go to the toolbar at the top of the window, where you will find a tool whose icon looks like a small target with a plus sign (+) in the top-left corner, the fifth from the left.
This is the adjustment tool in question. Click it to activate it, then place it over the area in the image containing an individual colour that you want to boost, or make less saturated, such as a blue sky, green grass or someone wearing a yellow shirt.
Click and drag upwards to increase the amount of that colour, along with related colours. The sky may consist not only of blue, but also aqua tones. The tool knows this, so it will automatically move both sliders for you as you drag.
Click and drag downwards to reduce the vibrancy of that colour. To change the brightness of the colours, click the Luminance tab. Click and drag the adjustment tool downwards and the colour will become deeper and richer.
If you actually want to change the colour, for example, if you want the yellow shirt to become green, first click the Hue tab at the top. Then click and drag the adjustment tool up or down until the colour changes to the one you have in mind.
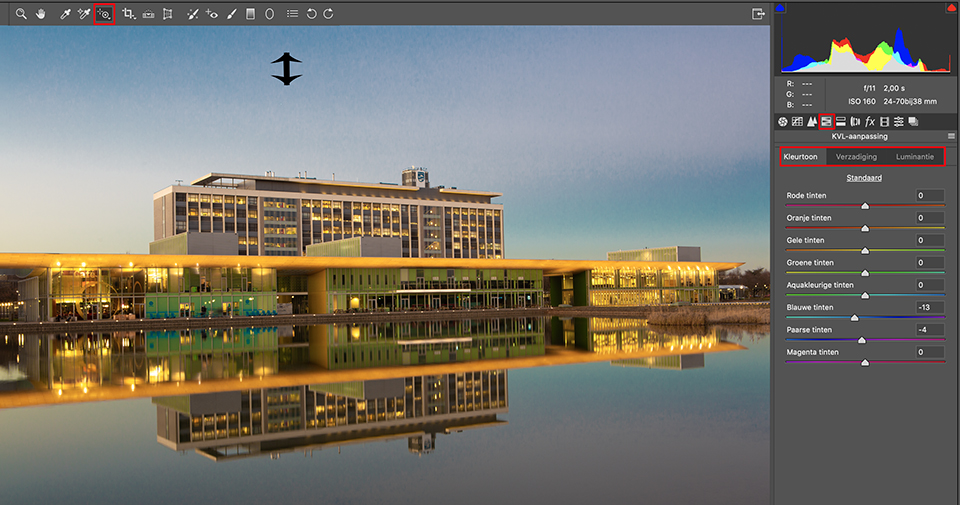
Note: this does not just change that one colour in that one area. It changes all similar colours in the image. So if the image contains a blue sky and the subject is wearing a blue shirt, remember that both the sky and the shirt will change when you adjust either one.
Want to learn more about editing photos in Photoshop?
At Photofacts Academy, our online learning environment for photographers, we have several courses on Adobe Photoshop.
- Photoshop for Beginners (Johan Elzenga)
- Photoshop for Photographers (Piet van den Eynde)
- Advanced Photoshop (Marit Hilarius)
- Photoshop Effects (Elja Trum)
And much more...
You can follow these courses for two weeks with a free trial membership.
About the author
Michelle Peeters is fotografe en oprichter van DeuxBleus Fotografie. Michelle herkent het bijzondere in het gewone en het gewone in het bijzondere. Ze heeft zich nooit willen specialiseren en is daardoor van alle markten thuis.
You might also like
-
 30 techniques for using colour in your photos
by Michelle Peeters
-
 Is there a quality difference between raw and compressed raw?
by Nando Harmsen
-
 Everyone photographs in raw, there are no exceptions
by Nando Harmsen
-
 ON1 Photo RAW 2019.5 launched. Lightroom rival?
by Michelle Peeters
-
 Is there a reason to save both raw and jpeg?
by Nando Harmsen
-
 17 ON1 Photo RAW tips
by Michelle Peeters
2 comments
-
 guest wrote on Monday 24 June 2019 at 14:26 | reply
Works with JPEGs in Photoshop too. Use the Camera Raw Filter for this under Filters.
Translated from Dutch. -

 Michelle Peeters wrote on Monday 24 June 2019 at 14:35
| reply
@Guest: ok good tip, thanks! Never used it before, this filter...
Translated from Dutch.
Have your say
Please note: Articles older than a week can only be commented on by signed-in visitors.Would you still like to comment? sign in or create a free account.
Become a better photographer every week
A practical photography tip in your inbox every week.
38,901 photography enthusiasts already receive the tips! More about the weekly mail. Or keep up to date via  Facebook.

Elja Trum
Photofacts; everything to do with photography!
Would you like to take better photos and keep up with what is happening in photography? Photofacts publishes articles that teach you something about photography — from a product announcement to a practical shooting tip or a look at a website. Photofacts covers photography every day and is a hobby project of Elja Trum's that got out of hand. The articles are written by a team of volunteer authors. If you would enjoy writing one or more articles for Photofacts, do get in touch.More about PhotofactsPhotofacts is made possible in part by
