

Create your own modern Vermeer photo portrait in 9 steps
Wednesday 12 December 2018, 13:41 by Michelle Peeters | 43,665 views | 25 commentsThis article was translated from Dutch with the help of AI. Read the original.
Taking a quick photo of yourself for social media is something we all do these days. We share our best portraits with family and friends.
In the 17th century, this was not an option for everyone. Those who could afford it had their family portraits painted by great masters such as Rembrandt, Vermeer and Frans Hals.
And be honest, who isn't impressed by the beautiful use of light, often with simple light from a window at the side, in the portraits by the great masters of the Golden Age at the Rijksmuseum?
This way of photographing with Rembrandt-style or atmospheric light, also known as pictorialism, has now become a trend. Photography literally means writing with light.
Light was also very important in the work of the artists of the Golden Age. In their paintings, they used small highlights to give precise expression to the different models they depicted.
The lighting is very flattering, because it makes the face look slimmer and gives the cheekbones more definition. A portrait that might otherwise have been rather ordinary becomes more atmospheric and intriguing as a result.
Kerstens, Banning, Olaf, van Meene
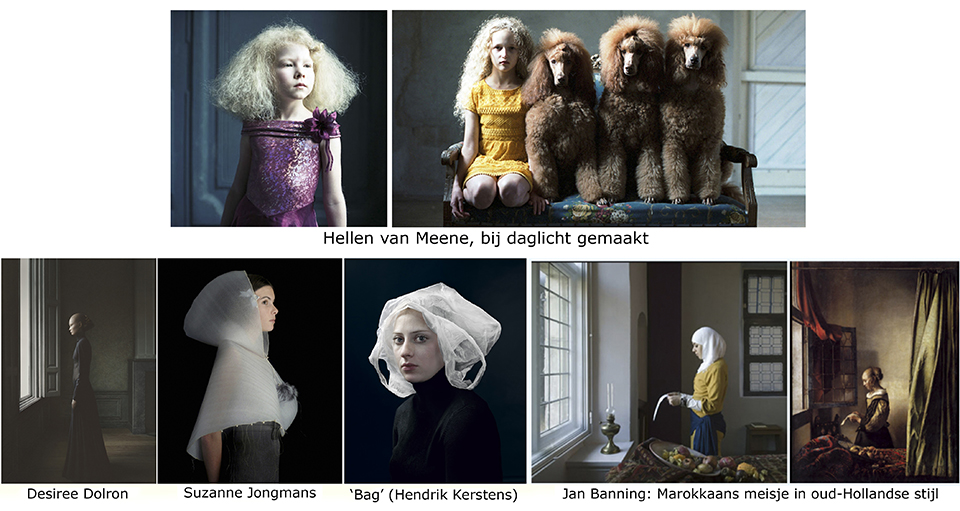
Good sources of inspiration may be the photos by Hendrik Kerstens. His work is often associated with the paintings of Johannes Vermeer.
Photographer Jan Banning also sometimes uses the style of the Dutch masters, including in his photo of a girl wearing a headscarf. And Erwin Olaf did the same for fashion brand The People of the Labyrinths.
The young women photographed by Hellen van Meene have a similar look. Van Meene says this effect occurs naturally because she does not work in a studio and only uses daylight.
Photographer Suzanne Jongmans made portraits of a young girl wearing a white cloak. She made the cloak from foam rubber and gold wire and made a fortune selling her photos.
In this famous photo by Kerstens, called 'Bag', his model appears to be wearing an old Dutch cap. He actually made it from a plastic bag…
How?
But how do you create such a painterly portrait with beautiful contrast and dynamism? The beauty of Rembrandt's use of light lies in its simplicity. In photography, lighting is usually aimed at illuminating the subject as much as possible.
With this technique, one side of the face is subtly left unlit, with a small triangle of light on the cheek, characteristic of Rembrandt.
The basis is a single soft light source: a softbox or umbrella. A round umbrella gives a more natural catchlight in the eyes and is also easier to carry.
Place the light approximately 45 degrees to the left or right of the model. This creates a difference in tone between the left and right sides of the face.
Make sure the light also shines on the 'second' eye, the eye furthest from the light source. Otherwise, you get so-called side lighting, which is not what you want in this case.
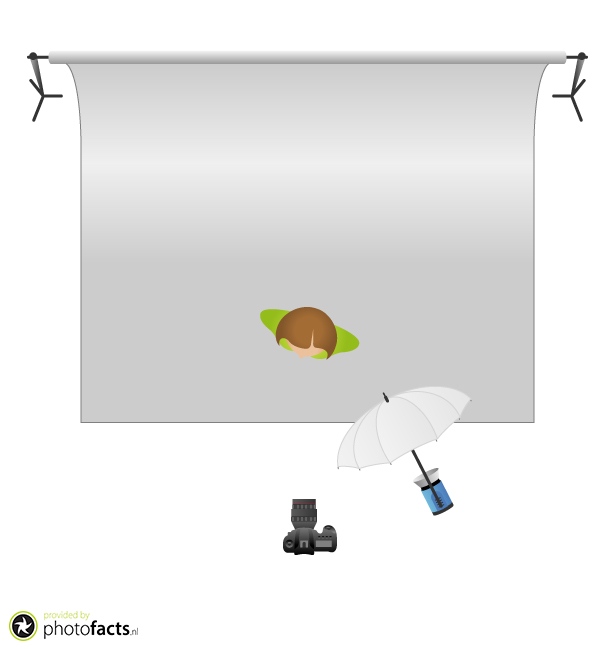
Studio setup for Rembrandt lighting
Natural light
Do you have a studio space with a window? You can use it as a source of natural light for your photos. On a cloudy day, the light is also beautifully diffused, making it a free softbox.
Studio flash
If you have a studio flash, you can adjust the light entirely to your own liking! The flash from a studio flash unit can be extremely powerful. It freezes your model's movement thanks to its short duration.
Depending on the power of your flash, it produces so much light that you can shoot your portrait at f/16 even at the lowest ISO settings.
Just a single light source!
Just start with one lamp. As soon as you add two lamps to your setup, they change each other's illumination and sometimes each other's shadows. With just one lamp, you can see directly what your light modifier does to your flash head and what effect it has on your model. With just one light source, you can play beautifully with the contrast between light and dark.
Make sure your light source is not too bright. If you use natural light, you can place a thin, white cloth in front of the window to make shadows lighter and less noticeable.
By using only a small amount of fill light, you can play nicely with light and dark. Rembrandt lighting, which accentuates wrinkles and crow's feet, is typical men's lighting. Women generally do not like it as much.
Light modifier, softbox or umbrella
The light modifier determines the character of the light. With a huge softbox, you create very soft light, with a completely different character from the harsh light of a snoot with a built-in grid.
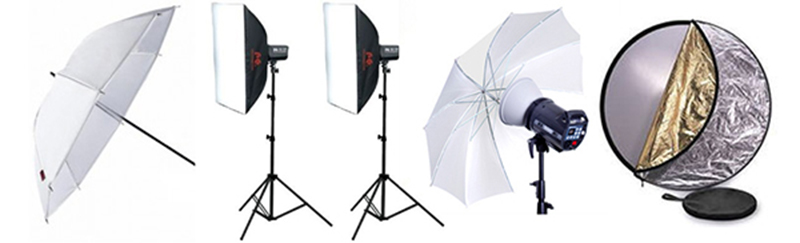
With a softbox, the light wraps beautifully around your subject. It does not produce high contrast, so you are less likely to see blocked-up shadows or blown highlights in your histogram. It is very forgiving light.
By placing the lamp at a 45-degree angle, you create attractive shadows on the face, giving the model more depth.
Also place your lamp high up, at a 45-degree angle from above. The light then falls nicely on your model, as if the sun were casting a natural, soft shadow across the face.
If you use a large window as your light source, it can be useful to block the light coming in below eye level. By lifting the shadow side of the model just a little with a reflector, which can also be a piece of white polystyrene, you prevent that side from becoming pitch black while retaining a beautiful dark area of shadow.
Black background and clothing
By choosing black for the background and the model's clothing, all attention is drawn to the face. If you place the black background roll far enough from the softbox that no light falls on it, it remains beautifully deep black.
Communication
Keep talking to your model so that it is clear what you have in mind. Keep talking and clearly explain what you would like to see. Make sure your model has a classic look and an intense gaze.
All attention should go to the eyes. The model's presence should be strong, without distracting backgrounds and with light that looks as natural as possible. Create an intense portrait, with the model looking into the lens, or a dreamy, absent atmosphere by having the model look 'empty' and not into the lens
Get started!
Do you feel like trying it yourself? Follow the explanation below step by step. I cannot guarantee that you will become as successful as Rembrandt, but your portrait photos will look fantastic!
- Look at 17th-century portraits, such as paintings by Vermeer or Rembrandt, or take inspiration from the photos of Hendrik Kerstens and Hellen van Meene
- Find a suitable model and explain what is expected of her/him
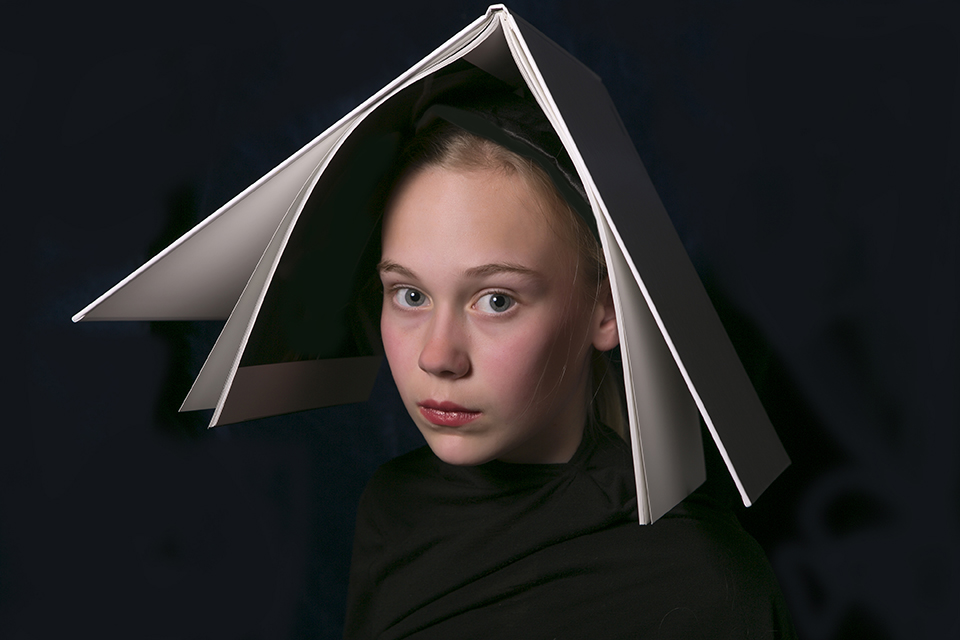
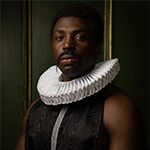
- Find objects you can use for styling. You can use anything, for example: plastic bags, tea towels, toilet rolls, a colander, scarves, flexible aluminium tubing to make a so-called 'millstone collar', bubble wrap, cake boards, black clothing, etc.
- Choose a dark or black background and dark clothing
- Use just one soft light source, a softbox or umbrella, as your starting point to create the chiaroscuro effect, strong light and dark, or use natural light coming through a window.
- Place the light 45 degrees to the left or right of the model. There should be a visible difference in tone between the left and right sides of the face. Have your model turn slightly away from the light until the shadow from the nose creates the familiar triangle of light on the cheek. Experiment as much as you like until you find the most flattering angle.
- Make sure the light also falls on the eye furthest from the light source. Otherwise, you get side lighting
- This so-called Rembrandt lighting accentuates wrinkles, which is why it is called 'men's lighting'. It is less flattering for women, so bear that in mind!
- Use fill light if necessary to lift the shadow side. This reduces the visibility of wrinkles, spots, etc. Or use a reflector to reduce the contrast. If you do, keep it very subtle, otherwise the chiaroscuro effect disappears. It is flattering, at least!
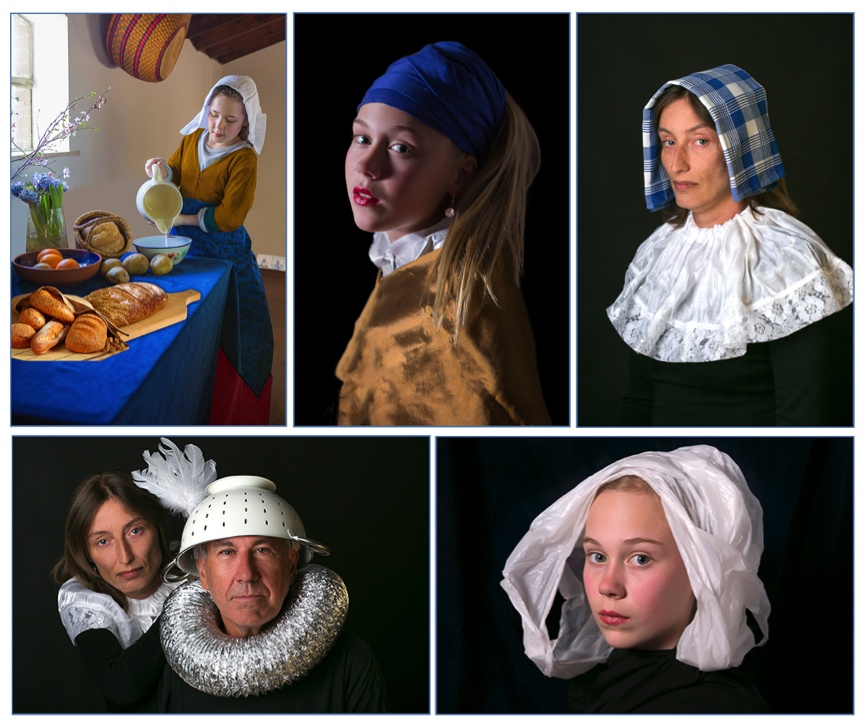
Below are a number of results using one studio lamp and natural light coming in through a window:
Want to know more about portrait photography?
At Photofacts Academy, our online learning environment for photographers, we have several courses on portrait photography.
- Portrait photography tips (Elja Trum)
- Portrait photography in practice (Elja Trum)
- Business portrait photography (Maurice Jager)
- From image to art (Micky Hoogendijk)
- Basic course on-location flash (Piet van den Eynde)
You can take these courses for two weeks with a free trial membership.
About the author
Michelle Peeters is fotografe en oprichter van DeuxBleus Fotografie. Michelle herkent het bijzondere in het gewone en het gewone in het bijzondere. Ze heeft zich nooit willen specialiseren en is daardoor van alle markten thuis.
You might also like
-
 Paintshoot; playing with paint in the studio
by Elja Trum
-
 Review: Chris Knight - Finding Rembrandt
by Michelle Peeters
-
 10 tips for light painting
by Liesbeth van Asselt
-
 Jan Banning: Red Utopia
by Michelle Peeters
-
 How to make a landscape photo look like a painting?
by Leen Koper
25 comments
-

 Tanja Thomas
wrote on Monday 20 February 2017 at 20:46
| reply
Super creatively thought up and described very clearly! Nice!
Translated from Dutch. -
 Koos wrote on Tuesday 21 February 2017 at 12:34 | reply
Take a look at Peter Kemp's site too. Beautiful photos in the Vermeer style. For inspiration.
Translated from Dutch. -
 Michelle Peeters wrote on Tuesday 21 February 2017 at 12:36
| reply
Indeed very beautiful... thanks for the tip!
Translated from Dutch. -
 Ton de V wrote on Tuesday 21 February 2017 at 12:44 | reply
I can't tell whether the photos are still post-processed and how. That will probably remain a question mark? You often see that quite a bit of tweaking is still done afterwards.
Translated from Dutch. -
Michelle Peeters wrote on Tuesday 21 February 2017 at 12:48
| reply
No more than the normal edits you generally make for portraits. The biggest effect comes from the special lighting and any props you use.
Translated from Dutch. -
 Huub Sanders wrote on Tuesday 21 February 2017 at 12:53 | reply
Cool! And really nice to know a few of the models very well.
Translated from Dutch. -
Ton de V wrote on Tuesday 21 February 2017 at 13:22 | reply
@Michelle .. I am curious then. When I see Peter Kemp's work, there is at least a Nik filter or something similar applied to it. Erwin Olaf also pushes the colour controls quite a bit.
Translated from Dutch. -
Michelle Peeters wrote on Tuesday 21 February 2017 at 13:24
| reply
That could very well be, Ton! There are of course all kinds of possibilities when it comes to filters. I haven't done this myself, but it seems like fun to experiment with this sometime! With Nik filters you can indeed achieve very surprising effects..
Translated from Dutch. -
 jaja wrote on Tuesday 21 February 2017 at 14:05 | reply
Think it is still quite clearly visible that not much post-processing has been done.
Translated from Dutch.
Which makes the photos look a bit 'unfinished' in my eyes and come across as a bit amateurish. Not meant offensively -
Michelle Peeters wrote on Tuesday 21 February 2017 at 14:10
| reply
You can indeed do it in a very simple way (what I did, just with some props and making sure the light falls nicely) but you can take it as far as you want. It's just a matter of what you like yourself!
Translated from Dutch. -
 Truus Nijland wrote on Tuesday 21 February 2017 at 16:46 | reply
Dora Van de Loo also gives fantastic workshops on the old masters. She is also holding workshops at Fotofair 2017 in Beekse Bergen. Highly recommended!
Translated from Dutch. -
Bart wrote on Tuesday 21 February 2017 at 17:28 | reply
Great to share this with us! Handy tips, no more excuses not to try it yourself for once.
Translated from Dutch.
And to Ton de V: with or without post-processing ! -
 marjon wijdeven wrote on Tuesday 21 February 2017 at 18:07 | reply
Wow Michelle what a clear explanation and so inspiring! What beautiful photos you've made with very simple means. I really like that colander!
Translated from Dutch. -
guest wrote on Tuesday 21 February 2017 at 22:38 | reply
WOW!!! Really good!
Translated from Dutch. -
 Gina wrote on Wednesday 22 February 2017 at 16:38 | reply
Good explanation and very useful. Which aperture do you use for this?
Translated from Dutch. -
Michelle Peeters wrote on Wednesday 22 February 2017 at 17:12
| reply
I usually use F/8 for studio portraits.
Translated from Dutch. -
Gina wrote on Wednesday 22 February 2017 at 18:02 | reply
Thank you !
Translated from Dutch. -
 Wim van der Graaf wrote on Wednesday 22 February 2017 at 22:35 | reply
Nice article, thanks. Small correction: in the picture with the studio setup for a Rembrandt photo, the flash with umbrella is facing 180 degrees the wrong way 😊
Translated from Dutch. -
Michelle Peeters wrote on Wednesday 22 February 2017 at 23:01
| reply
What exactly do you mean, Wim? You position the light at a 45-degree angle to the left or right of the model, and the light has to fall on both eyes. That can only be done this way!
Translated from Dutch. -

-
Michelle Peeters wrote on Thursday 23 February 2017 at 00:03
| reply
That's indeed correct Elja!
Translated from Dutch. -
guest wrote on Thursday 23 February 2017 at 11:11 | reply
Very nice idea and a beautiful result!
Translated from Dutch. -
 Roos wrote on Thursday 23 February 2017 at 11:12 | reply
Very nice idea and beautiful result!
Translated from Dutch. -

-
 Groef wrote on Monday 3 April 2017 at 18:24
| reply
Sorry, late reply, but here it is after all: I indeed assumed that the umbrella was a reflective umbrella, I wasn't familiar with shoot-through umbrellas. So I didn't mean that the light had to come from the left.
Translated from Dutch.

Have your say
Please note: Articles older than a week can only be commented on by signed-in visitors.Would you still like to comment? sign in or create a free account.
Become a better photographer every week
A practical photography tip in your inbox every week.
38,764 photography enthusiasts already receive the tips! More about the weekly mail. Or keep up to date via  Facebook.

Elja Trum
Photofacts; everything to do with photography!
Would you like to take better photos and keep up with what is happening in photography? Photofacts publishes articles that teach you something about photography — from a product announcement to a practical shooting tip or a look at a website. Photofacts covers photography every day and is a hobby project of Elja Trum's that got out of hand. The articles are written by a team of volunteer authors. If you would enjoy writing one or more articles for Photofacts, do get in touch.More about PhotofactsPhotofacts is made possible in part by
