

Review: HDR and Dynamic Range Course
Friday 2 April 2021, 14:41 by Martin van Rooij | 5,419 views | 0 commentsThis article was translated from Dutch with the help of AI. Read the original.
Do you recognise this? You have taken some photos and are desperate to see the result. You quickly import your photos. But when you do, they are disappointing. They are flat and don't give you the feeling you had when you pressed the shutter. Don't despair, but take a look at the HDR and Dynamic Range course.
So what went wrong with those disappointing photos? There is a good chance you took them in difficult lighting conditions, which in fact pushed your camera too far. Your camera's dynamic range is not enough. Does that mean you need to buy a new, better camera? No, even the most expensive cameras sometimes have problems with dynamic range.
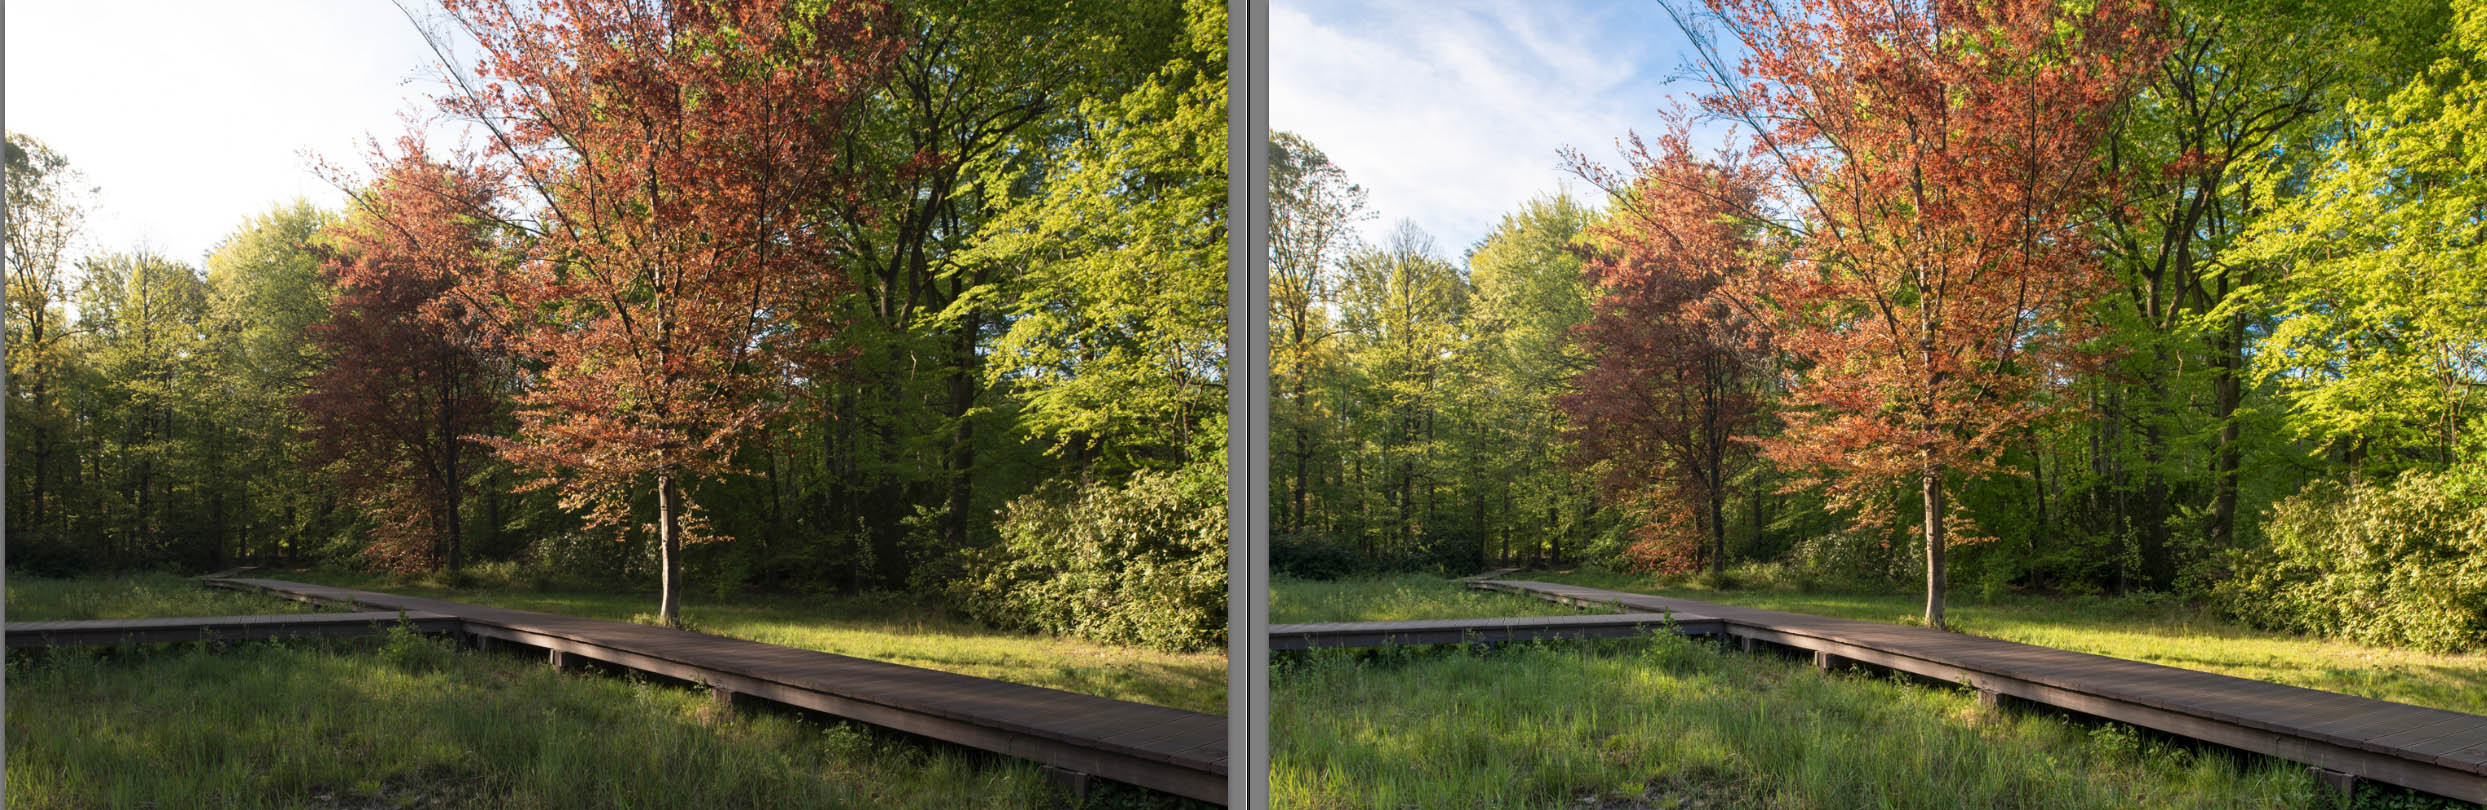
What do we actually mean by a camera's dynamic range? Dynamic range is your camera's ability to show detail in both the lightest and darkest parts of your photo.
More detail in light and dark areas
Imagine you are photographing directly into the sun. You will often get areas that are blown out, completely white with no information left, as well as areas that are blocked up, completely black with no detail left. Try taking photos of a snowy landscape on a sunny winter's day. Then you will understand what I mean.
With high contrast, the photo is effectively exposed for too long for the white areas and for too short for the dark ones. You saw it differently yourself. That is because our eyes bridge those high contrasts incredibly quickly. As soon as you look at a dark area, your pupils widen and you see detail. Your eye effectively adjusts the aperture.
So what is the problem with a photo with high contrast and little detail? You can make dark areas lighter, and light areas darker, in programmes such as Lightroom and Photoshop, can't you?
Yes, you can, but when you make dark areas lighter you often get colour noise. We generally find that ugly. You can prevent this colour noise by slightly overexposing the photo: the so-called expose to the right (ETTR), which refers to a histogram shifted to the right.
You then make that overexposed photo darker on the computer; darkening does not cause colour noise.
Analogue filters
If you want to get the most out of your photos, the HDR and dynamic range course is well worth taking. I learned a lot from it myself. First of all, I was pleased that Piet covers the use of filters. It was something I had been struggling with for a while.
Why would you use analogue filters when you can create a graduated filter very easily and precisely in Lightroom? Working with filters is quite a hassle, after all. What's more, good filters are certainly not cheap.
Take the set by Bas Meelker, who made a wonderful landscape photography workshop for Photofacts Academy.
That set costs no less than 349 euros. And what do you get? A holder and two filters...
On top of that, no filter fits my Nikon 14-24 mm lens, a bulging wide-angle lens with the glass protruding from the housing.
You can apply that filter afterwards in Lightroom too, can't you? That is only partly true, Piet explains. Imagine you have a dark foreground and a bright sky. Which of the two do you base your exposure on?
If you want detail in the dark foreground, you have to expose for longer. The result: a blown-out sky. And where there is no information, there is nothing left to recover, not even in Lightroom.
It is not for nothing that many professional landscape photographers work with analogue filters, under the motto 'Get it right in the camera'.
.jpg "Mont St.Michel before and after")
Better flash photos
Piet also solves a common problem with flash in the course. When you take a portrait of someone with flash, the subject is often well lit but the background is very dark. The contrast between the subject and the surroundings becomes too great.
Piet shows you how to solve this: by first metering the light with the flash switched off. You then set the exposure so that the background is correctly exposed. Next, you switch on the flash at that aperture to light the subject. You then know for certain that your background is correctly exposed; the flash does not change that because it does not reach the background.
Is the subject under- or overexposed? Then increase or decrease the flash power, or move the flash closer to or further away from the subject. You are then mixing artificial light with natural light, which, Piet shows convincingly, can produce beautiful effects.
The section on HDR, or high dynamic range, is also instructive. You have probably taken a photo that was under- or overexposed at some point. You then see certain areas flashing on your display, a sign that the photo is blown out or overexposed in that spot, also called clipping, or underexposed, also called blocked up.
There is no information left in those areas, and you cannot recover it, at least not completely, in a photo-editing programme.
Exposure bracketing
So how do you take a photo that contains information in both the light and dark areas? You do this by taking exposure brackets, also called 'bracketing'. Three, or five, or even more photos: 1 underexposed, 1 correctly exposed and 1 overexposed.
In a programme such as Lightroom, you effectively place those photos on top of each other. The blown-out areas are filled with information from the underexposed photo, and vice versa. Once the photos have been merged, you often have a stunning image.
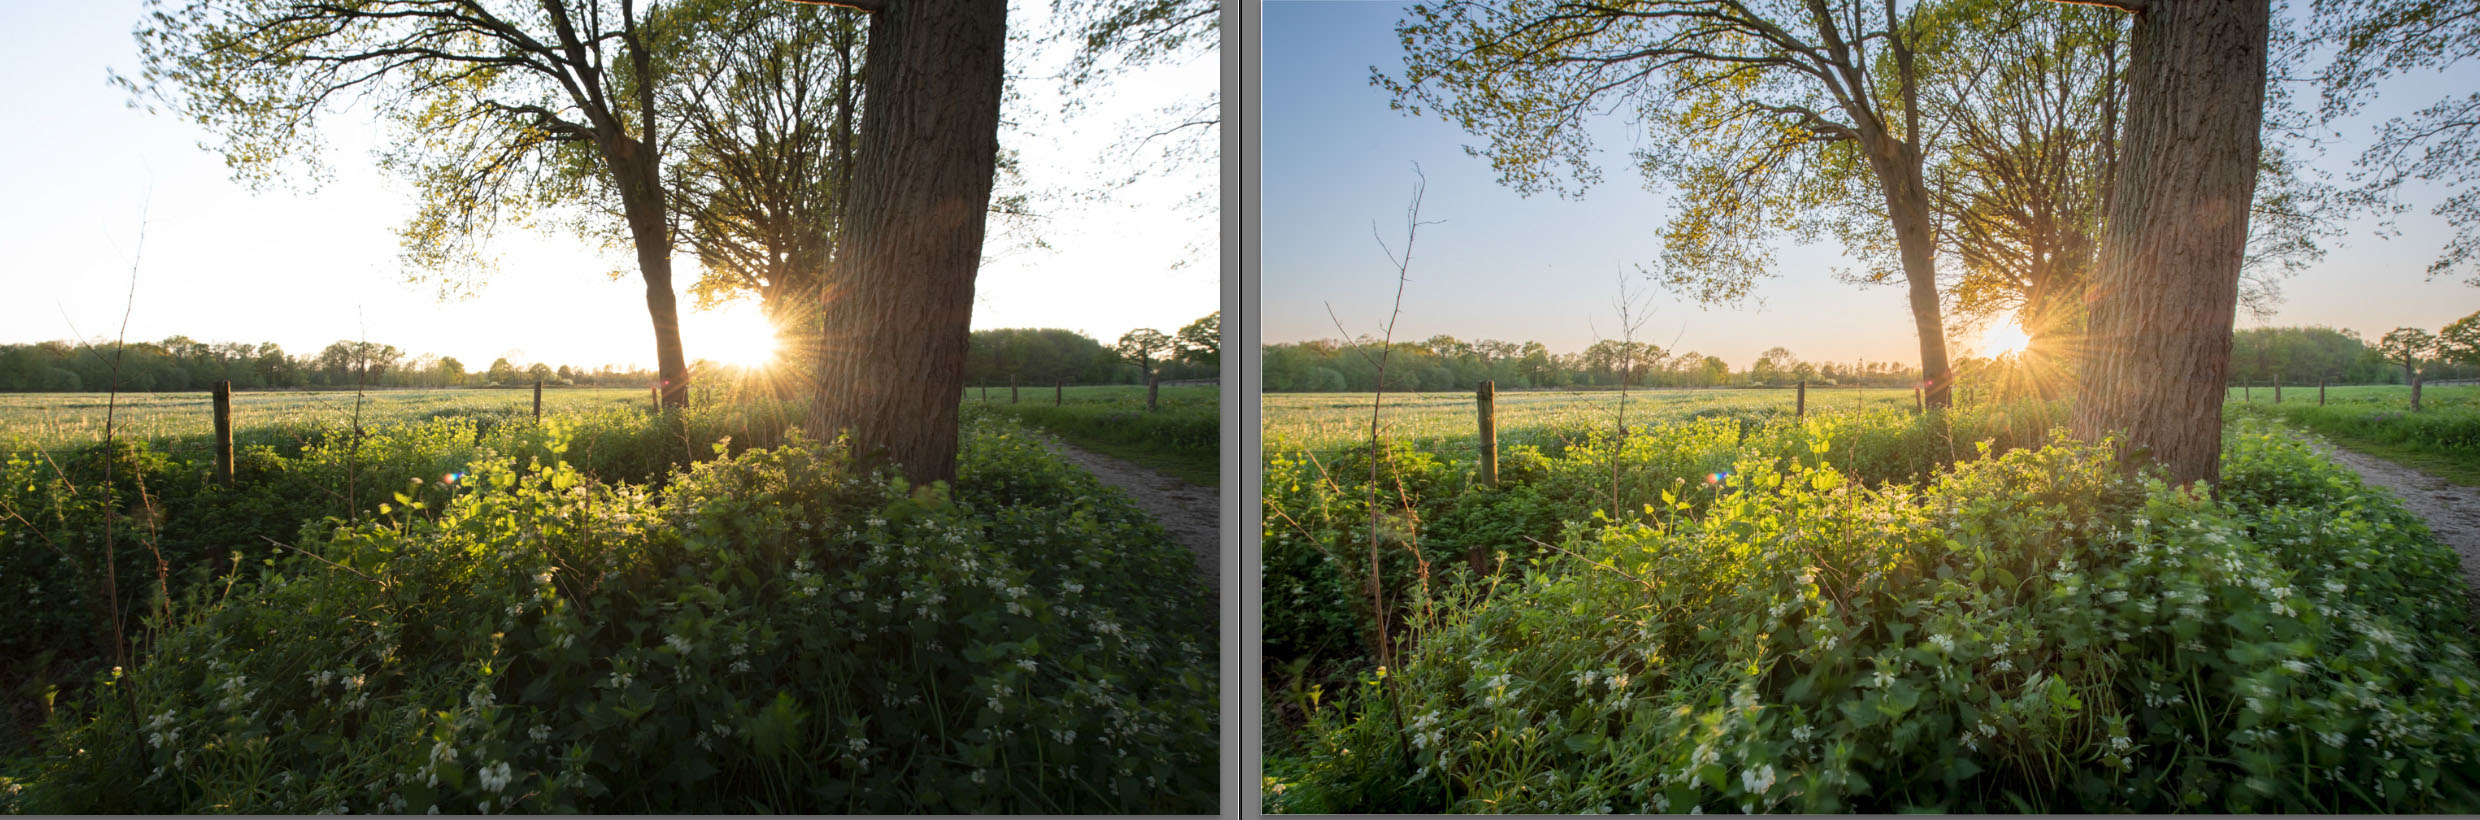
In one respect, the Dynamic Range and HDR course is fundamentally different from all the other courses on Photofacts Academy. The course is not limited to one software package, for example, but covers pretty much every technique you can think of for achieving a greater dynamic range: camera settings, the possibilities offered by flash and filters, Lightroom and Photoshop, and even a few plug-ins.
I learned a lot from the course. The most important lessons for me were:
- Shoot in RAW
- Expose to the right
- Never throw photos away
A RAW file offers more possibilities for recovering information from very dark and very light areas than a jpg. And as time passes and programmes such as Lightroom gain new functionality, you can still make quite decent images from photos that were initially disappointing.
Finally, I am now convinced that taking photos is only part of the story. The camera technology cannot, as yet, help with the fact that the RAW file is often not what you had hoped for. That is the bad news.
The good news is that everything you thought you saw when you took the photo is embedded in the RAW file. You just need to bring it out in post-processing.
A RAW file is a photo with its undercoat on. It is up to you to apply the finishing coat. So take a look at the course, dig out a few less successful photos from your archive and let yourself go!
» View now: HDR and dynamic range course
About the author
Martin is een freelance tekstschrijver die ooit door een uitgever werd gevraagd interviews te combineren met portretfotografie. Die uitgever was tevreden over zijn foto's, hij niet. Martin ging cursussen volgen en investeerde in apparatuur en software.
You might also like
-
 Exposure bracketing without a tripod
by Nando Harmsen
-
 Photographing an Exposure Bracket Without a Tripod
by Nando Harmsen
-
 Programme your camera for HDR
by Nando Harmsen
-
 The (Un)importance of High Dynamic Range in Landscape Photography
by Nando Harmsen
-
 How many shots do you need for an HDR?
by Nando Harmsen
-
 Exposure bracketing instead of brightening dark areas
by Nando Harmsen
0 comments
Be the first to share what you think!
Have your say
Please note: Articles older than a week can only be commented on by signed-in visitors.Would you still like to comment? sign in or create a free account.
Become a better photographer every week
A practical photography tip in your inbox every week.
39,103 photography enthusiasts already receive the tips! More about the weekly mail. Or keep up to date via  Facebook.

Elja Trum
Photofacts; everything to do with photography!
Would you like to take better photos and keep up with what is happening in photography? Photofacts publishes articles that teach you something about photography — from a product announcement to a practical shooting tip or a look at a website. Photofacts covers photography every day and is a hobby project of Elja Trum's that got out of hand. The articles are written by a team of volunteer authors. If you would enjoy writing one or more articles for Photofacts, do get in touch.More about PhotofactsPhotofacts is made possible in part by
